
Quick Start Guide
Page 4
...Vista™ operating system Ultimate Edition (hereafter referred to Canon Inc. Disclaimer Canon U.S.A., Inc. z "Bluetooth" is a trademark of Bluetooth SIG, Inc., U.S.A. has reviewed this manual are subject to your Canon PIXMA iP100 series Photo Printer. For details, refer to the instruction manual of ...this publication may differ. Trademarks z "Microsoft" is made regarding non-Canon products was compiled from publicly available information. and other countries. Specifications are in the U.S. No part of...
...Vista™ operating system Ultimate Edition (hereafter referred to Canon Inc. Disclaimer Canon U.S.A., Inc. z "Bluetooth" is a trademark of Bluetooth SIG, Inc., U.S.A. has reviewed this manual are subject to your Canon PIXMA iP100 series Photo Printer. For details, refer to the instruction manual of ...this publication may differ. Trademarks z "Microsoft" is made regarding non-Canon products was compiled from publicly available information. and other countries. Specifications are in the U.S. No part of...
Quick Start Guide
Page 8
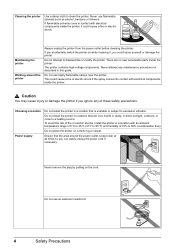
... extension lead/cord. 4 Safety Precautions Cleaning the printer Use a damp cloth to disassemble or modify the printer. Do not attempt to clean the printer. There are very humid or dusty, in a location that are no user serviceable parts inside the printer. This could cause a fire or electric shock.... Never use flammable solvents such as alcohol, benzene or thinners. Caution You may cause injury or damage the printer if you can easily unplug the power cord if...
... extension lead/cord. 4 Safety Precautions Cleaning the printer Use a damp cloth to disassemble or modify the printer. Do not attempt to clean the printer. There are very humid or dusty, in a location that are no user serviceable parts inside the printer. This could cause a fire or electric shock.... Never use flammable solvents such as alcohol, benzene or thinners. Caution You may cause injury or damage the printer if you can easily unplug the power cord if...
Quick Start Guide
Page 9
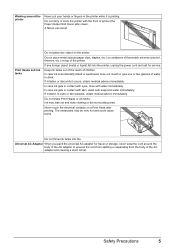
... wash with the front of children. Never touch the electrical contacts on top of the printer. The metal parts may leak out and stain clothing or the surrounding area. Do not throw ink tanks into the printer, unplug the power cord and call for travel or storage, never wrap the cord around... the printer Never put your hands or fingers in the printer while it is accidentally licked or swallowed...
... wash with the front of children. Never touch the electrical contacts on top of the printer. The metal parts may leak out and stain clothing or the surrounding area. Do not throw ink tanks into the printer, unplug the power cord and call for travel or storage, never wrap the cord around... the printer Never put your hands or fingers in the printer while it is accidentally licked or swallowed...
Quick Start Guide
Page 49
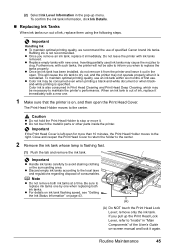
...Cover is on -screen manual and lock it again. Furthermore, with a new one when replacing both ink tanks at a time. Color ink is out of specified Canon brand ink tanks. When an ink tank is also consumed in the pop-up the Print Head Lock Lever, refer to "Inside"..."Getting the Ink Status Information" on page 43. (A) (A) Do NOT touch the Print Head Lock Lever; z Do not touch the metallic parts or other parts inside the printer. Important z Handle ink tanks carefully to avoid staining clothing or the surrounding area. To confirm the ink tank information, click Ink Details. &#...
...Cover is on -screen manual and lock it again. Furthermore, with a new one when replacing both ink tanks at a time. Color ink is out of specified Canon brand ink tanks. When an ink tank is also consumed in the pop-up the Print Head Lock Lever, refer to "Inside"..."Getting the Ink Status Information" on page 43. (A) (A) Do NOT touch the Print Head Lock Lever; z Do not touch the metallic parts or other parts inside the printer. Important z Handle ink tanks carefully to avoid staining clothing or the surrounding area. To confirm the ink tank information, click Ink Details. &#...
Quick Start Guide
Page 51
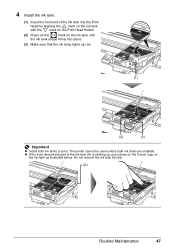
The printer cannot be used unless both ink tanks to print. 4 Install the ink tank. (1) Insert the front end of the ink tank (A) is sticking up red. (1) (2) (3) Important z Install both ink tanks are installed. Do not remove the ink tank forcibly. (A) Routine Maintenance 47 z If the front (innermost) part of... the ink tank into place. (3) Make sure that the ink lamp lights up , push down on the Canon logo on the ink tank until the ink tank snaps firmly into the Print Head by...
The printer cannot be used unless both ink tanks to print. 4 Install the ink tank. (1) Insert the front end of the ink tank (A) is sticking up red. (1) (2) (3) Important z Install both ink tanks are installed. Do not remove the ink tank forcibly. (A) Routine Maintenance 47 z If the front (innermost) part of... the ink tank into place. (3) Make sure that the ink lamp lights up , push down on the Canon logo on the ink tank until the ink tank snaps firmly into the Print Head by...

Quick Start Guide
Page 57
... button. 1. For details on the Paper Thickness Lever, refer to clean the inside of the printer. If the problem is not resolved after performing cleaning twice, the protrusions inside the printer may be dirty. Check the folded part of paper, and proceed from step 3. Routine Maintenance 53 Bottom Plate Cleaning is performed and...
... button. 1. For details on the Paper Thickness Lever, refer to clean the inside of the printer. If the problem is not resolved after performing cleaning twice, the protrusions inside the printer may be dirty. Check the folded part of paper, and proceed from step 3. Routine Maintenance 53 Bottom Plate Cleaning is performed and...
Quick Start Guide
Page 58
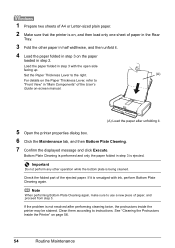
... half widthwise, and then unfold it is smudged with the open side facing up. If the problem is not resolved after unfolding it. 5 Open the printer properties dialog box. 6 Click the Maintenance tab, and then Bottom Plate Cleaning. 7 Confirm the displayed message and click Execute. Clean them according to use a... in "Main Components" of the User's Guide on page 56. 54 Routine Maintenance Check the folded part of the ejected paper. 1 Prepare two sheets of A4 or Letter-sized plain paper. 2 Make sure that the printer is on, and then load only one sheet of paper in the Rear Tray. 3 Fold the...
... half widthwise, and then unfold it is smudged with the open side facing up. If the problem is not resolved after unfolding it. 5 Open the printer properties dialog box. 6 Click the Maintenance tab, and then Bottom Plate Cleaning. 7 Confirm the displayed message and click Execute. Clean them according to use a... in "Main Components" of the User's Guide on page 56. 54 Routine Maintenance Check the folded part of the ejected paper. 1 Prepare two sheets of A4 or Letter-sized plain paper. 2 Make sure that the printer is on, and then load only one sheet of paper in the Rear Tray. 3 Fold the...
Quick Start Guide
Page 59
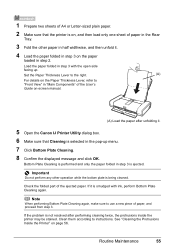
... the paper folded in step 3 is ejected. Check the folded part of paper, and proceed from step 3. Important Do not perform ...the User's Guide on-screen manual. (A) Load the paper after performing cleaning twice, the protrusions inside the printer may be stained. Note When performing Bottom Plate Cleaning again, make sure to instructions. Routine Maintenance 55 Clean ... 3 Fold the other operation while the bottom plate is not resolved after unfolding it. 5 Open the Canon IJ Printer Utility dialog box. 6 Make sure that Cleaning is selected in step 2. Bottom Plate Cleaning is performed ...
... the paper folded in step 3 is ejected. Check the folded part of paper, and proceed from step 3. Important Do not perform ...the User's Guide on-screen manual. (A) Load the paper after performing cleaning twice, the protrusions inside the printer may be stained. Note When performing Bottom Plate Cleaning again, make sure to instructions. Routine Maintenance 55 Clean ... 3 Fold the other operation while the bottom plate is not resolved after unfolding it. 5 Open the Canon IJ Printer Utility dialog box. 6 Make sure that Cleaning is selected in step 2. Bottom Plate Cleaning is performed ...
Quick Start Guide
Page 71
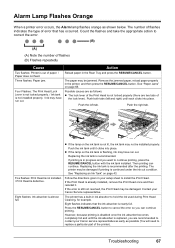
... out of paper. / Paper does not feed. Press the RESUME/CANCEL button to cancel the error so you are recommended to contact your Canon service representative as early as possible (You will need to correct the error. (B) (A) (A) Note the number of flashes (B) Flashes repeatedly Cause ... tabs of the lock lever). Eight flashes indicates that has occurred. Count the flashes and take the appropriate action to replace a particular part of the printer). The paper may be jammed. Push both tabs (left tab. Push the right tab. Push the ink tank until the ink absorber...
... out of paper. / Paper does not feed. Press the RESUME/CANCEL button to cancel the error so you are recommended to contact your Canon service representative as early as possible (You will need to correct the error. (B) (A) (A) Note the number of flashes (B) Flashes repeatedly Cause ... tabs of the lock lever). Eight flashes indicates that has occurred. Count the flashes and take the appropriate action to replace a particular part of the printer). The paper may be jammed. Push both tabs (left tab. Push the right tab. Push the ink tank until the ink absorber...
Easy Setup Instructions
Page 1
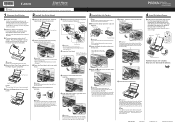
... in "Troubleshooting" of the Quick Start Guide. d Similarly, insert the Color ink tank into the printer, and connect the other than 10 minutes, the Print Head Holder moves to steady...;ashing and changes to the right. QT5-1436-V02 XXXXXXXX © 2008 Canon Inc. Remove all the shipping tapes on the printer flashes orange after it clicks. The Print Head Holder moves to the AC ...Do not reattach the protective tape once you have removed it . Important If the front (innermost) part of the ink tank (A) is now complete. Be careful not to turn over and install the software...
... in "Troubleshooting" of the Quick Start Guide. d Similarly, insert the Color ink tank into the printer, and connect the other than 10 minutes, the Print Head Holder moves to steady...;ashing and changes to the right. QT5-1436-V02 XXXXXXXX © 2008 Canon Inc. Remove all the shipping tapes on the printer flashes orange after it clicks. The Print Head Holder moves to the AC ...Do not reattach the protective tape once you have removed it . Important If the front (innermost) part of the ink tank (A) is now complete. Be careful not to turn over and install the software...
Easy Setup Instructions
Page 2
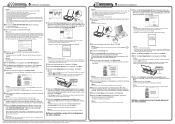
... particular items to install, click Custom Install and follow the instruction on the rear of Canon printers. If Restart is located on the screen. Note Keep the Setup CD-ROM in a... cannot be executed properly, the Alarm lamp on - "Windows" is displayed, follow the on the printer will take part in subsequent steps, click Continue. "Macintosh" and "Mac" are using . • Log into .... The software installation screen may close automatically when the USB cable is clicked, the PIXMA Extended Survey Program will need your computer has been restarted. • If the computer...
... particular items to install, click Custom Install and follow the instruction on the rear of Canon printers. If Restart is located on the screen. Note Keep the Setup CD-ROM in a... cannot be executed properly, the Alarm lamp on - "Windows" is displayed, follow the on the printer will take part in subsequent steps, click Continue. "Macintosh" and "Mac" are using . • Log into .... The software installation screen may close automatically when the USB cable is clicked, the PIXMA Extended Survey Program will need your computer has been restarted. • If the computer...


