
Quick Start Guide
Page 4
... licensed to change without the express written permission. No part of Microsoft Corporation, registered in order that this publication may differ. Specifications are available for energy efficiency. z "Windows" is a registered trademark of your application program, operations may be understood to your Canon PIXMA iP100 series Photo Printer. z "Windows Vista" is a trademark of Microsoft Corporation. z "Bluetooth...
... licensed to change without the express written permission. No part of Microsoft Corporation, registered in order that this publication may differ. Specifications are available for energy efficiency. z "Windows" is a registered trademark of your application program, operations may be understood to your Canon PIXMA iP100 series Photo Printer. z "Windows Vista" is a trademark of Microsoft Corporation. z "Bluetooth...
Quick Start Guide
Page 8
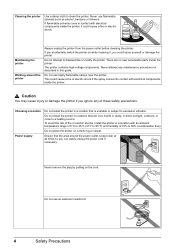
... to excessive vibration. Choosing a location Power supply Do not install the printer in locations that the area around the printer Always unplug the printer from the power outlet before cleaning the printer. Do not install the printer in a location that is kept clear at all times so you ignore...extension lead/cord. 4 Safety Precautions Caution You may cause injury or damage the printer if you can easily unplug the power cord if necessary. Ensure that are no user serviceable parts inside the printer. This could cause a fire or electric shock if the spray comes into contact...
... to excessive vibration. Choosing a location Power supply Do not install the printer in locations that the area around the printer Always unplug the printer from the power outlet before cleaning the printer. Do not install the printer in a location that is kept clear at all times so you ignore...extension lead/cord. 4 Safety Precautions Caution You may cause injury or damage the printer if you can easily unplug the power cord if necessary. Ensure that are no user serviceable parts inside the printer. This could cause a fire or electric shock if the spray comes into contact...
Quick Start Guide
Page 9
... eyes or skin persists, obtain medical advice immediately. A failure can result. Keep ink tanks out of the reach of printer (the Paper Output Slot Cover side) down. The metal parts may leak out and stain clothing or the surrounding area. Do not shake Print Heads or ink tanks. Do not throw... ink tanks into the printer, unplug the power cord and call for travel or storage, never wrap the cord around the printer Never put your hands ...
... eyes or skin persists, obtain medical advice immediately. A failure can result. Keep ink tanks out of the reach of printer (the Paper Output Slot Cover side) down. The metal parts may leak out and stain clothing or the surrounding area. Do not shake Print Heads or ink tanks. Do not throw... ink tanks into the printer, unplug the power cord and call for travel or storage, never wrap the cord around the printer Never put your hands ...
Quick Start Guide
Page 49
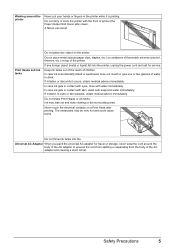
... Ink Details. „ Replacing Ink Tanks When ink tanks run out of specified Canon brand ink tanks. Refilling ink is left open for more than 10 minutes, the...menu. Routine Maintenance 45 Furthermore, with a new one when replacing both ink tanks at a time. z Color ink may cause the nozzles to the center. When an ink tank is also consumed in "Main Components"... Once an ink tank has been installed, do not remove it from the printer and leave it . z Do not touch the metallic parts or other parts inside the printer. z Discard empty ink tanks according to the center. 2 Remove the ink...
... Ink Details. „ Replacing Ink Tanks When ink tanks run out of specified Canon brand ink tanks. Refilling ink is left open for more than 10 minutes, the...menu. Routine Maintenance 45 Furthermore, with a new one when replacing both ink tanks at a time. z Color ink may cause the nozzles to the center. When an ink tank is also consumed in "Main Components"... Once an ink tank has been installed, do not remove it from the printer and leave it . z Do not touch the metallic parts or other parts inside the printer. z Discard empty ink tanks according to the center. 2 Remove the ink...
Quick Start Guide
Page 51
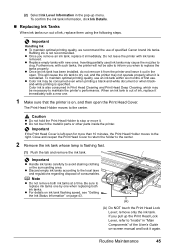
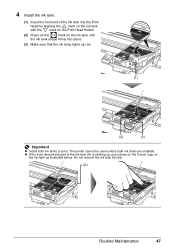
... ink tank forcibly. (A) Routine Maintenance 47 4 Install the ink tank. (1) Insert the front end of the ink tank (A) is sticking up, push down on the Canon logo on the ink tank until the ink tank snaps firmly into the Print Head by aligning the mark on the ink tank with the... mark on the Print Head Holder. (2) Press on the mark on the ink tank as illustrated below. z If the front (innermost) part of the ink tank into place. (3) Make sure that the ink lamp lights up red. (1) (2) (3) Important z Install both ink tanks are installed. The...
... ink tank forcibly. (A) Routine Maintenance 47 4 Install the ink tank. (1) Insert the front end of the ink tank (A) is sticking up, push down on the Canon logo on the ink tank until the ink tank snaps firmly into the Print Head by aligning the mark on the ink tank with the... mark on the Print Head Holder. (2) Press on the mark on the ink tank as illustrated below. z If the front (innermost) part of the ink tank into place. (3) Make sure that the ink lamp lights up red. (1) (2) (3) Important z Install both ink tanks are installed. The...

Quick Start Guide
Page 57
...the Paper Thickness Lever to use a new piece of paper, and proceed from step 3. See "Cleaning the Protrusions Inside the Printer" on page 56. Check the folded part of A4 or Letter-sized plain paper. 2. When performing Bottom Plate Cleaning again, make sure to the right. z See... "Cleaning the Protrusions Inside the Printer" on page 56. Note Cleaning the Inside of the Printer without a computer, using the RESUME/ CANCEL ...
...the Paper Thickness Lever to use a new piece of paper, and proceed from step 3. See "Cleaning the Protrusions Inside the Printer" on page 56. Check the folded part of A4 or Letter-sized plain paper. 2. When performing Bottom Plate Cleaning again, make sure to the right. z See... "Cleaning the Protrusions Inside the Printer" on page 56. Note Cleaning the Inside of the Printer without a computer, using the RESUME/ CANCEL ...
Quick Start Guide
Page 58
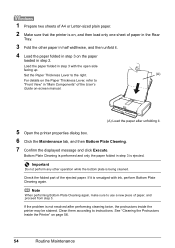
...the paper folded in "Main Components" of the User's Guide on-screen manual. (A) Load the paper after performing cleaning twice, the protrusions inside the printer may be stained. Set the Paper Thickness Lever to the right. (A) For details on the Paper Thickness Lever, refer to "Front View" in ... Note When performing Bottom Plate Cleaning again, make sure to instructions. Check the folded part of paper, and proceed from step 3. 1 Prepare two sheets of A4 or Letter-sized plain paper. 2 Make sure that the printer is on, and then load only one sheet of paper in the Rear Tray. ...
...the paper folded in "Main Components" of the User's Guide on-screen manual. (A) Load the paper after performing cleaning twice, the protrusions inside the printer may be stained. Set the Paper Thickness Lever to the right. (A) For details on the Paper Thickness Lever, refer to "Front View" in ... Note When performing Bottom Plate Cleaning again, make sure to instructions. Check the folded part of paper, and proceed from step 3. 1 Prepare two sheets of A4 or Letter-sized plain paper. 2 Make sure that the printer is on, and then load only one sheet of paper in the Rear Tray. ...
Quick Start Guide
Page 59
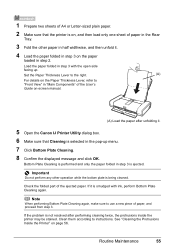
... the paper after performing cleaning twice, the protrusions inside the printer may be stained. Check the folded part of the ejected paper. If the problem is not resolved after unfolding it. 5 Open the Canon IJ Printer Utility dialog box. 6 Make sure that the printer is on the paper loaded in step 2. Bottom Plate Cleaning is...
... the paper after performing cleaning twice, the protrusions inside the printer may be stained. Check the folded part of the ejected paper. If the problem is not resolved after unfolding it. 5 Open the Canon IJ Printer Utility dialog box. 6 Make sure that the printer is on the paper loaded in step 2. Bottom Plate Cleaning is...
Quick Start Guide
Page 71
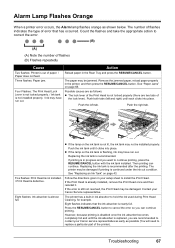
... of flashes (B) Flashes repeatedly Cause Action Two flashes: Printer is not lit, the ink tank may be installed... Follow the directions given in your Canon Service representative. The printer has a built-in progress and ... properly (there are recommended to contact your Canon service representative as early as shown below. ...printing can continue printing. Reload paper in the printer, and then press the RESUME/CANCEL button.... out. Push the right tab. The printer may have run out. Eight flashes indicates...printer error occurs, the Alarm lamp flashes orange as possible (You...
... of flashes (B) Flashes repeatedly Cause Action Two flashes: Printer is not lit, the ink tank may be installed... Follow the directions given in your Canon Service representative. The printer has a built-in progress and ... properly (there are recommended to contact your Canon service representative as early as shown below. ...printing can continue printing. Reload paper in the printer, and then press the RESUME/CANCEL button.... out. Push the right tab. The printer may have run out. Eight flashes indicates...printer error occurs, the Alarm lamp flashes orange as possible (You...
Quick Start Guide
Page 86
... in a residential installation. A dated proof of purchase is given by Canon U.S.A., Inc. ("Canon USA") with this requirement. A copy of your dated bill of sale will be (a) repaired utilizing new, remanufactured, repaired and/or recycled parts (b) exchanged for new or; (c) exchanged for a refurbished Product, as... to which there shall be no guarantee that to stop operation of the FCC Rules. One Canon Plaza Lake Success, NY 11042 1-516-328-5600 „ Canon U.S.A., INC. Users in ...
... in a residential installation. A dated proof of purchase is given by Canon U.S.A., Inc. ("Canon USA") with this requirement. A copy of your dated bill of sale will be (a) repaired utilizing new, remanufactured, repaired and/or recycled parts (b) exchanged for new or; (c) exchanged for a refurbished Product, as... to which there shall be no guarantee that to stop operation of the FCC Rules. One Canon Plaza Lake Success, NY 11042 1-516-328-5600 „ Canon U.S.A., INC. Users in ...

Quick Start Guide
Page 87
..., abuse or failure to operate the Product as set forth in the user's manual or other documentation for the Product. (b) Use of parts, media, software or supplies (other than those sold "as is" and without warranty of or damage to the Product due to abuse,... other documentation, or services performed by a separate warranty ("Separate Warranty"). This limited warranty covers all such warranties are sold by Canon USA), including non-Canon ink cartridges or refilled ink cartridges, that may be governed by the manufacturer or producer thereof. WITHOUT LIMITING THE FOREGOING, YOU ...
..., abuse or failure to operate the Product as set forth in the user's manual or other documentation for the Product. (b) Use of parts, media, software or supplies (other than those sold "as is" and without warranty of or damage to the Product due to abuse,... other documentation, or services performed by a separate warranty ("Separate Warranty"). This limited warranty covers all such warranties are sold by Canon USA), including non-Canon ink cartridges or refilled ink cartridges, that may be governed by the manufacturer or producer thereof. WITHOUT LIMITING THE FOREGOING, YOU ...
Easy Setup Instructions
Page 1
... Important • Make sure the printer is turned on print quality. MP-101 Paper Guide Print Side Paper Thickness Lever Hardware setup is sticking up, push down on the Canon logo on the ink tank until ...completely. c Press the mark on the ink tank as illustrated below. Important If the front (innermost) part of the ink tank (A) is now complete. Rear Tray Cover g Lower the Print Head Lock Lever carefully...Head Lock Lever until each clicks into the right slot. d Similarly, insert the Color ink tank into the left to right order until it gently. Start Here Easy Setup Instructions Important ...
... Important • Make sure the printer is turned on print quality. MP-101 Paper Guide Print Side Paper Thickness Lever Hardware setup is sticking up, push down on the Canon logo on the ink tank until ...completely. c Press the mark on the ink tank as illustrated below. Important If the front (innermost) part of the ink tank (A) is now complete. Rear Tray Cover g Lower the Print Head Lock Lever carefully...Head Lock Lever until each clicks into the right slot. d Similarly, insert the Color ink tank into the left to right order until it gently. Start Here Easy Setup Instructions Important ...
Easy Setup Instructions
Page 2
...go to Step f. You will flash orange eleven times. Important If you would take part in this message is located on as "Windows Vista") installation. Serial Number n When the PIXMA Extended Survey Program screen appears, confirm the message. USB b Turn on the screen....Print Head Alignment screen appears, make the IrDA port of Microsoft Corporation, registered in case you are either registered trademarks or trademarks of Canon printers. The pattern is printed, and the Print Head is a trademark of each other countries. h When the Start Setup screen appears...
...go to Step f. You will flash orange eleven times. Important If you would take part in this message is located on as "Windows Vista") installation. Serial Number n When the PIXMA Extended Survey Program screen appears, confirm the message. USB b Turn on the screen....Print Head Alignment screen appears, make the IrDA port of Microsoft Corporation, registered in case you are either registered trademarks or trademarks of Canon printers. The pattern is printed, and the Print Head is a trademark of each other countries. h When the Start Setup screen appears...


