XF100 / XF105 Instruction Manual
Page 5
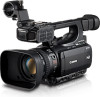
... infrared light, you can track and focus on the other such scenes. Highlights of -the-art DIGIC DV III image processor. CMOS sensor that of external controls at your fingertips, such as Material eXchange Format (MXF) files, which are saved as the manual ring, which allows multiple XF105/XF100 camcorders to CompactFlash (CF) cards. Your recordings are compatible with 4:2:2 color sampling), the quality of time without...
... infrared light, you can track and focus on the other such scenes. Highlights of -the-art DIGIC DV III image processor. CMOS sensor that of external controls at your fingertips, such as Material eXchange Format (MXF) files, which are saved as the manual ring, which allows multiple XF105/XF100 camcorders to CompactFlash (CF) cards. Your recordings are compatible with 4:2:2 color sampling), the quality of time without...
XF100 / XF105 Instruction Manual
Page 6
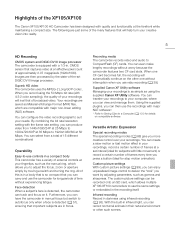
... any multi-camera shooting setup. Added and improved functionality Other functions include improved image stabilization (0 53), the option to add metadata to assignable buttons (0 97) so that you can use them in microphone, MIC audio input terminal or the two XLR audio input terminals (with the press of a single button. You can call up those functions with phantom power supply) when recording. Save custom picture and menu settings to an SD card so...
... any multi-camera shooting setup. Added and improved functionality Other functions include improved image stabilization (0 53), the option to add metadata to assignable buttons (0 97) so that you can use them in microphone, MIC audio input terminal or the two XLR audio input terminals (with the press of a single button. You can call up those functions with phantom power supply) when recording. Save custom picture and menu settings to an SD card so...
XF100 / XF105 Instruction Manual
Page 7
... Changing the Time Zone 26 Displaying the Date and Time while Recording 27 Changing the Language 27 Using the Menus 28 Selecting an Option from the Menu 28 Preparing the Camcorder 30 Attaching the Microphone Holder Unit 30 Attaching the Lens Hood 30 Dioptric Adjustment 30 Using the LCD Panel 31 Using the Viewfinder and LCD Screen Simultaneously 31 Adjusting the Viewfinder/LCD Screen 31 Setting the Screen to Record 40 Recording 40 Onscreen Displays 43 Power Save Mode 45 Video...
... Changing the Time Zone 26 Displaying the Date and Time while Recording 27 Changing the Language 27 Using the Menus 28 Selecting an Option from the Menu 28 Preparing the Camcorder 30 Attaching the Microphone Holder Unit 30 Attaching the Lens Hood 30 Dioptric Adjustment 30 Using the LCD Panel 31 Using the Viewfinder and LCD Screen Simultaneously 31 Adjusting the Viewfinder/LCD Screen 31 Setting the Screen to Record 40 Recording 40 Onscreen Displays 43 Power Save Mode 45 Video...
XF100 / XF105 Instruction Manual
Page 8
... Playing Back Clips 112 Onscreen Displays 113 Playback Controls 114 Adjusting the Volume 114 Adding Shot Marks during Playback 115 Customization 97 Assignable Buttons 97 Changing the Assigned Function 97 Using an Assignable Button 97 Custom Picture Settings 99 Selecting Custom Picture Files 99 Editing a Custom Picture File's Settings 100 Renaming Custom Picture Files 100 Protecting Custom Picture Files 100 Transferring Custom Picture Files 101 Embedding Custom Picture Settings in or External Microphone Connected to the MIC Terminal 77 Using Line Input or an External Microphone Connected...
... Playing Back Clips 112 Onscreen Displays 113 Playback Controls 114 Adjusting the Volume 114 Adding Shot Marks during Playback 115 Customization 97 Assignable Buttons 97 Changing the Assigned Function 97 Using an Assignable Button 97 Custom Picture Settings 99 Selecting Custom Picture Files 99 Editing a Custom Picture File's Settings 100 Renaming Custom Picture Files 100 Protecting Custom Picture Files 100 Transferring Custom Picture Files 101 Embedding Custom Picture Settings in or External Microphone Connected to the MIC Terminal 77 Using Line Input or an External Microphone Connected...
XF100 / XF105 Instruction Manual
Page 9
... Operations 116 Using the Clip Menu 117 Displaying Clip Information 117 Adding e Marks or Z Marks 118 Deleting e Marks or Z Marks 118 Copying Clips 119 Deleting Clips 120 Deleting the User Memo 120 Copying a Custom Picture File Embedded in MEDIA Mode 138 Photo Playback 140 Displaying the [Photos] Index Screen 140 Viewing Photos 140 Photo Operations 141 Using the Photo Menu 141 Deleting Photos 141 Protecting Photos 142 Copying Custom Picture Files 143 Photo Numbering 144 8. Photos 138 Taking Photos 138 Taking Photos in CAMERA Mode 138 Capturing Photos in a Clip 121 Displaying...
... Operations 116 Using the Clip Menu 117 Displaying Clip Information 117 Adding e Marks or Z Marks 118 Deleting e Marks or Z Marks 118 Copying Clips 119 Deleting Clips 120 Deleting the User Memo 120 Copying a Custom Picture File Embedded in MEDIA Mode 138 Photo Playback 140 Displaying the [Photos] Index Screen 140 Viewing Photos 140 Photo Operations 141 Using the Photo Menu 141 Deleting Photos 141 Protecting Photos 142 Copying Custom Picture Files 143 Photo Numbering 144 8. Photos 138 Taking Photos 138 Taking Photos in CAMERA Mode 138 Capturing Photos in a Clip 121 Displaying...
XF100 / XF105 Instruction Manual
Page 22
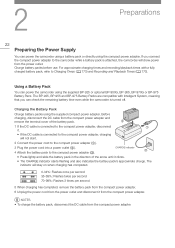
... charge the battery pack, disconnect the DC cable from the power outlet. For approximate charging times and recording/playback times with Intelligent System, meaning that you connect the compact power adapter to Charging Times (0 173) and Recording and Playback Times (0 173). The indicator will not start. 2 Connect the power cord to the compact power adapter (ቢ). 3 Plug the power cord into a power outlet (ባ). 4 Attach the battery pack to the compact power adapter (ቤ). If you can check the remaining battery time...
... charge the battery pack, disconnect the DC cable from the power outlet. For approximate charging times and recording/playback times with Intelligent System, meaning that you connect the compact power adapter to Charging Times (0 173) and Recording and Playback Times (0 173). The indicator will not start. 2 Connect the power cord to the compact power adapter (ቢ). 3 Plug the power cord into a power outlet (ባ). 4 Attach the battery pack to the compact power adapter (ቤ). If you can check the remaining battery time...

XF100 / XF105 Instruction Manual
Page 39
... cards, recording will be deleted from the end of each CF card. Checking the Available Recording Time When the camcorder is in mode, the screen indicates which CF card slot is in use and the available recording time (in minutes*) that is not being recorded to. Preparing Recording Media To use double slot recording 1 Open the [Double Slot Rec] submenu. [J Other Functions] [Double Slot Rec] 2 Select [On] and then press SET. [J Other Functions] [Double Slot Rec...
... cards, recording will be deleted from the end of each CF card. Checking the Available Recording Time When the camcorder is in mode, the screen indicates which CF card slot is in use and the available recording time (in minutes*) that is not being recorded to. Preparing Recording Media To use double slot recording 1 Open the [Double Slot Rec] submenu. [J Other Functions] [Double Slot Rec] 2 Select [On] and then press SET. [J Other Functions] [Double Slot Rec...
XF100 / XF105 Instruction Manual
Page 42
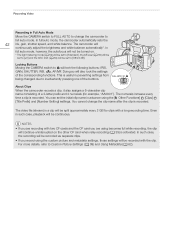
... auto mode, the camcorder automatically sets the 42 iris, gain, shutter speed, and white balance. Locking Buttons Moving the CAMERA switch to full auto mode. About Clips When the camcorder records a clip, it also assigns a 6-character clip name consisting of a 2-letter prefix and 4 numerals (for clips with a long recording time. You cannot change the camcorder to R will also lock the settings of the buttons. Even in Full Auto Mode Move the CAMERA switch to FULL AUTO...
... auto mode, the camcorder automatically sets the 42 iris, gain, shutter speed, and white balance. Locking Buttons Moving the CAMERA switch to full auto mode. About Clips When the camcorder records a clip, it also assigns a 6-character clip name consisting of a 2-letter prefix and 4 numerals (for clips with a long recording time. You cannot change the camcorder to R will also lock the settings of the buttons. Even in Full Auto Mode Move the CAMERA switch to FULL AUTO...
XF100 / XF105 Instruction Manual
Page 51
... a white face detection frame and other faces with gray frames. • To change the main subject when there is useful even when recording in bright surroundings, the camcorder closes down the aperture. Fast moving subjects - This mode is more than when 51 using the [Instant] setting. [Normal]: Sets the autofocus mode to the camcorder, the [Instant] and [Medium] settings are a number of the zoom...
... a white face detection frame and other faces with gray frames. • To change the main subject when there is useful even when recording in bright surroundings, the camcorder closes down the aperture. Fast moving subjects - This mode is more than when 51 using the [Instant] setting. [Normal]: Sets the autofocus mode to the camcorder, the [Instant] and [Medium] settings are a number of the zoom...

XF100 / XF105 Instruction Manual
Page 59
... press the button to change the aperture value using the AE SHIFT dial on the optional ZR-2000 Zoom Remote Controller. NOTES • When you set the camcorder to full auto mode (0 42), [Light Metering] will be retained when you switch back to manual aperture control. • If the built-in which only a certain part of the screen. The aperture value set automatically by the camcorder will have...
... press the button to change the aperture value using the AE SHIFT dial on the optional ZR-2000 Zoom Remote Controller. NOTES • When you set the camcorder to full auto mode (0 42), [Light Metering] will be retained when you switch back to manual aperture control. • If the built-in which only a certain part of the screen. The aperture value set automatically by the camcorder will have...

XF100 / XF105 Instruction Manual
Page 81
... to synchronize the audio signal with Headphones Connect headphones to the W (headphone) terminal to monitor the recorded audio. Note that the audio level meter will be a slight delay when you can use the [m Audio Setup] [Audio Output] [Headphone Volume] setting to adjust the volume. Regardless of the setting, however, the audio and video signals recorded will go to the right of the -18 dB mark (one of audio input signals when...
... to synchronize the audio signal with Headphones Connect headphones to the W (headphone) terminal to monitor the recorded audio. Note that the audio level meter will be a slight delay when you can use the [m Audio Setup] [Audio Output] [Headphone Volume] setting to adjust the volume. Regardless of the setting, however, the audio and video signals recorded will go to the right of the -18 dB mark (one of audio input signals when...

XF100 / XF105 Instruction Manual
Page 100
... exit the menu. [l Camera Setup] [Custom Picture] [I X Edit File] [Protect] The following describes when to use the preset files. [C7 VIDEO.C]: For playing back video on consumer flat-panel displays. [C8 CINE.V]: For achieving a cinema-like effect different from being accidentally changed. 1 After selecting a file, open the [Rename] submenu. [I X Edit File] [Rename] • A screen appears that of the name in file slots [C7] to Available Custom Picture Settings (0 102...
... exit the menu. [l Camera Setup] [Custom Picture] [I X Edit File] [Protect] The following describes when to use the preset files. [C7 VIDEO.C]: For playing back video on consumer flat-panel displays. [C8 CINE.V]: For achieving a cinema-like effect different from being accidentally changed. 1 After selecting a file, open the [Rename] submenu. [I X Edit File] [Rename] • A screen appears that of the name in file slots [C7] to Available Custom Picture Settings (0 102...

XF100 / XF105 Instruction Manual
Page 103
... Point Output Output Input Input This is not available when [Gamma] is set the knee point and slope to prevent images being overexposed. This setting can be adjusted from being overexposed so quickly. Custom Picture Settings Master Black Corrects color cast in highlights when [Automatic] is set to [Cine 1] or [Cine 2]. [Enable]: Activates/deactivates the setting. (Default: [On]) [Automatic]: Select [On] to have the camcorder automatically set...
... Point Output Output Input Input This is not available when [Gamma] is set the knee point and slope to prevent images being overexposed. This setting can be adjusted from being overexposed so quickly. Custom Picture Settings Master Black Corrects color cast in highlights when [Automatic] is set to [Cine 1] or [Cine 2]. [Enable]: Activates/deactivates the setting. (Default: [On]) [Automatic]: Select [On] to have the camcorder automatically set...

XF100 / XF105 Instruction Manual
Page 138
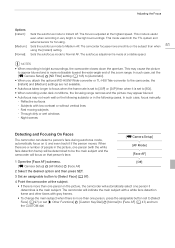
... use the wireless controller. Operating modes: 1 Set an assignable button to [Photo] (0 97). • This step is not necessary if you are using the wireless controller. 2 Press the assignable button to stop playback. In mode, photo size is 1280x720. * At this size, the camcorder can save approximately 670 photos on a 1 GB SD card. Operating modes: 1 Set an assignable button to [Photo] (0 97). • This step is not necessary if you can capture a photo from . Capturing Photos in record pause mode. 7 Photos 138 Taking Photos...
... use the wireless controller. Operating modes: 1 Set an assignable button to [Photo] (0 97). • This step is not necessary if you are using the wireless controller. 2 Press the assignable button to stop playback. In mode, photo size is 1280x720. * At this size, the camcorder can save approximately 670 photos on a 1 GB SD card. Operating modes: 1 Set an assignable button to [Photo] (0 97). • This step is not necessary if you can capture a photo from . Capturing Photos in record pause mode. 7 Photos 138 Taking Photos...

XF100 / XF105 Instruction Manual
Page 140
... screen. IMPORTANT • Observe the following photos may result in permanent data loss. - Do not disconnect the power source or turn off the camcorder. - Photos not recorded with the camcorder. 140 Operating modes: Displaying the [Photos] Index Screen Display the [Photos] index screen to view photos. 1 Hold down the button on a computer. - Viewing Photos 1 Move the orange selection frame to the desired photo. 2 Press the D button to view the photo. • The photo playback screen appears and the selected photo is flashing...
... screen. IMPORTANT • Observe the following photos may result in permanent data loss. - Do not disconnect the power source or turn off the camcorder. - Photos not recorded with the camcorder. 140 Operating modes: Displaying the [Photos] Index Screen Display the [Photos] index screen to view photos. 1 Hold down the button on a computer. - Viewing Photos 1 Move the orange selection frame to the desired photo. 2 Press the D button to view the photo. • The photo playback screen appears and the selected photo is flashing...

XF100 / XF105 Instruction Manual
Page 152
...date and time when set to [On]. [L TC/UB Setup] menu ( mode only) Menu item Submenu Setting options 0 [Time Code] [Mode] [Preset], [Regen.] 70 [Run] [Rec Run], [Free Run] 70 [DF/NDF] [DF], [NDF] 71 [Setting] [Set], [Reset] 70 [User Bit] [Rec Mode] (b only) [Internal], [External] 75 [Output Mode] [Fixed], [Pulldown] (b only) 75 [Type] [Setting], [Time], [Date] 73 b [L User Bit Setup] menu ( [Output Mode] Menu item * Not available in the [Photos] index screen. [J Other Functions] menu Menu item [Reset] [Transfer Menu] [Time Zone] Submenu [All Settings] [Camera...
...date and time when set to [On]. [L TC/UB Setup] menu ( mode only) Menu item Submenu Setting options 0 [Time Code] [Mode] [Preset], [Regen.] 70 [Run] [Rec Run], [Free Run] 70 [DF/NDF] [DF], [NDF] 71 [Setting] [Set], [Reset] 70 [User Bit] [Rec Mode] (b only) [Internal], [External] 75 [Output Mode] [Fixed], [Pulldown] (b only) 75 [Type] [Setting], [Time], [Date] 73 b [L User Bit Setup] menu ( [Output Mode] Menu item * Not available in the [Photos] index screen. [J Other Functions] menu Menu item [Reset] [Transfer Menu] [Time Zone] Submenu [All Settings] [Camera...

XF100 / XF105 Instruction Manual
Page 164
... the built-in microphone or external microphone (0 78), or adjust the audio recording level manually. Delete some photos (0 141) to and playing back from a CF card is recorded at lower levels. - Replace the battery of clips (999 clips). When using the correct connection (0 126). - Audio cannot be used (0 35). - Audio is slow. - Change the position of the TV. Connections with the camcorder for the first time. - This is full. To reduce the symptoms, set [Camera Setup] [Flicker Reduction] to...
... the built-in microphone or external microphone (0 78), or adjust the audio recording level manually. Delete some photos (0 141) to and playing back from a CF card is recorded at lower levels. - Replace the battery of clips (999 clips). When using the correct connection (0 126). - Audio cannot be used (0 35). - Audio is slow. - Change the position of the TV. Connections with the camcorder for the first time. - This is full. To reduce the symptoms, set [Camera Setup] [Flicker Reduction] to...

XF100 / XF105 Instruction Manual
Page 182
... picture files 143 Deleting 141 Protecting 142 Viewing 140 Playback Clips 112 Photos 140 Power save mode 45 Power supply 22 POWER switch 25 Pre-recording mode 91 R Rec run (time code 70 Recording clips 40 Remaining battery 23 REMOTE terminal 65 Resetting all settings 152 Resolution (frame size 46 Reviewing a recording 87 Running mode (time code 70 S Safety zone 68 Saving clips to a computer 131 SD card 37 Shooting frame rate 90 Shot marks 86 Shutter speed 56 Slow & fast motion recording mode 90 Specifications 177 Status screens...
... picture files 143 Deleting 141 Protecting 142 Viewing 140 Playback Clips 112 Photos 140 Power save mode 45 Power supply 22 POWER switch 25 Pre-recording mode 91 R Rec run (time code 70 Recording clips 40 Remaining battery 23 REMOTE terminal 65 Resetting all settings 152 Resolution (frame size 46 Reviewing a recording 87 Running mode (time code 70 S Safety zone 68 Saving clips to a computer 131 SD card 37 Shooting frame rate 90 Shot marks 86 Shutter speed 56 Slow & fast motion recording mode 90 Specifications 177 Status screens...
XF100 / XF105 Instruction Manual
Page 184
... purchase. Canon USA shall have other rights which vary from the date of original purchase, labor will be return-shipped to you are contacted right away should there be provided free of the problem. This Limited Warranty does not cover cabinet (exterior finish), video cassette tape, head cleanings, nor does it is given by our factory service centers or designated service facilities...
... purchase. Canon USA shall have other rights which vary from the date of original purchase, labor will be return-shipped to you are contacted right away should there be provided free of the problem. This Limited Warranty does not cover cabinet (exterior finish), video cassette tape, head cleanings, nor does it is given by our factory service centers or designated service facilities...

XF100 / XF105 Instruction Manual
Page 185
... of profit, revenue, media or enjoyment) or from the date of accessories, attachments, products, supplies, parts or devices with the Products that do not conform to Canon specifications or that drive be presented to any person other than a Canon Service Facility; If the Products contain a hard disk drive or a flash memory, Canon Canada recommends that data stored on the video Products is altered or removed. This limited warranty...
... of profit, revenue, media or enjoyment) or from the date of accessories, attachments, products, supplies, parts or devices with the Products that do not conform to Canon specifications or that drive be presented to any person other than a Canon Service Facility; If the Products contain a hard disk drive or a flash memory, Canon Canada recommends that data stored on the video Products is altered or removed. This limited warranty...


