XF100 / XF105 Instruction Manual
Page 6
...an SD card so that you can use them in the same way. You can transfer your setting preferences to other XF105/XF100 camcorders in order to aid in microphone, MIC audio input terminal or the two XLR audio input terminals (with the press of...time 6 code synchronization (0 74) allow the camcorder to recordings (0 82), and the Intelligent System-compatible battery pack (0 173). Video scopes Check the brightness of professional broadcast cameras. Advanced Professional Features Pro-level connectivity (b only) An industry-standard HD/SD SDI terminal (0 127) for uncompressed HD signal output...
...an SD card so that you can use them in the same way. You can transfer your setting preferences to other XF105/XF100 camcorders in order to aid in microphone, MIC audio input terminal or the two XLR audio input terminals (with the press of...time 6 code synchronization (0 74) allow the camcorder to recordings (0 82), and the Intelligent System-compatible battery pack (0 173). Video scopes Check the brightness of professional broadcast cameras. Advanced Professional Features Pro-level connectivity (b only) An industry-standard HD/SD SDI terminal (0 127) for uncompressed HD signal output...
XF100 / XF105 Instruction Manual
Page 8
... 109 Saving Camera Settings to an XLR Terminal 78 Adjusting the Audio Level 80 Monitoring the Audio with an External Device 74 Connecting an External Device 74 Using a Reference Video Signal (Genlock Synchronization) 74 Using a Time Code Signal 74 Time Code Signal Output 75 Recording Audio 77 ...Using the Built-in or External Microphone Connected to the MIC Terminal 77 Using Line Input or an External Microphone Connected to an SD Card 109 Loading Camera Settings from...
... 109 Saving Camera Settings to an XLR Terminal 78 Adjusting the Audio Level 80 Monitoring the Audio with an External Device 74 Connecting an External Device 74 Using a Reference Video Signal (Genlock Synchronization) 74 Using a Time Code Signal 74 Time Code Signal Output 75 Recording Audio 77 ...Using the Built-in or External Microphone Connected to the MIC Terminal 77 Using Line Input or an External Microphone Connected to an SD Card 109 Loading Camera Settings from...
XF100 / XF105 Instruction Manual
Page 9
... a Computer 131 System Requirements 131 Installing and Uninstalling Canon XF Utility (Windows) 132 Installing and Uninstalling Canon XF Utility (Mac OS) 134 Viewing the Software Instruction Manuals 137 7. Photos 138 Taking Photos 138 Taking Photos in CAMERA Mode 138 Capturing Photos in a Clip 121 Displaying ...AV Terminal 128 Superimposing Onscreen Displays to Appear on an External Monitor 128 Audio Output 129 b Embedded Audio 129 Synchronizing the Video with the Audio being Monitored 129 Selecting the Audio Channel 129 Selecting the Output Level of Messages 165 Handling Precautions 168 ...
... a Computer 131 System Requirements 131 Installing and Uninstalling Canon XF Utility (Windows) 132 Installing and Uninstalling Canon XF Utility (Mac OS) 134 Viewing the Software Instruction Manuals 137 7. Photos 138 Taking Photos 138 Taking Photos in CAMERA Mode 138 Capturing Photos in a Clip 121 Displaying ...AV Terminal 128 Superimposing Onscreen Displays to Appear on an External Monitor 128 Audio Output 129 b Embedded Audio 129 Synchronizing the Video with the Audio being Monitored 129 Selecting the Audio Channel 129 Selecting the Output Level of Messages 165 Handling Precautions 168 ...
XF100 / XF105 Instruction Manual
Page 40
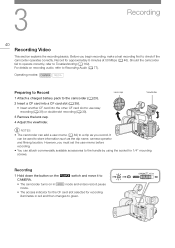
... Recording 1 Hold down the button on the d switch and move it to CAMERA. • The camcorder turns on recording audio, refer to check if the camcorder operates correctly. 3 Recording 40 Recording Video This section explains the recording basics. Should the camcorder fail to operate correctly,...Recording Audio (0 77). Lens cap Viewfinder NOTES • The camcorder can attach commercially available accessories to a clip as the clip name, camera operator and filming location. Before you must set the user memo before recording. • You can add a user memo (0 82) to...
... Recording 1 Hold down the button on the d switch and move it to CAMERA. • The camcorder turns on recording audio, refer to check if the camcorder operates correctly. 3 Recording 40 Recording Video This section explains the recording basics. Should the camcorder fail to operate correctly,...Recording Audio (0 77). Lens cap Viewfinder NOTES • The camcorder can attach commercially available accessories to a clip as the clip name, camera operator and filming location. Before you must set the user memo before recording. • You can add a user memo (0 82) to...
XF100 / XF105 Instruction Manual
Page 42
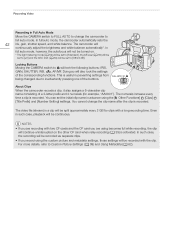
...initial clip name in a clip will lock the following buttons: IRIS, GAIN, SHUTTER, WB, S, AF/MF. Recording Video Recording in Full Auto Mode Move the CAMERA switch to FULL AUTO to change the clip name after the clip is recorded. In full auto mode, the camcorder ... continuously adjust the brightness and white balance automatically*. Even in such case, playback will be split approximately every 2 GB for example, "AA0001"). The video file (stream) in advance using the [J Other Functions] [Clips] [Title Prefix] and [Number Setting] settings. About Clips When the camcorder records...
...initial clip name in a clip will lock the following buttons: IRIS, GAIN, SHUTTER, WB, S, AF/MF. Recording Video Recording in Full Auto Mode Move the CAMERA switch to FULL AUTO to change the clip name after the clip is recorded. In full auto mode, the camcorder ... continuously adjust the brightness and white balance automatically*. Even in such case, playback will be split approximately every 2 GB for example, "AA0001"). The video file (stream) in advance using the [J Other Functions] [Clips] [Title Prefix] and [Number Setting] settings. About Clips When the camcorder records...
XF100 / XF105 Instruction Manual
Page 50
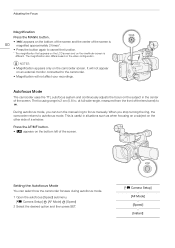
... When you can select how the camcorder focuses during autofocus mode. 1 Open the autofocus [Speed] submenu. [l Camera Setup] [AF Mode] [Speed] 2 Select the desired option and then press SET. [l Camera Setup] [AF Mode] [Speed] [Instant] This is useful in the center of a window. It will not... will not appear on the bottom left of the lens barrel) to focus manually. NOTES • Magnification appears only on the video configuration. The magnification also differs based on the camcorder screen. The focusing range is different. at full wide-angle, measured from the...
... When you can select how the camcorder focuses during autofocus mode. 1 Open the autofocus [Speed] submenu. [l Camera Setup] [AF Mode] [Speed] 2 Select the desired option and then press SET. [l Camera Setup] [AF Mode] [Speed] [Instant] This is useful in the center of a window. It will not... will not appear on the bottom left of the lens barrel) to focus manually. NOTES • Magnification appears only on the video configuration. The magnification also differs based on the camcorder screen. The focusing range is different. at full wide-angle, measured from the...
XF100 / XF105 Instruction Manual
Page 54
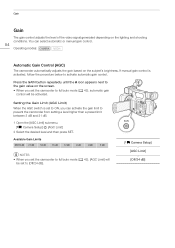
... (0 42), [AGC Limit] will be activated. Gain Gain The gain control adjusts the level of the video signal generated depending on the subject's brightness. You can activate the gain limit to [Off/24 dB]. [l Camera Setup] [AGC Limit] [Off/24 dB] If manual gain control is set to ON, you set... to prevent the camcorder from setting a level higher than a preset limit between 3 dB and 21 dB. 1 Open the [AGC Limit] submenu. [l Camera Setup] [AGC Limit] 2 Select the desired level and then press SET. Press the GAIN button repeatedly until the A icon appears next to the gain value...
... (0 42), [AGC Limit] will be activated. Gain Gain The gain control adjusts the level of the video signal generated depending on the subject's brightness. You can activate the gain limit to [Off/24 dB]. [l Camera Setup] [AGC Limit] [Off/24 dB] If manual gain control is set to ON, you set... to prevent the camcorder from setting a level higher than a preset limit between 3 dB and 21 dB. 1 Open the [AGC Limit] submenu. [l Camera Setup] [AGC Limit] 2 Select the desired level and then press SET. Press the GAIN button repeatedly until the A icon appears next to the gain value...
XF100 / XF105 Instruction Manual
Page 55
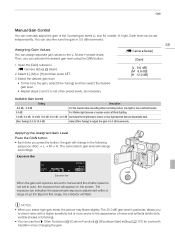
...independently. Each level can manually adjust the gain of ±2 EV. The camcorder's gain level will change accordingly. NOTES • When you to shoot video with a higher sensitivity but is not set other preset levels, as necessary. [L 0.0 dB] [M 6.0 dB] [H 12.0 dB] Available Gain Levels ...levels, the picture may flicker slightly. Assigning Gain Values You can activate the desired gain level using the GAIN button. 55 [l Camera Setup] [Gain] 1 Open the [Gain] submenu. [l Camera Setup] [Gain] 2 Select [L], [M] or [H] and then press SET. 3 Select the desired gain level. • ...
...independently. Each level can manually adjust the gain of ±2 EV. The camcorder's gain level will change accordingly. NOTES • When you to shoot video with a higher sensitivity but is not set other preset levels, as necessary. [L 0.0 dB] [M 6.0 dB] [H 12.0 dB] Available Gain Levels ...levels, the picture may flicker slightly. Assigning Gain Values You can activate the desired gain level using the GAIN button. 55 [l Camera Setup] [Gain] 1 Open the [Gain] submenu. [l Camera Setup] [Gain] 2 Select [L], [M] or [H] and then press SET. 3 Select the desired gain level. • ...
XF100 / XF105 Instruction Manual
Page 74
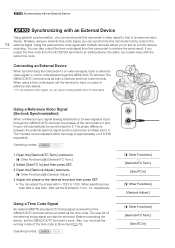
...signal. Also, you must set the terminal to input or output in advance (see below). * For the reference video signal, you can create video with multiple cameras allows you can also output the time code signal from the GENLOCK/TC terminal will automatically be synchronized to the desired... an external time code signal, you to set the first field to 1023. When selecting more than 999 or less than -999, set up a multi-camera recording. Operating modes: [J Other Functions] [Genlock/TC Term.] [Gen/TC In] [J Other Functions] [Genlock Adjust.] [J Other Functions] [Genlock/TC Term.]...
...signal. Also, you must set the terminal to input or output in advance (see below). * For the reference video signal, you can create video with multiple cameras allows you can also output the time code signal from the GENLOCK/TC terminal will automatically be synchronized to the desired... an external time code signal, you to set the first field to 1023. When selecting more than 999 or less than -999, set up a multi-camera recording. Operating modes: [J Other Functions] [Genlock/TC Term.] [Gen/TC In] [J Other Functions] [Genlock Adjust.] [J Other Functions] [Genlock/TC Term.]...
XF100 / XF105 Instruction Manual
Page 98
...Function name Description [Img Stab.] Turns the selected image stabilization method (Dynamic IS or Standard IS) on/off . N [TL-H58] Sets the [l Camera Setup] [Conversion Lens] setting to the clip. N [LCD/VF B&W] Turns the B&W mode of the LCD and viewfinder on/off . N [Shot...Code] submenu. N [Zebra] Turns zebra patterns on /off . N [WFM (LCD)] Activates video scopes in Infrared mode. N [Color Bars] Turns color bars on /off . N [IR Light] Turns the infrared light on/off when [l Camera Setup] [Infrared] [Light] is in the following sequence: 1.5x J 3x J 6x J...
...Function name Description [Img Stab.] Turns the selected image stabilization method (Dynamic IS or Standard IS) on/off . N [TL-H58] Sets the [l Camera Setup] [Conversion Lens] setting to the clip. N [LCD/VF B&W] Turns the B&W mode of the LCD and viewfinder on/off . N [Shot...Code] submenu. N [Zebra] Turns zebra patterns on /off . N [WFM (LCD)] Activates video scopes in Infrared mode. N [Color Bars] Turns color bars on /off . N [IR Light] Turns the infrared light on/off when [l Camera Setup] [Infrared] [Light] is in the following sequence: 1.5x J 3x J 6x J...

XF100 / XF105 Instruction Manual
Page 100
..., select [Unprotect] instead. 3 Press the MENU button to exit the menu. [l Camera Setup] [Custom Picture] [I X Edit File] [Protect] The following describes when to use the preset files. [C7 VIDEO.C]: For playing back video on consumer flat-panel displays. [C8 CINE.V]: For achieving a cinema-like picture on ...files in the camcorder in the same way. 3 Select [Set] and then press SET. 4 Press the MENU button to exit the menu. [l Camera Setup] [Custom Picture] [I X Edit File] [Rename] Protecting Custom Picture Files Protecting a custom picture file prevents its settings from that displays the ...
..., select [Unprotect] instead. 3 Press the MENU button to exit the menu. [l Camera Setup] [Custom Picture] [I X Edit File] [Protect] The following describes when to use the preset files. [C7 VIDEO.C]: For playing back video on consumer flat-panel displays. [C8 CINE.V]: For achieving a cinema-like picture on ...files in the camcorder in the same way. 3 Select [Set] and then press SET. 4 Press the MENU button to exit the menu. [l Camera Setup] [Custom Picture] [I X Edit File] [Rename] Protecting Custom Picture Files Protecting a custom picture file prevents its settings from that displays the ...

XF100 / XF105 Instruction Manual
Page 145
...the reference page. For details about how to select an item, refer to the page of a specific menu: [l Camera Setup] menu Custom picture [X Edit File] settings [m Audio Setup] menu [N Video Setup] menu [M LCD/VF Setup] menu [L TC/UB Setup] menu [L User Bit Setup] menu [J Other ...Functions] menu 0 145 0 146 0 148 0 149 0 149 0 152 0 152 0 152 [l Camera Setup] menu ( mode only) Menu item Submenu Setting options 0 [Light...
...the reference page. For details about how to select an item, refer to the page of a specific menu: [l Camera Setup] menu Custom picture [X Edit File] settings [m Audio Setup] menu [N Video Setup] menu [M LCD/VF Setup] menu [L TC/UB Setup] menu [L User Bit Setup] menu [J Other ...Functions] menu 0 145 0 146 0 148 0 149 0 149 0 152 0 152 0 152 [l Camera Setup] menu ( mode only) Menu item Submenu Setting options 0 [Light...
XF100 / XF105 Instruction Manual
Page 149
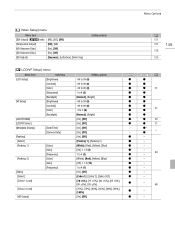
Menu Options [N Video Setup] menu Menu item [SDI Output] (b only) [Component Output] [HD Onscreen Disp.] [SD Onscreen Disp.] [SD Output] [HD], [SD], [Off] [HD], [SD] [On], ...LCD/VF Simul.] [Metadata Display] [Peaking] [Select] [Peaking 1] [Peaking 2] [Zebra] [Select] [Zebra 1 Level] Submenu [Brightness] [Contrast] [Color] [Sharpness] [Backlight] [Brightness] [Contrast] [Color] [Backlight] [Date/Time] [Camera Data] [Color] [Gain] [Frequency] [Color] [Gain] [Frequency] [Zebra 2 Level] [HD Output] Setting options -99 to 99 (0) N -99 to 99 (0) N -20 to 20 (0) N 1 to 4 (2) N [Normal...
Menu Options [N Video Setup] menu Menu item [SDI Output] (b only) [Component Output] [HD Onscreen Disp.] [SD Onscreen Disp.] [SD Output] [HD], [SD], [Off] [HD], [SD] [On], ...LCD/VF Simul.] [Metadata Display] [Peaking] [Select] [Peaking 1] [Peaking 2] [Zebra] [Select] [Zebra 1 Level] Submenu [Brightness] [Contrast] [Color] [Sharpness] [Backlight] [Brightness] [Contrast] [Color] [Backlight] [Date/Time] [Camera Data] [Color] [Gain] [Frequency] [Color] [Gain] [Frequency] [Zebra 2 Level] [HD Output] Setting options -99 to 99 (0) N -99 to 99 (0) N -20 to 20 (0) N 1 to 4 (2) N [Normal...
XF100 / XF105 Instruction Manual
Page 156
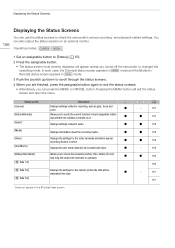
... status screen most recently displayed will be N embedded into clips. * Does not appear in mode. Displays the settings for the video terminals and which special N recording mode is on an external monitor. Pressing the MENU button will be recorded with clips. N ... life and N how long the camcorder has been in operation. N Allows you can also output the status screens on . Status screen [Camera] [Buttons/Remote] [Audio]* [Media] [Video] [User Memo] [Battery/Hour Meter] [X Data 1/3] [X Data 2/3] [X Data 3/3] Description Displays settings related to recording, such as ...
... status screen most recently displayed will be N embedded into clips. * Does not appear in mode. Displays the settings for the video terminals and which special N recording mode is on an external monitor. Pressing the MENU button will be recorded with clips. N ... life and N how long the camcorder has been in operation. N Allows you can also output the status screens on . Status screen [Camera] [Buttons/Remote] [Audio]* [Media] [Video] [User Memo] [Battery/Hour Meter] [X Data 1/3] [X Data 2/3] [X Data 3/3] Description Displays settings related to recording, such as ...
XF100 / XF105 Instruction Manual
Page 159
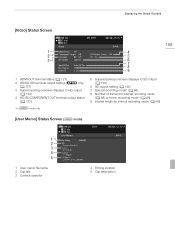
Displaying the Status Screens [Video] Status Screen 159 1 4 2 5 3 6 7 8 9 1 HDMI OUT terminal status (0 127) 2 HD/SD SDI terminal output setting (b only, 0 127) 3 Superimposing onscreen displays to HD output (0 128) 4 HD/SD ... mode (0 88) or frame recording mode* (0 89) 9 Interval length for interval recording mode* (0 88) [User Memo] Status Screen ( mode) 1 2 3 4 5 1 User memo file name 2 Clip title 3 Camera operator 4 Filming location 5 Clip description
Displaying the Status Screens [Video] Status Screen 159 1 4 2 5 3 6 7 8 9 1 HDMI OUT terminal status (0 127) 2 HD/SD SDI terminal output setting (b only, 0 127) 3 Superimposing onscreen displays to HD output (0 128) 4 HD/SD ... mode (0 88) or frame recording mode* (0 89) 9 Interval length for interval recording mode* (0 88) [User Memo] Status Screen ( mode) 1 2 3 4 5 1 User memo file name 2 Clip title 3 Camera operator 4 Filming location 5 Clip description

XF100 / XF105 Instruction Manual
Page 164
...CF card is on the CF card. - Replace the battery of the LOCK switch. - This is not facing the correct direction. Select the correct video input. The microphone attenuator is slow. - Activate the microphone attenuator of the built-in a room where a TV is slow. - Turn it over...card. - Save your photos and initialize the SD card (0 37). Set [Other Functions] [Wireless Controller] to 1/100 (0 56). To reduce the symptoms, set [Camera Setup] [Flicker Reduction] to [Automatic] (0 57) or set the shutter speed to [On]. - Save your clips (0 131) and initialize the CF card (0 ...
...CF card is on the CF card. - Replace the battery of the LOCK switch. - This is not facing the correct direction. Select the correct video input. The microphone attenuator is slow. - Activate the microphone attenuator of the built-in a room where a TV is slow. - Turn it over...card. - Save your photos and initialize the SD card (0 37). Set [Other Functions] [Wireless Controller] to 1/100 (0 56). To reduce the symptoms, set [Camera Setup] [Flicker Reduction] to [Automatic] (0 57) or set the shutter speed to [On]. - Save your clips (0 131) and initialize the CF card (0 ...
XF100 / XF105 Instruction Manual
Page 177
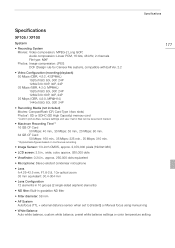
Specifications Specifications XF105 / XF100 System • Recording System Movies: Video compression: MPEG-2 Long GOP; Audio compression: Linear PCM, 16 bits, 48 kHz, 2 channels File type: MXF Photos: Image compression: JPEG DCF (Design rule for Camera File system), compatible with Exif Ver. 2.2 • Video Configuration (recording/playback) 50... Movies: CompactFlash (CF) Card Type I (two slots) Photos*: SD or SDHC (SD High Capacity) memory card *Custom picture files, camera settings and user memo files can be saved and loaded. • Maximum Recording Time** 16 GB CF Card 50 Mbps: 40 min.,...
Specifications Specifications XF105 / XF100 System • Recording System Movies: Video compression: MPEG-2 Long GOP; Audio compression: Linear PCM, 16 bits, 48 kHz, 2 channels File type: MXF Photos: Image compression: JPEG DCF (Design rule for Camera File system), compatible with Exif Ver. 2.2 • Video Configuration (recording/playback) 50... Movies: CompactFlash (CF) Card Type I (two slots) Photos*: SD or SDHC (SD High Capacity) memory card *Custom picture files, camera settings and user memo files can be saved and loaded. • Maximum Recording Time** 16 GB CF Card 50 Mbps: 40 min.,...
XF100 / XF105 Instruction Manual
Page 178
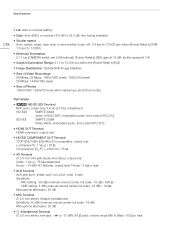
...or slow shutter mode, off; 1/4 sec to 1/2000 sec (when [Frame Rate] is [24P]: 1/3 sec to 1/2000) • Minimum Illumination: 0.11 lux (CAMERA switch set to M (manual), [Frame Rate] at [60i], gain at 33 dB, shutter speed at 1/4) • Subject Illumination Range: 0.11 to 10,000 lux...only Luminance (Y): 1 Vp-p / 75 Ω Chrominance (Pb /Pr ): ±350 mV / 75 Ω • AV Terminal ∅ 3.5 mm mini jack (audio and video), output only Video: 1 Vp-p / 75 Ω unbalanced Audio: -10 dBV (47 kΩ load, output level 1Vrms) / 3 kΩ or less • XLR Terminal XLR jack (pin1: ...
...or slow shutter mode, off; 1/4 sec to 1/2000 sec (when [Frame Rate] is [24P]: 1/3 sec to 1/2000) • Minimum Illumination: 0.11 lux (CAMERA switch set to M (manual), [Frame Rate] at [60i], gain at 33 dB, shutter speed at 1/4) • Subject Illumination Range: 0.11 to 10,000 lux...only Luminance (Y): 1 Vp-p / 75 Ω Chrominance (Pb /Pr ): ±350 mV / 75 Ω • AV Terminal ∅ 3.5 mm mini jack (audio and video), output only Video: 1 Vp-p / 75 Ω unbalanced Audio: -10 dBV (47 kΩ load, output level 1Vrms) / 3 kΩ or less • XLR Terminal XLR jack (pin1: ...


