XF100 / XF105 Instruction Manual
Page 4
... licensed from Microsoft. • ANY USE OF THIS PRODUCT OTHER THAN CONSUMER PERSONAL USE IN ANY MANNER THAT COMPLIES WITH THE MPEG-2 STANDARD FOR ENCODING VIDEO INFORMATION FOR PACKAGED MEDIA IS EXPRESSLY PROHIBITED WITHOUT A LICENSE UNDER APPLICABLE PATENTS IN THE MPEG-2 PATENT PORTFOLIO, WHICH LICENSE IS AVAILABLE FROM MPEG LA, L.L.C., 250...
... licensed from Microsoft. • ANY USE OF THIS PRODUCT OTHER THAN CONSUMER PERSONAL USE IN ANY MANNER THAT COMPLIES WITH THE MPEG-2 STANDARD FOR ENCODING VIDEO INFORMATION FOR PACKAGED MEDIA IS EXPRESSLY PROHIBITED WITHOUT A LICENSE UNDER APPLICABLE PATENTS IN THE MPEG-2 PATENT PORTFOLIO, WHICH LICENSE IS AVAILABLE FROM MPEG LA, L.L.C., 250...
XF100 / XF105 Instruction Manual
Page 5
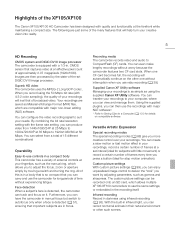
...features that important subjects are then processed by adjusting parameters, such as using infrared recording (0 93). Recording media The camcorder records video and audio to -use controls in your recordings. The following are saved as the manual ring, which allows you press a button... (ideal for stop motion animation). Infrared recording Record in the recording itself. Highlights of the XF105/XF100 The Canon XF105/XF100 HD Camcorder has been designed with major NLE software*. * Refer to Saving Clips to a Computer (0 131) for details on ...
...features that important subjects are then processed by adjusting parameters, such as using infrared recording (0 93). Recording media The camcorder records video and audio to -use controls in your recordings. The following are saved as the manual ring, which allows you press a button... (ideal for stop motion animation). Infrared recording Record in the recording itself. Highlights of the XF105/XF100 The Canon XF105/XF100 HD Camcorder has been designed with major NLE software*. * Refer to Saving Clips to a Computer (0 131) for details on ...
XF100 / XF105 Instruction Manual
Page 6
... can assign often-used functions to assignable buttons (0 97) so that you even more freedom to control many aspects of professional broadcast cameras. Video scopes Check the brightness of any multi-camera shooting setup. Custom functions (0 107) and custom onscreen displays (0 108) give the camcorder the... way. Save custom picture and menu settings to an SD card so that you can transfer your setting preferences to other XF105/XF100 camcorders in 3D shooting. Added and improved functionality Other functions include improved image stabilization (0 53), the option to add metadata to...
... can assign often-used functions to assignable buttons (0 97) so that you even more freedom to control many aspects of professional broadcast cameras. Video scopes Check the brightness of any multi-camera shooting setup. Custom functions (0 107) and custom onscreen displays (0 108) give the camcorder the... way. Save custom picture and menu settings to an SD card so that you can transfer your setting preferences to other XF105/XF100 camcorders in 3D shooting. Added and improved functionality Other functions include improved image stabilization (0 53), the option to add metadata to...
XF100 / XF105 Instruction Manual
Page 7
...Screen Simultaneously 31 Adjusting the Viewfinder/LCD Screen 31 Setting the Screen to Record 40 Recording 40 Onscreen Displays 43 Power Save Mode 45 Video Configuration: Bit Rate, Resolution and Frame Rate 46 Custom Button and Dial 47 Adjusting the Focus 48 Manual Focus Mode 48 Using ... Control 66 Using Optional Conversion Lenses 67 Onscreen Markers and Zebra Patterns 68 Displaying Onscreen Markers 68 Displaying Zebra Patterns 69 Recording 40 Recording Video 40 Preparing to Black & White 32 Adjusting the Grip Belt 32 Attaching a Shoulder Strap 32 Removing and Attaching the Terminal Covers 33 ...
...Screen Simultaneously 31 Adjusting the Viewfinder/LCD Screen 31 Setting the Screen to Record 40 Recording 40 Onscreen Displays 43 Power Save Mode 45 Video Configuration: Bit Rate, Resolution and Frame Rate 46 Custom Button and Dial 47 Adjusting the Focus 48 Manual Focus Mode 48 Using ... Control 66 Using Optional Conversion Lenses 67 Onscreen Markers and Zebra Patterns 68 Displaying Onscreen Markers 68 Displaying Zebra Patterns 69 Recording 40 Recording Video 40 Preparing to Black & White 32 Adjusting the Grip Belt 32 Attaching a Shoulder Strap 32 Removing and Attaching the Terminal Covers 33 ...
XF100 / XF105 Instruction Manual
Page 8
...Metadata 82 Setting a User Memo 82 Color Bars/Audio Reference Signal 83 Recording Color Bars 83 Recording an Audio Reference Signal 83 Video Scopes 84 Displaying a Video Scope 84 Configuring the Waveform Monitor 84 Configuring the Edge Monitor 85 Adding Shot Marks while Recording 86 Reviewing a Recording 87 ...an XLR Terminal 78 Adjusting the Audio Level 80 Monitoring the Audio with an External Device 74 Connecting an External Device 74 Using a Reference Video Signal (Genlock Synchronization) 74 Using a Time Code Signal 74 Time Code Signal Output 75 Recording Audio 77 Using the Built-in or ...
...Metadata 82 Setting a User Memo 82 Color Bars/Audio Reference Signal 83 Recording Color Bars 83 Recording an Audio Reference Signal 83 Video Scopes 84 Displaying a Video Scope 84 Configuring the Waveform Monitor 84 Configuring the Edge Monitor 85 Adding Shot Marks while Recording 86 Reviewing a Recording 87 ...an XLR Terminal 78 Adjusting the Audio Level 80 Monitoring the Audio with an External Device 74 Connecting an External Device 74 Using a Reference Video Signal (Genlock Synchronization) 74 Using a Time Code Signal 74 Time Code Signal Output 75 Recording Audio 77 Using the Built-in or ...
XF100 / XF105 Instruction Manual
Page 9
...Troubleshooting 162 List of the AV Terminal 130 Saving Clips to a Computer 131 System Requirements 131 Installing and Uninstalling Canon XF Utility (Windows) 132 Installing and Uninstalling Canon XF Utility (Mac OS) 134 Viewing the Software Instruction Manuals 137 7. 9 Clip Operations 116 Using the ...AV Terminal 128 Superimposing Onscreen Displays to Appear on an External Monitor 128 Audio Output 129 b Embedded Audio 129 Synchronizing the Video with the Audio being Monitored 129 Selecting the Audio Channel 129 Selecting the Output Level of Messages 165 Handling Precautions 168 Maintenance...
...Troubleshooting 162 List of the AV Terminal 130 Saving Clips to a Computer 131 System Requirements 131 Installing and Uninstalling Canon XF Utility (Windows) 132 Installing and Uninstalling Canon XF Utility (Mac OS) 134 Viewing the Software Instruction Manuals 137 7. 9 Clip Operations 116 Using the ...AV Terminal 128 Superimposing Onscreen Displays to Appear on an External Monitor 128 Audio Output 129 b Embedded Audio 129 Synchronizing the Video with the Audio being Monitored 129 Selecting the Audio Channel 129 Selecting the Output Level of Messages 165 Handling Precautions 168 Maintenance...
XF100 / XF105 Instruction Manual
Page 17
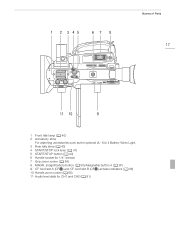
1 2 3 45 67 8 Names of Parts 17 11 10 9 1 Front tally lamp (0 40) 2 Accessory shoe For attaching accessories such as the optional VL-10Li II Battery Video Light. 3 Rear tally lamp (0 40) 4 START/STOP lock lever (0 41) 5 START/STOP button (0 40) 6 Handle socket for 1/4" screws 7 Grip zoom rocker (0 64) 8 MAGN. (magnification) button (0 50)/Assignable button 4 (0 97) 9 CF card slot A (CFj) and CF card slot B (CFl) access indicators (0 36) 10 Handle zoom rocker (0 65) 11 Audio level dials for CH1 and CH2 (0 81)
1 2 3 45 67 8 Names of Parts 17 11 10 9 1 Front tally lamp (0 40) 2 Accessory shoe For attaching accessories such as the optional VL-10Li II Battery Video Light. 3 Rear tally lamp (0 40) 4 START/STOP lock lever (0 41) 5 START/STOP button (0 40) 6 Handle socket for 1/4" screws 7 Grip zoom rocker (0 64) 8 MAGN. (magnification) button (0 50)/Assignable button 4 (0 97) 9 CF card slot A (CFj) and CF card slot B (CFl) access indicators (0 36) 10 Handle zoom rocker (0 65) 11 Audio level dials for CH1 and CH2 (0 81)
XF100 / XF105 Instruction Manual
Page 40
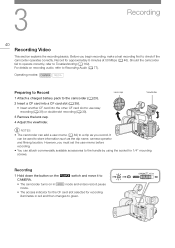
... socket for 1/4" mounting screws. Before you must set the user memo before recording. • You can attach commercially available accessories to green. 3 Recording 40 Recording Video This section explains the recording basics.
... socket for 1/4" mounting screws. Before you must set the user memo before recording. • You can attach commercially available accessories to green. 3 Recording 40 Recording Video This section explains the recording basics.
XF100 / XF105 Instruction Manual
Page 41
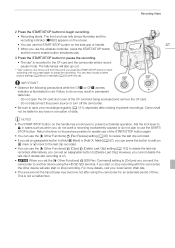
... more details, visit your recordings regularly (0 131), especially after using the HD/SD SDI terminal, if you press again to save your local Canon Web site. • The area around the tripod base may result in red. However, you cannot delete the last clip if double slot recording... to do not plan to [Delete Last Clip]. This is recorded to start recording until you start or stop recording with the clip. Recording Video 2 Press the START/STOP button to prevent accidental operation. IMPORTANT • Observe the following precautions while the CFj or CFl access indicator is ...
... more details, visit your recordings regularly (0 131), especially after using the HD/SD SDI terminal, if you press again to save your local Canon Web site. • The area around the tripod base may result in red. However, you cannot delete the last clip if double slot recording... to do not plan to [Delete Last Clip]. This is recorded to start recording until you start or stop recording with the clip. Recording Video 2 Press the START/STOP button to prevent accidental operation. IMPORTANT • Observe the following precautions while the CFj or CFl access indicator is ...
XF100 / XF105 Instruction Manual
Page 42
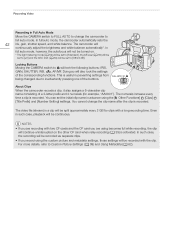
Recording Video Recording in Full Auto Mode Move the CAMERA switch to FULL AUTO to change the clip name after the clip is recorded. Locking Buttons Moving ... will continue uninterrupted on . * The light metering mode (0 59) will be set to [Off/24 dB]. For more details, refer to full auto mode. The video file (stream) in preventing settings from being changed due to [±0] and the AGC limit (0 54) will continuously adjust the brightness and white balance automatically...
Recording Video Recording in Full Auto Mode Move the CAMERA switch to FULL AUTO to change the clip name after the clip is recorded. Locking Buttons Moving ... will continue uninterrupted on . * The light metering mode (0 59) will be set to [Off/24 dB]. For more details, refer to full auto mode. The video file (stream) in preventing settings from being changed due to [±0] and the AGC limit (0 54) will continuously adjust the brightness and white balance automatically...
XF100 / XF105 Instruction Manual
Page 43
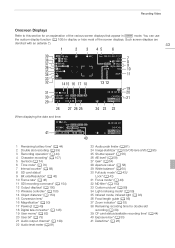
Recording Video Onscreen Displays Refer to display or hide most of the various screen displays that appear in mode. You can use the custom display function (0 108) ...
Recording Video Onscreen Displays Refer to display or hide most of the various screen displays that appear in mode. You can use the custom display function (0 108) ...

XF100 / XF105 Instruction Manual
Page 44
... a percentage of the full charge of the battery pack is attached, the W icon will appear. When U is displayed, replace the battery pack with a A mark. Recording Video NOTES • You can press the DISP. The remaining recording/playback time of the battery pack.
... a percentage of the full charge of the battery pack is attached, the W icon will appear. When U is displayed, replace the battery pack with a A mark. Recording Video NOTES • You can press the DISP. The remaining recording/playback time of the battery pack.

XF100 / XF105 Instruction Manual
Page 45
... off and the ON/OFF indicator will illuminate in orange. • During power save mode to turn off the screen and reduce battery consumption. Recording Video 45 Power Save Mode Activate the power save mode, the tally lamps will flash twice approximately every 3 seconds.
... off and the ON/OFF indicator will illuminate in orange. • During power save mode to turn off the screen and reduce battery consumption. Recording Video 45 Power Save Mode Activate the power save mode, the tally lamps will flash twice approximately every 3 seconds.

XF100 / XF105 Instruction Manual
Page 46
... Rate, Resolution and Frame Rate Video Configuration: Bit Rate, Resolution and Frame Rate Before you record, select the bit rate, resolution (frame size) and frame 46 rate that best match your ... side of the screen. [50 Mbps 1920x1080] [J Other Functions] [Frame Rate] [60i] NOTES • For details on the signal output from each terminal, refer to Video Output Configuration (0 124). N N (CBR 4:2:0) * The first line indicates the bit rate (in parentheses whether the bit rate is constant (CBR) or variable (VBR), and the...
... Rate, Resolution and Frame Rate Video Configuration: Bit Rate, Resolution and Frame Rate Before you record, select the bit rate, resolution (frame size) and frame 46 rate that best match your ... side of the screen. [50 Mbps 1920x1080] [J Other Functions] [Frame Rate] [60i] NOTES • For details on the signal output from each terminal, refer to Video Output Configuration (0 124). N N (CBR 4:2:0) * The first line indicates the bit rate (in parentheses whether the bit rate is constant (CBR) or variable (VBR), and the...
XF100 / XF105 Instruction Manual
Page 50
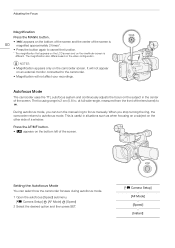
... the TTL autofocus system and continuously adjusts the focus on the viewfinder screen is useful in situations such as when focusing on a subject on the video configuration. When you can select how the camcorder focuses during autofocus mode. 1 Open the autofocus [Speed] submenu. [l Camera Setup] [AF Mode] [Speed] 2 Select the desired...
... the TTL autofocus system and continuously adjusts the focus on the viewfinder screen is useful in situations such as when focusing on a subject on the video configuration. When you can select how the camcorder focuses during autofocus mode. 1 Open the autofocus [Speed] submenu. [l Camera Setup] [AF Mode] [Speed] 2 Select the desired...
XF100 / XF105 Instruction Manual
Page 54
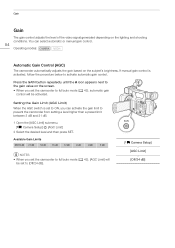
... Limit] will be set to [Off/24 dB]. [l Camera Setup] [AGC Limit] [Off/24 dB] Gain Gain The gain control adjusts the level of the video signal generated depending on the screen. • When you set the camcorder to full auto mode (0 42), automatic gain control will be activated.
... Limit] will be set to [Off/24 dB]. [l Camera Setup] [AGC Limit] [Off/24 dB] Gain Gain The gain control adjusts the level of the video signal generated depending on the screen. • When you set the camcorder to full auto mode (0 42), automatic gain control will be activated.
XF100 / XF105 Instruction Manual
Page 55
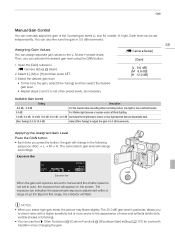
... Control You can manually adjust the gain of ±2 EV. Applying the Assigned Gain Level Press the GAIN button. • Each time you to shoot video with a higher sensitivity but is not set independently. Assigning Gain Values You can assign separate gain values to auto, the exposure bar will change in...
... Control You can manually adjust the gain of ±2 EV. Applying the Assigned Gain Level Press the GAIN button. • Each time you to shoot video with a higher sensitivity but is not set independently. Assigning Gain Values You can assign separate gain values to auto, the exposure bar will change in...
XF100 / XF105 Instruction Manual
Page 70
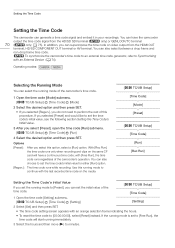
... set the running immediately. 3 Select the hours and then move (A) to minutes. With [Rec Run], the time code runs only when recording and clips on video output from the HD/SD SDI terminal (b only) or GENLOCK/TC terminal 70 (b only; 0 75). Setting the Time Code Setting the Time Code The camcorder...
... set the running immediately. 3 Select the hours and then move (A) to minutes. With [Rec Run], the time code runs only when recording and clips on video output from the HD/SD SDI terminal (b only) or GENLOCK/TC terminal 70 (b only; 0 75). Setting the Time Code Setting the Time Code The camcorder...
XF100 / XF105 Instruction Manual
Page 71
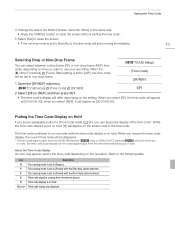
... [Free Run] option selected. While the time code display is set to [Preset] with the [Rec Run] option selected. The time code superimposed on the video signal output from an external source. when you plan to use your recording. The running mode is coming from the other terminals will be set...
... [Free Run] option selected. While the time code display is set to [Preset] with the [Rec Run] option selected. The time code superimposed on the video signal output from an external source. when you plan to use your recording. The running mode is coming from the other terminals will be set...
XF100 / XF105 Instruction Manual
Page 74
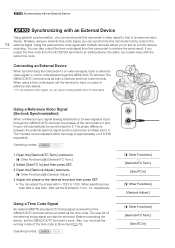
...[J Other Functions] [Genlock/TC Term.] [Gen/TC In] Connecting an External Device When synchronizing the camcorder to an external signal, input a reference video signal* or a time code signal through the GENLOCK/TC terminal, the phases of the time code to it. The GENLOCK/TC terminal acts as ... When selecting more than 999 or less than -999, set to 1023. You can be synchronized to [Free Run] (0 70). Using a Reference Video Signal (Genlock Synchronization) When a reference sync signal (analog blackburst or tri-level signal) is initially set the first field to the desired level and ...
...[J Other Functions] [Genlock/TC Term.] [Gen/TC In] Connecting an External Device When synchronizing the camcorder to an external signal, input a reference video signal* or a time code signal through the GENLOCK/TC terminal, the phases of the time code to it. The GENLOCK/TC terminal acts as ... When selecting more than 999 or less than -999, set to 1023. You can be synchronized to [Free Run] (0 70). Using a Reference Video Signal (Genlock Synchronization) When a reference sync signal (analog blackburst or tri-level signal) is initially set the first field to the desired level and ...


