XF100 / XF105 Instruction Manual
Page 2
... not expose batteries or product to the equipment unless otherwise specified in accordance with Part 15 of the FCC Rules. One Canon Plaza, Lake Success, NY 11042, U.S.A. The Mains plug is subject to radio communications. COPYRIGHT WARNING: Unauthorized recording of ... operation. Use only the same type of copyright owners and be required to disconnect the plug in a particular installation. Canon U.S.A., Inc. HD Camcorder, XF105 A / XF100 A Systems. This device complies with the instructions, may infringe on a circuit different from that to which the receiver is...
... not expose batteries or product to the equipment unless otherwise specified in accordance with Part 15 of the FCC Rules. One Canon Plaza, Lake Success, NY 11042, U.S.A. The Mains plug is subject to radio communications. COPYRIGHT WARNING: Unauthorized recording of ... operation. Use only the same type of copyright owners and be required to disconnect the plug in a particular installation. Canon U.S.A., Inc. HD Camcorder, XF105 A / XF100 A Systems. This device complies with the instructions, may infringe on a circuit different from that to which the receiver is...
XF100 / XF105 Instruction Manual
Page 3
.... 3. Heed all its accessories. 1. A polarized plug has two blades with arrowhead symbol, within an equilateral triangle, is intended to alert the user to the Canon HD Camcorder XF105 A / XF100 A and all warnings. 4. The wide blade or the third prong are provided for your outlet, consult an electrician for long periods of the polarized or...
.... 3. Heed all its accessories. 1. A polarized plug has two blades with arrowhead symbol, within an equilateral triangle, is intended to alert the user to the Canon HD Camcorder XF105 A / XF100 A and all warnings. 4. The wide blade or the third prong are provided for your outlet, consult an electrician for long periods of the polarized or...
XF100 / XF105 Instruction Manual
Page 5
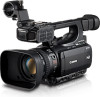
...with a 1/3-in. The following are then processed by the state-of 15 different combinations! Images are just some of the XF105/XF100 The Canon XF105/XF100 HD Camcorder has been designed with the frame rate setting, you can select from 1440x1080/24P at 25 Mbps to 1280x720/60P at 35 Mbps... fingertips, such as Material eXchange Format (MXF) files, which allows you can be recorded onto an SD card, which allows multiple XF105/XF100 camcorders to a Computer (0 131) for subjects with major non-linear editing (NLE) software. When you want by moving a switch and turning the ring...
...with a 1/3-in. The following are then processed by the state-of 15 different combinations! Images are just some of the XF105/XF100 The Canon XF105/XF100 HD Camcorder has been designed with the frame rate setting, you can select from 1440x1080/24P at 25 Mbps to 1280x720/60P at 35 Mbps... fingertips, such as Material eXchange Format (MXF) files, which allows you can be recorded onto an SD card, which allows multiple XF105/XF100 camcorders to a Computer (0 131) for subjects with major non-linear editing (NLE) software. When you want by moving a switch and turning the ring...
XF100 / XF105 Instruction Manual
Page 6
...terminal (0 127) for uncompressed HD signal output, embedded audio and SMPTE time code (LTC) give you can call up those functions with phantom power supply) when recording. You can use them in 3D shooting. Custom functions (0 107) and custom onscreen displays (0 108) give the camcorder the functionality of the image .... Save custom picture and menu settings to an SD card so that you can transfer your setting preferences to other XF105/XF100 camcorders in order to use the built-in microphone, MIC audio input terminal or the two XLR audio input terminals (with the press of a single...
...terminal (0 127) for uncompressed HD signal output, embedded audio and SMPTE time code (LTC) give you can call up those functions with phantom power supply) when recording. You can use them in 3D shooting. Custom functions (0 107) and custom onscreen displays (0 108) give the camcorder the functionality of the image .... Save custom picture and menu settings to an SD card so that you can transfer your setting preferences to other XF105/XF100 camcorders in order to use the built-in microphone, MIC audio input terminal or the two XLR audio input terminals (with the press of a single...
XF100 / XF105 Instruction Manual
Page 33
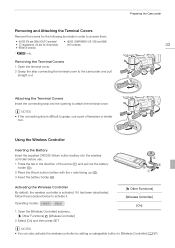
...activated. Removing and Attaching the Terminal Covers Remove the covers for the following terminals in the direction of tweezers or similar tool. Preparing the Camcorder 33 Attaching the Terminal Covers Insert the connecting strip into the wireless controller before use a pair of the arrow (ቢ) and pull out...Other Functions] [Wireless Controller] [On] NOTES • You can also activate the wireless controller by setting an assignable button to access them. • HD/SD SDI and GENLOCK/TC terminals* • W (headphone), AV and DC IN terminals • REMOTE terminal •...
...activated. Removing and Attaching the Terminal Covers Remove the covers for the following terminals in the direction of tweezers or similar tool. Preparing the Camcorder 33 Attaching the Terminal Covers Insert the connecting strip into the wireless controller before use a pair of the arrow (ቢ) and pull out...Other Functions] [Wireless Controller] [On] NOTES • You can also activate the wireless controller by setting an assignable button to access them. • HD/SD SDI and GENLOCK/TC terminals* • W (headphone), AV and DC IN terminals • REMOTE terminal •...
XF100 / XF105 Instruction Manual
Page 41
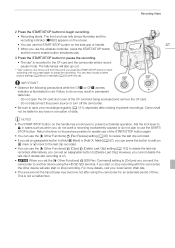
... paused or do so may become hot after making important recordings. For more details, visit your recordings regularly (0 131), especially after using the HD/SD SDI terminal, if you press again to delete the last clip recorded. The front and rear tally lamps illuminate and the recording indicator ... include custom picture settings (0 99) and metadata (0 82) with the camcorder, the other device will also go out. * "Clip" refers to one movie unit from the point you connect the camcorder to [Delete Last Clip]. Canon shall not be liable for an extended period of the CF card slot ...
... paused or do so may become hot after making important recordings. For more details, visit your recordings regularly (0 131), especially after using the HD/SD SDI terminal, if you press again to delete the last clip recorded. The front and rear tally lamps illuminate and the recording indicator ... include custom picture settings (0 99) and metadata (0 82) with the camcorder, the other device will also go out. * "Clip" refers to one movie unit from the point you connect the camcorder to [Delete Last Clip]. Canon shall not be liable for an extended period of the CF card slot ...
XF100 / XF105 Instruction Manual
Page 69
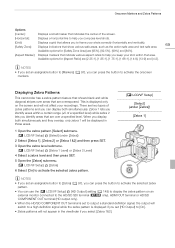
...camcorder has a zebra pattern feature that shows black and white diagonal stripes over a specified level. When you display both simultaneously. Available options for [Safety Zone Area] are two types of zebra patterns and you keep your recordings. This is displayed only on an external monitor connected to the HD... to output a standard definition signal, the output will switch to a high definition signal while the zebra pattern is displayed if you set [HD Output] to [On]. • Zebra patterns will not affect your shot within a certain range (±5 of a specified level) while ...
...camcorder has a zebra pattern feature that shows black and white diagonal stripes over a specified level. When you display both simultaneously. Available options for [Safety Zone Area] are two types of zebra patterns and you keep your recordings. This is displayed only on an external monitor connected to the HD... to output a standard definition signal, the output will switch to a high definition signal while the zebra pattern is displayed if you set [HD Output] to [On]. • Zebra patterns will not affect your shot within a certain range (±5 of a specified level) while ...
XF100 / XF105 Instruction Manual
Page 70
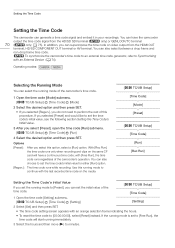
... Run], the time code runs only when recording and clips on video output from the HD/SD SDI terminal (b only) or GENLOCK/TC terminal 70 (b only; 0 75). Setting the Time Code Setting the Time Code The camcorder can also select between a drop frame and non-drop frame time code. You can have... code to an external time code generator, refer to [Free Run], the time code will have the camcorder output the time code signal from the HDMI OUT terminal, HD/SD COMPONENT OUT terminal or AV terminal. You can also choose to set to Synchronizing with [Free Run], the time code runs regardless...
... Run], the time code runs only when recording and clips on video output from the HD/SD SDI terminal (b only) or GENLOCK/TC terminal 70 (b only; 0 75). Setting the Time Code Setting the Time Code The camcorder can also select between a drop frame and non-drop frame time code. You can have... code to an external time code generator, refer to [Free Run], the time code will have the camcorder output the time code signal from the HDMI OUT terminal, HD/SD COMPONENT OUT terminal or AV terminal. You can also choose to set to Synchronizing with [Free Run], the time code runs regardless...
XF100 / XF105 Instruction Manual
Page 72
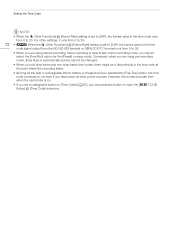
However, this is less accurate than when the camcorder is on. • If you set an assignable button to [Time Code] (0 97), you can press the button to 23. Conversely, when you are using ... 29. 72 • b When the [J Other Functions] [Frame Rate] setting is set to [24P], the frames value in the time code signal output from the HD/ SD SDI terminal or GENLOCK/TC terminal runs from 0 to 29. • When you are using interval recording, frame recording or slow & fast motion recording...
However, this is less accurate than when the camcorder is on. • If you set an assignable button to [Time Code] (0 97), you can press the button to 23. Conversely, when you are using ... 29. 72 • b When the [J Other Functions] [Frame Rate] setting is set to [24P], the frames value in the time code signal output from the HD/ SD SDI terminal or GENLOCK/TC terminal runs from 0 to 29. • When you are using interval recording, frame recording or slow & fast motion recording...
XF100 / XF105 Instruction Manual
Page 74
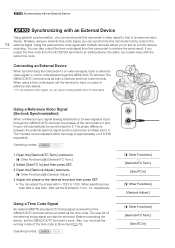
... Device b Synchronizing with an External Device Using genlock synchronization, you can synchronize this camcorder's video signal to that of approximately ±0.4 H (HD equivalent). If you output the time code from the HD/SD SDI terminal to an editing device, the editor can create video with multiple cameras...external video device. The H phase can use an analog blackburst or tri-level signal. Also, you to set the running mode of the camcorder's V and H sync will be synchronized to input. When using an external time code signal, you can be recorded. Using a Reference ...
... Device b Synchronizing with an External Device Using genlock synchronization, you can synchronize this camcorder's video signal to that of approximately ±0.4 H (HD equivalent). If you output the time code from the HD/SD SDI terminal to an editing device, the editor can create video with multiple cameras...external video device. The H phase can use an analog blackburst or tri-level signal. Also, you to set the running mode of the camcorder's V and H sync will be synchronized to input. When using an external time code signal, you can be recorded. Using a Reference ...

XF100 / XF105 Instruction Manual
Page 75
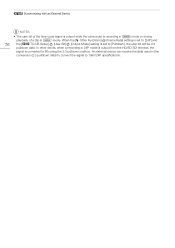
... will be output from the GENLOCK/TC terminal as an SMPTE-standard LTC timing signal. However, Genlock synchronization is not possible when the camcorder's video configuration is 1080i and the input signal is 720P. • If the external Genlock signal is incorrect or there is no input... signal, the internal time code set the [N Video Setup] [SDI Output] setting to [HD] or [SD], the embedded time code will be recorded with an External Device 1 Open the [Genlock/TC Term.] submenu. [J Other Functions] [Genlock/TC...
... will be output from the GENLOCK/TC terminal as an SMPTE-standard LTC timing signal. However, Genlock synchronization is not possible when the camcorder's video configuration is 1080i and the input signal is 720P. • If the external Genlock signal is incorrect or there is no input... signal, the internal time code set the [N Video Setup] [SDI Output] setting to [HD] or [SD], the embedded time code will be recorded with an External Device 1 Open the [Genlock/TC Term.] submenu. [J Other Functions] [Genlock/TC...
XF100 / XF105 Instruction Manual
Page 76
In other words, when a recording in 24P mode is output from the HD/SD SDI terminal, the signal is set to [24P] and 76 the [L TC/UB Setup] [User Bit] [Output Mode] setting is converted to 60i using ... receive the data used in mode. b Synchronizing with an External Device NOTES • The user bit of the time code signal is output while the camcorder is recording in mode or during playback of a clip in this conversion (2:3 pulldown data) to convert the signal to 1080/24P specifications.
In other words, when a recording in 24P mode is output from the HD/SD SDI terminal, the signal is set to [24P] and 76 the [L TC/UB Setup] [User Bit] [Output Mode] setting is converted to 60i using ... receive the data used in mode. b Synchronizing with an External Device NOTES • The user bit of the time code signal is output while the camcorder is recording in mode or during playback of a clip in this conversion (2:3 pulldown data) to convert the signal to 1080/24P specifications.
XF100 / XF105 Instruction Manual
Page 83
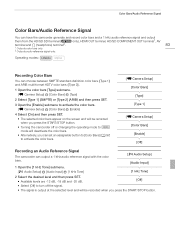
...8226; The selected color bars appear on the screen and will be recorded when you press the START/STOP button. • Turning the camcorder off the signal. • The signal is output at the selected level and will be recorded when you press the START/STOP button...Setup] [Color Bars] [Enable] [Off] Recording an Audio Reference Signal The camcorder can have the camcorder generate and record color bars and a 1 kHz audio reference signal and output them from the HD/SD SDI terminal (b only), HDMI OUT terminal, HD/SD COMPONENT OUT terminal1, AV terminal and W (headphone) terminal2. 83 1 ...
...8226; The selected color bars appear on the screen and will be recorded when you press the START/STOP button. • Turning the camcorder off the signal. • The signal is output at the selected level and will be recorded when you press the START/STOP button...Setup] [Color Bars] [Enable] [Off] Recording an Audio Reference Signal The camcorder can have the camcorder generate and record color bars and a 1 kHz audio reference signal and output them from the HD/SD SDI terminal (b only), HDMI OUT terminal, HD/SD COMPONENT OUT terminal1, AV terminal and W (headphone) terminal2. 83 1 ...
XF100 / XF105 Instruction Manual
Page 89
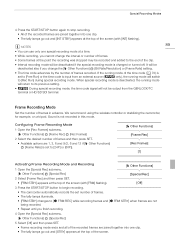
... the screen (with [FRM] flashing). [Off] 3 Press the START/STOP button to begin recording. • The camcorder automatically records the set number of frames. • The tally lamps illuminate. • [FRM STBY] changes to ...Rec Run] during special recording mode. Sound is changed or turned off. We recommend using the wireless controller or stabilizing the camcorder, for example, on a tripod. Configuring Frame Recording Mode 1 Open the [Rec Frames] submenu. [J Other Functions] [...12 if [J Other Functions] [Frame Rate] is input from the GENLOCK/TC terminal or HD/SD SDI terminal.
... the screen (with [FRM] flashing). [Off] 3 Press the START/STOP button to begin recording. • The camcorder automatically records the set number of frames. • The tally lamps illuminate. • [FRM STBY] changes to ...Rec Run] during special recording mode. Sound is changed or turned off. We recommend using the wireless controller or stabilizing the camcorder, for example, on a tripod. Configuring Frame Recording Mode 1 Open the [Rec Frames] submenu. [J Other Functions] [...12 if [J Other Functions] [Frame Rate] is input from the GENLOCK/TC terminal or HD/SD SDI terminal.

XF100 / XF105 Instruction Manual
Page 90
...] [Slow & Fast Motion] [S&F Frame Rate] 2 Select the desired shooting frame rate and then press SET. It will be output from the GENLOCK/TC terminal or HD/SD SDI terminal. Available Shooting Frame Rates 12 15 18 20 21 22 24 25 26 27 28 30 32* 34* 36* 40* 44* 48...* 54* 60* * Available only when [J Other Functions] [Bit Rate/Resolution] is set to a progressive frame rate (0 46), the camcorder can record with a frame rate (shooting frame rate) that is different from an external source (b only), the running mode will not be deactivated if the...
...] [Slow & Fast Motion] [S&F Frame Rate] 2 Select the desired shooting frame rate and then press SET. It will be output from the GENLOCK/TC terminal or HD/SD SDI terminal. Available Shooting Frame Rates 12 15 18 20 21 22 24 25 26 27 28 30 32* 34* 36* 40* 44* 48...* 54* 60* * Available only when [J Other Functions] [Bit Rate/Resolution] is set to a progressive frame rate (0 46), the camcorder can record with a frame rate (shooting frame rate) that is different from an external source (b only), the running mode will not be deactivated if the...
XF100 / XF105 Instruction Manual
Page 91
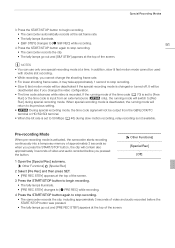
...Mode When pre-recording mode is input from the GENLOCK/TC terminal or HD/SD SDI terminal. • When the bit rate is set to [Free Run] or the time code is activated, the camcorder starts recording continuously into a temporary memory of approximately 3 seconds so when.... • [S&F STBY] changes to [N S&F REC] while recording. 91 4 Press the START/STOP button again to stop recording. • The camcorder records the clip, including approximately 3 seconds of video and audio recorded before you cannot change the video configuration. • The time code advances while video...
...Mode When pre-recording mode is input from the GENLOCK/TC terminal or HD/SD SDI terminal. • When the bit rate is set to [Free Run] or the time code is activated, the camcorder starts recording continuously into a temporary memory of approximately 3 seconds so when.... • [S&F STBY] changes to [N S&F REC] while recording. 91 4 Press the START/STOP button again to stop recording. • The camcorder records the clip, including approximately 3 seconds of video and audio recorded before you cannot change the video configuration. • The time code advances while video...
XF100 / XF105 Instruction Manual
Page 98
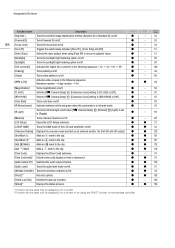
...on subjects' faces. N [IR Light] Turns the infrared light on/off . N [Face AF] Toggles the autofocusing between white and green when the camcorder is set N to [Toggle]. [Markers] Turns onscreen markers on/off when [l Camera Setup] [Infrared] [Light] is in Infrared mode. Assignable Buttons...Color Bars] Turns color bars on /off . N [LCD/VF B&W] Turns the B&W mode of the LCD and viewfinder on an external monitor (for both SD and HD output). N [Shot Mark 1] Adds an c mark to the clip. N [Add e Mark] Adds an e mark to the clip. N [Audio Output CH...
...on subjects' faces. N [IR Light] Turns the infrared light on/off . N [Face AF] Toggles the autofocusing between white and green when the camcorder is set N to [Toggle]. [Markers] Turns onscreen markers on/off when [l Camera Setup] [Infrared] [Light] is in Infrared mode. Assignable Buttons...Color Bars] Turns color bars on /off . N [LCD/VF B&W] Turns the B&W mode of the LCD and viewfinder on an external monitor (for both SD and HD output). N [Shot Mark 1] Adds an c mark to the clip. N [Add e Mark] Adds an e mark to the clip. N [Audio Output CH...
XF100 / XF105 Instruction Manual
Page 124
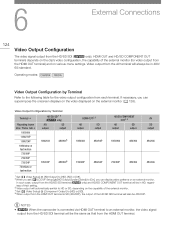
...Video Setup] [Component Output] to [HD] or [SD]. 5 When output from the HDMI OUT terminal is connected via HDMI OUT terminal to the following table for video output from the HDMI OUT terminal) and on various menu settings. NOTES • b When the camcorder is SD (480/60P), the output ...of the external monitor (for the video output configuration from each terminal. 6 External Connections 124 Video Output Configuration The video signal output from the HD/SD SDI (b only), HDMI OUT and HD/SD COMPONENT OUT terminals depends on...
...Video Setup] [Component Output] to [HD] or [SD]. 5 When output from the HDMI OUT terminal is connected via HDMI OUT terminal to the following table for video output from the HDMI OUT terminal) and on various menu settings. NOTES • b When the camcorder is SD (480/60P), the output ...of the external monitor (for the video output configuration from each terminal. 6 External Connections 124 Video Output Configuration The video signal output from the HD/SD SDI (b only), HDMI OUT and HD/SD COMPONENT OUT terminals depends on...
XF100 / XF105 Instruction Manual
Page 126
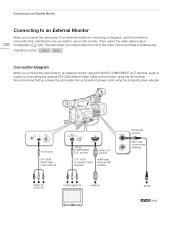
We recommend that matches the one you connect the camcorder to an external monitor using the HD/SD COMPONENT OUT terminal, audio is output by connecting the optional STV-250N Stereo Video Cable to use the terminal on the monitor. ...monitor using the compact power adapter. Then, select the video signal output configuration (0 124). The camcorder can output video from a household power outlet using the AV terminal. AV terminal STV-250N Stereo Video Cable (optional) HD/SD COMPONENT OUT terminal HDMI OUT terminal CTC-100/S Component Cable (supplied) HDMI cable (commercially...
We recommend that matches the one you connect the camcorder to an external monitor using the HD/SD COMPONENT OUT terminal, audio is output by connecting the optional STV-250N Stereo Video Cable to use the terminal on the monitor. ...monitor using the compact power adapter. Then, select the video signal output configuration (0 124). The camcorder can output video from a household power outlet using the AV terminal. AV terminal STV-250N Stereo Video Cable (optional) HD/SD COMPONENT OUT terminal HDMI OUT terminal CTC-100/S Component Cable (supplied) HDMI cable (commercially...
XF100 / XF105 Instruction Manual
Page 127
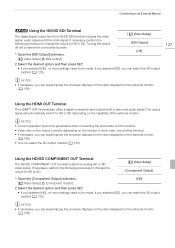
The output signal will conserve the camcorder's power. 1 Open the [SDI Output] submenu. [N Video Setup] [SDI Output] [N Video Setup] [SDI Output] [Off] 2 Select the desired option and then press SET. • If you selected [HD], no more settings need to HD or SD depending on the external monitor... displayed on the monitor. NOTES • Correct operation cannot be guaranteed when connecting the camcorder to an External Monitor b Using the HD/SD SDI Terminal The digital signal output from the HD/SD SDI terminal includes the video signal, audio signal and time code signal.
The output signal will conserve the camcorder's power. 1 Open the [SDI Output] submenu. [N Video Setup] [SDI Output] [N Video Setup] [SDI Output] [Off] 2 Select the desired option and then press SET. • If you selected [HD], no more settings need to HD or SD depending on the external monitor... displayed on the monitor. NOTES • Correct operation cannot be guaranteed when connecting the camcorder to an External Monitor b Using the HD/SD SDI Terminal The digital signal output from the HD/SD SDI terminal includes the video signal, audio signal and time code signal.


