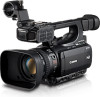
XF100 / XF105 Instruction Manual
Page 2
... OF ELECTRIC SHOCK, DO NOT EXPOSE THIS PRODUCT TO DRIPPING OR SPLASHING. HD Camcorder, XF105 A / XF100 A Systems. This device complies with the limits for help. This equipment generates, uses and can be determined by one or more of the FCC Rules. TO REDUCE THE RISK OF ELECTRIC ... should be made, you could be contrary to comply with Part 15 of a car under direct sunlight, fire, etc. One Canon Plaza, Lake Success, NY 11042, U.S.A. Canon U.S.A., Inc. Important Usage Instructions WARNING! 2 TO REDUCE THE RISK OF FIRE OR ELECTRIC SHOCK, DO NOT EXPOSE THIS PRODUCT TO...
... OF ELECTRIC SHOCK, DO NOT EXPOSE THIS PRODUCT TO DRIPPING OR SPLASHING. HD Camcorder, XF105 A / XF100 A Systems. This device complies with the limits for help. This equipment generates, uses and can be determined by one or more of the FCC Rules. TO REDUCE THE RISK OF ELECTRIC ... should be made, you could be contrary to comply with Part 15 of a car under direct sunlight, fire, etc. One Canon Plaza, Lake Success, NY 11042, U.S.A. Canon U.S.A., Inc. Important Usage Instructions WARNING! 2 TO REDUCE THE RISK OF FIRE OR ELECTRIC SHOCK, DO NOT EXPOSE THIS PRODUCT TO...
XF100 / XF105 Instruction Manual
Page 3
...The wide blade or the third prong are provided for your outlet, consult an electrician for long periods of time. 12. Only use this apparatus during lightning storms or when unused for replacement of uninsulated "dangerous voltage" within an equilateral triangle, is damaged, liquid has... may be of sufficient magnitude to constitute a risk of the polarized or grounding-type plug. Refer all servicing to the Canon HD Camcorder XF105 A / XF100 A and all its accessories. 1. Important Safety Instructions In these safety instructions the word "product" refers to qualified service personnel....
...The wide blade or the third prong are provided for your outlet, consult an electrician for long periods of time. 12. Only use this apparatus during lightning storms or when unused for replacement of uninsulated "dangerous voltage" within an equilateral triangle, is damaged, liquid has... may be of sufficient magnitude to constitute a risk of the polarized or grounding-type plug. Refer all servicing to the Canon HD Camcorder XF105 A / XF100 A and all its accessories. 1. Important Safety Instructions In these safety instructions the word "product" refers to qualified service personnel....
XF100 / XF105 Instruction Manual
Page 4
... may be trademarks or registered trademarks of their respective companies. • This device incorporates exFAT technology licensed from Microsoft. • ANY USE OF THIS PRODUCT OTHER THAN CONSUMER PERSONAL USE IN ANY MANNER THAT COMPLIES WITH THE MPEG-2 STANDARD FOR ENCODING VIDEO INFORMATION FOR PACKAGED MEDIA IS EXPRESSLY PROHIBITED WITHOUT A LICENSE UNDER...
... may be trademarks or registered trademarks of their respective companies. • This device incorporates exFAT technology licensed from Microsoft. • ANY USE OF THIS PRODUCT OTHER THAN CONSUMER PERSONAL USE IN ANY MANNER THAT COMPLIES WITH THE MPEG-2 STANDARD FOR ENCODING VIDEO INFORMATION FOR PACKAGED MEDIA IS EXPRESSLY PROHIBITED WITHOUT A LICENSE UNDER...
XF100 / XF105 Instruction Manual
Page 5
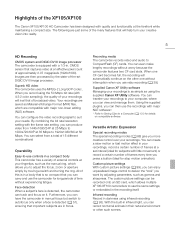
...transfer your recordings to your fingertips, such as Material eXchange Format (MXF) files, which allows multiple XF105/XF100 camcorders to use the camcorder for details on compatible software. Using the supplied plugins, you can select from 1440x1080/24P at 25 Mbps to 1280x720/60P at 35 Mbps... you can enjoy unparalleled image control to deliver the "look" you use the recordings with major NLE software*. * Refer to Saving Clips to -use controls in focus. Highlights of the XF105/XF100 The Canon XF105/XF100 HD Camcorder has been designed with quality and functionality at an effective ...
...transfer your recordings to your fingertips, such as Material eXchange Format (MXF) files, which allows multiple XF105/XF100 camcorders to use the camcorder for details on compatible software. Using the supplied plugins, you can select from 1440x1080/24P at 25 Mbps to 1280x720/60P at 35 Mbps... you can enjoy unparalleled image control to deliver the "look" you use the recordings with major NLE software*. * Refer to Saving Clips to -use controls in focus. Highlights of the XF105/XF100 The Canon XF105/XF100 HD Camcorder has been designed with quality and functionality at an effective ...
XF100 / XF105 Instruction Manual
Page 6
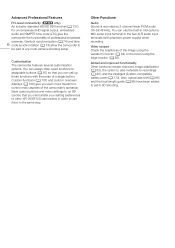
...(LTC) give you even more freedom to control many aspects of the image using the waveform monitor (0 84) or the focus using the edge monitor (0 85). You can transfer your setting preferences to other XF105/XF100 camcorders in microphone, MIC audio input terminal or the two XLR audio input... terminals (with the press of a single button. Genlock synchronization (0 74) and time 6 code synchronization (0 74) allow the camcorder to use the built-in order to be part...
...(LTC) give you even more freedom to control many aspects of the image using the waveform monitor (0 84) or the focus using the edge monitor (0 85). You can transfer your setting preferences to other XF105/XF100 camcorders in microphone, MIC audio input terminal or the two XLR audio input... terminals (with the press of a single button. Genlock synchronization (0 74) and time 6 code synchronization (0 74) allow the camcorder to use the built-in order to be part...
XF100 / XF105 Instruction Manual
Page 7
... 40 Preparing to Black & White 32 Adjusting the Grip Belt 32 Attaching a Shoulder Strap 32 Removing and Attaching the Terminal Covers 33 Using the Wireless Controller 33 Using a Tripod 34 Preparing Recording Media 35 Inserting a CF Card 35 Checking the Status of the CF Card Slots 36 Removing a CF...from the Menu 28 Preparing the Camcorder 30 Attaching the Microphone Holder Unit 30 Attaching the Lens Hood 30 Dioptric Adjustment 30 Using the LCD Panel 31 Using the Viewfinder and LCD Screen Simultaneously 31 Adjusting the Viewfinder/LCD Screen 31 Setting the Screen to Record 40 Recording 40 ...
... 40 Preparing to Black & White 32 Adjusting the Grip Belt 32 Attaching a Shoulder Strap 32 Removing and Attaching the Terminal Covers 33 Using the Wireless Controller 33 Using a Tripod 34 Preparing Recording Media 35 Inserting a CF Card 35 Checking the Status of the CF Card Slots 36 Removing a CF...from the Menu 28 Preparing the Camcorder 30 Attaching the Microphone Holder Unit 30 Attaching the Lens Hood 30 Dioptric Adjustment 30 Using the LCD Panel 31 Using the Viewfinder and LCD Screen Simultaneously 31 Adjusting the Viewfinder/LCD Screen 31 Setting the Screen to Record 40 Recording 40 ...
XF100 / XF105 Instruction Manual
Page 8
... Bit 73 b Synchronizing with an External Device 74 Connecting an External Device 74 Using a Reference Video Signal (Genlock Synchronization) 74 Using a Time Code Signal 74 Time Code Signal Output 75 Recording Audio 77 Using the Built-in a Recording 102 Available Custom Picture Settings 102 Customizing Functions and...Loading Camera Settings 109 Saving Camera Settings to an XLR Terminal 78 Adjusting the Audio Level 80 Monitoring the Audio with Headphones 81 Using Metadata 82 Setting a User Memo 82 Color Bars/Audio Reference Signal 83 Recording Color Bars 83 Recording an Audio Reference Signal 83...
... Bit 73 b Synchronizing with an External Device 74 Connecting an External Device 74 Using a Reference Video Signal (Genlock Synchronization) 74 Using a Time Code Signal 74 Time Code Signal Output 75 Recording Audio 77 Using the Built-in a Recording 102 Available Custom Picture Settings 102 Customizing Functions and...Loading Camera Settings 109 Saving Camera Settings to an XLR Terminal 78 Adjusting the Audio Level 80 Monitoring the Audio with Headphones 81 Using Metadata 82 Setting a User Memo 82 Color Bars/Audio Reference Signal 83 Recording Color Bars 83 Recording an Audio Reference Signal 83...
XF100 / XF105 Instruction Manual
Page 9
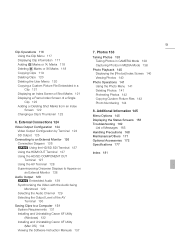
... AV Terminal 128 Superimposing Onscreen Displays to a Computer 131 System Requirements 131 Installing and Uninstalling Canon XF Utility (Windows) 132 Installing and Uninstalling Canon XF Utility (Mac OS) 134 Viewing the Software Instruction Manuals 137 7. 9 Clip Operations 116 Using the Clip Menu 117 Displaying Clip Information 117 Adding e Marks or Z Marks 118 Deleting...
... AV Terminal 128 Superimposing Onscreen Displays to a Computer 131 System Requirements 131 Installing and Uninstalling Canon XF Utility (Windows) 132 Installing and Uninstalling Canon XF Utility (Mac OS) 134 Viewing the Software Instruction Manuals 137 7. 9 Clip Operations 116 Using the Clip Menu 117 Displaying Clip Information 117 Adding e Marks or Z Marks 118 Deleting...
XF100 / XF105 Instruction Manual
Page 10
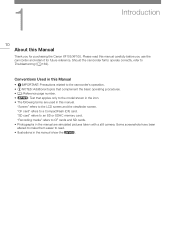
1 Introduction 10 About this Manual Thank you use the camcorder and retain it for purchasing the Canon XF105/XF100. "Screen" refers to an SD or SDHC memory card. "SD card" refers to the LCD screen and the viewfinder screen. Some screenshots have been altered ...to make them easier to the model shown in this manual. "CF card" refers to Troubleshooting (0 162). Conventions Used in the icon...
1 Introduction 10 About this Manual Thank you use the camcorder and retain it for purchasing the Canon XF105/XF100. "Screen" refers to an SD or SDHC memory card. "SD card" refers to the LCD screen and the viewfinder screen. Some screenshots have been altered ...to make them easier to the model shown in this manual. "CF card" refers to Troubleshooting (0 162). Conventions Used in the icon...

XF100 / XF105 Instruction Manual
Page 11
... 88), you can find the function by selecting the 11 [J Other Functions] menu and then the [Rec Review] menu item. The arrow is used to refer to review the entire clip. For a detailed explanation, refer to abbreviate menu selections. Operating modes: mode, you cannot review a clip....; If the camcorder switched CF cards during a recording, the camcorder will play back the clip on the CF card most recently recorded on how to Using the Menus (0 28). Brackets [ ] are displayed on screen. Options [Entire Clip]: [Last 4 sec]: Allows you finish recording, press the U ...
... 88), you can find the function by selecting the 11 [J Other Functions] menu and then the [Rec Review] menu item. The arrow is used to refer to review the entire clip. For a detailed explanation, refer to abbreviate menu selections. Operating modes: mode, you cannot review a clip....; If the camcorder switched CF cards during a recording, the camcorder will play back the clip on the CF card most recently recorded on how to Using the Menus (0 28). Brackets [ ] are displayed on screen. Options [Entire Clip]: [Last 4 sec]: Allows you finish recording, press the U ...
XF100 / XF105 Instruction Manual
Page 21
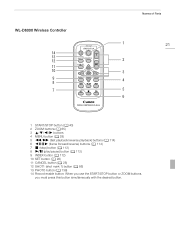
... (0 112) 10 SET button (0 28) 11 CANCEL button (0 28) 12 SHOT1 (shot mark 1) button (0 86) 13 PHOTO button (0 138) 14 Record enable button: When you use the START/STOP button or ZOOM buttons, you must press this button simultaneously with the desired button.
... (0 112) 10 SET button (0 28) 11 CANCEL button (0 28) 12 SHOT1 (shot mark 1) button (0 86) 13 PHOTO button (0 138) 14 Record enable button: When you use the START/STOP button or ZOOM buttons, you must press this button simultaneously with the desired button.
XF100 / XF105 Instruction Manual
Page 22
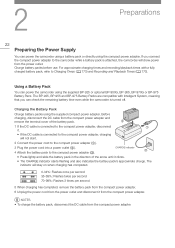
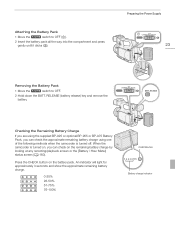
...Pack You can check the remaining battery time even while the camcorder is turned off. Charging the Battery Pack Charge battery packs using the compact power adapter. For approximate charging times and recording/playback times with Intelligent System, meaning that you connect the compact ... the compact power adapter. 2 Preparations 22 Preparing the Power Supply You can power the camcorder using a battery pack or directly using the supplied compact power adapter. If you can power the camcorder using the supplied BP-925 or optional BP-950G, BP-955, BP-970G or BP-975 Battery...
...Pack You can check the remaining battery time even while the camcorder is turned off. Charging the Battery Pack Charge battery packs using the compact power adapter. For approximate charging times and recording/playback times with Intelligent System, meaning that you connect the compact ... the compact power adapter. 2 Preparations 22 Preparing the Power Supply You can power the camcorder using a battery pack or directly using the supplied compact power adapter. If you can power the camcorder using the supplied BP-925 or optional BP-950G, BP-955, BP-970G or BP-975 Battery...
XF100 / XF105 Instruction Manual
Page 23
... the approximate remaining battery charge. 0-25% 26-50% 51-75% 76-100% CHECKbutton 0 100% Battery charge indicator Checking the Remaining Battery Charge If you are using the supplied BP-925 or optional BP-955 or BP-975 Battery Pack, you can check the approximate remaining battery charge... using one of the following methods when the camcorder is turned on, you can check on the battery pack. Preparing the Power Supply 23 Removing the ...
... the approximate remaining battery charge. 0-25% 26-50% 51-75% 76-100% CHECKbutton 0 100% Battery charge indicator Checking the Remaining Battery Charge If you are using the supplied BP-925 or optional BP-955 or BP-975 Battery Pack, you can check the approximate remaining battery charge... using one of the following methods when the camcorder is turned on, you can check on the battery pack. Preparing the Power Supply 23 Removing the ...
XF100 / XF105 Instruction Manual
Page 24
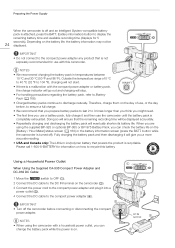
... Hour Meter] status screen (0 160) or the battery information screen (press the BATT. Fully charging the battery pack and then discharging it and then use with a household power outlet, you can check the battery life on the camcorder (ባ). 3 Connect the power cord to the compact power adapter and... plug it into a power outlet (ቤ). 4 Connect the DC cable to recycle this camcorder. Using a Household Power Outlet When Using the Supplied CA-930 Compact Power Adapter and DC-930 DC Cable: 1 Move the d switch to OFF (ቢ). 2 Connect the ...
... Hour Meter] status screen (0 160) or the battery information screen (press the BATT. Fully charging the battery pack and then discharging it and then use with a household power outlet, you can check the battery life on the camcorder (ባ). 3 Connect the power cord to the compact power adapter and... plug it into a power outlet (ቤ). 4 Connect the DC cable to recycle this camcorder. Using a Household Power Outlet When Using the Supplied CA-930 Compact Power Adapter and DC-930 DC Cable: 1 Move the d switch to OFF (ቢ). 2 Connect the ...

XF100 / XF105 Instruction Manual
Page 25
...: CAMERA ( ) mode for making recordings and MEDIA ( ) mode for mode. CAMERA mode MEDIA mode To turn off . Preparing the Power Supply When Using the Optional CA-920 Compact Power Adapter and DC-920 DC Coupler: 1 Move the d switch to OFF (ቢ). 2 Attach the DC coupler to the...OFF indicator will illuminate in green. IMPORTANT • Turn off the camcorder before connecting or disconnecting the compact power adapter. Select the operating mode using the d switch. The ON/OFF indicator will turn on the camcorder Hold down the button on the d switch and move it into a power...
...: CAMERA ( ) mode for making recordings and MEDIA ( ) mode for mode. CAMERA mode MEDIA mode To turn off . Preparing the Power Supply When Using the Optional CA-920 Compact Power Adapter and DC-920 DC Coupler: 1 Move the d switch to OFF (ቢ). 2 Attach the DC coupler to the...OFF indicator will illuminate in green. IMPORTANT • Turn off the camcorder before connecting or disconnecting the compact power adapter. Select the operating mode using the d switch. The ON/OFF indicator will turn on the camcorder Hold down the button on the d switch and move it into a power...
XF100 / XF105 Instruction Manual
Page 26
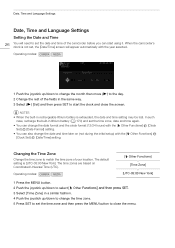
... and time later on Coordinated Universal Time (UTC). NOTES • When the built-in the same way. 3 Select (A) [Set] and then press SET to start using it. Operating modes: 1 Push the joystick up /down to change the time zone. 5 Press SET to set the time zone and then press the MENU...
... and time later on Coordinated Universal Time (UTC). NOTES • When the built-in the same way. 3 Select (A) [Set] and then press SET to start using it. Operating modes: 1 Push the joystick up /down to change the time zone. 5 Press SET to set the time zone and then press the MENU...
XF100 / XF105 Instruction Manual
Page 27
Operating modes: [J Other Functions] [Language o] [English] 1 Press the MENU button. 2 Push the joystick up /down to select [J Other Functions]. 3 Select [Language o] in a similar fashion. 4 Use the joystick to select a language. 5 Press SET to select the language and then press the MENU button to close the menu. Date, Time and Language ...
Operating modes: [J Other Functions] [Language o] [English] 1 Press the MENU button. 2 Push the joystick up /down to select [J Other Functions]. 3 Select [Language o] in a similar fashion. 4 Use the joystick to select a language. 5 Press SET to select the language and then press the MENU button to close the menu. Date, Time and Language ...

XF100 / XF105 Instruction Manual
Page 28
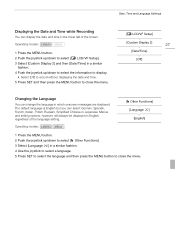
Using the Menus Using the Menus In mode, many menu items, a scroll bar will appear on the menu item, additional selections may be adjusted from the Menu The following ...
Using the Menus Using the Menus In mode, many menu items, a scroll bar will appear on the menu item, additional selections may be adjusted from the Menu The following ...

XF100 / XF105 Instruction Manual
Page 29
Using the Menus NOTES • Unavailable items may appear grayed out. • Pressing the MENU button at any time closes the menu. • When using the wireless controller, use the h, i, f, g and SET buttons in the same way as the 29 camcorder's joystick. • You can check the current settings on the status screens (0 156).
Using the Menus NOTES • Unavailable items may appear grayed out. • Pressing the MENU button at any time closes the menu. • When using the wireless controller, use the h, i, f, g and SET buttons in the same way as the 29 camcorder's joystick. • You can check the current settings on the status screens (0 156).
XF100 / XF105 Instruction Manual
Page 30
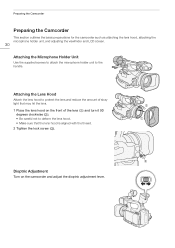
... camcorder such as attaching the lens hood, attaching the microphone holder unit, and adjusting the viewfinder and LCD screen. 30 Attaching the Microphone Holder Unit Use the supplied screws to attach the microphone holder unit to deform the lens hood. • Make sure that may hit the lens. 1 Place the lens...
... camcorder such as attaching the lens hood, attaching the microphone holder unit, and adjusting the viewfinder and LCD screen. 30 Attaching the Microphone Holder Unit Use the supplied screws to attach the microphone holder unit to deform the lens hood. • Make sure that may hit the lens. 1 Place the lens...


