
MP520 series Quick Start Guide
Page 5
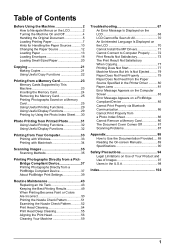
... an Ink Tank 43 Keeping the Best Printing Results 49 When Printing Becomes Faint or Colors Are Incorrect 50 Printing the Nozzle Check Pattern 51 Examining the Nozzle Check Pattern ...........52 Print Head Cleaning 54 Print Head Deep Cleaning 55 Aligning the Print Head 56 Cleaning Your Machine 59 Troubleshooting 67 An Error Message Is Displayed on the LCD 68...
... an Ink Tank 43 Keeping the Best Printing Results 49 When Printing Becomes Faint or Colors Are Incorrect 50 Printing the Nozzle Check Pattern 51 Examining the Nozzle Check Pattern ...........52 Print Head Cleaning 54 Print Head Deep Cleaning 55 Aligning the Print Head 56 Cleaning Your Machine 59 Troubleshooting 67 An Error Message Is Displayed on the LCD 68...
MP520 series Quick Start Guide
Page 8
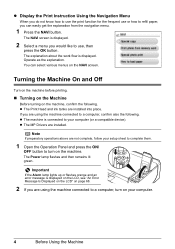
... about the work flow is displayed on the LCD, see "An Error Message Is Displayed on the LCD" on the NAVI screen. If you are using the machine connected to a computer, turn on your computer. 4 Before Using the Machine z The Print Head and ink tanks are not complete, follow your computer (or a compatible...
... about the work flow is displayed on the LCD, see "An Error Message Is Displayed on the LCD" on the NAVI screen. If you are using the machine connected to a computer, turn on your computer. 4 Before Using the Machine z The Print Head and ink tanks are not complete, follow your computer (or a compatible...
MP520 series Quick Start Guide
Page 47
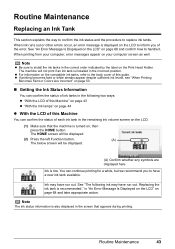
When printing from your computer, error messages appear on the Print Head Holder. Note z Be sure to install the ink tanks in the incorrect position. Replacing the ink tank is installed in the correct order indicated by ...the label on your computer screen as well. in the remaining ink volume screen on page 44 z With the LCD of this guide. See "An Error...
When printing from your computer, error messages appear on the Print Head Holder. Note z Be sure to install the ink tanks in the incorrect position. Replacing the ink tank is installed in the correct order indicated by ...the label on your computer screen as well. in the remaining ink volume screen on page 44 z With the LCD of this guide. See "An Error...
MP520 series Quick Start Guide
Page 48
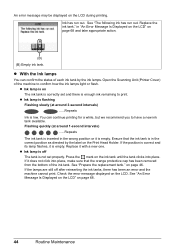
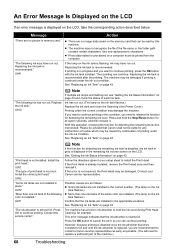
...is empty. Replace it is low. See "An Error Message Is Displayed on the LCD" on page 68 and take appropriate action. (B) (B) Empty ink tank. z Ink lamp is on the Print Head Holder. If it is correctly set properly. on the LCD during printing. Replace the ink tank." Ensure that the orange ...46. If the position is off after reinserting the ink tanks, there has been an error and the machine cannot print. z Ink lamp is correct and its lamp flashes, it with a new one. Check the error message displayed on the ink tank until the tank clicks into place, make sure that ...
...is empty. Replace it is low. See "An Error Message Is Displayed on the LCD" on page 68 and take appropriate action. (B) (B) Empty ink tank. z Ink lamp is on the Print Head Holder. If it is correctly set properly. on the LCD during printing. Replace the ink tank." Ensure that the orange ...46. If the position is off after reinserting the ink tanks, there has been an error and the machine cannot print. z Ink lamp is correct and its lamp flashes, it with a new one. Check the error message displayed on the ink tank until the tank clicks into place, make sure that ...
MP520 series Quick Start Guide
Page 52
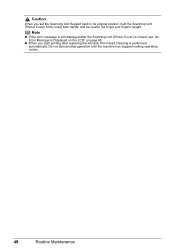
Do not start printing after the Scanning Unit (Printer Cover) is performed automatically. z When you set the Scanning Unit Support back to its original position, hold the Scanning Unit (Printer Cover) firmly using both hands, and be careful not to get your fingers caught. Note z If the error message is still displayed after replacing the ink tank, Print Head Cleaning is closed, see "An Error Message Is Displayed on the LCD" on page 68. Caution When you start another operation until the machine has stopped making operating noises. 48 Routine Maintenance
Do not start printing after the Scanning Unit (Printer Cover) is performed automatically. z When you set the Scanning Unit Support back to its original position, hold the Scanning Unit (Printer Cover) firmly using both hands, and be careful not to get your fingers caught. Note z If the error message is still displayed after replacing the ink tank, Print Head Cleaning is closed, see "An Error Message Is Displayed on the LCD" on page 68. Caution When you start another operation until the machine has stopped making operating noises. 48 Routine Maintenance
MP520 series Quick Start Guide
Page 72
... take the corresponding action described below. Please be advised that can be printed from the computer. U051 "The type of print head is replaced, you are not installed in progress and you need to contact a Canon service representative as early as follows: z Some ink tanks are not ... ink tank flashes.) Confirm that the ink absorber is not resolved, the Print Head may be damaged. Press and hold the ink used during Print Head Cleaning, for detecting the remaining ink level. If the error is nearly full. Contact your setup sheet to release the function for example...
... take the corresponding action described below. Please be advised that can be printed from the computer. U051 "The type of print head is replaced, you are not installed in progress and you need to contact a Canon service representative as early as follows: z Some ink tanks are not ... ink tank flashes.) Confirm that the ink absorber is not resolved, the Print Head may be damaged. Press and hold the ink used during Print Head Cleaning, for detecting the remaining ink level. If the error is nearly full. Contact your setup sheet to release the function for example...
MP520 series Quick Start Guide
Page 78
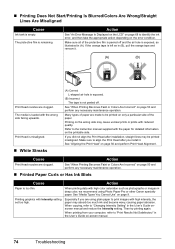
..., refer to identify the ink error, and then take the appropriate action depending on page 68 to "Changing Intensity Setting" in the User's Guide onscreen manual and reduce the Intensity setting. If the orange tape is too thin. Printing on page 50 and perform any...using Photo Paper Pro or other Canon specialty paper. See "When Printing Becomes Faint or Colors Are Incorrect" on page 56 and perform Print Head Alignment. See "Aligning the Print Head" on page 50 and perform any necessary maintenance operation. „ Printing Does Not Start/Printing Is Blurred/Colors Are Wrong/...
..., refer to identify the ink error, and then take the appropriate action depending on page 68 to "Changing Intensity Setting" in the User's Guide onscreen manual and reduce the Intensity setting. If the orange tape is too thin. Printing on page 50 and perform any...using Photo Paper Pro or other Canon specialty paper. See "When Printing Becomes Faint or Colors Are Incorrect" on page 56 and perform Print Head Alignment. See "Aligning the Print Head" on page 50 and perform any necessary maintenance operation. „ Printing Does Not Start/Printing Is Blurred/Colors Are Wrong/...

MP520 series Quick Start Guide
Page 83
... if the paper you load paper in the Rear Tray or Front Tray, regardless of the sheets before loading. Check to identify the ink error, and then take the appropriate action depending on page 9. Cleaning the Paper Feed Roller will wear the roller, so perform this procedure only...Roller Cleaning)" on page 50 and perform any necessary maintenance operations. Machine Moves But Ink Is Not Ejected Cause Print Head nozzles are printing on is not too thick or curled. Action See "When Printing Becomes Faint or Colors Are Incorrect" on page 61. For details on cleaning, see "Loading Paper" on ...
... if the paper you load paper in the Rear Tray or Front Tray, regardless of the sheets before loading. Check to identify the ink error, and then take the appropriate action depending on page 9. Cleaning the Paper Feed Roller will wear the roller, so perform this procedure only...Roller Cleaning)" on page 50 and perform any necessary maintenance operations. Machine Moves But Ink Is Not Ejected Cause Print Head nozzles are printing on is not too thick or curled. Action See "When Printing Becomes Faint or Colors Are Incorrect" on page 61. For details on cleaning, see "Loading Paper" on ...
MP520 series Quick Start Guide
Page 89
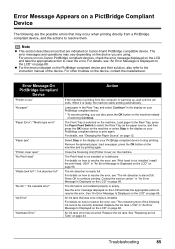
...errors on non-Canon PictBridge compliant devices, check the error message displayed on the LCD and take the appropriate action to print again. For other troubles on the machine. Load paper in the Rear Tray, and select Continue* in use" "No paper" "Paper Error" / "Media type error" "Paper jam" "Printer cover open" "No Print Head..." "Waste tank full" / "Ink absorber full" "No ink" / "Ink cassette error" "Ink Error" "Hardware Error" Action If the machine is printing from a PictBridge compliant ...
...errors on non-Canon PictBridge compliant devices, check the error message displayed on the LCD and take the appropriate action to print again. For other troubles on the machine. Load paper in the Rear Tray, and select Continue* in use" "No paper" "Paper Error" / "Media type error" "Paper jam" "Printer cover open" "No Print Head..." "Waste tank full" / "Ink absorber full" "No ink" / "Ink cassette error" "Ink Error" "Hardware Error" Action If the machine is printing from a PictBridge compliant ...
MP520 series Easy Setup Instructions
Page 1
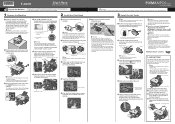
...to "Cleaning Your Machine" in the Rear Tray with the print side facing UP. If the Print Head is tilted forward, or the Print Head Lock Lever is pressed only halfway down, raise the Print Head Lock Lever and remove the Print Head, and then reinstall the Print Head. • If the Scanning Unit (Printer Cover) is ... is displayed, press the OK button. Refer to "Aligning the Print Head" in "Routine Maintenance" of the Quick Start Guide. • If the Alarm lamp is lit and an error message is displayed on the LCD, refer to "An Error Message Is Displayed on the LCD" in "Troubleshooting" of the ...
...to "Cleaning Your Machine" in the Rear Tray with the print side facing UP. If the Print Head is tilted forward, or the Print Head Lock Lever is pressed only halfway down, raise the Print Head Lock Lever and remove the Print Head, and then reinstall the Print Head. • If the Scanning Unit (Printer Cover) is ... is displayed, press the OK button. Refer to "Aligning the Print Head" in "Routine Maintenance" of the Quick Start Guide. • If the Alarm lamp is lit and an error message is displayed on the LCD, refer to "An Error Message Is Displayed on the LCD" in "Troubleshooting" of the ...


