
MP520 series Quick Start Guide
Page 5
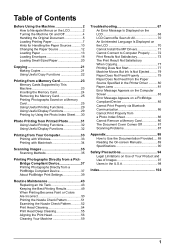
... Routine Maintenance 43 Replacing an Ink Tank 43 Keeping the Best Printing Results 49 When Printing Becomes Faint or Colors Are Incorrect 50 Printing the Nozzle Check Pattern 51 Examining the Nozzle Check Pattern ...........52 Print Head Cleaning 54 Print Head Deep Cleaning 55 Aligning the Print Head 56 Cleaning Your Machine 59 Troubleshooting 67 An Error Message Is...
... Routine Maintenance 43 Replacing an Ink Tank 43 Keeping the Best Printing Results 49 When Printing Becomes Faint or Colors Are Incorrect 50 Printing the Nozzle Check Pattern 51 Examining the Nozzle Check Pattern ...........52 Print Head Cleaning 54 Print Head Deep Cleaning 55 Aligning the Print Head 56 Cleaning Your Machine 59 Troubleshooting 67 An Error Message Is...
MP520 series Quick Start Guide
Page 8
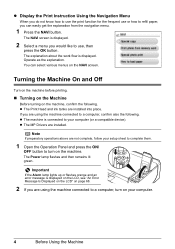
... the Machine Before turning on your computer (or a compatible device). z Display the Print Instruction Using the Navigation Menu When you do not know how to use the print function for the frequent use , then press the OK button. z The Print Head and ink tanks are installed. z The machine is displayed on the LCD, see...
... the Machine Before turning on your computer (or a compatible device). z Display the Print Instruction Using the Navigation Menu When you do not know how to use the print function for the frequent use , then press the OK button. z The Print Head and ink tanks are installed. z The machine is displayed on the LCD, see...
MP520 series Quick Start Guide
Page 47
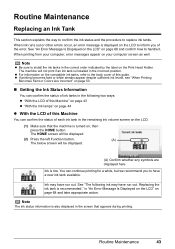
... Ink is recommended." Ink may have a new ink tank available. Routine Maintenance 43 z For information on the LCD. (1) Make sure that appears during printing. You can confirm the status of this guide. in the correct order indicated by the label on page 44 z With the LCD of this Machine..." on page 43 z "With the Ink lamps" on the Print Head Holder. See "The following two ways: z "With the LCD of this Machine You can continue printing for a while, but we recommend you of the error. Replacing the ink tank is low. Note The...
... Ink is recommended." Ink may have a new ink tank available. Routine Maintenance 43 z For information on the LCD. (1) Make sure that appears during printing. You can confirm the status of this guide. in the correct order indicated by the label on page 44 z With the LCD of this Machine..." on page 43 z "With the Ink lamps" on the Print Head Holder. See "The following two ways: z "With the LCD of this Machine You can continue printing for a while, but we recommend you of the error. Replacing the ink tank is low. Note The...
MP520 series Quick Start Guide
Page 48
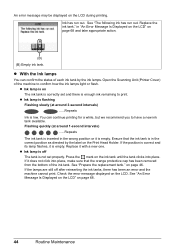
...inserted in "An Error Message Is Displayed on the LCD" on the Print Head Holder. Check the error message displayed on page 46. Open the Scanning Unit (Printer Cover) of the machine... If it is off after reinserting the ink tanks, there has been an error and the machine cannot print. z Ink lamp is empty. If the lamps are still off The tank is not set and there...intervals) ......Repeats Ink is empty. See "An Error Message Is Displayed on the LCD" on the LCD during printing. See "The following ink has run out. See "Prepare the replacement tank." An error message may be displayed...
...inserted in "An Error Message Is Displayed on the LCD" on the Print Head Holder. Check the error message displayed on page 46. Open the Scanning Unit (Printer Cover) of the machine... If it is off after reinserting the ink tanks, there has been an error and the machine cannot print. z Ink lamp is empty. If the lamps are still off The tank is not set and there...intervals) ......Repeats Ink is empty. See "An Error Message Is Displayed on the LCD" on the LCD during printing. See "The following ink has run out. See "Prepare the replacement tank." An error message may be displayed...
MP520 series Quick Start Guide
Page 49
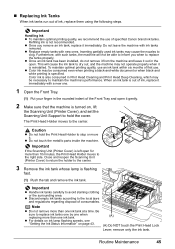
... months of specified Canon brand ink tanks. Important If the Scanning Unit (Printer Cover) is reinstalled. z For details on ink lamp flashing speeds, see "Getting the Ink Status Information" on , lift the Scanning Unit (Printer Cover), and set the Scanning Unit Support to hold the Print Head Holder to stop...the machine is out of the Front Tray and open . When an ink tank is turned on page 43. (A) (A) Do NOT touch the Print Head Lock Lever; Be sure to clog. Inserting partially used ink tanks may not operate properly when it immediately. Important z Handle ink tanks carefully to...
... months of specified Canon brand ink tanks. Important If the Scanning Unit (Printer Cover) is reinstalled. z For details on ink lamp flashing speeds, see "Getting the Ink Status Information" on , lift the Scanning Unit (Printer Cover), and set the Scanning Unit Support to hold the Print Head Holder to stop...the machine is out of the Front Tray and open . When an ink tank is turned on page 43. (A) (A) Do NOT touch the Print Head Lock Lever; Be sure to clog. Inserting partially used ink tanks may not operate properly when it immediately. Important z Handle ink tanks carefully to...
MP520 series Quick Start Guide
Page 51
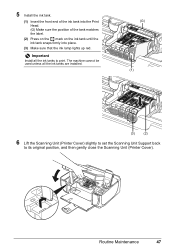
5 Install the ink tank. (1) Insert the front end of the ink tank into the Print Head. (G) Make sure the position of the tank matches the label. (2) Press on the mark on the ink tank until the ink tank snaps firmly into ... (Printer Cover). Important Install all the ink tanks are installed. (G) (1) (3) (2) 6 Lift the Scanning Unit (Printer Cover) slightly to set the Scanning Unit Support back to print.
5 Install the ink tank. (1) Insert the front end of the ink tank into the Print Head. (G) Make sure the position of the tank matches the label. (2) Press on the mark on the ink tank until the ink tank snaps firmly into ... (Printer Cover). Important Install all the ink tanks are installed. (G) (1) (3) (2) 6 Lift the Scanning Unit (Printer Cover) slightly to set the Scanning Unit Support back to print.
MP520 series Quick Start Guide
Page 52
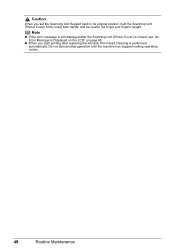
z When you set the Scanning Unit Support back to its original position, hold the Scanning Unit (Printer Cover) firmly using both hands, and be careful not to get your fingers caught. Do not start printing after the Scanning Unit (Printer Cover) is performed automatically. Note z If the error message is still displayed after replacing the ink tank, Print Head Cleaning is closed, see "An Error Message Is Displayed on the LCD" on page 68. Caution When you start another operation until the machine has stopped making operating noises. 48 Routine Maintenance
z When you set the Scanning Unit Support back to its original position, hold the Scanning Unit (Printer Cover) firmly using both hands, and be careful not to get your fingers caught. Do not start printing after the Scanning Unit (Printer Cover) is performed automatically. Note z If the error message is still displayed after replacing the ink tank, Print Head Cleaning is closed, see "An Error Message Is Displayed on the LCD" on page 68. Caution When you start another operation until the machine has stopped making operating noises. 48 Routine Maintenance
MP520 series Quick Start Guide
Page 53
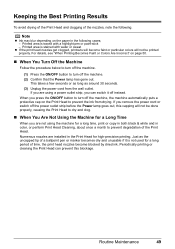
...- Just as around 30 seconds. (3) Unplug the power cord from drying. Routine Maintenance 49 For details, see "When Printing Becomes Faint or Colors Are Incorrect" on the Print Head to turn off the machine. (2) Confirm that the Power lamp has gone out. When you remove the power cord or...to turn off the machine. (1) Press the ON/OFF button to prevent the ink from the wall outlet. Printed area is not used for high-precision printing. Periodically printing or cleaning the Print Head can switch it is stained with a highlight pen or paint-stick - This takes a few seconds or ...
...- Just as around 30 seconds. (3) Unplug the power cord from drying. Routine Maintenance 49 For details, see "When Printing Becomes Faint or Colors Are Incorrect" on the Print Head to turn off the machine. (2) Confirm that the Power lamp has gone out. When you remove the power cord or...to turn off the machine. (1) Press the ON/OFF button to prevent the ink from the wall outlet. Printed area is not used for high-precision printing. Periodically printing or cleaning the Print Head can switch it is stained with a highlight pen or paint-stick - This takes a few seconds or ...
MP520 series Quick Start Guide
Page 54
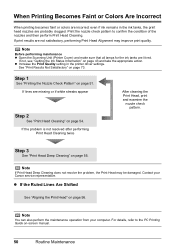
... You can also perform the maintenance operation from your Canon service representative. If the problem is not resolved after performing Print Head Cleaning twice After cleaning the Print Head, print and examine the nozzle check pattern. If print results are missing or if white streaks appear Step 2 See "Print Head Cleaning" on page 54. Note Before performing maintenance z Open...
... You can also perform the maintenance operation from your Canon service representative. If the problem is not resolved after performing Print Head Cleaning twice After cleaning the Print Head, print and examine the nozzle check pattern. If print results are missing or if white streaks appear Step 2 See "Print Head Cleaning" on page 54. Note Before performing maintenance z Open...
MP520 series Quick Start Guide
Page 55
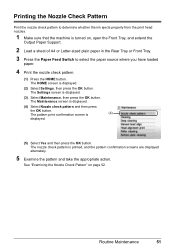
... screen is (4) displayed. (5) Select Yes and then press the OK button. The pattern print confirmation screen is displayed. (3) Select Maintenance, then press the OK button. The HOME screen is printed, and the pattern confirmation screens are displayed alternately. 5 Examine the pattern and take the... Paper Feed Switch to determine whether the ink ejects properly from the print head nozzles. 1 Make sure that the machine is turned on page 52. Routine Maintenance 51 Printing the Nozzle Check Pattern Print the nozzle check pattern to select the paper source where you have ...
... screen is (4) displayed. (5) Select Yes and then press the OK button. The pattern print confirmation screen is displayed. (3) Select Maintenance, then press the OK button. The HOME screen is printed, and the pattern confirmation screens are displayed alternately. 5 Examine the pattern and take the... Paper Feed Switch to determine whether the ink ejects properly from the print head nozzles. 1 Make sure that the machine is turned on page 52. Routine Maintenance 51 Printing the Nozzle Check Pattern Print the nozzle check pattern to select the paper source where you have ...
MP520 series Quick Start Guide
Page 57
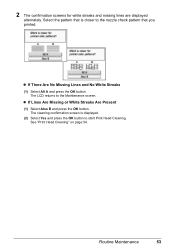
z If There Are No Missing Lines and No White Streaks (1) Select All A and press the OK button. See "Print Head Cleaning" on page 54. z If Lines Are Missing or White Streaks Are Present (1) Select Also B and press the OK button. Routine Maintenance 53 2 The ...confirmation screens for white streaks and missing lines are displayed alternately. Select the pattern that you printed. The cleaning confirmation screen is closer to the nozzle check pattern that is displayed. (2) Select Yes and press the OK button to the Maintenance screen...
z If There Are No Missing Lines and No White Streaks (1) Select All A and press the OK button. See "Print Head Cleaning" on page 54. z If Lines Are Missing or White Streaks Are Present (1) Select Also B and press the OK button. Routine Maintenance 53 2 The ...confirmation screens for white streaks and missing lines are displayed alternately. Select the pattern that you printed. The cleaning confirmation screen is closer to the nozzle check pattern that is displayed. (2) Select Yes and press the OK button to the Maintenance screen...
MP520 series Quick Start Guide
Page 58
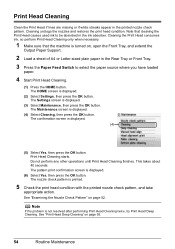
..., then press the OK button. The Maintenance screen is printed. 5 Check the print head condition with the printed nozzle check pattern, and take appropriate action. Print Head Cleaning starts. Do not perform any other operations until Print Head Cleaning finishes. Note that the machine is displayed. (2) ...Select Settings, then press the OK button. The confirmation screen is not resolved after performing Print Head Cleaning twice, try Print Head Deep Cleaning. See "Examining the Nozzle Check Pattern" on page 55. 54 Routine Maintenance Note If the problem is...
..., then press the OK button. The Maintenance screen is printed. 5 Check the print head condition with the printed nozzle check pattern, and take appropriate action. Print Head Cleaning starts. Do not perform any other operations until Print Head Cleaning finishes. Note that the machine is displayed. (2) ...Select Settings, then press the OK button. The confirmation screen is not resolved after performing Print Head Cleaning twice, try Print Head Deep Cleaning. See "Examining the Nozzle Check Pattern" on page 55. 54 Routine Maintenance Note If the problem is...
MP520 series Quick Start Guide
Page 59
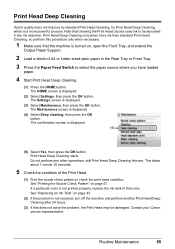
... press the OK button. Contact your Canon service representative. Routine Maintenance 55 The confirmation screen is displayed. (2) Select Settings, then press the OK button. See "Printing the Nozzle Check Pattern" on page 43. (2) If the problem is not resolved, turn off the machine and perform another Print Head Deep Cleaning after 24 hours. (3) If...
... press the OK button. Contact your Canon service representative. Routine Maintenance 55 The confirmation screen is displayed. (2) Select Settings, then press the OK button. See "Printing the Nozzle Check Pattern" on page 43. (2) If the problem is not resolved, turn off the machine and perform another Print Head Deep Cleaning after 24 hours. (3) If...

MP520 series Quick Start Guide
Page 60
... Settings, then press the OK button. The HOME screen is displayed. 56 Routine Maintenance Aligning the Print Head If ruled lines are printed misaligned or print results are otherwise unsatisfactory, adjust the print head position. 1 Make sure that the pattern is printed correctly, select Yes, then press the OK button. is displayed, confirm that the machine is...
... Settings, then press the OK button. The HOME screen is displayed. 56 Routine Maintenance Aligning the Print Head If ruled lines are printed misaligned or print results are otherwise unsatisfactory, adjust the print head position. 1 Make sure that the pattern is printed correctly, select Yes, then press the OK button. is displayed, confirm that the machine is...
MP520 series Quick Start Guide
Page 61
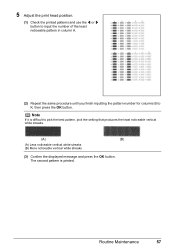
... second pattern is difficult to K, then press the OK button. Routine Maintenance 57 5 Adjust the print head position. (1) Check the printed patterns and use the [ or ] button to input the number of the least noticeable pattern in column A. (2) Repeat the same procedure until you finish inputting ...
... second pattern is difficult to K, then press the OK button. Routine Maintenance 57 5 Adjust the print head position. (1) Check the printed patterns and use the [ or ] button to input the number of the least noticeable pattern in column A. (2) Repeat the same procedure until you finish inputting ...
MP520 series Quick Start Guide
Page 63
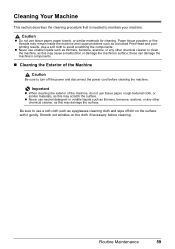
... surface with it gently. Routine Maintenance 59 Important z When cleaning the exterior of the Machine Caution Be sure to clean the machine, as a blocked Print Head and poor printing results. Cleaning Your Machine This section describes the cleaning procedure that is needed to avoid scratching the components. z Never use volatile liquids such as...
... surface with it gently. Routine Maintenance 59 Important z When cleaning the exterior of the Machine Caution Be sure to clean the machine, as a blocked Print Head and poor printing results. Cleaning Your Machine This section describes the cleaning procedure that is needed to avoid scratching the components. z Never use volatile liquids such as...
MP520 series Quick Start Guide
Page 72
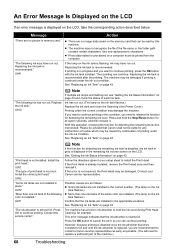
... want to continue printing in your Canon service representative. If you need to hold the Stop/Reset button for detecting the remaining ink level is disabled, the ink tank in gray is displayed in place." Press and hold the ink used during Print Head Cleaning, for detecting...be damaged. U072 "More than one ink tank of printing under the ink out condition. Contact the service center." If the Print Head is recommended. See "Replacing an Ink Tank" on the LCD. This error message indicates that Canon shall not be liable for detecting the remaining ink level...
... want to continue printing in your Canon service representative. If you need to hold the Stop/Reset button for detecting the remaining ink level is disabled, the ink tank in gray is displayed in place." Press and hold the ink used during Print Head Cleaning, for detecting...be damaged. U072 "More than one ink tank of printing under the ink out condition. Contact the service center." If the Print Head is recommended. See "Replacing an Ink Tank" on the LCD. This error message indicates that Canon shall not be liable for detecting the remaining ink level...
MP520 series Quick Start Guide
Page 78
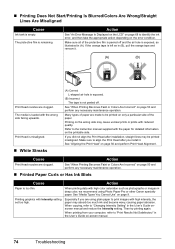
... much ink and become wavy, causing paper abrasion. When copying, refer to "Changing Intensity Setting" in the User's Guide on page 56 and perform Print Head Alignment. If you are using Photo Paper Pro or other Canon specialty paper. See "Media Types You Cannot Use" on the wrong side may be...all of the paper. If the orange tape is too thin. The media is exposed, as illustrated in (B), pull the orange tape and remove it . Print Head is misaligned. „ White Streaks (A) Correct L-shaped air hole is exposed. (B) Incorrect The tape is not peeled off and the air hole is loaded...
... much ink and become wavy, causing paper abrasion. When copying, refer to "Changing Intensity Setting" in the User's Guide on page 56 and perform Print Head Alignment. If you are using Photo Paper Pro or other Canon specialty paper. See "Media Types You Cannot Use" on the wrong side may be...all of the paper. If the orange tape is too thin. The media is exposed, as illustrated in (B), pull the orange tape and remove it . Print Head is misaligned. „ White Streaks (A) Correct L-shaped air hole is exposed. (B) Incorrect The tape is not peeled off and the air hole is loaded...
MP520 series Quick Start Guide
Page 79
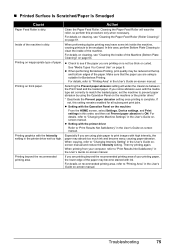
..." in the User's Guide on page 9. Cleaning the Paper Feed Roller will widen the clearance between the Print Head and the loaded paper. When performing duplex printing may be smudged. When copying, refer to "Changing the Machine Settings" in the User's Guide on thick paper. ...See "Media Types You Cannot Use" on -screen manual. If you are printing beyond the recommended printing area. When printing from your printing paper, the lower edge of the machine is dirty. Printing on -screen manual. Especially if you notice abrasion even with ink. z Setting with ...
..." in the User's Guide on page 9. Cleaning the Paper Feed Roller will widen the clearance between the Print Head and the loaded paper. When performing duplex printing may be smudged. When copying, refer to "Changing the Machine Settings" in the User's Guide on thick paper. ...See "Media Types You Cannot Use" on -screen manual. If you are printing beyond the recommended printing area. When printing from your printing paper, the lower edge of the machine is dirty. Printing on -screen manual. Especially if you notice abrasion even with ink. z Setting with ...
MP520 series Quick Start Guide
Page 80
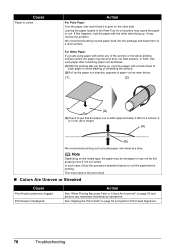
...recommend putting unused paper back into the package and keep them on page 50 and perform any of plain paper to curl the paper before printing. Print Head is within approximately 0.08 to 0.2 inches / 2 to curl. This may resolve the problem. Leaving the paper loaded in the Rear ...sheet at a time. Note Depending on page 56 and perform Print Head Alignment. 76 Troubleshooting Action See "When Printing Becomes Faint or Colors Are Incorrect" on a level surface. Use such paper after correcting paper curl as follows. (1)With the printing side (A) facing up, cover the paper with a fresh ...
...recommend putting unused paper back into the package and keep them on page 50 and perform any of plain paper to curl the paper before printing. Print Head is within approximately 0.08 to 0.2 inches / 2 to curl. This may resolve the problem. Leaving the paper loaded in the Rear ...sheet at a time. Note Depending on page 56 and perform Print Head Alignment. 76 Troubleshooting Action See "When Printing Becomes Faint or Colors Are Incorrect" on a level surface. Use such paper after correcting paper curl as follows. (1)With the printing side (A) facing up, cover the paper with a fresh ...


