
MP520 series Quick Start Guide
Page 5
... Machine Moves But Ink Is Not Ejected......... 79 Paper Does Not Feed Properly 79 Paper Does Not Feed from the Paper Source Specified in the Printer Driver .......... 80 Paper Jams 81 Error Message Appears on the Computer Screen 83 Error Message Appears on a PictBridge Compliant Device 85 Cannot Print Properly via...
... Machine Moves But Ink Is Not Ejected......... 79 Paper Does Not Feed Properly 79 Paper Does Not Feed from the Paper Source Specified in the Printer Driver .......... 80 Paper Jams 81 Error Message Appears on the Computer Screen 83 Error Message Appears on a PictBridge Compliant Device 85 Cannot Print Properly via...
MP520 series Quick Start Guide
Page 12
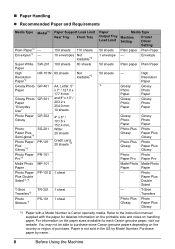
.... Photo Paper Plus Double Sided - T-Shirt Transfers Photo Plus Photo Glossy Paper Plus Glossy *1 Paper with the paper for each Canon genuine paper, visit our website. Refer to purchase some Canon genuine papers depending on handling paper. You may not be able to the instruction manual supplied with a Model Number is not... PP-101D 1 sheet Plus Double Sided*3, *4 T-Shirt Transfers*3 Photo Stickers*7 TR-301 1 sheet PS-101 1 sheet Paper Output Tray Load Limit Media Type Machine Setting Printer Driver Setting 50 sheets Plain paper Plain Paper 1 envelope -
.... Photo Paper Plus Double Sided - T-Shirt Transfers Photo Plus Photo Glossy Paper Plus Glossy *1 Paper with the paper for each Canon genuine paper, visit our website. Refer to purchase some Canon genuine papers depending on handling paper. You may not be able to the instruction manual supplied with a Model Number is not... PP-101D 1 sheet Plus Double Sided*3, *4 T-Shirt Transfers*3 Photo Stickers*7 TR-301 1 sheet PS-101 1 sheet Paper Output Tray Load Limit Media Type Machine Setting Printer Driver Setting 50 sheets Plain paper Plain Paper 1 envelope -
MP520 series Quick Start Guide
Page 14
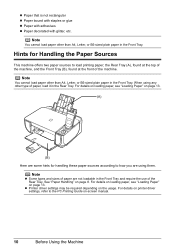
... (B) Here are using any other than A4, Letter, or B5-sized plain paper in the Rear Tray. See "Paper Handling" on the usage. z Printer driver settings may be required depending on page 8. z Paper that is not rectangular z Paper bound with staples or glue z Paper with adhesives z Paper ...decorated with glitter, etc. For details on loading paper, see "Loading Paper" on printer driver settings, refer to how you are some hints for Handling the Paper Sources This machine offers two paper sources to load printing paper; For...
... (B) Here are using any other than A4, Letter, or B5-sized plain paper in the Rear Tray. See "Paper Handling" on the usage. z Printer driver settings may be required depending on page 8. z Paper that is not rectangular z Paper bound with staples or glue z Paper with adhesives z Paper ...decorated with glitter, etc. For details on loading paper, see "Loading Paper" on printer driver settings, refer to how you are some hints for Handling the Paper Sources This machine offers two paper sources to load printing paper; For...
MP520 series Quick Start Guide
Page 16
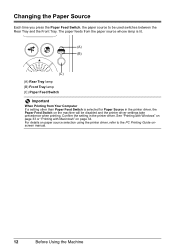
...Feed Switch Important When Printing from Your Computer If a setting other than Paper Feed Switch is selected for Paper Source in the printer driver. Confirm the setting in the printer driver, the Paper Feed Switch on the machine will be used switches between the Rear Tray and the Front Tray. Changing the... onscreen manual. 12 Before Using the Machine See "Printing with Windows" on page 33 or "Printing with Macintosh" on paper source selection using the printer driver, refer to be disabled and the printer driver settings take precedence when printing. For details on page 34.
...Feed Switch Important When Printing from Your Computer If a setting other than Paper Feed Switch is selected for Paper Source in the printer driver. Confirm the setting in the printer driver, the Paper Feed Switch on the machine will be used switches between the Rear Tray and the Front Tray. Changing the... onscreen manual. 12 Before Using the Machine See "Printing with Windows" on page 33 or "Printing with Macintosh" on paper source selection using the printer driver, refer to be disabled and the printer driver settings take precedence when printing. For details on page 34.
MP520 series Quick Start Guide
Page 17
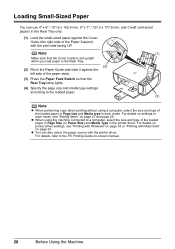
... before loading it. When Printing on Plain Paper z You can cause the paper to be jammed. (A) (B) Note z We recommend using genuine Canon photo media when printing photographs. See "Paper is curled, hold the opposing curled corners and gently bend them back into the package, and keep ... paper in the Rear Tray 1 Flatten the four corners of sheets from the Rear Tray, put them in landscape orientation (B) can use with its various printers, refer to "Using Specialty Media" on postcards affixed with photos or stickers. When printing on page 76. When you cut plain paper to 4" x 6" ...
... before loading it. When Printing on Plain Paper z You can cause the paper to be jammed. (A) (B) Note z We recommend using genuine Canon photo media when printing photographs. See "Paper is curled, hold the opposing curled corners and gently bend them back into the package, and keep ... paper in the Rear Tray 1 Flatten the four corners of sheets from the Rear Tray, put them in landscape orientation (B) can use with its various printers, refer to "Using Specialty Media" on postcards affixed with photos or stickers. When printing on page 76. When you cut plain paper to 4" x 6" ...
MP520 series Quick Start Guide
Page 18
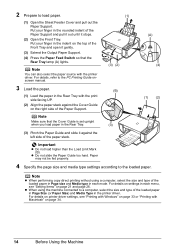
... the Cover Guide on the top of the loaded paper in Page Size (or Paper Size) and Media Type in the Rear Tray with the printer driver. Put your finger in the indent on the right side of the Paper Support. (1) (3) (2) (B) (A) (4) (1) (2) Note Make sure that the Rear Tray ...When performing copy direct printing without using the machine connected to the PC Printing Guide onscreen manual. 3 Load the paper. (1) Load the paper in the printer driver. For details, refer to a computer, select the size and type of the Front Tray and open it stops. (2) Open the Front Tray....
... the Cover Guide on the top of the loaded paper in Page Size (or Paper Size) and Media Type in the Rear Tray with the printer driver. Put your finger in the indent on the right side of the Paper Support. (1) (3) (2) (B) (A) (4) (1) (2) Note Make sure that the Rear Tray ...When performing copy direct printing without using the machine connected to the PC Printing Guide onscreen manual. 3 Load the paper. (1) Load the paper in the printer driver. For details, refer to a computer, select the size and type of the Front Tray and open it stops. (2) Open the Front Tray....
MP520 series Quick Start Guide
Page 19
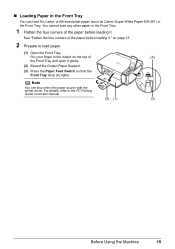
... paper before loading it. on -screen manual. (2) (1) (3) Before Using the Machine 15 Note You can load A4, Letter, or B5-sized plain paper (such as Canon Super White Paper SW-201) in the Front Tray. „ Loading Paper in the Front Tray You can also select the paper source with the... printer driver. For details, refer to the PC Printing Guide on page 13. 2 Prepare to load paper. (1) Open the Front Tray. You cannot load any other ...
... paper before loading it. on -screen manual. (2) (1) (3) Before Using the Machine 15 Note You can load A4, Letter, or B5-sized plain paper (such as Canon Super White Paper SW-201) in the Front Tray. „ Loading Paper in the Front Tray You can also select the paper source with the... printer driver. For details, refer to the PC Printing Guide on page 13. 2 Prepare to load paper. (1) Open the Front Tray. You cannot load any other ...
MP520 series Quick Start Guide
Page 21
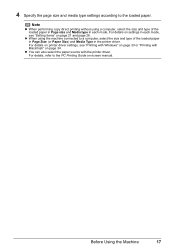
...26. z When using a computer, select the size and type of the loaded paper in Page Size (or Paper Size) and Media Type in the printer driver. z You can also select the paper source with Macintosh" on -screen manual. For details, refer to the loaded paper. Before Using the ...Machine 17 For details on printer driver settings, see "Setting Items" on settings in each mode, see "Printing with Windows" on page 33 or "Printing with the printer driver. 4 Specify the page size and media type settings according to the PC...
...26. z When using a computer, select the size and type of the loaded paper in Page Size (or Paper Size) and Media Type in the printer driver. z You can also select the paper source with Macintosh" on -screen manual. For details, refer to the loaded paper. Before Using the ...Machine 17 For details on printer driver settings, see "Setting Items" on settings in each mode, see "Printing with Windows" on page 33 or "Printing with the printer driver. 4 Specify the page size and media type settings according to the PC...
MP520 series Quick Start Guide
Page 22
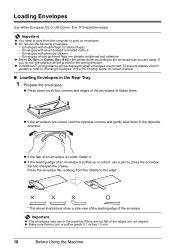
... direction. Env. #10-sized envelope. Envelopes with pressure stickers - To prevent display of an envelope is curled, flatten it. or Comm. Env. #10 in the printer driver according to "Printing Envelopes" in the PC Printing Guide on-screen manual. „ Loading Envelopes in the wrong direction. Important z You need to print...
... direction. Env. #10-sized envelope. Envelopes with pressure stickers - To prevent display of an envelope is curled, flatten it. or Comm. Env. #10 in the printer driver according to "Printing Envelopes" in the PC Printing Guide on-screen manual. „ Loading Envelopes in the wrong direction. Important z You need to print...

MP520 series Quick Start Guide
Page 23
.... (4) Press the Paper Feed Switch so that the Cover Guide is extended. (3) (4) (2) Load the envelope against the left . Note For details on printer driver settings, see "Printing with Windows" on page 33 or "Printing with the address side facing UP and the rear flaps DOWN on the left... side of the Paper Support. Important Make sure that the Rear Tray lamp lights up. 3 Specify the settings in the printer driver. (1) Select Envelope in the Rear Tray. (A) (A) Printing orientation (B) Make sure the flaps are folded. (3) Pinch the Paper Guide and slide it ...
.... (4) Press the Paper Feed Switch so that the Cover Guide is extended. (3) (4) (2) Load the envelope against the left . Note For details on printer driver settings, see "Printing with Windows" on page 33 or "Printing with the address side facing UP and the rear flaps DOWN on the left... side of the Paper Support. Important Make sure that the Rear Tray lamp lights up. 3 Specify the settings in the printer driver. (1) Select Envelope in the Rear Tray. (A) (A) Printing orientation (B) Make sure the flaps are folded. (3) Pinch the Paper Guide and slide it ...
MP520 series Quick Start Guide
Page 24
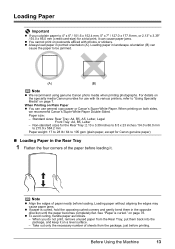
For details on printer driver settings, see "Setting Items" on page 21 and page 26. Note (1) Make sure that the Cover... in each mode. For details on settings in each mode, see "Printing with Windows" on page 33 or "Printing with the printer driver. For details, refer to a computer, select the size and type of the loaded paper in Page Size (or Paper Size... UP. z You can use 4" x 6" / 101.6 x 152.4 mm, 5" x 7" / 127.0 x 177.8 mm, and Credit card-sized papers in the printer driver. Loading Small-Sized Paper You can also select the paper source with Macintosh" on page 34.
For details on printer driver settings, see "Setting Items" on page 21 and page 26. Note (1) Make sure that the Cover... in each mode. For details on settings in each mode, see "Printing with Windows" on page 33 or "Printing with the printer driver. For details, refer to a computer, select the size and type of the loaded paper in Page Size (or Paper Size... UP. z You can use 4" x 6" / 101.6 x 152.4 mm, 5" x 7" / 127.0 x 177.8 mm, and Credit card-sized papers in the printer driver. Loading Small-Sized Paper You can also select the paper source with Macintosh" on page 34.

MP520 series Quick Start Guide
Page 37
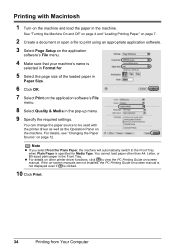
... the machine will automatically switch to view the online help or the PC Printing Guide on the application software's File menu. 4 Make sure that Canon XXX Printer (where "XXX" is specified for basic printing. See "Turning the Machine On and Off" on page 4 and "Loading Printing Paper" on page.... 3 Select Print on -screen manual. For details, see "Changing the Paper Source" on the machine and load the paper in Select Printer, and click Preferences (or Properties). 5 Specify the required settings and click OK. You can perform Borderless Printing in the Front Tray. Printing...
... the machine will automatically switch to view the online help or the PC Printing Guide on the application software's File menu. 4 Make sure that Canon XXX Printer (where "XXX" is specified for basic printing. See "Turning the Machine On and Off" on page 4 and "Loading Printing Paper" on page.... 3 Select Print on -screen manual. For details, see "Changing the Paper Source" on the machine and load the paper in Select Printer, and click Preferences (or Properties). 5 Specify the required settings and click OK. You can perform Borderless Printing in the Front Tray. Printing...
MP520 series Quick Start Guide
Page 38
... 1 Turn on -screen manual is not displayed even if is clicked. 10 Click Print. 34 Printing from Your Computer You cannot load paper other printer driver functions, click to print using an appropriate application software. 3 Select Page Setup on the application software's File menu. 4 Make sure that your... is specified for . 5 Select the page size of the loaded paper in the pop-up menu. 9 Specify the required settings. Printing with the printer driver as well as the Operation Panel on -screen manual. See "Turning the Machine On and Off" on page 4 and "Loading Printing Paper" on...
... 1 Turn on -screen manual is not displayed even if is clicked. 10 Click Print. 34 Printing from Your Computer You cannot load paper other printer driver functions, click to print using an appropriate application software. 3 Select Page Setup on the application software's File menu. 4 Make sure that your... is specified for . 5 Select the page size of the loaded paper in the pop-up menu. 9 Specify the required settings. Printing with the printer driver as well as the Operation Panel on -screen manual. See "Turning the Machine On and Off" on page 4 and "Loading Printing Paper" on...
MP520 series Quick Start Guide
Page 48
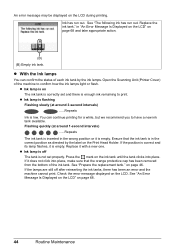
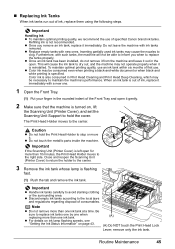
Ink has run out. Open the Scanning Unit (Printer Cover) of the machine to have a new ink tank available. If the position is correct and its lamp flashes, it with a new one. Check the ...
Ink has run out. Open the Scanning Unit (Printer Cover) of the machine to have a new ink tank available. If the position is correct and its lamp flashes, it with a new one. Check the ...
MP520 series Quick Start Guide
Page 49
...(A) (A) Do NOT touch the Print Head Lock Lever; The Print Head Holder moves to the local laws and regulations regarding disposal of specified Canon brand ink tanks. z Once an ink tank has been installed, do not remove it from the machine and leave it out in the rounded...them using the following steps. Important Handling Ink z To maintain optimal printing quality, we recommend the use . Close and reopen the Scanning Unit (Printer Cover) to return the holder to maintain the machine's performance. Note z Do not remove more than 10 minutes, the Print Head Holder moves to...
...(A) (A) Do NOT touch the Print Head Lock Lever; The Print Head Holder moves to the local laws and regulations regarding disposal of specified Canon brand ink tanks. z Once an ink tank has been installed, do not remove it from the machine and leave it out in the rounded...them using the following steps. Important Handling Ink z To maintain optimal printing quality, we recommend the use . Close and reopen the Scanning Unit (Printer Cover) to return the holder to maintain the machine's performance. Note z Do not remove more than 10 minutes, the Print Head Holder moves to...
MP520 series Quick Start Guide
Page 51
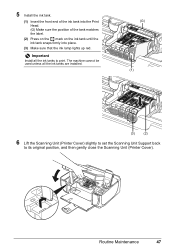
... cannot be used unless all the ink tanks to its original position, and then gently close the Scanning Unit (Printer Cover). Important Install all the ink tanks are installed. (G) (1) (3) (2) 6 Lift the Scanning Unit (Printer Cover) slightly to set the Scanning Unit Support back to print. 5 Install the ink tank. (1) Insert the front...
... cannot be used unless all the ink tanks to its original position, and then gently close the Scanning Unit (Printer Cover). Important Install all the ink tanks are installed. (G) (1) (3) (2) 6 Lift the Scanning Unit (Printer Cover) slightly to set the Scanning Unit Support back to print. 5 Install the ink tank. (1) Insert the front...
MP520 series Quick Start Guide
Page 52
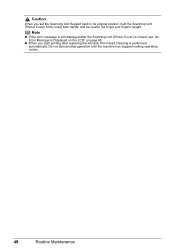
Note z If the error message is still displayed after replacing the ink tank, Print Head Cleaning is closed, see "An Error Message Is Displayed on the LCD" on page 68. Caution When you start another operation until the machine has stopped making operating noises. 48 Routine Maintenance Do not start printing after the Scanning Unit (Printer Cover) is performed automatically. z When you set the Scanning Unit Support back to its original position, hold the Scanning Unit (Printer Cover) firmly using both hands, and be careful not to get your fingers caught.
Note z If the error message is still displayed after replacing the ink tank, Print Head Cleaning is closed, see "An Error Message Is Displayed on the LCD" on page 68. Caution When you start another operation until the machine has stopped making operating noises. 48 Routine Maintenance Do not start printing after the Scanning Unit (Printer Cover) is performed automatically. z When you set the Scanning Unit Support back to its original position, hold the Scanning Unit (Printer Cover) firmly using both hands, and be careful not to get your fingers caught.
MP520 series Quick Start Guide
Page 54
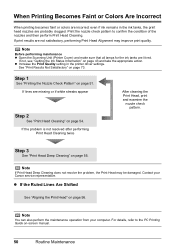
... pattern. Step 3 See "Print Head Deep Cleaning" on page 54. Note You can also perform the maintenance operation from your Canon service representative. Note Before performing maintenance z Open the Scanning Unit (Printer Cover) and make sure that all lamps for the ink tanks are lit red. When Printing Becomes Faint or Colors...
... pattern. Step 3 See "Print Head Deep Cleaning" on page 54. Note You can also perform the maintenance operation from your Canon service representative. Note Before performing maintenance z Open the Scanning Unit (Printer Cover) and make sure that all lamps for the ink tanks are lit red. When Printing Becomes Faint or Colors...
MP520 series Quick Start Guide
Page 71
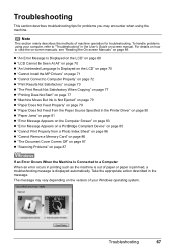
Troubleshooting 67 For details on how to a Computer When an error occurs in the Printer Driver" on page 80 z "Paper Jams" on page 81 z "Error Message Appears on the Computer Screen" on page 83 z "Error Message Appears on a PictBridge Compliant ...
Troubleshooting 67 For details on how to a Computer When an error occurs in the Printer Driver" on page 80 z "Paper Jams" on page 81 z "Error Message Appears on the Computer Screen" on page 83 z "Error Message Appears on a PictBridge Compliant ...
MP520 series Quick Start Guide
Page 72
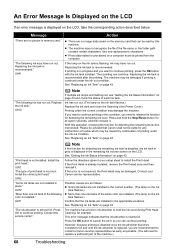
... becomes completely full and until the ink absorber is replaced, you want to continue printing in your Canon service representative. If printing is in progress and you are recommended to contact a Canon service representative as early as follows: z Some ink tanks are not installed in the remaining ink ... particular part of the same color are no image data saved on the ink tank flashes.) Replace the ink tank and close the Scanning Unit (Printer Cover). Replacing the ink tank is nearly full. "Print head is almost full. "The following ink has run out. U041 If the lamp...
... becomes completely full and until the ink absorber is replaced, you want to continue printing in your Canon service representative. If printing is in progress and you are recommended to contact a Canon service representative as early as follows: z Some ink tanks are not installed in the remaining ink ... particular part of the same color are no image data saved on the ink tank flashes.) Replace the ink tank and close the Scanning Unit (Printer Cover). Replacing the ink tank is nearly full. "Print head is almost full. "The following ink has run out. U041 If the lamp...


