

MP520 series Quick Start Guide
Page 2
Extended Service and Support - CarePAK must be purchased during your product's warranty period. CarePAK offers toll-free Canon technical support and includes Canon's superb InstantExchange product replacement program. Internet - Email Tech Support - Toll-Free Live Tech Support - (1-800-828-4040)...where to three full years of the product Model Number (located above the LCD Setup CD-ROM number (located on the CD-ROM Purchase Date Customer Technical Support Sequence* 1. www.canonesp.com Canon CarePAK Extended Service Plan is a cost-attractive and easy-to-use extended...
Extended Service and Support - CarePAK must be purchased during your product's warranty period. CarePAK offers toll-free Canon technical support and includes Canon's superb InstantExchange product replacement program. Internet - Email Tech Support - Toll-Free Live Tech Support - (1-800-828-4040)...where to three full years of the product Model Number (located above the LCD Setup CD-ROM number (located on the CD-ROM Purchase Date Customer Technical Support Sequence* 1. www.canonesp.com Canon CarePAK Extended Service Plan is a cost-attractive and easy-to-use extended...
MP520 series Quick Start Guide
Page 5
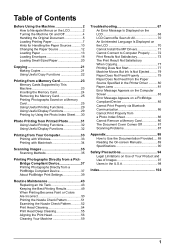
Table of Contents Before Using the Machine 2 How to Navigate Menus on the LCD 2 Turning the Machine On and Off 4 Handling the Original Document 5 Loading Printing Paper 7 Hints for Handling the Paper Sources ..........10 Changing the Paper Source 12 ... Aligning the Print Head 56 Cleaning Your Machine 59 Troubleshooting 67 An Error Message Is Displayed on the LCD 68 LCD Cannot Be Seen At All 70 An Unintended Language Is Displayed on the LCD 70 Cannot Install the MP Drivers 71 Cannot Connect to Computer Properly ........ 72 Print Results Not Satisfactory 73...
Table of Contents Before Using the Machine 2 How to Navigate Menus on the LCD 2 Turning the Machine On and Off 4 Handling the Original Document 5 Loading Printing Paper 7 Hints for Handling the Paper Sources ..........10 Changing the Paper Source 12 ... Aligning the Print Head 56 Cleaning Your Machine 59 Troubleshooting 67 An Error Message Is Displayed on the LCD 68 LCD Cannot Be Seen At All 70 An Unintended Language Is Displayed on the LCD 70 Cannot Install the MP Drivers 71 Cannot Connect to Computer Properly ........ 72 Print Results Not Satisfactory 73...
MP520 series Quick Start Guide
Page 6
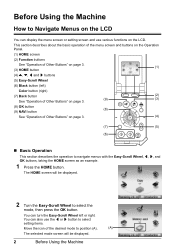
... Operation This section describes the operation to select the mode, then press the OK button. Before Using the Machine How to Navigate Menus on the LCD You can display the menu screen or setting screen and use the [ or ] button to select setting items. Move the icon of Other Buttons" on...
... Operation This section describes the operation to select the mode, then press the OK button. Before Using the Machine How to Navigate Menus on the LCD You can display the menu screen or setting screen and use the [ or ] button to select setting items. Move the icon of Other Buttons" on...
MP520 series Quick Start Guide
Page 7
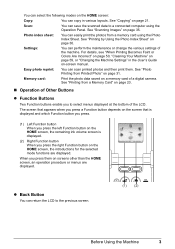
See "Copying" on a memory card of the LCD. For details, see "When Printing Becomes Faint or Colors Are Incorrect" on page 50, "Cleaning Your Machine" on page 59, or "Changing the Machine Settings" ... card: Print the photo data saved on page 21. When you to the previous screen. (1) (2) Before Using the Machine 3 z Back Button You can return the LCD to select menus displayed at the bottom of a digital camera. You can select the following modes on the HOME screen: Copy: You can copy in...
See "Copying" on a memory card of the LCD. For details, see "When Printing Becomes Faint or Colors Are Incorrect" on page 50, "Cleaning Your Machine" on page 59, or "Changing the Machine Settings" ... card: Print the photo data saved on page 21. When you to the previous screen. (1) (2) Before Using the Machine 3 z Back Button You can return the LCD to select menus displayed at the bottom of a digital camera. You can select the following modes on the HOME screen: Copy: You can copy in...
MP520 series Quick Start Guide
Page 8
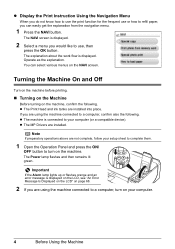
You can easily get the explanation from the navigation menu. 1 Press the NAVI button. z The machine is displayed on the LCD, see "An Error Message Is Displayed on the LCD" on page 68. 2 If you are using the machine connected to a computer, confirm also the following . The explanation about the work flow is...
You can easily get the explanation from the navigation menu. 1 Press the NAVI button. z The machine is displayed on the LCD, see "An Error Message Is Displayed on the LCD" on page 68. 2 If you are using the machine connected to a computer, confirm also the following . The explanation about the work flow is...
MP520 series Quick Start Guide
Page 9
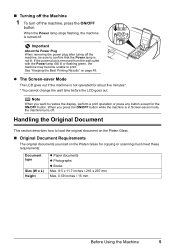
... unable to restore the display, perform a print operation or press any button except for about five minutes*. * You cannot change the wait time before the LCD goes out. „ Turning off the Machine 1 To turn off the machine, be sure to confirm that the Power lamp is not lit. Important About... document on page 49. When the Power lamp stops flashing, the machine is not operated for the ON/OFF button. z The Screen-saver Mode The LCD goes out if the machine is turned off . Note When you want to print.
... unable to restore the display, perform a print operation or press any button except for about five minutes*. * You cannot change the wait time before the LCD goes out. „ Turning off the Machine 1 To turn off the machine, be sure to confirm that the Power lamp is not lit. Important About... document on page 49. When the Power lamp stops flashing, the machine is not operated for the ON/OFF button. z The Screen-saver Mode The LCD goes out if the machine is turned off . Note When you want to print.

MP520 series Quick Start Guide
Page 33
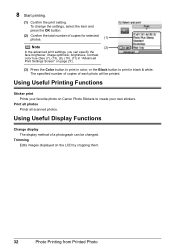
... print Prints your digital camera, if you pasted in the margin of a photograph can be changed. Captured info print Prints information on Canon Photo Stickers. Trimming Edits images displayed on the LCD by cropping them . Using Useful Display Functions Change display The display method of Photo index print or selected individual photos.
... print Prints your digital camera, if you pasted in the margin of a photograph can be changed. Captured info print Prints information on Canon Photo Stickers. Trimming Edits images displayed on the LCD by cropping them . Using Useful Display Functions Change display The display method of Photo index print or selected individual photos.
MP520 series Quick Start Guide
Page 35
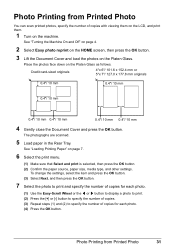
... print. (2) Press the [+] or [-] button to specify the number of copies. (3) Repeat steps (1) and (2) to specify the number of copies with viewing them on the LCD, and print them. 1 Turn on page 7. 6 Select the print menu. (1) Make sure that Select and print is selected, then press the OK button. (2) Confirm the...
... print. (2) Press the [+] or [-] button to specify the number of copies. (3) Repeat steps (1) and (2) to specify the number of copies with viewing them on the LCD, and print them. 1 Turn on page 7. 6 Select the print menu. (1) Make sure that Select and print is selected, then press the OK button. (2) Confirm the...
MP520 series Quick Start Guide
Page 36
Trimming Edits images displayed on Canon Photo Stickers to print in color, or the Black button to create your favorite photo on the LCD by cropping them. 32 Photo Printing from Printed Photo The specified number of copies of each photo will be changed. Print all photos Prints all ...
Trimming Edits images displayed on Canon Photo Stickers to print in color, or the Black button to create your favorite photo on the LCD by cropping them. 32 Photo Printing from Printed Photo The specified number of copies of each photo will be changed. Print all photos Prints all ...

MP520 series Quick Start Guide
Page 42
Note When printing directly from a PictBridge Compliant Device If your device does not turn on automatically, turn on the LCD of your PictBridge compliant device does not have to turn it to this machine according to the machine. Select the size and type of the ... sure that you may also have setting menu, change the setting from the machine. Do not load paper in the machine. Note Depending on the LCD of paper that the PictBridge compliant device is correctly connected. 3 Specify the print settings such as the paper source. You may have to the machine...
Note When printing directly from a PictBridge Compliant Device If your device does not turn on automatically, turn on the LCD of your PictBridge compliant device does not have to turn it to this machine according to the machine. Select the size and type of the ... sure that you may also have setting menu, change the setting from the machine. Do not load paper in the machine. Note Depending on the LCD of paper that the PictBridge compliant device is correctly connected. 3 Specify the print settings such as the paper source. You may have to the machine...
MP520 series Quick Start Guide
Page 47
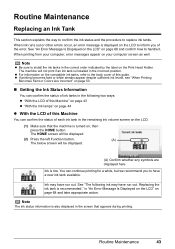
...turned on page 68 and take appropriate action. in the screen that the machine is also displayed in "An Error Message Is Displayed on the LCD" on , then press the HOME button. The machine will be displayed. (2) Press the left Function button. (A) The below screen will not... print if an ink tank is recommended." Routine Maintenance 43 See "An Error Message Is Displayed on the LCD" on your computer screen as well. The HOME screen will be displayed. (A) Confirm whether any symbols are displayed here. Routine Maintenance Replacing an...
...turned on page 68 and take appropriate action. in the screen that the machine is also displayed in "An Error Message Is Displayed on the LCD" on , then press the HOME button. The machine will be displayed. (2) Press the left Function button. (A) The below screen will not... print if an ink tank is recommended." Routine Maintenance 43 See "An Error Message Is Displayed on the LCD" on your computer screen as well. The HOME screen will be displayed. (A) Confirm whether any symbols are displayed here. Routine Maintenance Replacing an...
MP520 series Quick Start Guide
Page 48
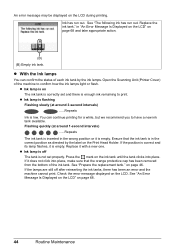
... page 68 and take appropriate action. (B) (B) Empty ink tank. See "An Error Message Is Displayed on the LCD" on The ink tank is correctly set properly. z Ink lamp is flashing Flashing slowly (at around 3-second intervals...tank is not set and there is enough ink remaining to print. Press the mark on the LCD during printing. An error message may be displayed on the ink tank until the tank clicks ... orange protective cap has been removed from the bottom of each ink tank by the label on the LCD. Ink has run out. z With the Ink lamps You can continue printing for a while, but...
... page 68 and take appropriate action. (B) (B) Empty ink tank. See "An Error Message Is Displayed on the LCD" on The ink tank is correctly set properly. z Ink lamp is flashing Flashing slowly (at around 3-second intervals...tank is not set and there is enough ink remaining to print. Press the mark on the LCD during printing. An error message may be displayed on the ink tank until the tank clicks ... orange protective cap has been removed from the bottom of each ink tank by the label on the LCD. Ink has run out. z With the Ink lamps You can continue printing for a while, but...
MP520 series Quick Start Guide
Page 52
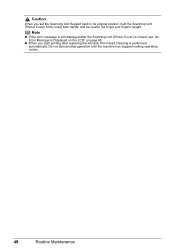
Do not start printing after the Scanning Unit (Printer Cover) is performed automatically. Note z If the error message is still displayed after replacing the ink tank, Print Head Cleaning is closed, see "An Error Message Is Displayed on the LCD" on page 68. Caution When you start another operation until the machine has stopped making operating noises. 48 Routine Maintenance z When you set the Scanning Unit Support back to its original position, hold the Scanning Unit (Printer Cover) firmly using both hands, and be careful not to get your fingers caught.
Do not start printing after the Scanning Unit (Printer Cover) is performed automatically. Note z If the error message is still displayed after replacing the ink tank, Print Head Cleaning is closed, see "An Error Message Is Displayed on the LCD" on page 68. Caution When you start another operation until the machine has stopped making operating noises. 48 Routine Maintenance z When you set the Scanning Unit Support back to its original position, hold the Scanning Unit (Printer Cover) firmly using both hands, and be careful not to get your fingers caught.
MP520 series Quick Start Guide
Page 57
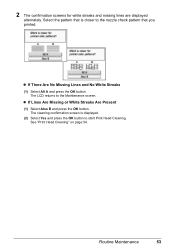
... press the OK button. z If There Are No Missing Lines and No White Streaks (1) Select All A and press the OK button. Routine Maintenance 53 The LCD returns to start Print Head Cleaning. The cleaning confirmation screen is closer to the nozzle check pattern that is displayed. (2) Select Yes and press the...
... press the OK button. z If There Are No Missing Lines and No White Streaks (1) Select All A and press the OK button. Routine Maintenance 53 The LCD returns to start Print Head Cleaning. The cleaning confirmation screen is closer to the nozzle check pattern that is displayed. (2) Select Yes and press the...
MP520 series Quick Start Guide
Page 71
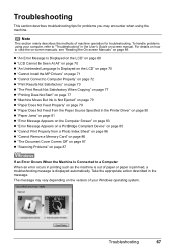
... Properly from the Paper Source Specified in the message. z "An Error Message Is Displayed on the LCD" on page 68 z "LCD Cannot Be Seen At All" on page 70 z "An Unintended Language Is Displayed on the LCD" on page 70 z "Cannot Install the MP Drivers" on page 71 z "Cannot Connect to a Computer When...
... Properly from the Paper Source Specified in the message. z "An Error Message Is Displayed on the LCD" on page 68 z "LCD Cannot Be Seen At All" on page 70 z "An Unintended Language Is Displayed on the LCD" on page 70 z "Cannot Install the MP Drivers" on page 71 z "Cannot Connect to a Computer When...
MP520 series Quick Start Guide
Page 72
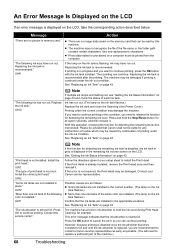
... "Replacing an Ink Tank" on page 43. Install the correct print head." Contact the service center." Follow the directions given in your Canon service representative. Contact your setup sheet to hold the Stop/Reset button for example. Use only alphanumeric characters. Replacing the ink tank is...Cleaning, for at least 5 seconds, and then release it . U052 "Some ink tanks are no image data saved on the LCD. Press OK to contact a Canon service representative as early as follows: z Some ink tanks are installed in place." Message Action "There are not installed in ...
... "Replacing an Ink Tank" on page 43. Install the correct print head." Contact the service center." Follow the directions given in your Canon service representative. Contact your setup sheet to hold the Stop/Reset button for example. Use only alphanumeric characters. Replacing the ink tank is...Cleaning, for at least 5 seconds, and then release it . U052 "Some ink tanks are no image data saved on the LCD. Press OK to contact a Canon service representative as early as follows: z Some ink tanks are installed in place." Message Action "There are not installed in ...
MP520 series Quick Start Guide
Page 73
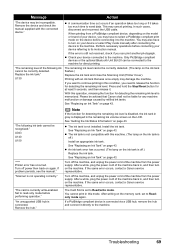
...back on the machine. If a PictBridge compliant device is memorized. Remove the device and check the manual supplied with an ink tank that Canon shall not be connected to its instruction manual. In such cases, disconnect and reconnect the USB cable. When printing from the power supply..... z The ink tank is set to the machine. z An ink tank error has occurred. (The lamp on the LCD. If the same error occurs, contact a Canon service representative. The Card Slot is not compatible with this operation, releasing the function for detecting the remaining ink level is disabled...
...back on the machine. If a PictBridge compliant device is memorized. Remove the device and check the manual supplied with an ink tank that Canon shall not be connected to its instruction manual. In such cases, disconnect and reconnect the USB cable. When printing from the power supply..... z The ink tank is set to the machine. z An ink tank error has occurred. (The lamp on the LCD. If the same error occurs, contact a Canon service representative. The Card Slot is not compatible with this operation, releasing the function for detecting the remaining ink level is disabled...
MP520 series Quick Start Guide
Page 74
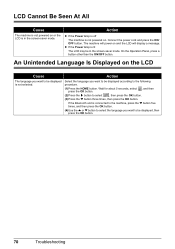
... the ] button to the following procedure. (1)Press the HOME button. Select the language you want to be displayed is not selected. LCD Cannot Be Seen At All Cause The machine is not powered on and the LCD will display a message. Action z If the Power lamp is off The machine is lit The... OK button. 70 Troubleshooting On the Operation Panel, press a button other than the ON/OFF button. z If the Power lamp is not powered on the LCD Cause Action The language you want to be in the screen-saver mode. Connect the power cord and press the ON/ OFF button.
... the ] button to the following procedure. (1)Press the HOME button. Select the language you want to be displayed is not selected. LCD Cannot Be Seen At All Cause The machine is not powered on and the LCD will display a message. Action z If the Power lamp is off The machine is lit The... OK button. 70 Troubleshooting On the Operation Panel, press a button other than the ON/OFF button. z If the Power lamp is not powered on the LCD Cause Action The language you want to be in the screen-saver mode. Connect the power cord and press the ON/ OFF button.
MP520 series Quick Start Guide
Page 78
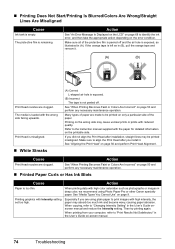
... to the instruction manual supplied with the paper for detailed information on only a particular side of paper are using Photo Paper Pro or other Canon specialty paper. Make sure to "Print Results Not Satisfactory" in the User's Guide on page 68 to "Changing Intensity Setting" in (A). See... "Aligning the Print Head" on page 50 and perform any necessary maintenance operation. Action See "An Error Message Is Displayed on the LCD" on -screen manual. 74 Troubleshooting See "When Printing Becomes Faint or Colors Are Incorrect" on page 56 and perform Print Head Alignment. When ...
... to the instruction manual supplied with the paper for detailed information on only a particular side of paper are using Photo Paper Pro or other Canon specialty paper. Make sure to "Print Results Not Satisfactory" in the User's Guide on page 68 to "Changing Intensity Setting" in (A). See... "Aligning the Print Head" on page 50 and perform any necessary maintenance operation. Action See "An Error Message Is Displayed on the LCD" on -screen manual. 74 Troubleshooting See "When Printing Becomes Faint or Colors Are Incorrect" on page 56 and perform Print Head Alignment. When ...
MP520 series Quick Start Guide
Page 81
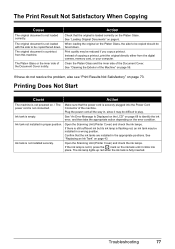
... may be installed in the appropriate positions. Plug the power cord all the way in proper position. See "An Error Message Is Displayed on the LCD" on page 68 to plug. Ink tank is not loaded correctly. If the ink lamp is not powered on the error condition. Troubleshooting 77
... may be installed in the appropriate positions. Plug the power cord all the way in proper position. See "An Error Message Is Displayed on the LCD" on page 68 to plug. Ink tank is not loaded correctly. If the ink lamp is not powered on the error condition. Troubleshooting 77


