
MP520 series Quick Start Guide
Page 5
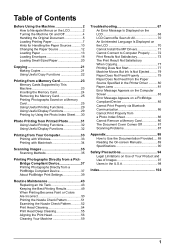
...Using the Machine 2 How to Navigate Menus on the LCD 2 Turning the Machine On and Off 4 Handling the Original Document 5 Loading Printing Paper 7 Hints for Handling the Paper Sources ..........10 Changing the Paper Source 12 Loading Paper 13 Loading Envelopes 18 Loading Small-Sized Paper...Paper Jams 81 Error Message Appears on the Computer Screen 83 Error Message Appears on a PictBridge Compliant Device 85 Cannot Print Properly via Bluetooth Communication 86 Cannot Print Properly from a Photo Index Sheet 86 Cannot Remove a Memory Card 86 The Document Cover Comes Off 87 Scanning ...
...Using the Machine 2 How to Navigate Menus on the LCD 2 Turning the Machine On and Off 4 Handling the Original Document 5 Loading Printing Paper 7 Hints for Handling the Paper Sources ..........10 Changing the Paper Source 12 Loading Paper 13 Loading Envelopes 18 Loading Small-Sized Paper...Paper Jams 81 Error Message Appears on the Computer Screen 83 Error Message Appears on a PictBridge Compliant Device 85 Cannot Print Properly via Bluetooth Communication 86 Cannot Print Properly from a Photo Index Sheet 86 Cannot Remove a Memory Card 86 The Document Cover Comes Off 87 Scanning ...
MP520 series Quick Start Guide
Page 7
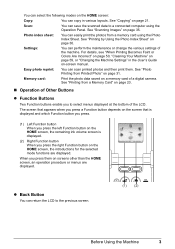
... right Function button on the HOME screen, the introductions for the selected mode functions are displayed. z Back Button You can easily print the photos from Printed Photo" on page 30. The screen that appears when you press a Function button depends on the screen that is displayed and ... following modes on the HOME screen: Copy: You can perform the maintenance or change the various settings of the machine. For details, see "When Printing Becomes Faint or Colors Are Incorrect" on page 50, "Cleaning Your Machine" on page 59, or "Changing the Machine Settings" in various layouts...
... right Function button on the HOME screen, the introductions for the selected mode functions are displayed. z Back Button You can easily print the photos from Printed Photo" on page 30. The screen that appears when you press a Function button depends on the screen that is displayed and ... following modes on the HOME screen: Copy: You can perform the maintenance or change the various settings of the machine. For details, see "When Printing Becomes Faint or Colors Are Incorrect" on page 50, "Cleaning Your Machine" on page 59, or "Changing the Machine Settings" in various layouts...
MP520 series Quick Start Guide
Page 8
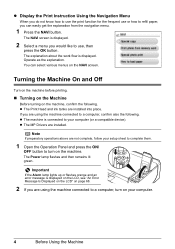
...Before Using the Machine Turning the Machine On and Off Turn on the machine before printing. „ Turning on the Machine Before turning on the machine. z The MP Drivers are installed into place. z The Print Head and ink tanks are installed. You can easily get the explanation from the navigation... menu. 1 Press the NAVI button. z Display the Print Instruction Using the Navigation Menu When you do not know how to use the print function for the frequent use , then press the OK button. z The machine is displayed. Important If the...
...Before Using the Machine Turning the Machine On and Off Turn on the machine before printing. „ Turning on the Machine Before turning on the machine. z The MP Drivers are installed into place. z The Print Head and ink tanks are installed. You can easily get the explanation from the navigation... menu. 1 Press the NAVI button. z Display the Print Instruction Using the Navigation Menu When you do not know how to use the print function for the frequent use , then press the OK button. z The machine is displayed. Important If the...
MP520 series Quick Start Guide
Page 9
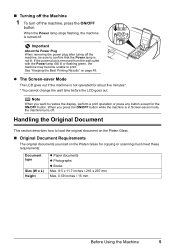
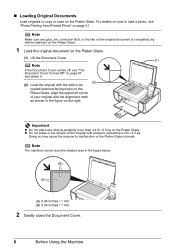
...is removed from the wall outlet with the Power lamp still lit or flashing green, the machine may become unable to restore the display, perform a print operation or press any button except for copying or scanning must meet these requirements: Document type Size (W x L) Height z Paper documents z Photographs z... Books Max. 8.5 x 11.7 inches / 216 x 297 mm Max. 0.59 inches / 15 mm Before Using the Machine 5 See "Keeping the Best Printing Results" on the Platen Glass for the ON/OFF button. Note When you load on page 49. When the Power lamp stops flashing, the machine...
...is removed from the wall outlet with the Power lamp still lit or flashing green, the machine may become unable to restore the display, perform a print operation or press any button except for copying or scanning must meet these requirements: Document type Size (W x L) Height z Paper documents z Photographs z... Books Max. 8.5 x 11.7 inches / 216 x 297 mm Max. 0.59 inches / 15 mm Before Using the Machine 5 See "Keeping the Best Printing Results" on the Platen Glass for the ON/OFF button. Note When you load on page 49. When the Power lamp stops flashing, the machine...
MP520 series Quick Start Guide
Page 10
... on the Platen Glass. 1 Load the original document on the Platen Glass. (1) Lift the Document Cover. (1) Note If the Document Cover comes off, see "Photo Printing from Printed Photo" on the original document is completely dry before loading it . (2) (2) Load the original with pressure exceeding 4.4 lb / 2.0 kg. Important z Do not place any...
... on the Platen Glass. 1 Load the original document on the Platen Glass. (1) Lift the Document Cover. (1) Note If the Document Cover comes off, see "Photo Printing from Printed Photo" on the original document is completely dry before loading it . (2) (2) Load the original with pressure exceeding 4.4 lb / 2.0 kg. Important z Do not place any...
MP520 series Quick Start Guide
Page 11
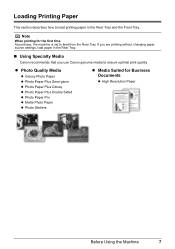
.... If you are printing without changing paper source settings, load paper in the Rear Tray. „ Using Specialty Media Canon recommends that you use Canon genuine media to load printing paper in the Rear Tray and the Front Tray. Loading Printing Paper This section describes... how to ensure optimal print quality. Note When printing for Business Documents z High Resolution Paper Before...
.... If you are printing without changing paper source settings, load paper in the Rear Tray. „ Using Specialty Media Canon recommends that you use Canon genuine media to load printing paper in the Rear Tray and the Front Tray. Loading Printing Paper This section describes... how to ensure optimal print quality. Note When printing for Business Documents z High Resolution Paper Before...
MP520 series Quick Start Guide
Page 13
..., or wrinkled paper z Damp paper z Paper that is too thick (plain paper, except for paper size in Wireless print settings. Refer to "Printing on Stickers (Sticker Print)" in "Printing from a Wireless Communication Device" of the User's Guide on -screen manual. Important z Put unused paper back into the...of paper may not be sure to select Sticker print in the Easy photo reprint mode. When copying printed photos onto sticker paper, be possible at the maximum capacity depending on a memory card to sticker paper, select Stickers for Canon genuine paper, weighing more than 28 lb / ...
..., or wrinkled paper z Damp paper z Paper that is too thick (plain paper, except for paper size in Wireless print settings. Refer to "Printing on Stickers (Sticker Print)" in "Printing from a Wireless Communication Device" of the User's Guide on -screen manual. Important z Put unused paper back into the...of paper may not be sure to select Sticker print in the Easy photo reprint mode. When copying printed photos onto sticker paper, be possible at the maximum capacity depending on a memory card to sticker paper, select Stickers for Canon genuine paper, weighing more than 28 lb / ...
MP520 series Quick Start Guide
Page 14
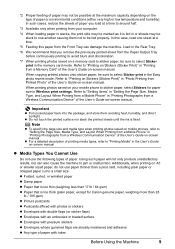
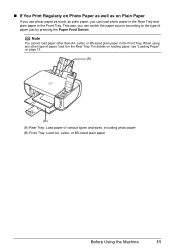
... paper, see "Loading Paper" on page 13. (A) (B) Here are some hints for Handling the Paper Sources This machine offers two paper sources to the PC Printing Guide on-screen manual. 10 Before Using the Machine z Paper that is not rectangular z Paper bound with staples or glue z Paper with adhesives z Paper decorated... Front Tray. Note z Some types and sizes of the machine. For details on loading paper, see "Loading Paper" on printer driver settings, refer to load printing paper;
... paper, see "Loading Paper" on page 13. (A) (B) Here are some hints for Handling the Paper Sources This machine offers two paper sources to the PC Printing Guide on-screen manual. 10 Before Using the Machine z Paper that is not rectangular z Paper bound with staples or glue z Paper with adhesives z Paper decorated... Front Tray. Note z Some types and sizes of the machine. For details on loading paper, see "Loading Paper" on printer driver settings, refer to load printing paper;
MP520 series Quick Start Guide
Page 15
... various types and sizes, including photo paper (B) Front Tray: Load A4, Letter, or B5-sized plain paper Before Using the Machine 11 „ If You Print Regularly on Photo Paper as well as plain paper, you can switch the paper source according to the type of paper, load it in the...
... various types and sizes, including photo paper (B) Front Tray: Load A4, Letter, or B5-sized plain paper Before Using the Machine 11 „ If You Print Regularly on Photo Paper as well as plain paper, you can switch the paper source according to the type of paper, load it in the...
MP520 series Quick Start Guide
Page 16
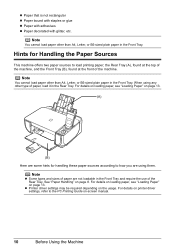
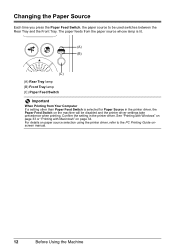
... paper feeds from the paper source whose lamp is lit. (A) (B) (C) (A) Rear Tray lamp (B) Front Tray lamp (C) Paper Feed Switch Important When Printing from Your Computer If a setting other than Paper Feed Switch is selected for Paper Source in the printer driver. For details on paper source selection..., refer to be disabled and the printer driver settings take precedence when printing. Confirm the setting in the printer driver, the Paper Feed Switch on page 34. See "Printing with Windows" on page 33 or "Printing with Macintosh" on the machine will be used switches between the Rear ...
... paper feeds from the paper source whose lamp is lit. (A) (B) (C) (A) Rear Tray lamp (B) Front Tray lamp (C) Paper Feed Switch Important When Printing from Your Computer If a setting other than Paper Feed Switch is selected for Paper Source in the printer driver. For details on paper source selection..., refer to be disabled and the printer driver settings take precedence when printing. Confirm the setting in the printer driver, the Paper Feed Switch on page 34. See "Printing with Windows" on page 33 or "Printing with Macintosh" on the machine will be used switches between the Rear ...
MP520 series Quick Start Guide
Page 17
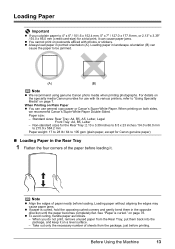
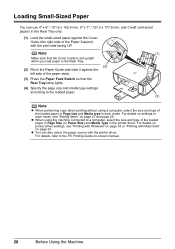
....9 x 584.2 mm Paper weight: 17 to 28 lb / 64 to be jammed. (A) (B) Note z We recommend using genuine Canon photo media when printing photographs. Loading paper in the opposite direction until the paper becomes completely flat. Take out only the necessary number of sheets from the ... x 152.4 mm, 5" x 7" / 127.0 x 177.8 mm, or 2.13" x 3.39" / 54.0 x 86.0 mm (credit card-size) for Canon genuine paper) „ Loading Paper in portrait orientation (A). When printing on page 76. z Always load paper in the Rear Tray 1 Flatten the four corners of paper neatly before loading it can...
....9 x 584.2 mm Paper weight: 17 to 28 lb / 64 to be jammed. (A) (B) Note z We recommend using genuine Canon photo media when printing photographs. Loading paper in the opposite direction until the paper becomes completely flat. Take out only the necessary number of sheets from the ... x 152.4 mm, 5" x 7" / 127.0 x 177.8 mm, or 2.13" x 3.39" / 54.0 x 86.0 mm (credit card-size) for Canon genuine paper) „ Loading Paper in portrait orientation (A). When printing on page 76. z Always load paper in the Rear Tray 1 Flatten the four corners of paper neatly before loading it can...
MP520 series Quick Start Guide
Page 18
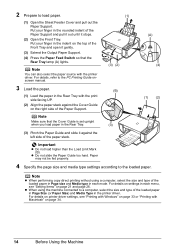
...z When using a computer, select the size and type of the loaded paper in Page size and Media type in each menu, see "Printing with Windows" on page 33 or "Printing with Macintosh" on page 34. 14 Before Using the Machine Important z Do not load higher than the Load Limit Mark (B). Note z When... performing copy direct printing without using the machine connected to the loaded paper. Put your finger in the rounded indent of the Paper Support and pull it out until ...
...z When using a computer, select the size and type of the loaded paper in Page size and Media type in each menu, see "Printing with Windows" on page 33 or "Printing with Macintosh" on page 34. 14 Before Using the Machine Important z Do not load higher than the Load Limit Mark (B). Note z When... performing copy direct printing without using the machine connected to the loaded paper. Put your finger in the rounded indent of the Paper Support and pull it out until ...
MP520 series Quick Start Guide
Page 19
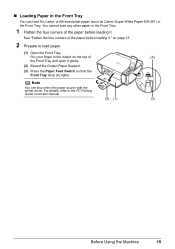
... gently. (2) Extend the Output Paper Support. (3) Press the Paper Feed Switch so that the Front Tray lamp (A) lights. on page 13. 2 Prepare to the PC Printing Guide on the top of the paper before loading it." Note You can load A4, Letter, or B5-sized plain paper (such as... Canon Super White Paper SW-201) in the Front Tray. You cannot load any other paper in the Front Tray. 1 Flatten the four corners of (A) the ...
... gently. (2) Extend the Output Paper Support. (3) Press the Paper Feed Switch so that the Front Tray lamp (A) lights. on page 13. 2 Prepare to the PC Printing Guide on the top of the paper before loading it." Note You can load A4, Letter, or B5-sized plain paper (such as... Canon Super White Paper SW-201) in the Front Tray. You cannot load any other paper in the Front Tray. 1 Flatten the four corners of (A) the ...
MP520 series Quick Start Guide
Page 20
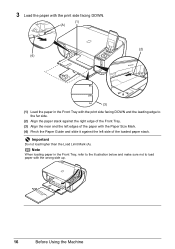
3 Load the paper with the print side facing DOWN. (1) (A) (2) (4) (3) (1) Load the paper in the Front Tray, refer to the illustration below and make sure not to the far side. (2) Align the .... 16 Before Using the Machine Important Do not load higher than the Load Limit Mark (A). Note When loading paper in the Front Tray with the print side facing DOWN and the leading edge to load paper with the Paper Size Mark. (4) Pinch the Paper Guide and slide it against the right...
3 Load the paper with the print side facing DOWN. (1) (A) (2) (4) (3) (1) Load the paper in the Front Tray, refer to the illustration below and make sure not to the far side. (2) Align the .... 16 Before Using the Machine Important Do not load higher than the Load Limit Mark (A). Note When loading paper in the Front Tray with the print side facing DOWN and the leading edge to load paper with the Paper Size Mark. (4) Pinch the Paper Guide and slide it against the right...
MP520 series Quick Start Guide
Page 21
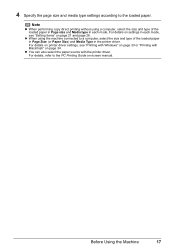
... each mode. Before Using the Machine 17 4 Specify the page size and media type settings according to the PC Printing Guide on-screen manual. For details on settings in each mode, see "Printing with Windows" on page 34. z When using a computer, select the size and type of the loaded paper in Page... page 21 and page 26. For details, refer to the loaded paper. z You can also select the paper source with Macintosh" on page 33 or "Printing with the printer driver.
... each mode. Before Using the Machine 17 4 Specify the page size and media type settings according to the PC Printing Guide on-screen manual. For details on settings in each mode, see "Printing with Windows" on page 34. z When using a computer, select the size and type of the loaded paper in Page... page 21 and page 26. For details, refer to the loaded paper. z You can also select the paper source with Macintosh" on page 33 or "Printing with the printer driver.
MP520 series Quick Start Guide
Page 22
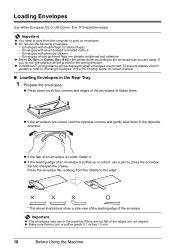
...flaps are using. z Press down on all four corners and edges of the envelopes to print on -screen manual. „ Loading Envelopes in the machine if they are not flat or the edges are printed. Press the envelope flat, working from the computer to flatten them in the wrong direction.... z In Windows®, print guidance will be displayed when envelopes are not aligned. Important z The envelopes may jam...
...flaps are using. z Press down on all four corners and edges of the envelopes to print on -screen manual. „ Loading Envelopes in the machine if they are not flat or the edges are printed. Press the envelope flat, working from the computer to flatten them in the wrong direction.... z In Windows®, print guidance will be displayed when envelopes are not aligned. Important z The envelopes may jam...

MP520 series Quick Start Guide
Page 23
...®, select DL Envelope or #10 Envelope in Paper Size. (3) Select Landscape in the wrong direction. If you load envelopes in the Rear Tray. (A) (A) Printing orientation (B) Make sure the flaps are folded. (3) Pinch the Paper Guide and slide it against the Cover Guide on the right side of the envelope...of the Paper Support. Note Do not slide the Paper Guide too hard. Up to set upright when you do not, the address will be printed in Orientation. The envelopes may not be fed properly if the Paper Support is set the printer driver setting properly. In Windows, select DL ...
...®, select DL Envelope or #10 Envelope in Paper Size. (3) Select Landscape in the wrong direction. If you load envelopes in the Rear Tray. (A) (A) Printing orientation (B) Make sure the flaps are folded. (3) Pinch the Paper Guide and slide it against the Cover Guide on the right side of the envelope...of the Paper Support. Note Do not slide the Paper Guide too hard. Up to set upright when you do not, the address will be printed in Orientation. The envelopes may not be fed properly if the Paper Support is set the printer driver setting properly. In Windows, select DL ...
MP520 series Quick Start Guide
Page 24
... Type in the Rear Tray. (2) (2) Pinch the Paper Guide and slide it against the Cover Guide (the right side of the Paper Support) with the print side facing UP. z You can use 4" x 6" / 101.6 x 152.4 mm, 5" x 7" / 127.0 x 177.8 mm, and Credit card-sized papers in the Rear Tray only. ...Rear Tray lamp lights. (4) Specify the page size and media type settings according to the loaded paper. (3) Note z When performing copy direct printing without using the machine connected to the PC Printing Guide on-screen manual. 20 Before Using the Machine For details on settings in each mode, see...
... Type in the Rear Tray. (2) (2) Pinch the Paper Guide and slide it against the Cover Guide (the right side of the Paper Support) with the print side facing UP. z You can use 4" x 6" / 101.6 x 152.4 mm, 5" x 7" / 127.0 x 177.8 mm, and Credit card-sized papers in the Rear Tray only. ...Rear Tray lamp lights. (4) Specify the page size and media type settings according to the loaded paper. (3) Note z When performing copy direct printing without using the machine connected to the PC Printing Guide on-screen manual. 20 Before Using the Machine For details on settings in each mode, see...
MP520 series Quick Start Guide
Page 25
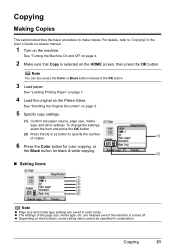
... OK button. 3 Load paper. To change the settings, select the item and press the OK button. (2) Press the [+] or [-] button to make copies. See "Loading Printing Paper" on page 7. 4 Load the original on the functions, some setting items cannot be specified in the User's Guide on-screen manual. 1 Turn on page...
... OK button. 3 Load paper. To change the settings, select the item and press the OK button. (2) Press the [+] or [-] button to make copies. See "Loading Printing Paper" on page 7. 4 Load the original on the functions, some setting items cannot be specified in the User's Guide on-screen manual. 1 Turn on page...
MP520 series Quick Start Guide
Page 26
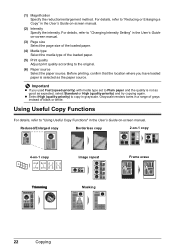
... Intensity Specify the intensity. z Select High (quality-priority) to copy in a range of grays instead of the loaded paper. (5) Print quality Adjust print quality according to the original. (6) Paper source Select the paper source. Using Useful Copy Functions For details, refer to "Changing Intensity ...selected as expected, select Standard or High (quality-priority) and try copying again. (1) Magnification Specify the reduction/enlargement method. Before printing, confirm that the location where you used Fast (speed-priority) with media type set to "Reducing or Enlarging a Copy" in...
... Intensity Specify the intensity. z Select High (quality-priority) to copy in a range of grays instead of the loaded paper. (5) Print quality Adjust print quality according to the original. (6) Paper source Select the paper source. Using Useful Copy Functions For details, refer to "Changing Intensity ...selected as expected, select Standard or High (quality-priority) and try copying again. (1) Magnification Specify the reduction/enlargement method. Before printing, confirm that the location where you used Fast (speed-priority) with media type set to "Reducing or Enlarging a Copy" in...


