
MP520 series Quick Start Guide
Page 4
... Vista") and Mac® OS X v.10.4.x. Canon U.S.A., Inc. Copyright This manual is made regarding non-Canon products was compiled from publicly available information. As an ENERGY STAR® Partner, Canon Inc. About Consumables Consumables (ink tanks / FINE Cartridges) are in part, without ...-One Quick Start Guide. with all rights reserved. All statements, technical information and recommendations in this manual may differ. Depending on your Canon PIXMA MP520 series Photo All-In-One. and other countries. z "xD-Picture Card" is a trademark of Fuji Film Co. z "Memory...
... Vista") and Mac® OS X v.10.4.x. Canon U.S.A., Inc. Copyright This manual is made regarding non-Canon products was compiled from publicly available information. As an ENERGY STAR® Partner, Canon Inc. About Consumables Consumables (ink tanks / FINE Cartridges) are in part, without ...-One Quick Start Guide. with all rights reserved. All statements, technical information and recommendations in this manual may differ. Depending on your Canon PIXMA MP520 series Photo All-In-One. and other countries. z "xD-Picture Card" is a trademark of Fuji Film Co. z "Memory...
MP520 series Quick Start Guide
Page 5
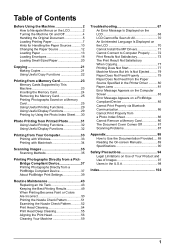
... PictBridge Compliant Device 37 Printing Photographs Directly from a PictBridge Compliant Device 37 About PictBridge Print Settings 39 Routine Maintenance 43 Replacing an Ink Tank 43 Keeping the Best Printing Results 49 When Printing Becomes Faint or Colors Are Incorrect 50 Printing the Nozzle Check Pattern 51........... 72 Print Results Not Satisfactory 73 The Print Result Not Satisfactory When Copying 77 Printing Does Not Start 77 Machine Moves But Ink Is Not Ejected......... 79 Paper Does Not Feed Properly 79 Paper Does Not Feed from the Paper Source Specified in the Printer Driver...
... PictBridge Compliant Device 37 Printing Photographs Directly from a PictBridge Compliant Device 37 About PictBridge Print Settings 39 Routine Maintenance 43 Replacing an Ink Tank 43 Keeping the Best Printing Results 49 When Printing Becomes Faint or Colors Are Incorrect 50 Printing the Nozzle Check Pattern 51........... 72 Print Results Not Satisfactory 73 The Print Result Not Satisfactory When Copying 77 Printing Does Not Start 77 Machine Moves But Ink Is Not Ejected......... 79 Paper Does Not Feed Properly 79 Paper Does Not Feed from the Paper Source Specified in the Printer Driver...
MP520 series Quick Start Guide
Page 7
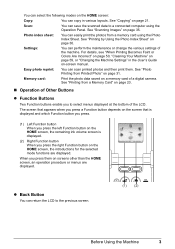
... that is displayed and which Function button you press. (1) Left Function button When you press the left Function button on the HOME screen, the remaining ink volume screen is displayed. (2) Right Function button When you press them .
... that is displayed and which Function button you press. (1) Left Function button When you press the left Function button on the HOME screen, the remaining ink volume screen is displayed. (2) Right Function button When you press them .
MP520 series Quick Start Guide
Page 8
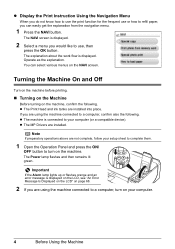
... like to a computer, turn on the machine. You can easily get the explanation from the navigation menu. 1 Press the NAVI button. z The Print Head and ink tanks are installed. If you are not complete, follow your computer. 4 Before Using the Machine z The machine is displayed. z The MP Drivers are installed into...
... like to a computer, turn on the machine. You can easily get the explanation from the navigation menu. 1 Press the NAVI button. z The Print Head and ink tanks are installed. If you are not complete, follow your computer. 4 Before Using the Machine z The machine is displayed. z The MP Drivers are installed into...
MP520 series Quick Start Guide
Page 10
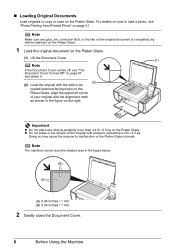
... details on how to break. Note The machine cannot scan the shaded area in the figure on the right. Important z Do not place any glue, ink, correction fluid, or the like on the original document is completely dry before loading it on the Platen Glass. 1 Load the original document on the...
... details on how to break. Note The machine cannot scan the shaded area in the figure on the right. Important z Do not place any glue, ink, correction fluid, or the like on the original document is completely dry before loading it on the Platen Glass. 1 Load the original document on the...
MP520 series Quick Start Guide
Page 13
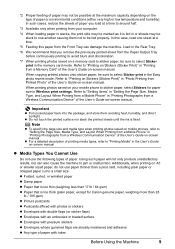
... / 64 gsm) z Paper that you load at a time to around half. *3 Available only when printing from your mobile phone to sticker paper, select Stickers for Canon genuine paper, weighing more than a post card, including plain paper or notepad paper cut to jam or malfunction. Refer to "Printing on Stickers (Sticker Print... sticker paper, be sure to "Printing Media" in the memory card mode. z Do not touch the printed surface nor stack the printed sheets until the ink is fed in or sheets may not be sure to select Sticker print in stacks, the print side may be marked as it is fixed...
... / 64 gsm) z Paper that you load at a time to around half. *3 Available only when printing from your mobile phone to sticker paper, select Stickers for Canon genuine paper, weighing more than a post card, including plain paper or notepad paper cut to jam or malfunction. Refer to "Printing on Stickers (Sticker Print... sticker paper, be sure to "Printing Media" in the memory card mode. z Do not touch the printed surface nor stack the printed sheets until the ink is fed in or sheets may not be sure to select Sticker print in stacks, the print side may be marked as it is fixed...
MP520 series Quick Start Guide
Page 47
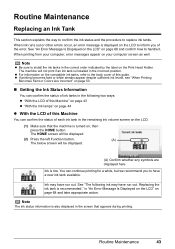
...while, but we recommend you of this guide. See "The following two ways: z "With the LCD of this Machine" on page 43 z "With the Ink lamps" on page 44 z With the LCD of the error. Routine Maintenance 43 The HOME screen will be displayed. (2) Press the left Function button. (A) ...The below screen will not print if an ink tank is displayed on , then press the HOME button. Ink is recommended." The machine will be displayed. (A) Confirm whether any symbols are displayed here. You can confirm the status ...
...while, but we recommend you of this guide. See "The following two ways: z "With the LCD of this Machine" on page 43 z "With the Ink lamps" on page 44 z With the LCD of the error. Routine Maintenance 43 The HOME screen will be displayed. (2) Press the left Function button. (A) ...The below screen will not print if an ink tank is displayed on , then press the HOME button. Ink is recommended." The machine will be displayed. (A) Confirm whether any symbols are displayed here. You can confirm the status ...
MP520 series Quick Start Guide
Page 48
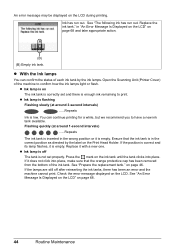
... If the position is correct and its lamp flashes, it is not set and there is enough ink remaining to confirm how the ink lamps light or flash. z Ink lamp is off after reinserting the ink tanks, there has been an error and the machine cannot print. Open the Scanning Unit (Printer Cover...low. See "An Error Message Is Displayed on the LCD" on page 68 and take appropriate action. (B) (B) Empty ink tank. Replace the ink tank." You can confirm the status of each ink tank by the label on the LCD during printing. Press the mark on the LCD. Check the error message displayed...
... If the position is correct and its lamp flashes, it is not set and there is enough ink remaining to confirm how the ink lamps light or flash. z Ink lamp is off after reinserting the ink tanks, there has been an error and the machine cannot print. Open the Scanning Unit (Printer Cover...low. See "An Error Message Is Displayed on the LCD" on page 68 and take appropriate action. (B) (B) Empty ink tank. Replace the ink tank." You can confirm the status of each ink tank by the label on the LCD during printing. Press the mark on the LCD. Check the error message displayed...
MP520 series Quick Start Guide
Page 49
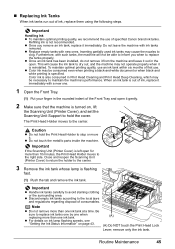
... white printing is turned on page 43. (A) (A) Do NOT touch the Print Head Lock Lever; The Print Head Holder moves to clog. z Once an ink tank has been installed, do not remove it from the machine and leave it out in the open it is also consumed in the rounded... indent of specified Canon brand ink tanks. Color ink is reinstalled. Important If the Scanning Unit (Printer Cover) is not recommended. „ Replacing Ink Tanks When ink tanks run out of ink, replace it . Be sure to replace ink tanks one by one when replacing more than one...
... white printing is turned on page 43. (A) (A) Do NOT touch the Print Head Lock Lever; The Print Head Holder moves to clog. z Once an ink tank has been installed, do not remove it from the machine and leave it out in the open it is also consumed in the rounded... indent of specified Canon brand ink tanks. Color ink is reinstalled. Important If the Scanning Unit (Printer Cover) is not recommended. „ Replacing Ink Tanks When ink tanks run out of ink, replace it . Be sure to replace ink tanks one by one when replacing more than one...
MP520 series Quick Start Guide
Page 50
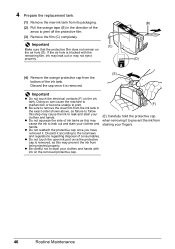
...reattach the protective cap once you have removed it according to stain your fingers. Discard it . If the air hole is blocked with ink on the removed protective cap. 46 Routine Maintenance Important z Do not touch the electrical contacts (F) on the air hole (D). z Do not touch... the open ink port once the protective cap is removed. z Be careful not to the local laws and regulations regarding disposal of consumables. 4 Prepare the replacement...
...reattach the protective cap once you have removed it according to stain your fingers. Discard it . If the air hole is blocked with ink on the removed protective cap. 46 Routine Maintenance Important z Do not touch the electrical contacts (F) on the air hole (D). z Do not touch... the open ink port once the protective cap is removed. z Be careful not to the local laws and regulations regarding disposal of consumables. 4 Prepare the replacement...
MP520 series Quick Start Guide
Page 51
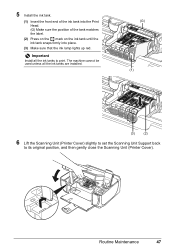
... Unit Support back to print. The machine cannot be used unless all the ink tanks to its original position, and then gently close the Scanning Unit (Printer Cover). 5 Install the ink tank. (1) Insert the front end of the ink tank into the Print Head. (G) Make sure the position of the tank ...matches the label. (2) Press on the mark on the ink tank until the ink tank snaps firmly into place. (3) Make sure that the...
... Unit Support back to print. The machine cannot be used unless all the ink tanks to its original position, and then gently close the Scanning Unit (Printer Cover). 5 Install the ink tank. (1) Insert the front end of the ink tank into the Print Head. (G) Make sure the position of the tank ...matches the label. (2) Press on the mark on the ink tank until the ink tank snaps firmly into place. (3) Make sure that the...
MP520 series Quick Start Guide
Page 52
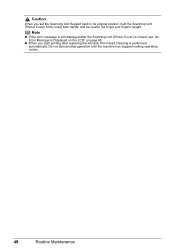
Caution When you start another operation until the machine has stopped making operating noises. 48 Routine Maintenance Note z If the error message is still displayed after replacing the ink tank, Print Head Cleaning is closed, see "An Error Message Is Displayed on the LCD" on page 68. Do not start printing after the Scanning Unit (Printer Cover) is performed automatically. z When you set the Scanning Unit Support back to its original position, hold the Scanning Unit (Printer Cover) firmly using both hands, and be careful not to get your fingers caught.
Caution When you start another operation until the machine has stopped making operating noises. 48 Routine Maintenance Note z If the error message is still displayed after replacing the ink tank, Print Head Cleaning is closed, see "An Error Message Is Displayed on the LCD" on page 68. Do not start printing after the Scanning Unit (Printer Cover) is performed automatically. z When you set the Scanning Unit Support back to its original position, hold the Scanning Unit (Printer Cover) firmly using both hands, and be careful not to get your fingers caught.
MP520 series Quick Start Guide
Page 53
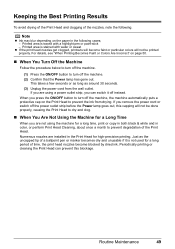
... of the Print Head and clogging of the nozzles, note the following cases; - Just as around 30 seconds. (3) Unplug the power cord from drying. Note z Ink may blur depending on the paper in the Print Head for a long time, print or copy in both black & white and in color, or perform... Print Head Cleaning, about once a month to prevent the ink from the wall outlet. This takes a few seconds or as long as the uncapped tip of the Print Head. For details, see "When Printing Becomes...
... of the Print Head and clogging of the nozzles, note the following cases; - Just as around 30 seconds. (3) Unplug the power cord from drying. Note z Ink may blur depending on the paper in the Print Head for a long time, print or copy in both black & white and in color, or perform... Print Head Cleaning, about once a month to prevent the ink from the wall outlet. This takes a few seconds or as long as the uncapped tip of the Print Head. For details, see "When Printing Becomes...
MP520 series Quick Start Guide
Page 54
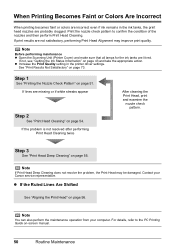
...page 56. Contact your computer. Note Before performing maintenance z Open the Scanning Unit (Printer Cover) and make sure that all lamps for the ink tanks are missing or if white streaks appear Step 2 See "Print Head Cleaning" on page 73. z If the Ruled Lines Are Shifted ...take the appropriate action. Note You can also perform the maintenance operation from your Canon service representative. See "Print Results Not Satisfactory" on page 54. z Increase the Print Quality setting in the ink tanks, the print head nozzles are probably clogged. When Printing Becomes Faint or ...
...page 56. Contact your computer. Note Before performing maintenance z Open the Scanning Unit (Printer Cover) and make sure that all lamps for the ink tanks are missing or if white streaks appear Step 2 See "Print Head Cleaning" on page 73. z If the Ruled Lines Are Shifted ...take the appropriate action. Note You can also perform the maintenance operation from your Canon service representative. See "Print Results Not Satisfactory" on page 54. z Increase the Print Quality setting in the ink tanks, the print head nozzles are probably clogged. When Printing Becomes Faint or ...
MP520 series Quick Start Guide
Page 55
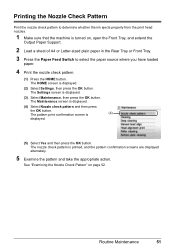
... loaded paper. 4 Print the nozzle check pattern. (1) Press the HOME button. Printing the Nozzle Check Pattern Print the nozzle check pattern to determine whether the ink ejects properly from the print head nozzles. 1 Make sure that the machine is turned on page 52. The HOME screen is displayed. (3) Select Maintenance, then...
... loaded paper. 4 Print the nozzle check pattern. (1) Press the HOME button. Printing the Nozzle Check Pattern Print the nozzle check pattern to determine whether the ink ejects properly from the print head nozzles. 1 Make sure that the machine is turned on page 52. The HOME screen is displayed. (3) Select Maintenance, then...
MP520 series Quick Start Guide
Page 56
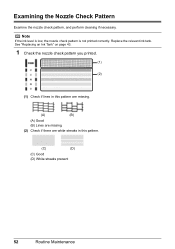
Replace the relevant ink tank. Examining the Nozzle Check Pattern Examine the nozzle check pattern, and perform cleaning if necessary. Note If the ink level is low, the nozzle check pattern is not printed correctly. See "Replacing an Ink Tank" on page 43. 1 Check the nozzle check pattern you printed. (1) (2) (1) Check if lines in this pattern are missing. (A) (B) (A) Good (B) Lines are missing (2) Check if there are white streaks in this pattern. (C) (D) (C) Good (D) White streaks present 52 Routine Maintenance
Replace the relevant ink tank. Examining the Nozzle Check Pattern Examine the nozzle check pattern, and perform cleaning if necessary. Note If the ink level is low, the nozzle check pattern is not printed correctly. See "Replacing an Ink Tank" on page 43. 1 Check the nozzle check pattern you printed. (1) (2) (1) Check if lines in this pattern are missing. (A) (B) (A) Good (B) Lines are missing (2) Check if there are white streaks in this pattern. (C) (D) (C) Good (D) White streaks present 52 Routine Maintenance
MP520 series Quick Start Guide
Page 58
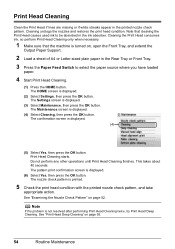
Cleaning unclogs the nozzles and restores the print head condition. Cleaning the Print Head consumes ink, so perform Print Head Cleaning only when necessary. 1 Make sure that cleaning the Print Head causes used ink to be absorbed in the Rear Tray or Front Tray. 3 Press the Paper Feed Switch to select the paper... screen is turned on, open the Front Tray, and extend the Output Paper Support. 2 Load a sheet of A4 or Letter-sized plain paper in the ink absorber. See "Print Head Deep Cleaning" on page 52.
Cleaning unclogs the nozzles and restores the print head condition. Cleaning the Print Head consumes ink, so perform Print Head Cleaning only when necessary. 1 Make sure that cleaning the Print Head causes used ink to be absorbed in the Rear Tray or Front Tray. 3 Press the Paper Feed Switch to select the paper... screen is turned on, open the Front Tray, and extend the Output Paper Support. 2 Load a sheet of A4 or Letter-sized plain paper in the ink absorber. See "Print Head Deep Cleaning" on page 52.
MP520 series Quick Start Guide
Page 59
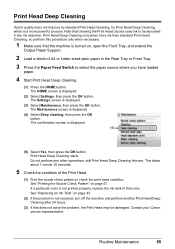
... button. The Maintenance screen is displayed. (2) Select Settings, then press the OK button. See "Replacing an Ink Tank" on page 43. (2) If the problem is displayed. (3) Select Maintenance, then press the OK button. Contact your Canon service representative. Print Head Deep Cleaning consumes more powerful process. The Settings screen is not resolved...
... button. The Maintenance screen is displayed. (2) Select Settings, then press the OK button. See "Replacing an Ink Tank" on page 43. (2) If the problem is displayed. (3) Select Maintenance, then press the OK button. Contact your Canon service representative. Print Head Deep Cleaning consumes more powerful process. The Settings screen is not resolved...
MP520 series Quick Start Guide
Page 69
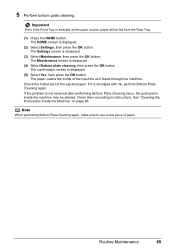
... performing Bottom Plate Cleaning twice, the protrusions inside of the machine as the paper source, paper will be stained. If the problem is smudged with ink, perform Bottom Plate Cleaning again. Note When performing Bottom Plate Cleaning again, make sure to instructions.
... performing Bottom Plate Cleaning twice, the protrusions inside of the machine as the paper source, paper will be stained. If the problem is smudged with ink, perform Bottom Plate Cleaning again. Note When performing Bottom Plate Cleaning again, make sure to instructions.
MP520 series Quick Start Guide
Page 70
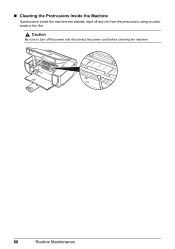
„ Cleaning the Protrusions Inside the Machine If protrusions inside the machine are stained, wipe off the power and disconnect the power cord before cleaning the machine. 66 Routine Maintenance Caution Be sure to turn off any ink from the protrusions using a cotton swab or the like.
„ Cleaning the Protrusions Inside the Machine If protrusions inside the machine are stained, wipe off the power and disconnect the power cord before cleaning the machine. 66 Routine Maintenance Caution Be sure to turn off any ink from the protrusions using a cotton swab or the like.


