
MP520 series Quick Start Guide
Page 5
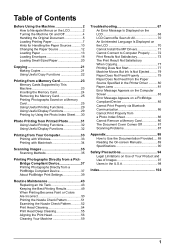
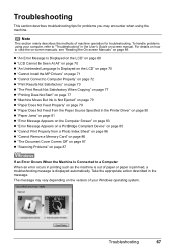
... Feed from the Paper Source Specified in the Printer Driver .......... 80 Paper Jams 81 Error Message Appears on the Computer Screen 83 Error Message Appears on a PictBridge Compliant Device 85 Cannot Print Properly via Bluetooth Communication 86 Cannot Print Properly from a Photo Index Sheet 86 Cannot Remove a Memory Card 86 The Document Cover Comes Off 87 Scanning Problems 87 Appendix 88 How to Use the Documentation Provided..... 88 Reading the On-screen Manuals 89 Specifications...
... Feed from the Paper Source Specified in the Printer Driver .......... 80 Paper Jams 81 Error Message Appears on the Computer Screen 83 Error Message Appears on a PictBridge Compliant Device 85 Cannot Print Properly via Bluetooth Communication 86 Cannot Print Properly from a Photo Index Sheet 86 Cannot Remove a Memory Card 86 The Document Cover Comes Off 87 Scanning Problems 87 Appendix 88 How to Use the Documentation Provided..... 88 Reading the On-screen Manuals 89 Specifications...
MP520 series Quick Start Guide
Page 7
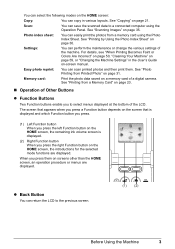
... easily print the photos from a memory card using the Operation Panel. z Back Button You can return the LCD to a connected computer using the Photo Index Sheet. Memory card: Print the photo data saved on page 23. „ Operation of Other Buttons z Function Buttons Two Function buttons enable you to select menus displayed at the bottom of a digital camera. For details, see "When Printing Becomes Faint or Colors Are Incorrect" on page 50, "Cleaning Your Machine" on page 59, or "Changing the Machine Settings...
... easily print the photos from a memory card using the Operation Panel. z Back Button You can return the LCD to a connected computer using the Photo Index Sheet. Memory card: Print the photo data saved on page 23. „ Operation of Other Buttons z Function Buttons Two Function buttons enable you to select menus displayed at the bottom of a digital camera. For details, see "When Printing Becomes Faint or Colors Are Incorrect" on page 50, "Cleaning Your Machine" on page 59, or "Changing the Machine Settings...
MP520 series Quick Start Guide
Page 29
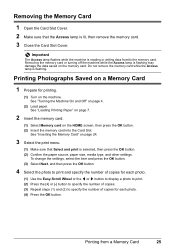
... button. (3) Select Next, and then press the OK button. 4 Select the photo to the memory card. Removing the Memory Card 1 Open the Card Slot Cover. 2 Make sure that Select and print is selected, then press the OK button. (2) Confirm the paper source, paper size, media type, and other settings. Printing from /to print and specify the number of copies for printing. (1) Turn on the memory card. Important The Access lamp flashes while the machine is flashing. See "Turning the Machine On and Off" on page 4. (2) Load paper...
... button. (3) Select Next, and then press the OK button. 4 Select the photo to the memory card. Removing the Memory Card 1 Open the Card Slot Cover. 2 Make sure that Select and print is selected, then press the OK button. (2) Confirm the paper source, paper size, media type, and other settings. Printing from /to print and specify the number of copies for printing. (1) Turn on the memory card. Important The Access lamp flashes while the machine is flashing. See "Turning the Machine On and Off" on page 4. (2) Load paper...

MP520 series Quick Start Guide
Page 37
..., see "Changing the Paper Source" on using the print information recorded at the time of shooting to print using Easy-PhotoPrint EX. Printing with the printer driver as well as the Operation Panel on the Setup CD-ROM. See "Turning the Machine On and Off" on page 4 and "Loading Printing Paper" on -screen manuals are installed. 6 Click Print (or OK). You can perform Borderless Printing in easy steps using an appropriate application software. 3 Select Print on...
..., see "Changing the Paper Source" on using the print information recorded at the time of shooting to print using Easy-PhotoPrint EX. Printing with the printer driver as well as the Operation Panel on the Setup CD-ROM. See "Turning the Machine On and Off" on page 4 and "Loading Printing Paper" on -screen manuals are installed. 6 Click Print (or OK). You can perform Borderless Printing in easy steps using an appropriate application software. 3 Select Print on...
MP520 series Quick Start Guide
Page 39
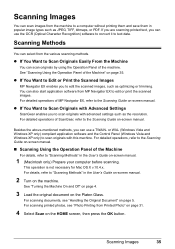
... with Advanced Settings ScanGear enables you to edit the scanned images, such as JPEG, TIFF, bitmaps, or PDF. See "Turning the Machine On and Off" on page 4. 3 Load the original document on the HOME screen, then press the OK button. For scanning printed photos, see "Handling the Original Document" on -screen manual. 1 (Macintosh only) Prepare your computer before scanning. Scanning Methods You can scan originals by using the Operation Panel of MP...
... with Advanced Settings ScanGear enables you to edit the scanned images, such as JPEG, TIFF, bitmaps, or PDF. See "Turning the Machine On and Off" on page 4. 3 Load the original document on the HOME screen, then press the OK button. For scanning printed photos, see "Handling the Original Document" on -screen manual. 1 (Macintosh only) Prepare your computer before scanning. Scanning Methods You can scan originals by using the Operation Panel of MP...
MP520 series Quick Start Guide
Page 71
... Ink Is Not Ejected" on page 79 z "Paper Does Not Feed Properly" on page 79 z "Paper Does Not Feed from the Paper Source Specified in the Printer Driver" on page 80 z "Paper Jams" on page 81 z "Error Message Appears on the Computer Screen" on page 83 z "Error Message Appears on a PictBridge Compliant Device" on page 85 z "Cannot Print Properly from a Photo Index Sheet" on page 86 z "Cannot Remove a Memory Card" on page 86 z "The Document Cover Comes Off" on page 87 z "Scanning Problems...
... Ink Is Not Ejected" on page 79 z "Paper Does Not Feed Properly" on page 79 z "Paper Does Not Feed from the Paper Source Specified in the Printer Driver" on page 80 z "Paper Jams" on page 81 z "Error Message Appears on the Computer Screen" on page 83 z "Error Message Appears on a PictBridge Compliant Device" on page 85 z "Cannot Print Properly from a Photo Index Sheet" on page 86 z "Cannot Remove a Memory Card" on page 86 z "The Document Cover Comes Off" on page 87 z "Scanning Problems...
MP520 series Quick Start Guide
Page 72
.... Replace the ink tank." See "Replacing an Ink Tank" on the ink tank flashes.) Replace the ink tank and close the Scanning Unit (Printer Cover). Install the print head." U052 "Some ink tanks are no image data saved on the ink tank flashes.) z More than one ink tanks of printing under the current condition may have run out. Follow the directions given in the appropriate positions. Possible causes are installed in your Canon service representative. This error message...
.... Replace the ink tank." See "Replacing an Ink Tank" on the ink tank flashes.) Replace the ink tank and close the Scanning Unit (Printer Cover). Install the print head." U052 "Some ink tanks are no image data saved on the ink tank flashes.) z More than one ink tanks of printing under the current condition may have run out. Follow the directions given in the appropriate positions. Possible causes are installed in your Canon service representative. This error message...
MP520 series Quick Start Guide
Page 73
... ink tank that Canon shall not be correctly detected. (The lamp on the ink tank flashes.) Replace the ink tank and close the Scanning Unit (Printer Cover). With this machine. (The lamp on the machine. Set to send data. "An unsupported USB hub is not installed. See "Getting the Ink Status Information" on page 43. Install the ink tank. z The ink tank is not compatible with the connected device." See "Replacing an Ink Tank" on page 43. Turn off power...
... ink tank that Canon shall not be correctly detected. (The lamp on the ink tank flashes.) Replace the ink tank and close the Scanning Unit (Printer Cover). With this machine. (The lamp on the machine. Set to send data. "An unsupported USB hub is not installed. See "Getting the Ink Status Information" on page 43. Install the ink tank. z The ink tank is not compatible with the connected device." See "Replacing an Ink Tank" on page 43. Turn off power...

MP520 series Quick Start Guide
Page 75
... remove the CD-ROM. (5)Turn the machine off. (6)Restart the computer. (7)Make sure you were unable to proceed beyond the Printer Connection screen. The drive letter of the setup program, MSETUP4.EXE. If the icon is a problem with the Setup CD-ROM. Troubleshooting 71 In Windows 2000, double-click the My Computer icon on the desktop. (2)Double-click the CD-ROM icon on the PIXMA...
... remove the CD-ROM. (5)Turn the machine off. (6)Restart the computer. (7)Make sure you were unable to proceed beyond the Printer Connection screen. The drive letter of the setup program, MSETUP4.EXE. If the icon is a problem with the Setup CD-ROM. Troubleshooting 71 In Windows 2000, double-click the My Computer icon on the desktop. (2)Double-click the CD-ROM icon on the PIXMA...
MP520 series Quick Start Guide
Page 78
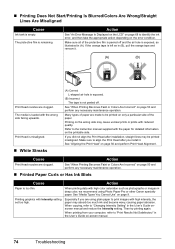
... on page 50 and perform any necessary maintenance operation. „ Printed Paper Curls or Has Ink Blots Cause Action Paper is left as in (B), pull the orange tape and remove it . The media is remaining. See "When Printing Becomes Faint or Colors Are Incorrect" on the error condition. If you did not align the Print Head after you are made to "Changing Intensity Setting" in the User's Guide onscreen manual...
... on page 50 and perform any necessary maintenance operation. „ Printed Paper Curls or Has Ink Blots Cause Action Paper is left as in (B), pull the orange tape and remove it . The media is remaining. See "When Printing Becomes Faint or Colors Are Incorrect" on the error condition. If you did not align the Print Head after you are made to "Changing Intensity Setting" in the User's Guide onscreen manual...
MP520 series Quick Start Guide
Page 80
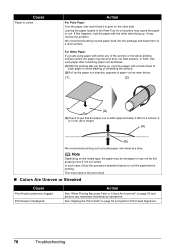
... paper loaded in height. (A) (B) We recommend printing curl-corrected paper one sheet at a time. We recommend putting unused paper back into the package and keep them on the media type, the paper may be smudged or may not be fed properly even if it to print on page 56 and perform Print Head Alignment. 76 Troubleshooting Note Depending on a level surface. If this happens, load the paper with the other side...
... paper loaded in height. (A) (B) We recommend printing curl-corrected paper one sheet at a time. We recommend putting unused paper back into the package and keep them on the media type, the paper may be smudged or may not be fed properly even if it to print on page 56 and perform Print Head Alignment. 76 Troubleshooting Note Depending on a level surface. If this happens, load the paper with the other side...
MP520 series Quick Start Guide
Page 84
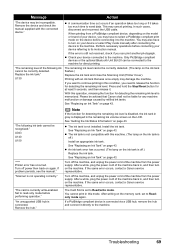
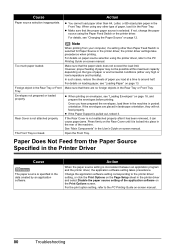
... on loading paper, see "Loading Paper" on -screen manual. 80 Troubleshooting See "Main Components" in the Rear Tray or Front Tray. Envelopes not prepared or loaded properly. z You cannot load paper other type of the application software on the type of the machine. If not, change the paper source using the Paper Feed Switch or the printer driver. Foreign object in the User's Guide on the Page Setup sheet in the data created by an application software. Note When printing from the Paper...
... on loading paper, see "Loading Paper" on -screen manual. 80 Troubleshooting See "Main Components" in the Rear Tray or Front Tray. Envelopes not prepared or loaded properly. z You cannot load paper other type of the application software on the type of the machine. If not, change the paper source using the Paper Feed Switch or the printer driver. Foreign object in the User's Guide on the Page Setup sheet in the data created by an application software. Note When printing from the Paper...
MP520 series Quick Start Guide
Page 87
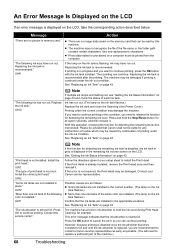
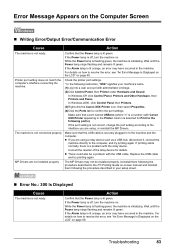
... MP Drivers. MP Drivers are using a relay device such as a USB hub, disconnect it, connect the machine directly to resolve the error, see "An Error Message Is Displayed on the LCD" on -screen manual and reinstall them following instruction, "XXX" signifies your setup sheet. „ Error No.: 300 Is Displayed Cause The machine is initializing. While the Power lamp is flashing green, the machine is not ready. In Windows 2000, click Control Panel then Printers...
... MP Drivers. MP Drivers are using a relay device such as a USB hub, disconnect it, connect the machine directly to resolve the error, see "An Error Message Is Displayed on the LCD" on -screen manual and reinstall them following instruction, "XXX" signifies your setup sheet. „ Error No.: 300 Is Displayed Cause The machine is initializing. While the Power lamp is flashing green, the machine is not ready. In Windows 2000, click Control Panel then Printers...
MP520 series Quick Start Guide
Page 88
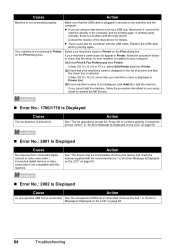
... displayed, click Add(+) to add the machine. In Mac OS X v.10.2.8, check that your machine's name is displayed in Printer List. (3)If your machine's name does not appear in Printer, follow the procedure described in Printer on page 68. „ Error No.: 2002 Is Displayed Cause Action An unsupported USB hub is almost full. Contact the service center." Make sure that your machine's name in your setup sheet to reinstall the MP Drivers...
... displayed, click Add(+) to add the machine. In Mac OS X v.10.2.8, check that your machine's name is displayed in Printer List. (3)If your machine's name does not appear in Printer, follow the procedure described in Printer on page 68. „ Error No.: 2002 Is Displayed Cause Action An unsupported USB hub is almost full. Contact the service center." Make sure that your machine's name in your setup sheet to reinstall the MP Drivers...
MP520 series Quick Start Guide
Page 89
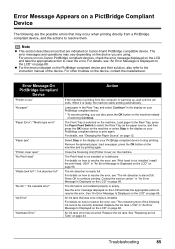
... stop printing. Close the Scanning Unit (Printer Cover) on page 68. U051" in the display on the machine and try printing again. Contact the service center." The ink tank is nearly full. Replace the ink tank. Troubleshooting 85 Load paper in the Rear Tray, press the Paper Feed Switch to print again. Remove the jammed paper, load new paper, press the OK button on your PictBridge compliant device to resolve the error, see "Print head is almost full. Install the print head. in "An Error Message Is Displayed...
... stop printing. Close the Scanning Unit (Printer Cover) on page 68. U051" in the display on the machine and try printing again. Contact the service center." The ink tank is nearly full. Replace the ink tank. Troubleshooting 85 Load paper in the Rear Tray, press the Paper Feed Switch to print again. Remove the jammed paper, load new paper, press the OK button on your PictBridge compliant device to resolve the error, see "Print head is almost full. Install the print head. in "An Error Message Is Displayed...
MP520 series Quick Start Guide
Page 92
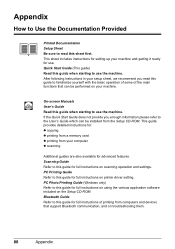
... guide provides detailed instructions for: z copying z printing from a memory card z printing from the Setup CD-ROM. PC Photo Printing Guide (Windows only) Refer to this guide for full instructions on using the various application software included on printer driver setting. Bluetooth Guide Refer to this guide for full instructions of the main functions that support Bluetooth communication, and on troubleshooting them. 88 Appendix Scanning Guide Refer to this guide for full instructions on scanning operation and settings. Quick Start Guide (This guide) Read this guide...
... guide provides detailed instructions for: z copying z printing from a memory card z printing from the Setup CD-ROM. PC Photo Printing Guide (Windows only) Refer to this guide for full instructions on using the various application software included on printer driver setting. Bluetooth Guide Refer to this guide for full instructions of the main functions that support Bluetooth communication, and on troubleshooting them. 88 Appendix Scanning Guide Refer to this guide for full instructions on scanning operation and settings. Quick Start Guide (This guide) Read this guide...

MP520 series Quick Start Guide
Page 104
... be covered for the balance of refurbished or new replacement units. 100 Safety Precautions Your Product must include street address). Monday through Canon USA's Authorized Service Facility (ASF) network. CANON USA WILL RETAIN THE PRODUCT THAT YOU ORIGINALLY PURCHASED, WHICH SHALL BECOME THE PROPERTY OF CANON USA. The name and telephone number of customer technical support* options: z Interactive troubleshooting, e-mail technical support, the latest driver downloads...
... be covered for the balance of refurbished or new replacement units. 100 Safety Precautions Your Product must include street address). Monday through Canon USA's Authorized Service Facility (ASF) network. CANON USA WILL RETAIN THE PRODUCT THAT YOU ORIGINALLY PURCHASED, WHICH SHALL BECOME THE PROPERTY OF CANON USA. The name and telephone number of customer technical support* options: z Interactive troubleshooting, e-mail technical support, the latest driver downloads...
MP520 series Quick Start Guide
Page 106
... Print Head Lock Lever 45 Printing from a Memory Card 23 Photo Index Sheet 30 select and print 25 Printing from Your Computer 33 Macintosh 34 Windows 33 Printing Photographs Directly from a Compliant Device 37 PictBridge 39 R Rear Cover 62 Rear Tray 7 Replacing Ink Tanks 45 Routine Maintenance 43 replacing ink tanks 45 S Safety Precautions 94 Scanning Images 35 Scanning Unit (Printer Cover) 45 Scanning Unit Support 45 Sheet Feeder Cover 14 Specialty Media 7 Specifications copy 90 general 90 PictBridge 91 scan 91 T Troubleshooting 67 Turning off the Machine 5 Turning...
... Print Head Lock Lever 45 Printing from a Memory Card 23 Photo Index Sheet 30 select and print 25 Printing from Your Computer 33 Macintosh 34 Windows 33 Printing Photographs Directly from a Compliant Device 37 PictBridge 39 R Rear Cover 62 Rear Tray 7 Replacing Ink Tanks 45 Routine Maintenance 43 replacing ink tanks 45 S Safety Precautions 94 Scanning Images 35 Scanning Unit (Printer Cover) 45 Scanning Unit Support 45 Sheet Feeder Cover 14 Specialty Media 7 Specifications copy 90 general 90 PictBridge 91 scan 91 T Troubleshooting 67 Turning off the Machine 5 Turning...
MP520 series Easy Setup Instructions
Page 1
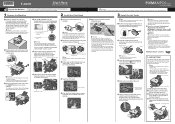
... Print Head. • If the Scanning Unit (Printer Cover) is pressed only halfway down the serial number located inside of the ink tank. Important The machine starts the preparatory operation. Wait until the machine has stopped making operating noises. Protective Cap Do not press! Front Tray Loading Paper in the Rear Tray a Load the paper in , or the inside the machine. Then open the Front Tray and extend the Output Paper Support. Once the message "Install the print head and set to "An Error Message...
... Print Head. • If the Scanning Unit (Printer Cover) is pressed only halfway down the serial number located inside of the ink tank. Important The machine starts the preparatory operation. Wait until the machine has stopped making operating noises. Protective Cap Do not press! Front Tray Loading Paper in the Rear Tray a Load the paper in , or the inside the machine. Then open the Front Tray and extend the Output Paper Support. Once the message "Install the print head and set to "An Error Message...

MP520 series Easy Setup Instructions
Page 2
.... USB b Turn on the desktop. c Double-click the Setup icon. The MP Drivers, On-screen Manuals, and application software are installed automatically. After software installation is displayed, follow the onscreen instructions to restart your Mac and insert the Setup CD-ROM. f on the operating system you are not supported, do not remove the Setup CD-ROM during installation, do not connect the machine to these. • The screens below refer to Windows...
.... USB b Turn on the desktop. c Double-click the Setup icon. The MP Drivers, On-screen Manuals, and application software are installed automatically. After software installation is displayed, follow the onscreen instructions to restart your Mac and insert the Setup CD-ROM. f on the operating system you are not supported, do not remove the Setup CD-ROM during installation, do not connect the machine to these. • The screens below refer to Windows...


