Software Users Manual - English
Page 21
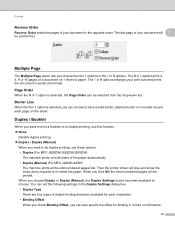
...sides of the paper automatically. • Duplex (Manual) (For MFC-J280WJ430W) The machine prints all the odd numbered pages first. When you choose the N in 1 options or the 1 in inches or millimeters. 12 Printing Reverse Order 1 Reverse Order prints the pages of your document will 1 be printed ... show the instructions required to print a booklet or do duplex printing, use these options. • Duplex (For MFC-J625DW/J825DW/J835DW) The machine prints on 1 sheet of your document in poster print mode. The 1 in N options enlarges your print size and prints the document in the opposite ...
...sides of the paper automatically. • Duplex (Manual) (For MFC-J280WJ430W) The machine prints all the odd numbered pages first. When you choose the N in 1 options or the 1 in inches or millimeters. 12 Printing Reverse Order 1 Reverse Order prints the pages of your document will 1 be printed ... show the instructions required to print a booklet or do duplex printing, use these options. • Duplex (For MFC-J625DW/J825DW/J835DW) The machine prints on 1 sheet of your document in poster print mode. The 1 in N options enlarges your print size and prints the document in the opposite ...
Software Users Manual - English
Page 22
...having to 15. You can set , from 1 to change the order of the page number. • Booklet (For MFC-J625DW/J825DW/J835DW) The machine prints on both sides of pages. • Binding Offset When you check Binding Offset, you can also specify the offset for each orientation. &#...in booklet format using duplex printing; You can help when folding the printed booklet that has a large number of the paper automatically. • Booklet (Manual) (For MFC-J280WJ430W) The machine prints all the even numbered sides first. Then the printer driver will be printed. This option can specify the...
...having to 15. You can set , from 1 to change the order of the page number. • Booklet (For MFC-J625DW/J825DW/J835DW) The machine prints on both sides of pages. • Binding Offset When you check Binding Offset, you can also specify the offset for each orientation. &#...in booklet format using duplex printing; You can help when folding the printed booklet that has a large number of the paper automatically. • Booklet (Manual) (For MFC-J280WJ430W) The machine prints all the even numbered sides first. Then the printer driver will be printed. This option can specify the...
Software Users Manual - English
Page 37
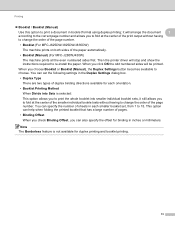
Printing Add Profile 1 The Add Profile dialog appears by clicking Delete Profile. c The selected profile will be deleted. 28 b Choose an icon you want to use ... Profile. You can add 20 new profiles with your preferred 1 settings. a Choose a profile you have added. b Click Delete. c The current settings shown on the left side of the profiles you want to delete from the Icon list, then click OK. a Enter the desired title in Name. You can delete any of...
Printing Add Profile 1 The Add Profile dialog appears by clicking Delete Profile. c The selected profile will be deleted. 28 b Choose an icon you want to use ... Profile. You can add 20 new profiles with your preferred 1 settings. a Choose a profile you have added. b Click Delete. c The current settings shown on the left side of the profiles you want to delete from the Icon list, then click OK. a Enter the desired title in Name. You can delete any of...
Software Users Manual - English
Page 141
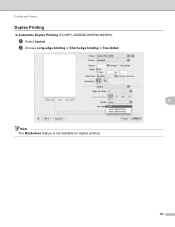
b Choose Long-edge binding or Short-edge binding in Two-Sided. 8 Note The Borderless feature is not available for duplex printing. 132 Printing and Faxing Duplex Printing 8 Automatic Duplex Printing (For MFC-J625DW/J825DW/J835DW) a Select Layout.
b Choose Long-edge binding or Short-edge binding in Two-Sided. 8 Note The Borderless feature is not available for duplex printing. 132 Printing and Faxing Duplex Printing 8 Automatic Duplex Printing (For MFC-J625DW/J825DW/J835DW) a Select Layout.
Software Users Manual - English
Page 142
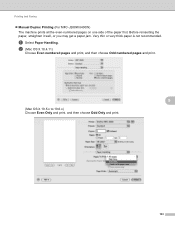
Before reinserting the paper, straighten it well, or you may get a paper jam. b (Mac OS X 10.4.11) Choose Even numbered pages and print, and then choose Odd numbered pages and print. 8 (Mac OS X 10.5.x to 10.6.x) Choose Even Only and print, and then choose Odd Only and print. 133 Very thin or very thick paper is not recommended. a Select Paper Handling. Printing and Faxing Manual Duplex Printing (For MFC-J280W/J430W) The machine prints all the even-numbered pages on one side of the paper first.
Before reinserting the paper, straighten it well, or you may get a paper jam. b (Mac OS X 10.4.11) Choose Even numbered pages and print, and then choose Odd numbered pages and print. 8 (Mac OS X 10.5.x to 10.6.x) Choose Even Only and print, and then choose Odd Only and print. 133 Very thin or very thick paper is not recommended. a Select Paper Handling. Printing and Faxing Manual Duplex Printing (For MFC-J280W/J430W) The machine prints all the even-numbered pages on one side of the paper first.
Software Users Manual - English
Page 164
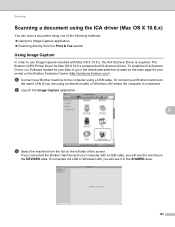
... your model on the Brother Solutions Center (http://solutions.brother.com/). The Brother CUPS Printer Driver for your Brother machine to the downloads selection located on the left side of the following methods: Using the Image Capture application Scanning directly from the Print & Fax section Using Image...go to the computer using a network model) or Wireless LAN where the computer is required. If you connected the Brother machine and your Brother machine to use Image Capture included with a USB cable, you will see it in the DEVICES area. Or connect...
... your model on the Brother Solutions Center (http://solutions.brother.com/). The Brother CUPS Printer Driver for your Brother machine to the downloads selection located on the left side of the following methods: Using the Image Capture application Scanning directly from the Print & Fax section Using Image...go to the computer using a network model) or Wireless LAN where the computer is required. If you connected the Brother machine and your Brother machine to use Image Capture included with a USB cable, you will see it in the DEVICES area. Or connect...

Software Users Manual - English
Page 167
... below: a Connect your Brother machine to the same LAN (if you can scan directly from there. d Select the machine from the Apple Menu. b Select System Preferences from the list on the left side of the screen and click on Open Print Queue. 9 e Click on the Print & Fax icon. Scanning... Scanning directly from the Print & Fax section 9 If you have already added your Brother machine in the Print & Fax section, you are using a USB cable.
... below: a Connect your Brother machine to the same LAN (if you can scan directly from there. d Select the machine from the Apple Menu. b Select System Preferences from the list on the left side of the screen and click on Open Print Queue. 9 e Click on the Print & Fax icon. Scanning... Scanning directly from the Print & Fax section 9 If you have already added your Brother machine in the Print & Fax section, you are using a USB cable.
Quick Setup Guide - English
Page 2
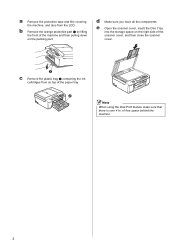
... the components. a Remove the protective tape and film covering the machine, and also from on top of the paper tray. 2 Note When using the Disk Print feature make sure that there is over 4 in. e Open the scanner cover, insert the Disc Tray into the storage space on the right...
... the components. a Remove the protective tape and film covering the machine, and also from on top of the paper tray. 2 Note When using the Disk Print feature make sure that there is over 4 in. e Open the scanner cover, insert the Disc Tray into the storage space on the right...

Quick Setup Guide - English
Page 4
... touch the edges of the paper. it clicks, and then unfold the paper support flap b. h Slowly push the paper tray completely into the paper tray print side down and top edge first. Note When you use Legal size paper, press and hold the universal guide release button a as you do not push... the paper into the machine. Make sure that you slide out the front of the tray and cause paper feed problems. f Gently adjust the paper side guides to the paper with both hands. Check that the paper is flat in place, pull out the paper support a until it may lift at...
... touch the edges of the paper. it clicks, and then unfold the paper support flap b. h Slowly push the paper tray completely into the paper tray print side down and top edge first. Note When you use Legal size paper, press and hold the universal guide release button a as you do not push... the paper into the machine. Make sure that you slide out the front of the tray and cause paper feed problems. f Gently adjust the paper side guides to the paper with both hands. Check that the paper is flat in place, pull out the paper support a until it may lift at...

Advanced Users Manual - English
Page 5
... 40 Ink Save Mode 41 Thin Paper Copy 41 Book Copy ...42 Watermark Copy 42 Duplex (2-sided) copying 44 Setting your favorites 45 8 PhotoCapture Center™: Printing photos from a memory card or USB Flash memory drive 46 PhotoCapture Center™ operations 46 Memory... cards, USB Flash memory drive and folder structures 46 Movie printing 47 Print Images...47 Print Index (Thumbnails 47 Printing Photos 48 Enhance Photos 48 DPOF printing 50 PhotoCapture Center™ print settings 51 Print Quality 51 Paper options 51 Adjusting Brightness, Contrast and Color 52 ...
... 40 Ink Save Mode 41 Thin Paper Copy 41 Book Copy ...42 Watermark Copy 42 Duplex (2-sided) copying 44 Setting your favorites 45 8 PhotoCapture Center™: Printing photos from a memory card or USB Flash memory drive 46 PhotoCapture Center™ operations 46 Memory... cards, USB Flash memory drive and folder structures 46 Movie printing 47 Print Images...47 Print Index (Thumbnails 47 Printing Photos 48 Enhance Photos 48 DPOF printing 50 PhotoCapture Center™ print settings 51 Print Quality 51 Paper options 51 Adjusting Brightness, Contrast and Color 52 ...

Advanced Users Manual - English
Page 47
c Enter the number of ink saved will vary depending on the other side does not bleed through. 7 a Press (COPY). f Press Ink Save Mode. Thin Paper Copy 7 If your document. The amount of copies you do not want to .... c Enter the number of the image. f Press Thin Paper Copy. b Load your document is a duplex copy on thin paper, choose Thin Paper Copy so the print on the document. g Press Black Start or Color Start. e Press Advanced Settings. Note • Watermark Copy, Book Copy, Thin Paper Copy and Page Layout are...
c Enter the number of ink saved will vary depending on the other side does not bleed through. 7 a Press (COPY). f Press Ink Save Mode. Thin Paper Copy 7 If your document. The amount of copies you do not want to .... c Enter the number of the image. f Press Thin Paper Copy. b Load your document is a duplex copy on thin paper, choose Thin Paper Copy so the print on the document. g Press Black Start or Color Start. e Press Advanced Settings. Note • Watermark Copy, Book Copy, Thin Paper Copy and Page Layout are...
Advanced Users Manual - English
Page 50
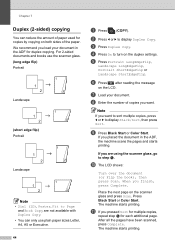
... additional page. k If you finish, press Complete. Place the next page on the duplex settings. Press Black Start or Color Start. The machine starts printing. Chapter 7 Duplex (2-sided) copying 7 You can only use the scanner glass. (long edge flip) Portrait 1 2 Landscape 1 2 2 2 11 1 2 (short edge flip) Portrait 1 1 2 Landscape...If you placed the document in the ADF for copies by copying on the LCD. The machine starts printing. f Press after reading the message on both sides of copies you load your document. If you want . After all the pages have been scanned, ...
... additional page. k If you finish, press Complete. Place the next page on the duplex settings. Press Black Start or Color Start. The machine starts printing. Chapter 7 Duplex (2-sided) copying 7 You can only use the scanner glass. (long edge flip) Portrait 1 2 Landscape 1 2 2 2 11 1 2 (short edge flip) Portrait 1 1 2 Landscape...If you placed the document in the ADF for copies by copying on the LCD. The machine starts printing. f Press after reading the message on both sides of copies you load your document. If you want . After all the pages have been scanned, ...

Advanced Users Manual - English
Page 51
... or Favorite:3. You can rename it. c Press d or c to three favorites. a Press (COPY). Duplex2 uses a longer print time and will print the first side and eject the paper and then pull the paper in lighter colors. b Choose the copy option and settings you want to 12 ...the new name (up to display Favorite Settings. Making copies g Do one of the following: If you want to print the second side. DO NOT touch the printed page until it . Note Set Watermark Copy to display Favorite. 7 c Press Favorite. f Press the location where you want...
... or Favorite:3. You can rename it. c Press d or c to three favorites. a Press (COPY). Duplex2 uses a longer print time and will print the first side and eject the paper and then pull the paper in lighter colors. b Choose the copy option and settings you want to 12 ...the new name (up to display Favorite Settings. Making copies g Do one of the following: If you want to print the second side. DO NOT touch the printed page until it . Note Set Watermark Copy to display Favorite. 7 c Press Favorite. f Press the location where you want...
Advanced Users Manual - English
Page 73
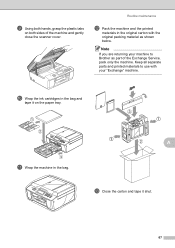
i Using both sides of the Exchange Service, pack only the machine. Routine maintenance l Pack the machine and the printed materials in the original carton with your machine to Brother as shown below. j Wrap the ink cartridges in the bag. A m Close the carton and tape it on both hands, grasp the plastic tabs on ...tray. k Wrap the machine in the bag and tape it shut. 67 Note If you are returning your "Exchange" machine. Keep all separate parts and printed materials to use with the original packing material as part of the machine and gently close the scanner cover.
i Using both sides of the Exchange Service, pack only the machine. Routine maintenance l Pack the machine and the printed materials in the original carton with your machine to Brother as shown below. j Wrap the ink cartridges in the bag. A m Close the carton and tape it on both hands, grasp the plastic tabs on ...tray. k Wrap the machine in the bag and tape it shut. 67 Note If you are returning your "Exchange" machine. Keep all separate parts and printed materials to use with the original packing material as part of the machine and gently close the scanner cover.
Advanced Users Manual - English
Page 78
... D Dialing access codes and credit card numbers 30 Caller ID history 29 Groups (Broadcasting 10 Outgoing Call 29 Direct printing from a non-PictBridge camera 60 from a PictBridge camera 57 Dual Access 9 Duplex (2-sided) copy 44 72 B Broadcasting 10 setting up Groups for 32 C Caller ID 26 Caller ID history 29 Add to...
... D Dialing access codes and credit card numbers 30 Caller ID history 29 Groups (Broadcasting 10 Outgoing Call 29 Direct printing from a non-PictBridge camera 60 from a PictBridge camera 57 Dual Access 9 Duplex (2-sided) copy 44 72 B Broadcasting 10 setting up Groups for 32 C Caller ID 26 Caller ID history 29 Add to...
Users Manual - English
Page 24
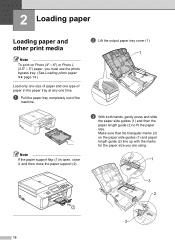
... (1) and then the paper length guide (2) to fit the paper size. 2 Loading paper 2 Loading paper and other print media 2 Note To print on the paper side guides (1) and paper length guide (2) line up with the marks for the paper size you must use the photo bypass tray. (See Loading photo paper ...
... (1) and then the paper length guide (2) to fit the paper size. 2 Loading paper 2 Loading paper and other print media 2 Note To print on the paper side guides (1) and paper length guide (2) line up with the marks for the paper size you must use the photo bypass tray. (See Loading photo paper ...

Users Manual - English
Page 25
... in first. Note Always make sure that the paper is not curled or wrinkled. 11 Loading paper e Gently put the paper into the paper tray print side down and top edge in too far; Check that the paper is flat in the paper tray, the machine may lift at least 10 sheets...
... in first. Note Always make sure that the paper is not curled or wrinkled. 11 Loading paper e Gently put the paper into the paper tray print side down and top edge in too far; Check that the paper is flat in the paper tray, the machine may lift at least 10 sheets...
Users Manual - English
Page 27
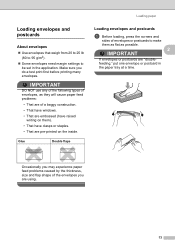
... as they will cause paper feed problems: • That are of the envelopes you do a test print first before printing many envelopes. Glue Double flaps Loading envelopes and postcards 2 a Before loading, press the corners and sides of envelopes or postcards to be set in the paper tray at a time. Make sure you are...
... as they will cause paper feed problems: • That are of the envelopes you do a test print first before printing many envelopes. Glue Double flaps Loading envelopes and postcards 2 a Before loading, press the corners and sides of envelopes or postcards to be set in the paper tray at a time. Make sure you are...
Users Manual - English
Page 137
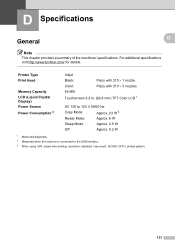
For additional specifications visit http://www.brother.com/ for details. D Specifications D General D D Note This chapter provides a summary of the machines' specifications. Printer Type Print Head Memory Capacity LCD (Liquid Crystal Display) Power Source Power Consumption 2 Inkjet Black: Piezo with 210 1 nozzle Color: Piezo with 210...Mode: Approx. 6 W Sleep Mode: Approx. 2.5 W Off: Approx. 0.2 W 1 Measured diagonally. 2 Measured when the machine is connected to the USB interface. 3 When using ADF, single-side printing, resolution: standard / document: ISO/IEC 24712...
For additional specifications visit http://www.brother.com/ for details. D Specifications D General D D Note This chapter provides a summary of the machines' specifications. Printer Type Print Head Memory Capacity LCD (Liquid Crystal Display) Power Source Power Consumption 2 Inkjet Black: Piezo with 210 1 nozzle Color: Piezo with 210...Mode: Approx. 6 W Sleep Mode: Approx. 2.5 W Off: Approx. 0.2 W 1 Measured diagonally. 2 Measured when the machine is connected to the USB interface. 3 When using ADF, single-side printing, resolution: standard / document: ISO/IEC 24712...
Users Manual - English
Page 145
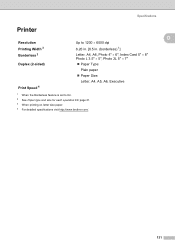
D D 131 Specifications Printer Resolution Printing Width 3 Borderless 2 Duplex (2-sided) Print Speed 4 Up to 1200 6000 dpi 8.26 in. [8.5 in. (borderless) 1] Letter, A4, A6, Photo 4" 6", Index Card 5" 8" Photo L 3.5" 5", Photo 2L 5" 7" Paper Type: Plain paper Paper Size: Letter, A4, A5, A6, Executive 1 When the Borderless feature is set to On. 2 See Paper type and size for each operation uu page 21. 3 When printing on letter size paper. 4 For detailed specifications visit http://www.brother.com/.
D D 131 Specifications Printer Resolution Printing Width 3 Borderless 2 Duplex (2-sided) Print Speed 4 Up to 1200 6000 dpi 8.26 in. [8.5 in. (borderless) 1] Letter, A4, A6, Photo 4" 6", Index Card 5" 8" Photo L 3.5" 5", Photo 2L 5" 7" Paper Type: Plain paper Paper Size: Letter, A4, A5, A6, Executive 1 When the Borderless feature is set to On. 2 See Paper type and size for each operation uu page 21. 3 When printing on letter size paper. 4 For detailed specifications visit http://www.brother.com/.


