Users Manual - English
Page 70
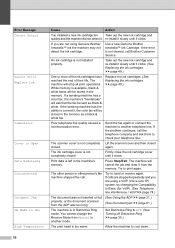
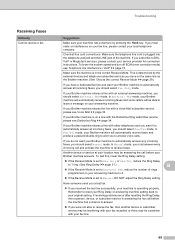
...Detect Cannot Print Replace Ink Comm.Error Cover is too warm. Use a new Genuine Brother Innobella™ Ink Cartridge. Firmly close it clicks. Press Stop/Exit. Try to print again. Set Distinctive Ring to check your telephone line. again. The ink cartridge cover is not completely closed . You ...install it slowly until it from the memory. If the sending machine has the ability to another telephone line. Send the fax again or connect the machine to cool down. 56 Print data is not installed properly. The machine will be sent as a black & white fax. If...
...Detect Cannot Print Replace Ink Comm.Error Cover is too warm. Use a new Genuine Brother Innobella™ Ink Cartridge. Firmly close it clicks. Press Stop/Exit. Try to print again. Set Distinctive Ring to check your telephone line. again. The ink cartridge cover is not completely closed . You ...install it slowly until it from the memory. If the sending machine has the ability to another telephone line. Send the fax again or connect the machine to cool down. 56 Print data is not installed properly. The machine will be sent as a black & white fax. If...
Users Manual - English
Page 79
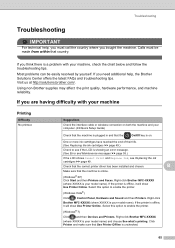
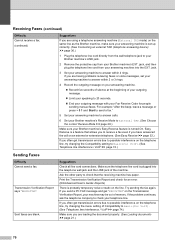
Visit us at http://solutions.brother.com/. Suggestions Check the interface cable or wireless connection on . Right-click Brother MFC-XXXXX (where XXXXX is on both the machine and your computer. (uuQuick Setup Guide) Check that the machine is plugged in and that the On/Off key is your model name). If the printer is offline, it...
Visit us at http://solutions.brother.com/. Suggestions Check the interface cable or wireless connection on . Right-click Brother MFC-XXXXX (where XXXXX is on both the machine and your computer. (uuQuick Setup Guide) Check that the machine is plugged in and that the On/Off key is your model name). If the printer is offline, it...
Users Manual - English
Page 82
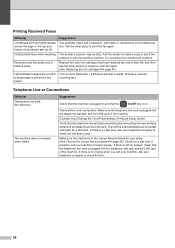
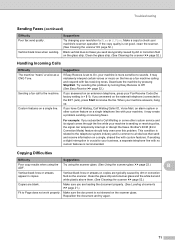
.... Try receiving from another fax machine. If there is still no answer, check that the telephone line and jack are working by connecting a known working telephone and telephone line to the jack. Telephone Line or Connections Difficulty Dialing does not work. (No dial tone) The machine does not ...answer when called. Suggestions Check that the machine is plugged in and that have reached the end of sentences are cut off . Check all line cord connections. Make sure the machine is in black & white. Vertical black lines when receiving....
.... Try receiving from another fax machine. If there is still no answer, check that the telephone line and jack are working by connecting a known working telephone and telephone line to the jack. Telephone Line or Connections Difficulty Dialing does not work. (No dial tone) The machine does not ...answer when called. Suggestions Check that the machine is plugged in and that have reached the end of sentences are cut off . Check all line cord connections. Make sure the machine is in black & white. Vertical black lines when receiving....
Users Manual - English
Page 83
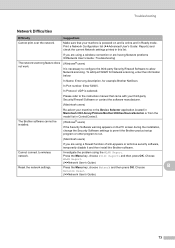
...original setting. If you were not able to receive faxes. Check all incoming faxes, you should select Fax Only mode. Have someone send you a test fax: If you received the test fax successfully, your Brother machine shares a line with an external answering machine, you...call before the machine has a chance to answer. If you subscribe to your Brother machine answers. If your Brother machine is set to automatically answer all line cord connections. Remember to reset your Ring Delay or answering machine setting back to DSL, VoIP or MagicJack...
...original setting. If you were not able to receive faxes. Check all incoming faxes, you should select Fax Only mode. Have someone send you a test fax: If you received the test fax successfully, your Brother machine shares a line with an external answering machine, you...call before the machine has a chance to answer. If you subscribe to your Brother machine answers. If your Brother machine is set to automatically answer all line cord connections. Remember to reset your Ring Delay or answering machine setting back to DSL, VoIP or MagicJack...
Users Manual - English
Page 84
...and Start to send a fax." 5 Set your answering machine to answer calls. 6 Set your Brother machine's Receive Mode to Basic(for people sending manual faxes. Print the Transmission Verification Report and check for an error. (uuAdvanced User's Guide: Reports) There is probably temporary noise or static on the...Telephone line interference / VoIP uu page 74.) Make sure you are having problems receiving faxes or voice messages, set up correctly. (See Connecting an external TAD (telephone answering device) uu page 36.) 1 Plug the telephone line cord directly from the wall telephone jack to 20 ...
...and Start to send a fax." 5 Set your answering machine to answer calls. 6 Set your Brother machine's Receive Mode to Basic(for people sending manual faxes. Print the Transmission Verification Report and check for an error. (uuAdvanced User's Guide: Reports) There is probably temporary noise or static on the...Telephone line interference / VoIP uu page 74.) Make sure you are having problems receiving faxes or voice messages, set up correctly. (See Connecting an external TAD (telephone answering device) uu page 36.) 1 Plug the telephone line cord directly from the wall telephone jack to 20 ...
Users Manual - English
Page 85
...or correction fluid on the scanner. When your business, a separate telephone line with custom features. Brother's ECM (Error Correction Mode) feature should help overcome this problem by dirt or correction fluid on ...Copies are typically caused by turning Easy Receive to the EXT. Make a copy to check your resolution to Page does not work properly. Custom features on the scanner glass. ...typically caused by pressing Stop/Exit. Vertical black lines or streaks on the external telephone (connected to Off. (See Easy Receive uu page 32.) If you send are loading the ...
...or correction fluid on the scanner. When your business, a separate telephone line with custom features. Brother's ECM (Error Correction Mode) feature should help overcome this problem by dirt or correction fluid on ...Copies are typically caused by turning Easy Receive to the EXT. Make a copy to check your resolution to Page does not work properly. Custom features on the scanner glass. ...typically caused by pressing Stop/Exit. Vertical black lines or streaks on the external telephone (connected to Off. (See Easy Receive uu page 32.) If you send are loading the ...
Users Manual - English
Page 87
... the installation, change the Security Software settings to permit the Brother product setup program or other program to run. (Macintosh users) If you are using a wireless connection or are using the WLAN Report. Print a Network Configuration list (uuAdvanced User's Guide: Reports) and check the current Network settings printed in ControlCenter2. Choose WLAN Report...
... the installation, change the Security Software settings to permit the Brother product setup program or other program to run. (Macintosh users) If you are using a wireless connection or are using the WLAN Report. Print a Network Configuration list (uuAdvanced User's Guide: Reports) and check the current Network settings printed in ControlCenter2. Choose WLAN Report...
Advanced Users Manual - English
Page 37
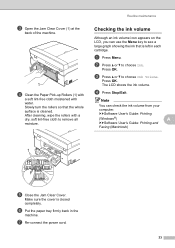
... see a large graph showing the ink that the whole surface is cleaned. Routine maintenance Checking the ink volume A Although an ink volume icon appears on the LCD, you can check the ink volume from your computer. Press OK. g Re-connect the power cord. 33 d Press Stop/Exit. Note You can use the Menu...
... see a large graph showing the ink that the whole surface is cleaned. Routine maintenance Checking the ink volume A Although an ink volume icon appears on the LCD, you can check the ink volume from your computer. Press OK. g Re-connect the power cord. 33 d Press Stop/Exit. Note You can use the Menu...

Advanced Users Manual - English
Page 43
... Fine and Photo. Search A numerical or alphabetical electronic listing of vertical and horizontal lines per inch. TAD (telephone answering device) You can check which jobs are waiting in real time. Tone A form of dialing on the top of faxed pages. WLAN Report A printed report that ... 203 196 dpi (color). Station ID The stored information that shows its B date, time and number. Remaining jobs You can connect an external telephone answering device or answering machine to the receiving fax machine. Ring Volume Volume setting for very small print and line art. Speed...
... Fine and Photo. Search A numerical or alphabetical electronic listing of vertical and horizontal lines per inch. TAD (telephone answering device) You can check which jobs are waiting in real time. Tone A form of dialing on the top of faxed pages. WLAN Report A printed report that ... 203 196 dpi (color). Station ID The stored information that shows its B date, time and number. Remaining jobs You can connect an external telephone answering device or answering machine to the receiving fax machine. Ring Volume Volume setting for very small print and line art. Speed...
Advanced Users Manual - English
Page 44
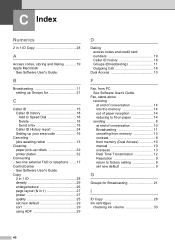
B Broadcasting 11 setting up rollers 32 printer platen 32 Connecting two-line external TAD or telephone .......17 ControlCenter See Software User's Guide. Fax, stand-alone receiving at end of paper reception 14 reducing to Speed ... 24 Setting up your area code 16 Canceling jobs awaiting redial 13 Cleaning paper pick-up Groups for Broadcasting 21 I ID Copy 28 Ink cartridges checking ink volume 33 40 Copy 2 in 1 ID 28 density 29 enlarge/reduce 26 page layout (N in 1 ID Copy 28 A Access codes, storing and dialing 19...
B Broadcasting 11 setting up rollers 32 printer platen 32 Connecting two-line external TAD or telephone .......17 ControlCenter See Software User's Guide. Fax, stand-alone receiving at end of paper reception 14 reducing to Speed ... 24 Setting up your area code 16 Canceling jobs awaiting redial 13 Cleaning paper pick-up Groups for Broadcasting 21 I ID Copy 28 Ink cartridges checking ink volume 33 40 Copy 2 in 1 ID 28 density 29 enlarge/reduce 26 page layout (N in 1 ID Copy 28 A Access codes, storing and dialing 19...
Quick Setup Guide - English
Page 15
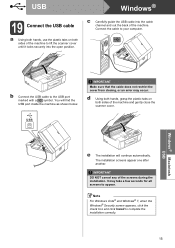
...USB cable a Using both hands, use the plastic tabs on both sides of the machine and gently close the scanner cover. Connect the cable to appear. b Connect the USB cable to complete the installation correctly. 15 Note For Windows Vista® and Windows® 7, when the Windows®...; Security screen appears, click the check box and click Install to the USB port marked with a symbol. IMPORTANT DO NOT cancel any of ...
...USB cable a Using both hands, use the plastic tabs on both sides of the machine and gently close the scanner cover. Connect the cable to appear. b Connect the USB cable to complete the installation correctly. 15 Note For Windows Vista® and Windows® 7, when the Windows®...; Security screen appears, click the check box and click Install to the USB port marked with a symbol. IMPORTANT DO NOT cancel any of ...
Quick Setup Guide - English
Page 23
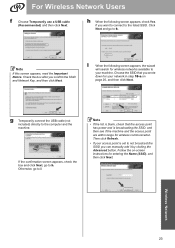
...Choose the SSID that the access point has power and is set to the computer and the machine. Note • If the list is blank, check that you can manually add it by clicking the Advanced button. Then click Refresh. • If your access point is broadcasting the SSID, and ...then see if the machine and the access point are within range for entering the Name (SSID), and then click Next. Check the box after you want to connect to h. g Temporarily connect the USB cable (not included) directly to not broadcast the SSID you wrote down for wireless networks available to k. Follow ...
...Choose the SSID that the access point has power and is set to the computer and the machine. Note • If the list is blank, check that you can manually add it by clicking the Advanced button. Then click Refresh. • If your access point is broadcasting the SSID, and ...then see if the machine and the access point are within range for entering the Name (SSID), and then click Next. Check the box after you want to connect to h. g Temporarily connect the USB cable (not included) directly to not broadcast the SSID you wrote down for wireless networks available to k. Follow ...
Quick Setup Guide - English
Page 25
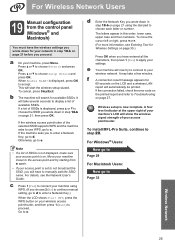
... Users 19 Manual configuration from a again. • If your access point is displayed, press a or b to e. If a list of available SSIDs. c Press 1 (Yes) to connect your machine using the dial pad to display a list of SSIDs is set to not broadcast the SSID, you proceed. Go to choose the SSID... you wrote down in step 18-b on page 21, then press OK. It may take several seconds to choose each letter or number. If the connection failed, check the error code on . Wireless setup is on the printed report and refer to e. a On your access point/router. Press a or b to Page ...
... Users 19 Manual configuration from a again. • If your access point is displayed, press a or b to e. If a list of available SSIDs. c Press 1 (Yes) to connect your machine using the dial pad to display a list of SSIDs is set to not broadcast the SSID, you proceed. Go to choose the SSID... you wrote down in step 18-b on page 21, then press OK. It may take several seconds to choose each letter or number. If the connection failed, check the error code on . Wireless setup is on the printed report and refer to e. a On your access point/router. Press a or b to Page ...
Quick Setup Guide - English
Page 26
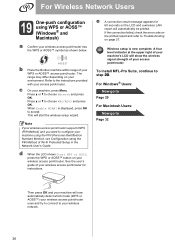
...;) your wireless network. 26 To install MFL-Pro Suite, continue to your wireless access point/router uses and try to connect to step 20. b Place the Brother machine within range of Wi-Fi Protected Setup in the Network User's Guide. d When the LCD shows Start WPS or...; button on the LCD and a wireless LAN report will start the wireless setup wizard. e A connection result message appears for instructions. Press a or b to accept. If the connection failed, check the error code on the printed report and refer to configure your machine using the PIN (Personal Identification...
...;) your wireless network. 26 To install MFL-Pro Suite, continue to your wireless access point/router uses and try to connect to step 20. b Place the Brother machine within range of Wi-Fi Protected Setup in the Network User's Guide. d When the LCD shows Start WPS or...; button on the LCD and a wireless LAN report will start the wireless setup wizard. e A connection result message appears for instructions. Press a or b to accept. If the connection failed, check the error code on the printed report and refer to configure your machine using the PIN (Personal Identification...
Quick Setup Guide - English
Page 27
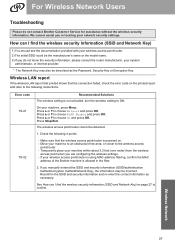
...ON. Press a or b to choose On and press OK. The wireless access point/router cannot be incorrect. Make sure that the connection failed, check the error code on . - If you manually entered the SSID and security information (SSID/authentication method/encryption method/Network Key), the ...settings. Press Stop/Exit. Move your machine within about 3.3 feet (one meter) from the wireless access point when you do not contact Brother Customer Service for assistance without the wireless security information. Press a or b to choose Network and press OK. Temporarily place your machine ...
...ON. Press a or b to choose On and press OK. The wireless access point/router cannot be incorrect. Make sure that the connection failed, check the error code on . - If you manually entered the SSID and security information (SSID/authentication method/encryption method/Network Key), the ...settings. Press Stop/Exit. Move your machine within about 3.3 feet (one meter) from the wireless access point when you do not contact Brother Customer Service for assistance without the wireless security information. Press a or b to choose Network and press OK. Temporarily place your machine ...
Quick Setup Guide - English
Page 30
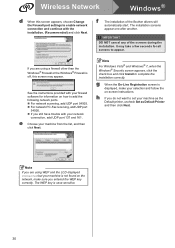
Note For Windows Vista® and Windows® 7, when the Windows® Security screen appears, click the check box and click Install to complete the installation correctly. g When the On-Line Registration screen is displayed, make sure you are using a firewall other than ... appear one after another. See the instructions provided with your machine from the list, and then click Next. IMPORTANT DO NOT cancel any of the Brother drivers will automatically start. e Choose your network connection, add UDP port 137 and 161. Note If you are using WEP and the LCD displayed...
Note For Windows Vista® and Windows® 7, when the Windows® Security screen appears, click the check box and click Install to complete the installation correctly. g When the On-Line Registration screen is displayed, make sure you are using a firewall other than ... appear one after another. See the instructions provided with your machine from the list, and then click Next. IMPORTANT DO NOT cancel any of the Brother drivers will automatically start. e Choose your network connection, add UDP port 137 and 161. Note If you are using WEP and the LCD displayed...
Quick Setup Guide - English
Page 34
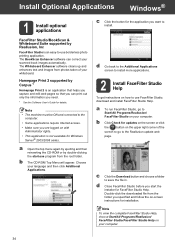
...and then click Additional Applications. The Whiteboard Enhancer software cleans up and enhances text and images from the root folder. b Click Check for installation. d Close FaceFilter Studio before you specified and follow the on-screen instructions for updates on the screen or click... require Internet access. • Make sure you want to use borderless photo printing application. Note • The machine must be ON and connected to install more applications. 2 Install FaceFilter Studio Help To get instructions on your computer. b The CD-ROM Top Menu will appear. c...
...and then click Additional Applications. The Whiteboard Enhancer software cleans up and enhances text and images from the root folder. b Click Check for installation. d Close FaceFilter Studio before you specified and follow the on-screen instructions for updates on the screen or click... require Internet access. • Make sure you want to use borderless photo printing application. Note • The machine must be ON and connected to install more applications. 2 Install FaceFilter Studio Help To get instructions on your computer. b The CD-ROM Top Menu will appear. c...

Network Glossary - English
Page 8
... server to automatically configure itself to manage network devices including computers, routers and Brother network ready machines. LLMNR 1 The Link-Local Multicast Name Resolution protocol (LLMNR) resolves the names of network connections and protocols WINS 1 Windows® Internet Name Service is an information providing service... that is Port 9100) 1 Another commonly used to work in the local network. The Web Services also lets you check the current status of the machine from the Network folder. (See Installing drivers used printing protocols on a TCP/IP network.
... server to automatically configure itself to manage network devices including computers, routers and Brother network ready machines. LLMNR 1 The Link-Local Multicast Name Resolution protocol (LLMNR) resolves the names of network connections and protocols WINS 1 Windows® Internet Name Service is an information providing service... that is Port 9100) 1 Another commonly used to work in the local network. The Web Services also lets you check the current status of the machine from the Network folder. (See Installing drivers used printing protocols on a TCP/IP network.

Network Glossary - English
Page 12
...Temporal Key Integrity Protocol) provides per-packet key mixing, a message integrity check and rekeying mechanism. AES AES (Advanced Encryption Standard) is sent on the network). Therefore care must be able to connect to access the network without IEEE 802.1x support. Authentication methods 3 &#...61550; Open system Wireless devices are configuring your Brother wireless machine supports. The Brother wireless machine uses the WEP key as it will...
...Temporal Key Integrity Protocol) provides per-packet key mixing, a message integrity check and rekeying mechanism. AES AES (Advanced Encryption Standard) is sent on the network). Therefore care must be able to connect to access the network without IEEE 802.1x support. Authentication methods 3 &#...61550; Open system Wireless devices are configuring your Brother wireless machine supports. The Brother wireless machine uses the WEP key as it will...
Network Users Manual - English
Page 22
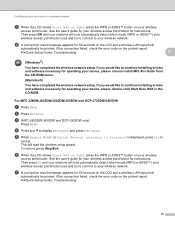
... necessary for operating your device, please double-click Start Here OSX in the CD-ROM. To cancel, press Stop/Exit. If the connection failed, check the error code on the printed report. uuQuick Setup Guide: Troubleshooting 3 (Windows®) You have completed the wireless network setup. See... detect which mode (WPS or AOSS™) your wireless access point/router uses and try to connect to your wireless network. If the connection failed, check the error code on the printed report. c (MFC-J825DW/J835DW and DCP-J925DW only) Press WLAN. e When Enable WLAN? f When the LCD...
... necessary for operating your device, please double-click Start Here OSX in the CD-ROM. To cancel, press Stop/Exit. If the connection failed, check the error code on the printed report. uuQuick Setup Guide: Troubleshooting 3 (Windows®) You have completed the wireless network setup. See... detect which mode (WPS or AOSS™) your wireless access point/router uses and try to connect to your wireless network. If the connection failed, check the error code on the printed report. c (MFC-J825DW/J835DW and DCP-J925DW only) Press WLAN. e When Enable WLAN? f When the LCD...


