Software Users Manual - English
Page 35
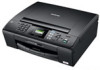
...d If you launch FaceFilter Studio for the first time, if your Brother machine is turned Off or not connected to your computer and then click Yes. Make sure your Brother machine is connected to your computer, this screen will appear. 1 1 b Click ...Detect in step a, and this screen will appear. If FaceFilter Studio still does not detect the Brother machine in step c, click Cancel. c If FaceFilter Studio does not detect the Brother machine, this screen will appear. Turn on your Brother machine and check...
...d If you launch FaceFilter Studio for the first time, if your Brother machine is turned Off or not connected to your computer and then click Yes. Make sure your Brother machine is connected to your computer, this screen will appear. 1 1 b Click ...Detect in step a, and this screen will appear. If FaceFilter Studio still does not detect the Brother machine in step c, click Cancel. c If FaceFilter Studio does not detect the Brother machine, this screen will appear. Turn on your Brother machine and check...
Software Users Manual - English
Page 108
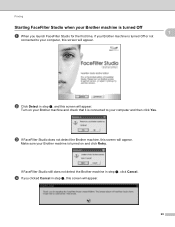
...the Add to Startup folder check box, so that the software automatically runs and can transfer any faxes on page 110. 102 Brother PC-FAX Software (MFC models only) PC-FAX receiving (Not available for MFC-J220, MFC-J265W, MFC-J270W, MFC-J410W and MFC-J415W) 5 The Brother PC-FAX Receive Software ...lets you view and store faxes on your faxes in its memory. If you switch your PC on locally or network connected machines...
...the Add to Startup folder check box, so that the software automatically runs and can transfer any faxes on page 110. 102 Brother PC-FAX Software (MFC models only) PC-FAX receiving (Not available for MFC-J220, MFC-J265W, MFC-J270W, MFC-J410W and MFC-J415W) 5 The Brother PC-FAX Receive Software ...lets you view and store faxes on your faxes in its memory. If you switch your PC on locally or network connected machines...

Software Users Manual - English
Page 117
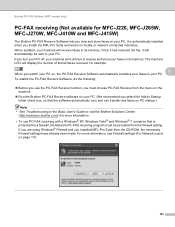
...of the computer hosting this service on your network: Enter "Localhost". 3 In External Port number for this service: Enter "54926". 4 In Internal Port number for this service: Enter "54926". 5 Make sure UDP is selected. 6 Click OK. 1 2 5 7 3 4 e ...checked, and then click OK. 111 Firewall settings (For Network users) d Add port 54925 for network scanning by entering the information below: 1 In Description of service: Enter any description, for example "Brother Scanner". 2 In Name or IP address (for example 192.168.0.12) of the computer hosting this service on your network connection...
...of the computer hosting this service on your network: Enter "Localhost". 3 In External Port number for this service: Enter "54926". 4 In Internal Port number for this service: Enter "54926". 5 Make sure UDP is selected. 6 Click OK. 1 2 5 7 3 4 e ...checked, and then click OK. 111 Firewall settings (For Network users) d Add port 54925 for network scanning by entering the information below: 1 In Description of service: Enter any description, for example "Brother Scanner". 2 In Name or IP address (for example 192.168.0.12) of the computer hosting this service on your network connection...
Software Users Manual - English
Page 120
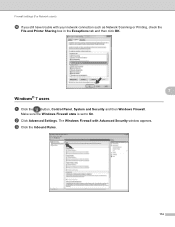
b Click Advanced Settings. Firewall settings (For Network users) j If you still have trouble with Advanced Security window appears. The Windows Firewall with your network connection such as Network Scanning or Printing, check the File and Printer Sharing box in the Exceptions tab and then click OK. Windows® 7 users a Click the button, Control Panel, System and Security and then Windows Firewall. Make sure the Windows Firewall state is set to On. c Click the Inbound Rules. 7 7 114
b Click Advanced Settings. Firewall settings (For Network users) j If you still have trouble with Advanced Security window appears. The Windows Firewall with your network connection such as Network Scanning or Printing, check the File and Printer Sharing box in the Exceptions tab and then click OK. Windows® 7 users a Click the button, Control Panel, System and Security and then Windows Firewall. Make sure the Windows Firewall state is set to On. c Click the Inbound Rules. 7 7 114
Advanced Users Manual - English
Page 54
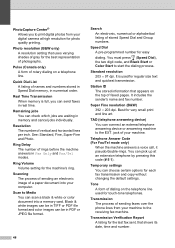
... that uses varying shades of names and numbers stored in Speed Dial memory, in Fax Only and Fax/Tel modes. Scan to Media You can connect an external telephone answering device or answering machine to print digital photos from your digital camera at an extension telephone by pressing this code (# 5 1)....Volume setting for very small print and line art. Black & white images can be in TIFF or PDF file format and color images can check which jobs are waiting in PDF or JPEG file format. 48 Search An electronic, numerical or alphabetical listing of sending faxes over the phone lines...
... that uses varying shades of names and numbers stored in Speed Dial memory, in Fax Only and Fax/Tel modes. Scan to Media You can connect an external telephone answering device or answering machine to print digital photos from your digital camera at an extension telephone by pressing this code (# 5 1)....Volume setting for very small print and line art. Black & white images can be in TIFF or PDF file format and color images can check which jobs are waiting in PDF or JPEG file format. 48 Search An electronic, numerical or alphabetical listing of sending faxes over the phone lines...

Advanced Users Manual - English
Page 56
...and dialing 19 Apple Macintosh See Software User's Guide. B Broadcasting 11 setting up roller 40 print head 41 printer platen 40 scanner 39 Connecting two-line external TAD or telephone .......17 ControlCenter See Software User's Guide. Fax, stand-alone receiving at end of conversation 14 into the ...History report 24 Setting up your area code 16 Canceling jobs awaiting redial 13 Cleaning paper pick-up Groups for Broadcasting 21 I Ink cartridges checking ink volume 43 J Jacks Convert to fit on paper 14 sending 8 at end of paper reception 14 reducing to RJ11 jack triplex ...
...and dialing 19 Apple Macintosh See Software User's Guide. B Broadcasting 11 setting up roller 40 print head 41 printer platen 40 scanner 39 Connecting two-line external TAD or telephone .......17 ControlCenter See Software User's Guide. Fax, stand-alone receiving at end of conversation 14 into the ...History report 24 Setting up your area code 16 Canceling jobs awaiting redial 13 Cleaning paper pick-up Groups for Broadcasting 21 I Ink cartridges checking ink volume 43 J Jacks Convert to fit on paper 14 sending 8 at end of paper reception 14 reducing to RJ11 jack triplex ...
Quick Setup Guide - English
Page 1
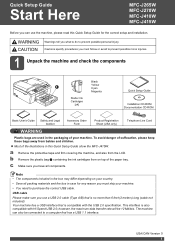
...than 6 feet (2 meters) long (cable not included). however, the maximum data transfer rate will be connected to prevent possible minor injuries. 1 Unpack the machine and check the components Black Yellow 1 Cyan Magenta Starter Ink Cartridges [x4] Quick Setup Guide Installation CD-ROM ...components. Your machine has a USB interface that is also compatible with the USB 2.0 specification. Quick Setup Guide Start Here MFC-J265W MFC-J270W MFC-J410W MFC-J415W Before you can also be 12 Mbits/s. Note • The components included in case for the correct setup and ...
...than 6 feet (2 meters) long (cable not included). however, the maximum data transfer rate will be connected to prevent possible minor injuries. 1 Unpack the machine and check the components Black Yellow 1 Cyan Magenta Starter Ink Cartridges [x4] Quick Setup Guide Installation CD-ROM ...components. Your machine has a USB interface that is also compatible with the USB 2.0 specification. Quick Setup Guide Start Here MFC-J265W MFC-J270W MFC-J410W MFC-J415W Before you can also be 12 Mbits/s. Note • The components included in case for the correct setup and ...

Quick Setup Guide - English
Page 16
... The installation will continue automatically. It may occur. Note For Windows Vista® and Windows® 7, when the Windows Security screen appears, click the check box and click Install to release the lock a. f When the User's Guides screen is displayed, make your selection and follow the on -screen instructions... View Manuals on the Web if you do not want to your machine as the Default printer, uncheck Set as shown below and connect the cable to download the manuals and follow the on -screen instructions. The installation screens appear one after another. You can also ...
... The installation will continue automatically. It may occur. Note For Windows Vista® and Windows® 7, when the Windows Security screen appears, click the check box and click Install to release the lock a. f When the User's Guides screen is displayed, make your selection and follow the on -screen instructions... View Manuals on the Web if you do not want to your machine as the Default printer, uncheck Set as shown below and connect the cable to download the manuals and follow the on -screen instructions. The installation screens appear one after another. You can also ...
Quick Setup Guide - English
Page 22
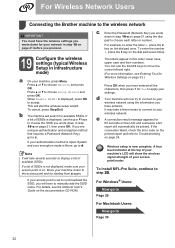
... 1 for available SSIDs. d Your machine will start the wireless setup wizard. If a list of available SSIDs. If the connection failed, check the error code on page 21 before you are using the dial pad to the wireless network IMPORTANT You must have entered. To...wrote down in infrastructure mode) a On your wireless network. For Wireless Network Users Connecting the Brother machine to choose each letter or number. This will now try starting from a again. e A connection result message appears for your wireless network using the information you have the wireless ...
... 1 for available SSIDs. d Your machine will start the wireless setup wizard. If a list of available SSIDs. If the connection failed, check the error code on page 21 before you are using the dial pad to the wireless network IMPORTANT You must have entered. To...wrote down in infrastructure mode) a On your wireless network. For Wireless Network Users Connecting the Brother machine to choose each letter or number. This will now try starting from a again. e A connection result message appears for your wireless network using the information you have the wireless ...

Quick Setup Guide - English
Page 23
b Place the Brother machine within range of Wi-Fi Protected Setup in the Network User...and you want to configure your machine using the automatic wireless (onepush) method a Confirm your machine, press Menu. e A connection result message appears for instructions. When Enable WLAN? Press a or b to accept. Wireless setup is displayed, press OK to...Press a or b to configure your Wi-Fi Protected Setup or AOSS™ access point/router. If the connection failed, check the error code on the documentation CD-ROM. A four level indicator at the top of your access point/...
b Place the Brother machine within range of Wi-Fi Protected Setup in the Network User...and you want to configure your machine using the automatic wireless (onepush) method a Confirm your machine, press Menu. e A connection result message appears for instructions. When Enable WLAN? Press a or b to accept. Wireless setup is displayed, press OK to...Press a or b to configure your Wi-Fi Protected Setup or AOSS™ access point/router. If the connection failed, check the error code on the documentation CD-ROM. A four level indicator at the top of your access point/...

Quick Setup Guide - English
Page 24
...the security information, please consult the router manufacturer, your wireless access point/router is using MAC address filtering, confirm the MAC address of the Brother machine is not activated, turn the wireless setting to ON. Press a or b to choose Network and press OK. Press Stop/Exit. ... reenter the correct information as the Password, Security Key or Encryption Key. Press a or b to confirm. 24 Make sure that the connection failed, check the error code on the printed report and refer to the wireless access point/router. - If you manually entered the SSID and security ...
...the security information, please consult the router manufacturer, your wireless access point/router is using MAC address filtering, confirm the MAC address of the Brother machine is not activated, turn the wireless setting to ON. Press a or b to choose Network and press OK. Press Stop/Exit. ... reenter the correct information as the Password, Security Key or Encryption Key. Press a or b to confirm. 24 Make sure that the connection failed, check the error code on the printed report and refer to the wireless access point/router. - If you manually entered the SSID and security ...
Quick Setup Guide - English
Page 32
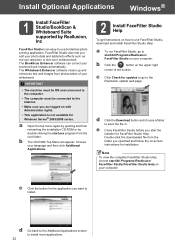
... Double-click the downloaded file from photos taken of the screen. IMPORTANT • The machine must be ON and connected to the computer. • The computer must be connected to the Internet. • Make sure you want to -use FaceFilter Studio, download and install FaceFilter Studio Help.... and then reinserting the installation CD-ROM or by Reallusion, Inc FaceFilter Studio is not available for FaceFilter Studio Help. c Click Check for updates to go to start /All Programs/Reallusion/ FaceFilter Studio/FaceFilter Studio Help on -screen instructions for the application you are...
... Double-click the downloaded file from photos taken of the screen. IMPORTANT • The machine must be ON and connected to the computer. • The computer must be connected to the Internet. • Make sure you want to -use FaceFilter Studio, download and install FaceFilter Studio Help.... and then reinserting the installation CD-ROM or by Reallusion, Inc FaceFilter Studio is not available for FaceFilter Studio Help. c Click Check for updates to go to start /All Programs/Reallusion/ FaceFilter Studio/FaceFilter Studio Help on -screen instructions for the application you are...
Network Users Manual - English
Page 40
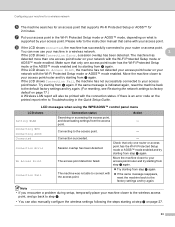
... WPS/AOSS™ control panel menu LCD shows Setting WLAN Connecting WPS Connecting AOSS Connected Connection Error No Access Point Connection Fail Connection status Searching or accessing the access point, and downloading settings from d again. Connection succeeded. You can also manually configure the wireless settings following the...step d again. If the same message reappears, reset the machine back to Troubleshooting in the Quick Setup Guide. Check that only one access point/router on your network with the Wi-Fi Protected Setup mode or AOSS™ mode enabled. If...
... WPS/AOSS™ control panel menu LCD shows Setting WLAN Connecting WPS Connecting AOSS Connected Connection Error No Access Point Connection Fail Connection status Searching or accessing the access point, and downloading settings from d again. Connection succeeded. You can also manually configure the wireless settings following the...step d again. If the same message reappears, reset the machine back to Troubleshooting in the Quick Setup Guide. Check that only one access point/router on your network with the Wi-Fi Protected Setup mode or AOSS™ mode enabled. If...

Network Users Manual - English
Page 48
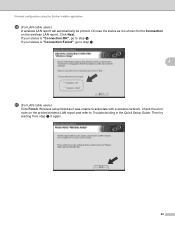
Check the box after you confirm the wired setting is enabled, and then click Next. 41 Wireless configuration using the Brother installer application f (For USB cable users) Temporarily connect the USB cable (not included) directly to step j. 4 g (For LAN cable users) Read the Important Notice. Then go to the computer and the machine.
Check the box after you confirm the wired setting is enabled, and then click Next. 41 Wireless configuration using the Brother installer application f (For USB cable users) Temporarily connect the USB cable (not included) directly to step j. 4 g (For LAN cable users) Read the Important Notice. Then go to the computer and the machine.

Network Users Manual - English
Page 49
Note The default Node name is blank, check if the access point and the machine are powered on, and then click Refresh. If the list is "BRNxxxxxxxxxxxx". 42 Wireless configuration using the Brother installer application h (For LAN cable users) Temporarily connect the Brother wireless device to your access point using a network cable (not included) and click Next. 4 i (For LAN cable users) Choose the machine you wish to configure, and click Next.
Note The default Node name is blank, check if the access point and the machine are powered on, and then click Refresh. If the list is "BRNxxxxxxxxxxxx". 42 Wireless configuration using the Brother installer application h (For LAN cable users) Temporarily connect the Brother wireless device to your access point using a network cable (not included) and click Next. 4 i (For LAN cable users) Choose the machine you wish to configure, and click Next.
Network Users Manual - English
Page 52
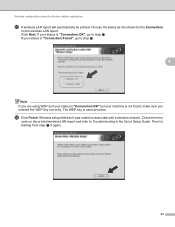
... Quick Setup Guide. Wireless configuration using the Brother installer application n (For LAN cable users) A wireless LAN report will automatically be printed. If your status is "Connection:Failed", go to step o. 4 o (For LAN cable users) Click Finish. If your status is "Connection:OK", go to step p. Check the error code on the wireless LAN report...
... Quick Setup Guide. Wireless configuration using the Brother installer application n (For LAN cable users) A wireless LAN report will automatically be printed. If your status is "Connection:Failed", go to step o. 4 o (For LAN cable users) Click Finish. If your status is "Connection:OK", go to step p. Check the error code on the wireless LAN report...

Network Users Manual - English
Page 59
...Connecting AOSS Connected Connection Error No Access Point Connection Fail Connection status Searching or accessing the access point, and downloading settings from f again. Make sure that only one router or access point has the Wi-Fi Protected Setup mode or AOSS™ mode enabled and try starting from f again. Check... the network settings to factory default on page 77.) LCD messages when using the Brother installer application i If the LCD shows Connected, the machine has successfully connected to the factory settings and try starting from step f again. Try ...
...Connecting AOSS Connected Connection Error No Access Point Connection Fail Connection status Searching or accessing the access point, and downloading settings from f again. Make sure that only one router or access point has the Wi-Fi Protected Setup mode or AOSS™ mode enabled and try starting from f again. Check... the network settings to factory default on page 77.) LCD messages when using the Brother installer application i If the LCD shows Connected, the machine has successfully connected to the factory settings and try starting from step f again. Try ...
Network Users Manual - English
Page 66
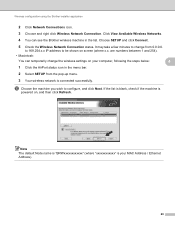
Choose SETUP and click Connect. 5 (For Windows Vista® only) Click Connect Anyway and then Close. 6 (Windows Vista®) Click View status of the wireless Brother machine in the list. and check the Network Connection Details. are numbers between 1 and 254). • Windows® XP ...SP2 or greater: You can temporarily change the wireless settings on this screen. Wireless configuration using the Brother installer application i To...
Choose SETUP and click Connect. 5 (For Windows Vista® only) Click Connect Anyway and then Close. 6 (Windows Vista®) Click View status of the wireless Brother machine in the list. and check the Network Connection Details. are numbers between 1 and 254). • Windows® XP ...SP2 or greater: You can temporarily change the wireless settings on this screen. Wireless configuration using the Brother installer application i To...
Network Users Manual - English
Page 67
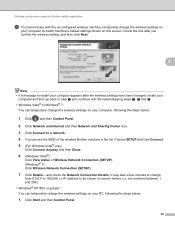
Wireless configuration using the Brother installer application 2 Click Network Connections icon. 3 Choose and right click Wireless Network Connection. Note The default Node name is "BRWxxxxxxxxxxxx" (where "xxxxxxxxxxxx" is powered on, and then click Refresh. j Choose ...; Macintosh: You can see the Brother wireless machine in the menu bar. 2 Select SETUP from 0.0.0.0. Click View Available Wireless Networks. 4 You can temporarily change from the pop-up menu. 3 Your wireless network is connected successfully. If the list is blank, check if the machine is your computer,...
Wireless configuration using the Brother installer application 2 Click Network Connections icon. 3 Choose and right click Wireless Network Connection. Note The default Node name is "BRWxxxxxxxxxxxx" (where "xxxxxxxxxxxx" is powered on, and then click Refresh. j Choose ...; Macintosh: You can see the Brother wireless machine in the menu bar. 2 Select SETUP from 0.0.0.0. Click View Available Wireless Networks. 4 You can temporarily change from the pop-up menu. 3 Your wireless network is connected successfully. If the list is blank, check if the machine is your computer,...
Network Users Manual - English
Page 70
... unable to Troubleshooting in the Quick Setup Guide. Wireless configuration using WEP and your status is "Connection:OK" but your status is not found, make sure you are using the Brother installer application o A wireless LAN report will automatically be printed. Choose the status as it is... case sensitive. The WEP key is shown for the Connection on the printed wireless LAN report and refer to associate with a wireless network. Check the error code on...
... unable to Troubleshooting in the Quick Setup Guide. Wireless configuration using WEP and your status is "Connection:OK" but your status is not found, make sure you are using the Brother installer application o A wireless LAN report will automatically be printed. Choose the status as it is... case sensitive. The WEP key is shown for the Connection on the printed wireless LAN report and refer to associate with a wireless network. Check the error code on...


