
User Manual
Page 3
Table of Contents iii Image Menu 17 3. PIP Menu 19 Shutdown 20 Maintenance 21 Lamp Information 21 Table of Contents Important Safety Instructions 1 Introduction 4 Projector Features 4 Shipping Contents 5 Optional Accessories 5 Projector Descriptions 6 Front View 6 Left View 6 Back View 6 External Control Panel 7 Adjuster 8 Remote Control Description 8 Your Remote Control at a Glance 8 Remote Control Effective Range...
Table of Contents iii Image Menu 17 3. PIP Menu 19 Shutdown 20 Maintenance 21 Lamp Information 21 Table of Contents Important Safety Instructions 1 Introduction 4 Projector Features 4 Shipping Contents 5 Optional Accessories 5 Projector Descriptions 6 Front View 6 Left View 6 Back View 6 External Control Panel 7 Adjuster 8 Remote Control Description 8 Your Remote Control at a Glance 8 Remote Control Effective Range...
User Manual
Page 4
... Replacement of Lamp 21 LED Status Indicators 21 Lamp Replacement 22 Resetting Lamp Hours 23 Service Information 24 Accessories (Included in the standard package 24 Optional Accessories (Not included in the standard package) ... 24 Ordering Parts or Getting Information 24 Troubleshooting 25 Common Problems & Solutions 25 Status Messages 26 Specifications 27 Projector Specifications 27...
... Replacement of Lamp 21 LED Status Indicators 21 Lamp Replacement 22 Resetting Lamp Hours 23 Service Information 24 Accessories (Included in the standard package 24 Optional Accessories (Not included in the standard package) ... 24 Ordering Parts or Getting Information 24 Troubleshooting 25 Common Problems & Solutions 25 Status Messages 26 Specifications 27 Projector Specifications 27...

User Manual
Page 5
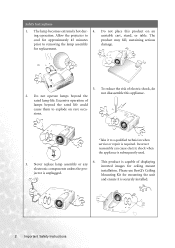
...could fail if power cuts or surges of 100 to install a power stabilizer unit. Important Safety Instructions 1 This projector is designed to operate safely within a bandwidth of ±10 volts occur. Save this user's manual before you ...your eyes. • In some countries, the line voltage is NOT stable. The intense light beam may damage your projector. No user-serviceable parts inside. • Refer servicing to qualified service personnel. • Please read this user's... open the lens shutter or remove the lens cap when the projector lamp is on. • Do not look straight at the...
...could fail if power cuts or surges of 100 to install a power stabilizer unit. Important Safety Instructions 1 This projector is designed to operate safely within a bandwidth of ±10 volts occur. Save this user's manual before you ...your eyes. • In some countries, the line voltage is NOT stable. The intense light beam may damage your projector. No user-serviceable parts inside. • Refer servicing to qualified service personnel. • Please read this user's... open the lens shutter or remove the lens cap when the projector lamp is on. • Do not look straight at the...
User Manual
Page 6
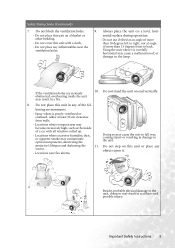
...projector to removing the lamp assembly damage. The cool for mounting the unit and ensure it to explode on an ing operation. To reduce the risk of displaying 3. Do not operate lamps beyond the rated life could cause them to a qualified technician when service or repair is capable of electric shock, do 2. rated lamp... life. sions. *Take it is securely installed. 2 Important Safety Instructions This product is required. Please use BenQ's Ceiling jector is subsequently used. 6. Mounting Kit for...
...projector to removing the lamp assembly damage. The cool for mounting the unit and ensure it to explode on an ing operation. To reduce the risk of displaying 3. Do not operate lamps beyond the rated life could cause them to a qualified technician when service or repair is capable of electric shock, do 2. rated lamp... life. sions. *Take it is securely installed. 2 Important Safety Instructions This product is required. Please use BenQ's Ceiling jector is subsequently used. 6. Mounting Kit for...
User Manual
Page 7
... during operation. - If the ventilation holes are seriously obstructed, overheating inside of , or damage to the unit, doing so may contaminate optical components, shortening the projector's lifespan and darkening the 11. Do not cover this unit in accidents and possible injury. Locations where excessive humidity, dust, or cigarette smoke may result... any objects upon it is poorly ventilated or confined. Always place the unit on this unit on end vertically. 8. Besides probable physical damage to , the lamp. Do not block the ventilation holes. -
... during operation. - If the ventilation holes are seriously obstructed, overheating inside of , or damage to the unit, doing so may contaminate optical components, shortening the projector's lifespan and darkening the 11. Do not cover this unit in accidents and possible injury. Locations where excessive humidity, dust, or cigarette smoke may result... any objects upon it is poorly ventilated or confined. Always place the unit on this unit on end vertically. 8. Besides probable physical damage to , the lamp. Do not block the ventilation holes. -
User Manual
Page 8
...keystone correction through hot keys to correct tilted pictures • Adjustable color balance control for data/video • Ultra-high brightness projection lamp • Ability to display high quality 16.7 million colors • On screen menus in 10 languages: English, French, German, ...and ease of your machine will vary depending on the ambient room conditions and contrast/brightness settings. 4 Introduction Introduction Projector Features The projector integrates high performance optical engine projection and user-friendly design to provide high AV picture results. • HDTV ...
...keystone correction through hot keys to correct tilted pictures • Adjustable color balance control for data/video • Ultra-high brightness projection lamp • Ability to display high quality 16.7 million colors • On screen menus in 10 languages: English, French, German, ...and ease of your machine will vary depending on the ambient room conditions and contrast/brightness settings. 4 Introduction Introduction Projector Features The projector integrates high performance optical engine projection and user-friendly design to provide high AV picture results. • HDTV ...
User Manual
Page 9
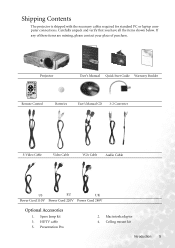
... shipped with the necessary cables required for standard PC or laptop computer connections. Carefully unpack and verify that you have all the items shown below. Projector PDUBisge2ir2t'a2sl0MP/raPoujBne2ca1tlo2r0 User's Manual Quick Start Guide Warranty Booklet Remote Control Batteries User's Manual CD 3-2 Converter S-Video Cable Video Cable VGA Cable Audio Cable...
... shipped with the necessary cables required for standard PC or laptop computer connections. Carefully unpack and verify that you have all the items shown below. Projector PDUBisge2ir2t'a2sl0MP/raPoujBne2ca1tlo2r0 User's Manual Quick Start Guide Warranty Booklet Remote Control Batteries User's Manual CD 3-2 Converter S-Video Cable Video Cable VGA Cable Audio Cable...
User Manual
Page 11
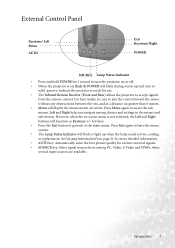
...back to access the submenus. Press Exit again to leave the menu system. • The Lamp Status Indicator will flash or light up and turn the projector on or off. • When the projector is on, Back-lit POWER will function as Keystone +/- Left and Right help you navigate among...sources are available. External Control Panel Keystone/ Left Menu AUTO Exit Keystone/ Right POWER SOURCE Lamp Status Indicator • Press and hold POWER for 1 second to turn to solid green to indicate the projector is ready for current received signals. • SOURCE key: Select signal sources from the ...
...back to access the submenus. Press Exit again to leave the menu system. • The Lamp Status Indicator will flash or light up and turn the projector on or off. • When the projector is on, Back-lit POWER will function as Keystone +/- Left and Right help you navigate among...sources are available. External Control Panel Keystone/ Left Menu AUTO Exit Keystone/ Right POWER SOURCE Lamp Status Indicator • Press and hold POWER for 1 second to turn to solid green to indicate the projector is ready for current received signals. • SOURCE key: Select signal sources from the ...
User Manual
Page 19
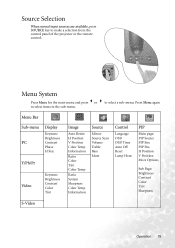
... Tint Color Temp Ratio System Sharpness Color Temp Information Source Mirror Source Scan Volume Treble Bass Mute Control Langauge OSD OSD Time Auto Off Reset Lamp Hour PIP Main page: PIP Source PIP Size PIP Pos. Menu System Press Menu for the main menu and press 3or 4 to select items in... the sub-menu. Source Selection When several input sources are available, press SOURCE key to make a selection from the control panel of the projector or the remote control.
... Tint Color Temp Ratio System Sharpness Color Temp Information Source Mirror Source Scan Volume Treble Bass Mute Control Langauge OSD OSD Time Auto Off Reset Lamp Hour PIP Main page: PIP Source PIP Size PIP Pos. Menu System Press Menu for the main menu and press 3or 4 to select items in... the sub-menu. Source Selection When several input sources are available, press SOURCE key to make a selection from the control panel of the projector or the remote control.

User Manual
Page 23
... of PIP image. Adjusts to increase or decrease the colors (R, G, B) of time to select more red or blue. Sets the length of the image. Lamp Hour Shows lamp usage time. 5. Uses 3 / 4 key to select the languages: English, French, German, Italian, Spanish, Portuguese, Traditional Chinese, Simplified Chinese, Japanese and Korean. Adjusts the vertical...
... of PIP image. Adjusts to increase or decrease the colors (R, G, B) of time to select more red or blue. Sets the length of the image. Lamp Hour Shows lamp usage time. 5. Uses 3 / 4 key to select the languages: English, French, German, Italian, Spanish, Portuguese, Traditional Chinese, Simplified Chinese, Japanese and Korean. Adjusts the vertical...
User Manual
Page 25
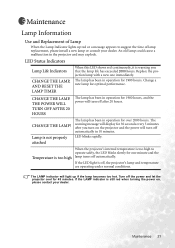
... operation for 30 seconds every 5 minutes after 20 hours. The LAMP indicator will display for over 2000 hours. Lamp is off the power and let the projector cool for optimal performance. Maintenance 21 LED Status Indicators Lamp Life Indicators CHANGE THE LAMP, AND RESET THE LAMP TIMER When this LED shows red continuously, it is warning...
... operation for 30 seconds every 5 minutes after 20 hours. The LAMP indicator will display for over 2000 hours. Lamp is off the power and let the projector cool for optimal performance. Maintenance 21 LED Status Indicators Lamp Life Indicators CHANGE THE LAMP, AND RESET THE LAMP TIMER When this LED shows red continuously, it is warning...
User Manual
Page 26
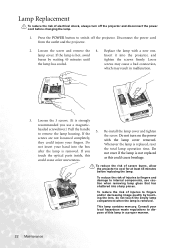
...the risk of injuries to fingers and damage to cool for at least 45 minutes before changing the lamp. 1. Disconnect the power cord from the outlet and the projector. 2. Replace the lamp with the lamp cover removed. Loosen the 3 screws. (It is strongly recommended you not reset if the...replaced touch the optical parts inside, this as this lamp in malfunction. 3. could injure your hand into the box the total lamp operation time. lamp cover. Do not turn off the projector. Do Whenever the lamp is removed. Do after the lamp is hot, avoid Insert it into sharp pieces. ...
...the risk of injuries to fingers and damage to cool for at least 45 minutes before changing the lamp. 1. Disconnect the power cord from the outlet and the projector. 2. Replace the lamp with the lamp cover removed. Loosen the 3 screws. (It is strongly recommended you not reset if the...replaced touch the optical parts inside, this as this lamp in malfunction. 3. could injure your hand into the box the total lamp operation time. lamp cover. Do not turn off the projector. Do Whenever the lamp is removed. Do after the lamp is hot, avoid Insert it into sharp pieces. ...
User Manual
Page 27
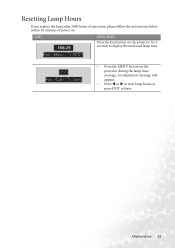
Resetting Lamp Hours If you replace the lamp after 2000 hours of operation, please follow the instructions below within 10 minutes of power on the projector for 3 seconds to leave. An adjustment message will appear. • Press W or X to reset lamp hours or press EXIT to display the total used lamp time. • Press the MENU button on the projector during the lamp hour message. Maintenance 23 OSD FUNCTION Press the Exit button on .
Resetting Lamp Hours If you replace the lamp after 2000 hours of operation, please follow the instructions below within 10 minutes of power on the projector for 3 seconds to leave. An adjustment message will appear. • Press W or X to reset lamp hours or press EXIT to display the total used lamp time. • Press the MENU button on the projector during the lamp hour message. Maintenance 23 OSD FUNCTION Press the Exit button on .
User Manual
Page 28
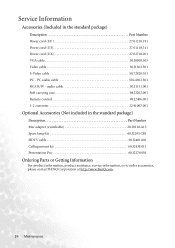
....501 S-Video cable 50.72920.011 PC - Service Information Accessories (Included in the standard package) Description Part Number Mac adapter (switchable 20.20118.A15 Spare lamp kit 60.J2203.CB1 HDTV cable 50.J2401.001 Ceiling mount kit 60.J2439.011 Presentation Pro 60.J2278.001 Ordering Parts or Getting Information...
....501 S-Video cable 50.72920.011 PC - Service Information Accessories (Included in the standard package) Description Part Number Mac adapter (switchable 20.20118.A15 Spare lamp kit 60.J2203.CB1 HDTV cable 50.J2401.001 Ceiling mount kit 60.J2439.011 Presentation Pro 60.J2278.001 Ordering Parts or Getting Information...
User Manual
Page 30
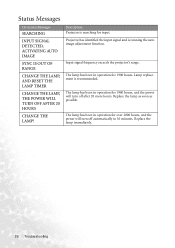
... for 1980 hours, and the power will turn off automatically in operation for input. Replace the lamp immediately. 26 Troubleshooting Projector has identified the input signal and is recommended. Input signal frequency exceeds the projector's range. The lamp has been in 10 minutes. Status Messages On Screen Messages SEARCHING INPUT SIGNAL DETECTED, ACTIVATING AUTO...
... for 1980 hours, and the power will turn off automatically in operation for input. Replace the lamp immediately. 26 Troubleshooting Projector has identified the input signal and is recommended. Input signal frequency exceeds the projector's range. The lamp has been in 10 minutes. Status Messages On Screen Messages SEARCHING INPUT SIGNAL DETECTED, ACTIVATING AUTO...
User Manual
Page 31
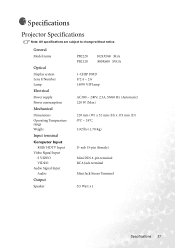
... Input terminal Computer Input RGB/ HDTV Input Video Signal Input S VIDEO VIDEO Audio Signal Input Audio Output Speaker PB2220 PB2120 1024X768 XGA 800X600 SVGA 1-CHIP DMD F/2.4 ~ 2.6 150W VIP lamp AC100 ~ 240V, 2.3A, 50/60 Hz (Automatic) 220 W (Max) 220 mm (W) x 52 mm ...(H) x 175 mm (D) 0°C ~ 35°C 3.92 lbs (1.78 Kg) D-sub 15-pin (female) Mini DIN 4-pin terminal RCA Jack terminal Mini Jack Stereo Terminal 0.5 Watt x 1 Specifications 27 Specifications Projector...
... Input terminal Computer Input RGB/ HDTV Input Video Signal Input S VIDEO VIDEO Audio Signal Input Audio Output Speaker PB2220 PB2120 1024X768 XGA 800X600 SVGA 1-CHIP DMD F/2.4 ~ 2.6 150W VIP lamp AC100 ~ 240V, 2.3A, 50/60 Hz (Automatic) 220 W (Max) 220 mm (W) x 52 mm ...(H) x 175 mm (D) 0°C ~ 35°C 3.92 lbs (1.78 Kg) D-sub 15-pin (female) Mini DIN 4-pin terminal RCA Jack terminal Mini Jack Stereo Terminal 0.5 Watt x 1 Specifications 27 Specifications Projector...
User Manual
Page 35
... purchased the product of any defects. Warranty 31 Important: The above warranty shall be replacement of purchase date will be required with BENQ's written instructions. In the event this product against any defects in accordance with any warranty claim. For more detailed information, please ...refer to country. Exclusion to Warranty: The lamps are considered as consumable items and are warranted for 90 days or 500 hours, whichever occurs first. Proof of any defective parts ...
... purchased the product of any defects. Warranty 31 Important: The above warranty shall be replacement of purchase date will be required with BENQ's written instructions. In the event this product against any defects in accordance with any warranty claim. For more detailed information, please ...refer to country. Exclusion to Warranty: The lamps are considered as consumable items and are warranted for 90 days or 500 hours, whichever occurs first. Proof of any defective parts ...

