

User Manual
Page 1
PB2220/ PB2120 Digital Projector User's Manual Welcome
PB2220/ PB2120 Digital Projector User's Manual Welcome
User Manual
Page 3
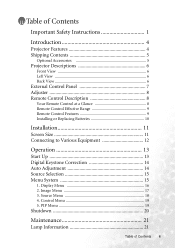
Control Menu 19 5. PIP Menu 19 Shutdown 20 Maintenance 21 Lamp Information 21 Table of Contents Important Safety Instructions 1 Introduction 4 Projector Features 4 Shipping Contents 5 Optional Accessories 5 Projector Descriptions 6 Front View 6 Left View 6 Back View 6 External Control Panel 7 Adjuster 8 Remote Control Description 8 Your Remote Control at a Glance 8 Remote Control Effective Range 9 Remote Control ...
Control Menu 19 5. PIP Menu 19 Shutdown 20 Maintenance 21 Lamp Information 21 Table of Contents Important Safety Instructions 1 Introduction 4 Projector Features 4 Shipping Contents 5 Optional Accessories 5 Projector Descriptions 6 Front View 6 Left View 6 Back View 6 External Control Panel 7 Adjuster 8 Remote Control Description 8 Your Remote Control at a Glance 8 Remote Control Effective Range 9 Remote Control ...
User Manual
Page 4
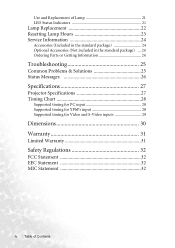
... Accessories (Not included in the standard package) ... 24 Ordering Parts or Getting Information 24 Troubleshooting 25 Common Problems & Solutions 25 Status Messages 26 Specifications 27 Projector Specifications 27 Timing Chart 28 Supported timing for PC input 28 Supported timing for YPbPr input 28 Supported timing for Video and S-Video inputs 29...
... Accessories (Not included in the standard package) ... 24 Ordering Parts or Getting Information 24 Troubleshooting 25 Common Problems & Solutions 25 Status Messages 26 Specifications 27 Projector Specifications 27 Timing Chart 28 Supported timing for PC input 28 Supported timing for YPbPr input 28 Supported timing for Video and S-Video inputs 29...
User Manual
Page 5
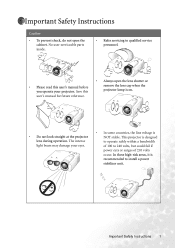
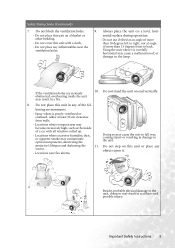
...or surges of 100 to qualified service personnel. • Please read this user's manual for future reference. • Always open the cabinet. This projector is designed to operate safely within a bandwidth of ±10 volts occur. Important Safety Instructions Caution • To prevent shock, do not open... the lens shutter or remove the lens cap when the projector lamp is on. • Do not look straight at the projector lens during operation. Save this user's manual before you operate your eyes. • In some countries, the...
...or surges of 100 to qualified service personnel. • Please read this user's manual for future reference. • Always open the cabinet. This projector is designed to operate safely within a bandwidth of ±10 volts occur. Important Safety Instructions Caution • To prevent shock, do not open... the lens shutter or remove the lens cap when the projector lamp is on. • Do not look straight at the projector lens during operation. Save this user's manual before you operate your eyes. • In some countries, the...
User Manual
Page 6
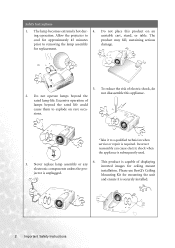
Allow the projector to removing the lamp assembly damage. The cool for mounting the unit and ensure it to explode on an ing operation. rated lamp life. Please use BenQ's Ceiling jector is subsequently used. 6. Do not place this appliance. To reduce the risk of lamps beyond the not disassemble this product on...
Allow the projector to removing the lamp assembly damage. The cool for mounting the unit and ensure it to explode on an ing operation. rated lamp life. Please use BenQ's Ceiling jector is subsequently used. 6. Do not place this appliance. To reduce the risk of lamps beyond the not disassemble this product on...
User Manual
Page 7
.... Besides probable physical damage to fall over, causing injury or resulting in any inflammables near fire alarms Doing so may contaminate optical components, shortening the projector's lifespan and darkening the 11. Do not place any of a car with a cloth. - If the ventilation holes are seriously obstructed, overheating inside of the fol...
.... Besides probable physical damage to fall over, causing injury or resulting in any inflammables near fire alarms Doing so may contaminate optical components, shortening the projector's lifespan and darkening the 11. Do not place any of a car with a cloth. - If the ventilation holes are seriously obstructed, overheating inside of the fol...

User Manual
Page 8
The Projector offers the following features: • Compact and portable unit • Full-function remote control • Manual zoom lens • One key auto-adjustment to display ... function to deliver high reliability and ease of your machine will vary depending on the ambient room conditions and contrast/brightness settings. 4 Introduction Introduction Projector Features The projector integrates high performance optical engine projection and user-friendly design to provide high AV picture results. • HDTV compatibility (YPbPr) The brightness of use...
The Projector offers the following features: • Compact and portable unit • Full-function remote control • Manual zoom lens • One key auto-adjustment to display ... function to deliver high reliability and ease of your machine will vary depending on the ambient room conditions and contrast/brightness settings. 4 Introduction Introduction Projector Features The projector integrates high performance optical engine projection and user-friendly design to provide high AV picture results. • HDTV compatibility (YPbPr) The brightness of use...
User Manual
Page 9
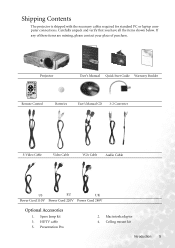
... you have all the items shown below. HDTV cable 5. If any of these items are missing, please contact your place of purchase. Projector PDUBisge2ir2t'a2sl0MP/raPoujBne2ca1tlo2r0 User's Manual Quick Start Guide Warranty Booklet Remote Control Batteries User's Manual CD 3-2 Converter S-Video Cable Video Cable VGA ...220V Power Cord 240V Optional Accessories 1. Ceiling mount kit Introduction 5 Macintosh adaptor 4. Spare lamp kit 3. Presentation Pro 2. Shipping Contents The projector is shipped with the necessary cables required for standard PC or laptop computer connections.
... you have all the items shown below. HDTV cable 5. If any of these items are missing, please contact your place of purchase. Projector PDUBisge2ir2t'a2sl0MP/raPoujBne2ca1tlo2r0 User's Manual Quick Start Guide Warranty Booklet Remote Control Batteries User's Manual CD 3-2 Converter S-Video Cable Video Cable VGA ...220V Power Cord 240V Optional Accessories 1. Ceiling mount kit Introduction 5 Macintosh adaptor 4. Spare lamp kit 3. Presentation Pro 2. Shipping Contents The projector is shipped with the necessary cables required for standard PC or laptop computer connections.
User Manual
Page 10
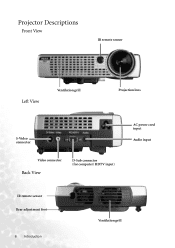
Projector Descriptions Front View IR remote sensor Left View Ventilation grill Projection lens S-Video connector Video connector Back View D-Sub connector (for computer/ HDTV input) AC power cord input Audio input IR remote sensor Rear adjustment foot 6 Introduction Ventilation grill
Projector Descriptions Front View IR remote sensor Left View Ventilation grill Projection lens S-Video connector Video connector Back View D-Sub connector (for computer/ HDTV input) AC power cord input Audio input IR remote sensor Rear adjustment foot 6 Introduction Ventilation grill
User Manual
Page 11
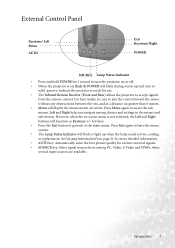
...submenus. Introduction 7 However, when the on screen menu is ready for use. • The Infrared Remote Receiver (Front and Rear) allows the projector to accept signals from among choices and settings in the menus and sub-menus. Press Exit again to leave the menu system. • The ... Exit Keystone/ Right POWER SOURCE Lamp Status Indicator • Press and hold POWER for 1 second to turn to solid green to indicate the projector is not activated, the Left and Right buttons will function as Keystone +/- See°uLamp Information°von page 21 for more detailed information....
...submenus. Introduction 7 However, when the on screen menu is ready for use. • The Infrared Remote Receiver (Front and Rear) allows the projector to accept signals from among choices and settings in the menus and sub-menus. Press Exit again to leave the menu system. • The ... Exit Keystone/ Right POWER SOURCE Lamp Status Indicator • Press and hold POWER for 1 second to turn to solid green to indicate the projector is not activated, the Left and Right buttons will function as Keystone +/- See°uLamp Information°von page 21 for more detailed information....

User Manual
Page 12
The adjuster will drop into posi- Lift the projector up and press the 3. back to release the release button and push the adjuster adjuster. tion and be locked. 3 1 2 Remote Control Description Your Remote Control at a Glance SOURCE AUTO POWER EXIT KEYSTONE MENU BLANK MUTE PIP VIDEO PIP S-VIDEO ZOOM IN ZOOM OUT FREEZE RETURN VOLUME 8 Introduction To stow the adjuster, depress the adjuster button to where it is equipped with a quick-release adjuster foot and button for adjusting its tilt angle. 1. Adjuster The projector is . 2.
The adjuster will drop into posi- Lift the projector up and press the 3. back to release the release button and push the adjuster adjuster. tion and be locked. 3 1 2 Remote Control Description Your Remote Control at a Glance SOURCE AUTO POWER EXIT KEYSTONE MENU BLANK MUTE PIP VIDEO PIP S-VIDEO ZOOM IN ZOOM OUT FREEZE RETURN VOLUME 8 Introduction To stow the adjuster, depress the adjuster button to where it is equipped with a quick-release adjuster foot and button for adjusting its tilt angle. 1. Adjuster The projector is . 2.
User Manual
Page 13
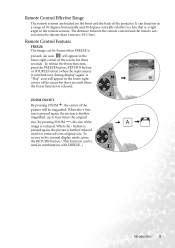
... are located on the front and the back of the screen for three seconds. A "Play" icon will appear in the lower right corner of the projector. By pressing ZOOM ―, the size of the picture will appear in the lower right corner of 30 degrees horizontally and 30 degrees vertically relative...
... are located on the front and the back of the screen for three seconds. A "Play" icon will appear in the lower right corner of the projector. By pressing ZOOM ―, the size of the picture will appear in the lower right corner of 30 degrees horizontally and 30 degrees vertically relative...
User Manual
Page 15
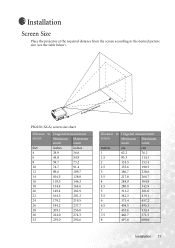
....2 237.7 28 209.1 256.0 30 224.0 274.3 32 239.0 292.6 Distance to the desired picture size (see the table below). Installation Screen Size Place the projector at the required distance from the screen according to Diagonal measurement screen Minimum Maximum zoom zoom meters cm cm 1 62.2 76.2 1.5 93.3 114.3 2 124.5 152...
....2 237.7 28 209.1 256.0 30 224.0 274.3 32 239.0 292.6 Distance to the desired picture size (see the table below). Installation Screen Size Place the projector at the required distance from the screen according to Diagonal measurement screen Minimum Maximum zoom zoom meters cm cm 1 62.2 76.2 1.5 93.3 114.3 2 124.5 152...
User Manual
Page 16
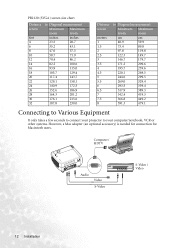
Computer / HDTV Audio Video S-Video S-Video / Video 12 Installation PB2120 (SVGA) screen size chart Distance screen feet 4 6 8 10 12 14 16 18 20 22 24 26 28 30 32 to Diagonal measurement Minimum Maximum zoom zoom ....6 299.5 269.0 329.4 293.5 359.4 317.9 389.3 342.4 419.3 366.8 449.2 391.3 479.1 Connecting to Various Equipment It only takes a few seconds to connect your projector to your computer/notebook, VCR or other systems. However, a Mac adapter (an optional accessory) is needed for connection for Macintosh users.
Computer / HDTV Audio Video S-Video S-Video / Video 12 Installation PB2120 (SVGA) screen size chart Distance screen feet 4 6 8 10 12 14 16 18 20 22 24 26 28 30 32 to Diagonal measurement Minimum Maximum zoom zoom ....6 299.5 269.0 329.4 293.5 359.4 317.9 389.3 342.4 419.3 366.8 449.2 391.3 479.1 Connecting to Various Equipment It only takes a few seconds to connect your projector to your computer/notebook, VCR or other systems. However, a Mac adapter (an optional accessory) is needed for connection for Macintosh users.

User Manual
Page 17
When the power is turned off, there is turned on all connected equipment. Switch on . Operation 13 Operation Start Up 1. The back-lit POWER key blinks green and stays green when the power is a 90-second cooling period before the projector can be re-started. 3. Plug the power cord into a wall socket. 2. Press and hold POWER for 1 second.
When the power is turned off, there is turned on all connected equipment. Switch on . Operation 13 Operation Start Up 1. The back-lit POWER key blinks green and stays green when the power is a 90-second cooling period before the projector can be re-started. 3. Plug the power cord into a wall socket. 2. Press and hold POWER for 1 second.

User Manual
Page 18
Press - To do this , press KEYSTONE +/- (hot key) on the control panel of the image. to correct keystoning at the bottom of the projector or on the remote control. To correct this , press the AUTO key on the control panel of the image. Within 3 seconds, the built-in ...Intelligent Auto Adjustment function will re-adjust the image to optimize the picture quality manually. Press + to correct keystoning at the top of the projector or on the remote control, then adjust the sliding bar labeled Keystone, as needed. Auto Adjustment In some cases, you may have to the best...
Press - To do this , press KEYSTONE +/- (hot key) on the control panel of the image. to correct keystoning at the bottom of the projector or on the remote control. To correct this , press the AUTO key on the control panel of the image. Within 3 seconds, the built-in ...Intelligent Auto Adjustment function will re-adjust the image to optimize the picture quality manually. Press + to correct keystoning at the top of the projector or on the remote control, then adjust the sliding bar labeled Keystone, as needed. Auto Adjustment In some cases, you may have to the best...
User Manual
Page 19
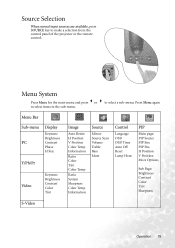
... Source PIP Size PIP Pos. Source Selection When several input sources are available, press SOURCE key to make a selection from the control panel of the projector or the remote control.
... Source PIP Size PIP Pos. Source Selection When several input sources are available, press SOURCE key to make a selection from the control panel of the projector or the remote control.
User Manual
Page 22
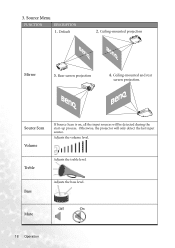
Otherwise, the projector will be detected during the start-up process. Bass Adjusts the bass level. Source Menu FUNCTION DESCRIPTION 1. Ceiling-mounted and rear screen projection. Treble Adjusts the treble level. Default 2. Ceiling-mounted projection Mirror 3. Adjusts the volume level. Mute Off On 18 Operation 3. Source Scan Volume If Source Scan is on, all the input sources will only detect the last input source. Rear screen projection 4.
Otherwise, the projector will be detected during the start-up process. Bass Adjusts the bass level. Source Menu FUNCTION DESCRIPTION 1. Ceiling-mounted and rear screen projection. Treble Adjusts the treble level. Default 2. Ceiling-mounted projection Mirror 3. Adjusts the volume level. Mute Off On 18 Operation 3. Source Scan Volume If Source Scan is on, all the input sources will only detect the last input source. Rear screen projection 4.

User Manual
Page 24
To turn off the projector, Press POWER again. 2. The fan will prompt up. Press and hold POWER and a warning message will continue to run for approximately 90 seconds. 3. Disconnect the power cord from the wall socket. Shutdown 1. Please do not unplug the power cord before POWER is shut down or during the 90-second cooling process. 20 Operation
To turn off the projector, Press POWER again. 2. The fan will prompt up. Press and hold POWER and a warning message will continue to run for approximately 90 seconds. 3. Disconnect the power cord from the wall socket. Shutdown 1. Please do not unplug the power cord before POWER is shut down or during the 90-second cooling process. 20 Operation
User Manual
Page 25
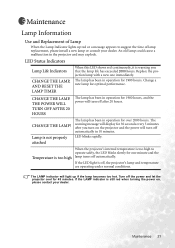
...red or a message appears to operate safely, the LED blinks slowly for 45 minutes. The warning message will turn off automatically in the projector and may explode. If the LED light is too high to suggest the time of Lamp When the Lamp Indicator lights up if the lamp...a malfunction in 10 minutes. CHANGE THE LAMP! Replace the projection lamp with a new one minute and the lamp turns off the power and let the projector cool for one immediately. LED blinks rapidly. Change a new lamp for 30 seconds every 5 minutes after 20 hours. Turn off automatically. CHANGE THE LAMP...
...red or a message appears to operate safely, the LED blinks slowly for 45 minutes. The warning message will turn off automatically in the projector and may explode. If the LED light is too high to suggest the time of Lamp When the Lamp Indicator lights up if the lamp...a malfunction in 10 minutes. CHANGE THE LAMP! Replace the projection lamp with a new one minute and the lamp turns off the power and let the projector cool for one immediately. LED blinks rapidly. Change a new lamp for 30 seconds every 5 minutes after 20 hours. Turn off automatically. CHANGE THE LAMP...


