User Manual
Page 3
... iii Display Menu 16 2. PIP Menu 19 Shutdown 20 Maintenance 21 Lamp Information 21 Table of Contents Important Safety Instructions 1 Introduction 4 Projector Features 4 Shipping Contents 5 Optional Accessories 5 Projector Descriptions 6 Front View 6 Left View 6 Back View 6 External Control Panel 7 Adjuster 8 Remote Control Description 8 Your Remote Control at a Glance 8 Remote Control Effective Range 9 Remote Control Features 9 Installing or Replacing Batteries 10 Installation 11 Screen Size 11 Connecting to Various Equipment 12 Operation 13 Start Up 13 Digital...
... iii Display Menu 16 2. PIP Menu 19 Shutdown 20 Maintenance 21 Lamp Information 21 Table of Contents Important Safety Instructions 1 Introduction 4 Projector Features 4 Shipping Contents 5 Optional Accessories 5 Projector Descriptions 6 Front View 6 Left View 6 Back View 6 External Control Panel 7 Adjuster 8 Remote Control Description 8 Your Remote Control at a Glance 8 Remote Control Effective Range 9 Remote Control Features 9 Installing or Replacing Batteries 10 Installation 11 Screen Size 11 Connecting to Various Equipment 12 Operation 13 Start Up 13 Digital...
User Manual
Page 4
Use and Replacement of Lamp 21 LED Status Indicators 21 Lamp Replacement 22 Resetting Lamp Hours 23 Service Information 24 Accessories (Included in the standard package 24 Optional Accessories (Not included in the standard package) ... 24 Ordering Parts or Getting Information 24 Troubleshooting 25 Common Problems & Solutions 25 Status Messages 26 Specifications 27 Projector Specifications 27 Timing Chart 28 Supported timing for PC input 28 Supported timing for YPbPr input 28 Supported timing for Video and S-Video inputs 29 Dimensions 30 Warranty 31...
Use and Replacement of Lamp 21 LED Status Indicators 21 Lamp Replacement 22 Resetting Lamp Hours 23 Service Information 24 Accessories (Included in the standard package 24 Optional Accessories (Not included in the standard package) ... 24 Ordering Parts or Getting Information 24 Troubleshooting 25 Common Problems & Solutions 25 Status Messages 26 Specifications 27 Projector Specifications 27 Timing Chart 28 Supported timing for PC input 28 Supported timing for YPbPr input 28 Supported timing for Video and S-Video inputs 29 Dimensions 30 Warranty 31...
User Manual
Page 5
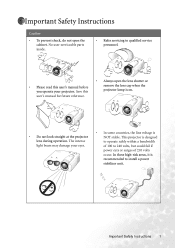
... voltage is NOT stable. In these high-risk areas, it is recommended to 240 volts, but could fail if power cuts or surges of 100 to install a power stabilizer unit. Important Safety Instructions 1 Important Safety Instructions Caution • To prevent shock, do not open the lens shutter or remove the lens cap when the projector lamp is on. • Do not look...
... voltage is NOT stable. In these high-risk areas, it is recommended to 240 volts, but could fail if power cuts or surges of 100 to install a power stabilizer unit. Important Safety Instructions 1 Important Safety Instructions Caution • To prevent shock, do not open the lens shutter or remove the lens cap when the projector lamp is on. • Do not look...
User Manual
Page 6
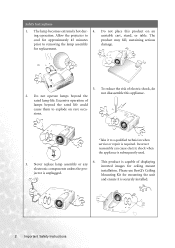
... technician when service or repair is securely installed. 2 Important Safety Instructions Allow the projector to removing the lamp assembly damage. Never replace lamp assembly or any inverted images for replacement. 5. Mounting Kit for approximately 45 minutes product may fall, sustaining serious prior to unstable cart, stand, or table. The lamp becomes extremely hot dur- 4. Please use BenQ's Ceiling jector is subsequently used. 6. for ceiling mount electronic components unless the pro- Do...
... technician when service or repair is securely installed. 2 Important Safety Instructions Allow the projector to removing the lamp assembly damage. Never replace lamp assembly or any inverted images for replacement. 5. Mounting Kit for approximately 45 minutes product may fall, sustaining serious prior to unstable cart, stand, or table. The lamp becomes extremely hot dur- 4. Please use BenQ's Ceiling jector is subsequently used. 6. for ceiling mount electronic components unless the pro- Do...
User Manual
Page 7
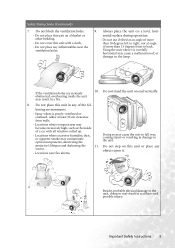
... optical components, shortening the projector's lifespan and darkening the 11. If the ventilation holes are seriously obstructed, overheating inside the unit may become excessively high, such as the inside of the fol- Locations where temperatures may result in accidents and possible injury. Important Safety Instructions 3 Always place the unit on end vertically. 8. screen. - Do not place any...
... optical components, shortening the projector's lifespan and darkening the 11. If the ventilation holes are seriously obstructed, overheating inside the unit may become excessively high, such as the inside of the fol- Locations where temperatures may result in accidents and possible injury. Important Safety Instructions 3 Always place the unit on end vertically. 8. screen. - Do not place any...
User Manual
Page 8
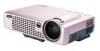
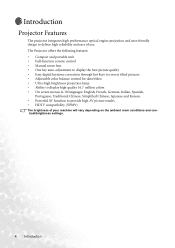
... following features: • Compact and portable unit • Full-function remote control • Manual zoom lens • One key auto-adjustment to display the best picture quality • Easy digital keystone correction through hot keys to correct tilted pictures • Adjustable color balance control for data/video • Ultra-high brightness projection lamp • Ability to display high quality 16.7 million colors • On screen menus in 10 languages: English, French, German, Italian, Spanish...
... following features: • Compact and portable unit • Full-function remote control • Manual zoom lens • One key auto-adjustment to display the best picture quality • Easy digital keystone correction through hot keys to correct tilted pictures • Adjustable color balance control for data/video • Ultra-high brightness projection lamp • Ability to display high quality 16.7 million colors • On screen menus in 10 languages: English, French, German, Italian, Spanish...
User Manual
Page 9
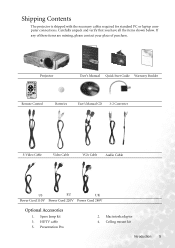
.../raPoujBne2ca1tlo2r0 User's Manual Quick Start Guide Warranty Booklet Remote Control Batteries User's Manual CD 3-2 Converter S-Video Cable Video Cable VGA Cable Audio Cable US EU UK Power Cord 110V Power Cord 220V Power Cord 240V Optional Accessories 1. Macintosh adaptor 4. If any of these items are missing, please contact your place of purchase. Spare lamp kit 3. Ceiling mount kit Introduction 5 Presentation Pro 2. HDTV cable 5. Shipping Contents The projector is shipped with the necessary cables required for standard PC or laptop computer connections...
.../raPoujBne2ca1tlo2r0 User's Manual Quick Start Guide Warranty Booklet Remote Control Batteries User's Manual CD 3-2 Converter S-Video Cable Video Cable VGA Cable Audio Cable US EU UK Power Cord 110V Power Cord 220V Power Cord 240V Optional Accessories 1. Macintosh adaptor 4. If any of these items are missing, please contact your place of purchase. Spare lamp kit 3. Ceiling mount kit Introduction 5 Presentation Pro 2. HDTV cable 5. Shipping Contents The projector is shipped with the necessary cables required for standard PC or laptop computer connections...
User Manual
Page 11
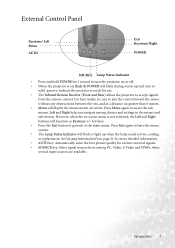
... help you navigate among PC, Video, S-Video and YPbPr, when several input sources are available. See°uLamp Information°von page 21 for more detailed information. • AUTO key: Automatically sense the best picture quality for current received signals. • SOURCE key: Select signal sources from the remote control. External Control Panel Keystone/ Left Menu AUTO Exit Keystone/ Right POWER SOURCE Lamp Status Indicator • Press and hold POWER for 1 second to turn to solid green...
... help you navigate among PC, Video, S-Video and YPbPr, when several input sources are available. See°uLamp Information°von page 21 for more detailed information. • AUTO key: Automatically sense the best picture quality for current received signals. • SOURCE key: Select signal sources from the remote control. External Control Panel Keystone/ Left Menu AUTO Exit Keystone/ Right POWER SOURCE Lamp Status Indicator • Press and hold POWER for 1 second to turn to solid green...

User Manual
Page 12
The adjuster will drop into posi- Adjuster The projector is . 2. Lift the projector up and press the 3. To stow the adjuster, depress the adjuster button to where it is equipped with a quick-release adjuster foot and button for adjusting its tilt angle. 1. tion and be locked. 3 1 2 Remote Control Description Your Remote Control at a Glance SOURCE AUTO POWER EXIT KEYSTONE MENU BLANK MUTE PIP VIDEO PIP S-VIDEO ZOOM IN ZOOM OUT FREEZE RETURN VOLUME 8 Introduction back to release the release button and push the adjuster adjuster.
The adjuster will drop into posi- Adjuster The projector is . 2. Lift the projector up and press the 3. To stow the adjuster, depress the adjuster button to where it is equipped with a quick-release adjuster foot and button for adjusting its tilt angle. 1. tion and be locked. 3 1 2 Remote Control Description Your Remote Control at a Glance SOURCE AUTO POWER EXIT KEYSTONE MENU BLANK MUTE PIP VIDEO PIP S-VIDEO ZOOM IN ZOOM OUT FREEZE RETURN VOLUME 8 Introduction back to release the release button and push the adjuster adjuster.
User Manual
Page 13
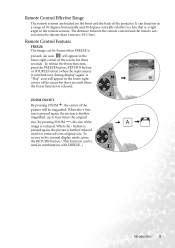
... to its original size. ZOOM IN/OUT + By pressing ZOOM , the center of the image is switched over during display) again. When the - It can be used in the lower right corner of the projector. When the + button is pressed again, the picture is pressed. Remote Control Effective Range The remote sensors are located on the front and the back of the screen for three...
... to its original size. ZOOM IN/OUT + By pressing ZOOM , the center of the image is switched over during display) again. When the - It can be used in the lower right corner of the projector. When the + button is pressed again, the picture is pressed. Remote Control Effective Range The remote sensors are located on the front and the back of the screen for three...
User Manual
Page 16
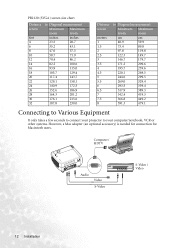
PB2120 (SVGA) screen size chart Distance screen feet 4 6 8 10 12 14 16 18 20 22 24 26 28 30 32 to Diagonal measurement Minimum Maximum zoom zoom inches inches 23.5 28.7 35.2 43.1 47.0 57.5 58.7 71.9 70.4 86.2 82.2 ...359.4 317.9 389.3 342.4 419.3 366.8 449.2 391.3 479.1 Connecting to Various Equipment It only takes a few seconds to connect your projector to your computer/notebook, VCR or other systems. However, a Mac adapter (an optional accessory) is needed for connection for Macintosh users. Computer / HDTV Audio Video S-Video S-Video / Video 12 Installation
PB2120 (SVGA) screen size chart Distance screen feet 4 6 8 10 12 14 16 18 20 22 24 26 28 30 32 to Diagonal measurement Minimum Maximum zoom zoom inches inches 23.5 28.7 35.2 43.1 47.0 57.5 58.7 71.9 70.4 86.2 82.2 ...359.4 317.9 389.3 342.4 419.3 366.8 449.2 391.3 479.1 Connecting to Various Equipment It only takes a few seconds to connect your projector to your computer/notebook, VCR or other systems. However, a Mac adapter (an optional accessory) is needed for connection for Macintosh users. Computer / HDTV Audio Video S-Video S-Video / Video 12 Installation
User Manual
Page 19
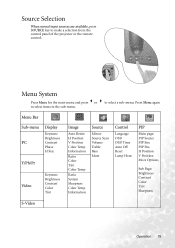
Menu Bar Sub-menu PC Display Keystone Brightness Contrast Phase H Size Y/Pb/Pr Video Keystone Brightness Contrast Color Tint Image Auto Resize H Position V Position Color Temp Information Ratio Color Tint Color Temp Ratio System Sharpness Color Temp Information Source Mirror Source Scan Volume Treble Bass Mute Control Langauge OSD OSD Time Auto Off Reset Lamp Hour PIP Main page: PIP Source PIP Size PIP Pos. Source Selection When several input sources are available, press SOURCE key to select items in the sub...
Menu Bar Sub-menu PC Display Keystone Brightness Contrast Phase H Size Y/Pb/Pr Video Keystone Brightness Contrast Color Tint Image Auto Resize H Position V Position Color Temp Information Ratio Color Tint Color Temp Ratio System Sharpness Color Temp Information Source Mirror Source Scan Volume Treble Bass Mute Control Langauge OSD OSD Time Auto Off Reset Lamp Hour PIP Main page: PIP Source PIP Size PIP Pos. Source Selection When several input sources are available, press SOURCE key to select items in the sub...

User Manual
Page 23
..., Color, Tint, Sharpness and System. Adjusts to select more red or blue. The range is Video or SVideo. Adjusts the brightness of manufacturing. OSD Time Auto Off Sets the length of time to the time of PIP image. Reset Returns all settings to shut off the system when no input is 1280x1024 (SXGA), the selected Large PIP size will remain active after the last time you pressed the button...
..., Color, Tint, Sharpness and System. Adjusts to select more red or blue. The range is Video or SVideo. Adjusts the brightness of manufacturing. OSD Time Auto Off Sets the length of time to the time of PIP image. Reset Returns all settings to shut off the system when no input is 1280x1024 (SXGA), the selected Large PIP size will remain active after the last time you pressed the button...
User Manual
Page 25
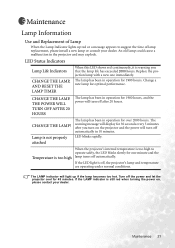
.... Temperature is too high When the projector's internal temperature is too high to suggest the time of Lamp When the Lamp Indicator lights up if the lamp becomes too hot. CHANGE THE LAMP. An old lamp could cause a malfunction in operation for over 2000 hours. Replace the projection lamp with a new one minute and the lamp turns off the power and let the projector cool for optimal performance. Maintenance Lamp Information Use and Replacement of lamp replacement, please install a new lamp or...
.... Temperature is too high When the projector's internal temperature is too high to suggest the time of Lamp When the Lamp Indicator lights up if the lamp becomes too hot. CHANGE THE LAMP. An old lamp could cause a malfunction in operation for over 2000 hours. Replace the projection lamp with a new one minute and the lamp turns off the power and let the projector cool for optimal performance. Maintenance Lamp Information Use and Replacement of lamp replacement, please install a new lamp or...
User Manual
Page 26
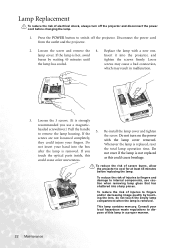
... lamp in malfunction. 3. Re-install the lamp cover and tighten to dispose of this could cause breakage. If the the screw. Do after the lamp is replaced, reset not insert your hand into the box the total lamp operation time. Loosen the screw and remove the 4. To reduce the risk of severe burns, allow the projector to switch off the projector and disconnect the power cord before replacing the lamp...
... lamp in malfunction. 3. Re-install the lamp cover and tighten to dispose of this could cause breakage. If the the screw. Do after the lamp is replaced, reset not insert your hand into the box the total lamp operation time. Loosen the screw and remove the 4. To reduce the risk of severe burns, allow the projector to switch off the projector and disconnect the power cord before replacing the lamp...
User Manual
Page 27
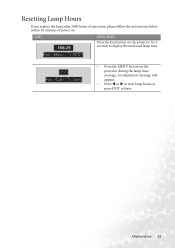
An adjustment message will appear. • Press W or X to reset lamp hours or press EXIT to display the total used lamp time. • Press the MENU button on the projector during the lamp hour message. Resetting Lamp Hours If you replace the lamp after 2000 hours of operation, please follow the instructions below within 10 minutes of power on the projector for 3 seconds to leave. Maintenance 23 OSD FUNCTION Press the Exit button on .
An adjustment message will appear. • Press W or X to reset lamp hours or press EXIT to display the total used lamp time. • Press the MENU button on the projector during the lamp hour message. Resetting Lamp Hours If you replace the lamp after 2000 hours of operation, please follow the instructions below within 10 minutes of power on the projector for 3 seconds to leave. Maintenance 23 OSD FUNCTION Press the Exit button on .
User Manual
Page 29
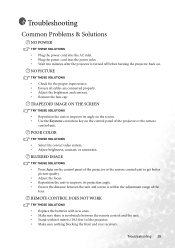
...; Plug the power cord into the power inlet. • Wait two minutes after the projector is turned off before turning the projector back on the control panel of the projector or the remote control unit. BLURRED IMAGE TRY THESE SOLUTIONS • Press Auto on the control panel of the projector or the remote control unit to get better picture quality. • Adjust the focus. • Reposition the unit to improve its projection angle...
...; Plug the power cord into the power inlet. • Wait two minutes after the projector is turned off before turning the projector back on the control panel of the projector or the remote control unit. BLURRED IMAGE TRY THESE SOLUTIONS • Press Auto on the control panel of the projector or the remote control unit to get better picture quality. • Adjust the focus. • Reposition the unit to improve its projection angle...
User Manual
Page 30
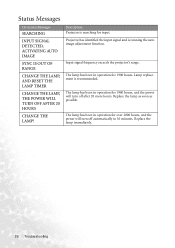
... lamp immediately. 26 Troubleshooting Status Messages On Screen Messages SEARCHING INPUT SIGNAL DETECTED, ACTIVATING AUTO IMAGE SYNC IS OUT OF RANGE CHANGE THE LAMP, AND RESET THE LAMP TIMER CHANGE THE LAMP, THE POWER WILL TURN OFF AFTER 20 HOURS CHANGE THE LAMP! Input signal frequency exceeds the projector's range. Lamp replacement is searching for input. The lamp has been in 10 minutes. The lamp has been in operation for over 2000 hours, and the power will turn off after 20 more hours. Projector has identified the input signal...
... lamp immediately. 26 Troubleshooting Status Messages On Screen Messages SEARCHING INPUT SIGNAL DETECTED, ACTIVATING AUTO IMAGE SYNC IS OUT OF RANGE CHANGE THE LAMP, AND RESET THE LAMP TIMER CHANGE THE LAMP, THE POWER WILL TURN OFF AFTER 20 HOURS CHANGE THE LAMP! Input signal frequency exceeds the projector's range. Lamp replacement is searching for input. The lamp has been in 10 minutes. The lamp has been in operation for over 2000 hours, and the power will turn off after 20 more hours. Projector has identified the input signal...
User Manual
Page 31
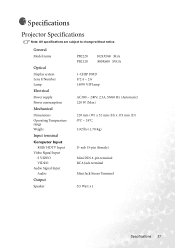
General Model name Optical Display system Lens F/Number Lamp Electrical Power supply Power consumption Mechanical Dimensions Operating Temperature range Weight Input terminal Computer Input RGB/ HDTV Input Video Signal Input S VIDEO VIDEO Audio Signal Input Audio Output Speaker PB2220 PB2120 1024X768 XGA 800X600 SVGA 1-CHIP DMD F/2.4 ~ 2.6 150W VIP lamp AC100 ~ 240V, 2.3A, 50/60 Hz (Automatic) 220 W (Max) 220 mm (W) x 52 mm (H) x 175 mm (D) 0°C ~ 35°C 3.92 lbs (1.78 Kg) D-sub 15-pin (...
General Model name Optical Display system Lens F/Number Lamp Electrical Power supply Power consumption Mechanical Dimensions Operating Temperature range Weight Input terminal Computer Input RGB/ HDTV Input Video Signal Input S VIDEO VIDEO Audio Signal Input Audio Output Speaker PB2220 PB2120 1024X768 XGA 800X600 SVGA 1-CHIP DMD F/2.4 ~ 2.6 150W VIP lamp AC100 ~ 240V, 2.3A, 50/60 Hz (Automatic) 220 W (Max) 220 mm (W) x 52 mm (H) x 175 mm (D) 0°C ~ 35°C 3.92 lbs (1.78 Kg) D-sub 15-pin (...

User Manual
Page 36
... if not installed and used in accordance with the instruction manual, may cause interference to radio communications. Operation of this equipment does cause harmful interference to radio or television reception, which case the user at his/her own expense will not occur in any area including residential area. 32 Safety Regulations Increase the distance between the equipment...
... if not installed and used in accordance with the instruction manual, may cause interference to radio communications. Operation of this equipment does cause harmful interference to radio or television reception, which case the user at his/her own expense will not occur in any area including residential area. 32 Safety Regulations Increase the distance between the equipment...


