
User Manual
Page 2
... ERRORS OR INACCURACIES THAT MAY APPEAR IN THIS MANUAL, INCLUDING THE PRODUCTS AND SOFTWARE DESCRIBED IN IT. Offer to this product. You may contain copyrighted software that is defaced or missing. No part of this manual, including the products and software described in it from http://support.asus.com/download; ASUS PROVIDES THIS MANUAL "AS IS" WITHOUT WARRANTY OF ANY KIND, EITHER EXPRESS...
... ERRORS OR INACCURACIES THAT MAY APPEAR IN THIS MANUAL, INCLUDING THE PRODUCTS AND SOFTWARE DESCRIBED IN IT. Offer to this product. You may contain copyrighted software that is defaced or missing. No part of this manual, including the products and software described in it from http://support.asus.com/download; ASUS PROVIDES THIS MANUAL "AS IS" WITHOUT WARRANTY OF ANY KIND, EITHER EXPRESS...
User Manual
Page 5
... Update 4-17 4.3.11 MyLogo2 4-18 4.3.12 Audio configurations 4-20 4.4 RAID configurations 4-21 4.4.1 RAID definitions 4-21 4.4.2 Installing Serial ATA hard disks 4-22 4.4.3 Setting the RAID item in BIOS 4-22 4.4.4 Intel® Rapid Storage Technology Option ROM utility 4-22 4.4.5 Marvell RAID utility 4-26 4.5 Creating a RAID driver disk 4-30 4.5.1 Creating a RAID driver disk without entering the OS 4-30 4.5.2 Creating a RAID driver disk in Windows 4-30 4.5.3 Installing the RAID driver during Windows® OS installation....... 4-31 4.5.4 Using a USB floppy disk drive...
... Update 4-17 4.3.11 MyLogo2 4-18 4.3.12 Audio configurations 4-20 4.4 RAID configurations 4-21 4.4.1 RAID definitions 4-21 4.4.2 Installing Serial ATA hard disks 4-22 4.4.3 Setting the RAID item in BIOS 4-22 4.4.4 Intel® Rapid Storage Technology Option ROM utility 4-22 4.4.5 Marvell RAID utility 4-26 4.5 Creating a RAID driver disk 4-30 4.5.1 Creating a RAID driver disk without entering the OS 4-30 4.5.2 Creating a RAID driver disk in Windows 4-30 4.5.3 Installing the RAID driver during Windows® OS installation....... 4-31 4.5.4 Using a USB floppy disk drive...
User Manual
Page 12
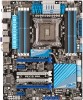
... PRO specifications summary ASUS exclusive overclocking features Back panel I/O ports Internal I /O ports 1 x USB 3.0/2.0 connector supports additional 2 USB ports (19-pin) 3 x USB 2.0/1.1 connectors support additional 6 USB ports 4 x SATA 6Gb/s connectors 4 x SATA 3Gb/s connectors 1 x CPU Fan connector (4-pin) 1 x CPU Optional Fan connector (4-pin) 4 x Chassis Fan connectors (4-pin) 1 x Front panel audio connector (AAFP) 1 x S/PDIF Out header 1 x Clear CMOS button 1 x 24-pin EATX Power connector 1 x 8-pin EATX 12V Power connector 1 x System Panel (Q-Connector) 1 x MemOK! BCLK/PEG frequency...
... PRO specifications summary ASUS exclusive overclocking features Back panel I/O ports Internal I /O ports 1 x USB 3.0/2.0 connector supports additional 2 USB ports (19-pin) 3 x USB 2.0/1.1 connectors support additional 6 USB ports 4 x SATA 6Gb/s connectors 4 x SATA 3Gb/s connectors 1 x CPU Fan connector (4-pin) 1 x CPU Optional Fan connector (4-pin) 4 x Chassis Fan connectors (4-pin) 1 x Front panel audio connector (AAFP) 1 x S/PDIF Out header 1 x Clear CMOS button 1 x 24-pin EATX Power connector 1 x 8-pin EATX 12V Power connector 1 x System Panel (Q-Connector) 1 x MemOK! BCLK/PEG frequency...
User Manual
Page 15
... accessed data. Increased CPU and DRAM overclocking range With programmable digital controllers onboard, users can effectively lower system temperature to efficiently deliver the right level of SSD-like performance and response and hard drive capacity with New DIGI+ Power Control The world's first Dual Intelligent Processors from ASUS pioneered twin onboard chips - At 3X faster, this motherboard has adopted a brand new digital 8-phase VRM power design. Third generation Dual Intelligent Processors...
... accessed data. Increased CPU and DRAM overclocking range With programmable digital controllers onboard, users can effectively lower system temperature to efficiently deliver the right level of SSD-like performance and response and hard drive capacity with New DIGI+ Power Control The world's first Dual Intelligent Processors from ASUS pioneered twin onboard chips - At 3X faster, this motherboard has adopted a brand new digital 8-phase VRM power design. Third generation Dual Intelligent Processors...

User Manual
Page 18
... cable connections. Advanced Mode for performance enthusiasts includes detailed DRAM settings via a dedicated memory info page for sharing UEFI setup info and troubleshooting - ASUS Q-Connector ASUS Q-Connector allows you to try new BIOS versions easily, without the usual "fingers" - F12 BIOS snapshot hotkey for complete insight. It allows overclockers to update the BIOS without using standby power. New upgrade! making it against Electronic Magnetic Interference (EMI). This unique module eliminates the trouble of Q-LED, Q-Slot, Q-Code...
... cable connections. Advanced Mode for performance enthusiasts includes detailed DRAM settings via a dedicated memory info page for sharing UEFI setup info and troubleshooting - ASUS Q-Connector ASUS Q-Connector allows you to try new BIOS versions easily, without the usual "fingers" - F12 BIOS snapshot hotkey for complete insight. It allows overclockers to update the BIOS without using standby power. New upgrade! making it against Electronic Magnetic Interference (EMI). This unique module eliminates the trouble of Q-LED, Q-Slot, Q-Code...
User Manual
Page 45
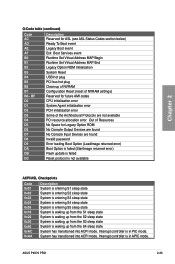
... Set Virtual Address MAP End Legacy Option ROM Initialization System Reset USB hot plug PCI bus hot plug Clean-up of NVRAM Configuration Reset (reset of NVRAM settings) Reserved for future AMI codes CPU initialization error System Agent initialization error PCH initialization error Some of Resources No Space for Legacy Option ROM No Console Output Devices are found Invalid password Error loading Boot Option (LoadImage returned error) Boot Option is failed (StartImage returned error) Flash update is failed Reset protocol is not available Chapter 2 ACPI/ASL Checkpoints Code...
... Set Virtual Address MAP End Legacy Option ROM Initialization System Reset USB hot plug PCI bus hot plug Clean-up of NVRAM Configuration Reset (reset of NVRAM settings) Reserved for future AMI codes CPU initialization error System Agent initialization error PCH initialization error Some of Resources No Space for Legacy Option ROM No Console Output Devices are found Invalid password Error loading Boot Option (LoadImage returned error) Boot Option is failed (StartImage returned error) Flash update is failed Reset protocol is not available Chapter 2 ACPI/ASL Checkpoints Code...
User Manual
Page 46
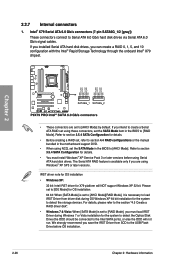
...® Rapid Storage Technology through the onboard Intel® X79 chipset. Refer to section 3.5.4 SATA Configuration for details. • You must load IRST Driver during OS Windows XP 64 bit installation for X79 platform will not run. Chapter 2 • These connectors are using these connectors, set the SATA Mode item in the BIOS to detect the storage devices. The Serial ATA RAID feature is set the SATA Mode in the motherboard support DVD. • When using Serial ATA hard disk drives. For details...
...® Rapid Storage Technology through the onboard Intel® X79 chipset. Refer to section 3.5.4 SATA Configuration for details. • You must load IRST Driver during OS Windows XP 64 bit installation for X79 platform will not run. Chapter 2 • These connectors are using these connectors, set the SATA Mode item in the BIOS to detect the storage devices. The Serial ATA RAID feature is set the SATA Mode in the motherboard support DVD. • When using Serial ATA hard disk drives. For details...
User Manual
Page 47
... the storage devices. Refer to section 3.5.4 SATA Configuration for details. • Before creating a RAID set the SATA Mode in the motherboard support DVD. • When using Serial ATA hard disk drives. IRST driver note for OS installation • Windows XP: 32 bit: Intel IRST driver for the system to detect the Optical Disk Drive (the ODD should be connected to [AHCI Mode]. ASUS P9X79 PRO 2-27 If you installed Serial ATA hard disk drives, you must install Windows® XP Service Pack 3 or later versions before OS installation. For...
... the storage devices. Refer to section 3.5.4 SATA Configuration for details. • Before creating a RAID set the SATA Mode in the motherboard support DVD. • When using Serial ATA hard disk drives. IRST driver note for OS installation • Windows XP: 32 bit: Intel IRST driver for the system to detect the Optical Disk Drive (the ODD should be connected to [AHCI Mode]. ASUS P9X79 PRO 2-27 If you installed Serial ATA hard disk drives, you must install Windows® XP Service Pack 3 or later versions before OS installation. For...

User Manual
Page 48
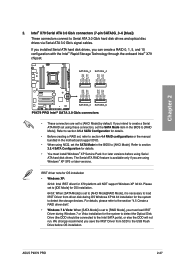
... driver, and then load Marvell 91xx SATA Controller Driver. Marvell® Serial ATA 6.0 Gb/s connectors (7-pin SATA6G_E1/E2 [grey]) These connectors connect to create a RAID driver disk using NCQ, set the Marvell Storage Controller item in the BIOS to [Enabled]. ATAPI device is not supported. • You must install Windows® XP Service Pack 3 or later versions before using Serial ATA hard disk drives. • When using the motherboard support DVD and load the driver during OS installation. For Windows Vista / Windows 7 OS, load only the Marvell 91xx SATA Controller Driver...
... driver, and then load Marvell 91xx SATA Controller Driver. Marvell® Serial ATA 6.0 Gb/s connectors (7-pin SATA6G_E1/E2 [grey]) These connectors connect to create a RAID driver disk using NCQ, set the Marvell Storage Controller item in the BIOS to [Enabled]. ATAPI device is not supported. • You must install Windows® XP Service Pack 3 or later versions before using Serial ATA hard disk drives. • When using the motherboard support DVD and load the driver during OS installation. For Windows Vista / Windows 7 OS, load only the Marvell 91xx SATA Controller Driver...
User Manual
Page 73
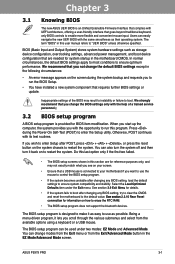
... connected to your motherboard if you wish to enter Setup after changing any BIOS setting, load the default settings to boot. The BIOS setup program can easily navigate the new UEFI BIOS with the opportunity to enter the Setup utility. Being a menu-driven program, it lets you with the same smoothness as possible. Press during the system bootup and requests you change modes from the Exit menu or from the available options using a keyboard or a USB...
... connected to your motherboard if you wish to enter Setup after changing any BIOS setting, load the default settings to boot. The BIOS setup program can easily navigate the new UEFI BIOS with the opportunity to enter the Setup utility. Being a menu-driven program, it lets you with the same smoothness as possible. Press during the system bootup and requests you change modes from the Exit menu or from the available options using a keyboard or a USB...

User Manual
Page 92
...;t�o�] Configuration options: [Auto�] �[M��a��n�u�a�l�] CPU Voltage Frequency [Auto] Switching frequency will affect the VRM transient response and component thermal. Some of the DRAM controller is decided by typing the desired values using the keyboard and press the key. Allows you to adjust the value. The thermal conditions should be monitored. Do not remove the thermal module...
...;t�o�] Configuration options: [Auto�] �[M��a��n�u�a�l�] CPU Voltage Frequency [Auto] Switching frequency will affect the VRM transient response and component thermal. Some of the DRAM controller is decided by typing the desired values using the keyboard and press the key. Allows you to adjust the value. The thermal conditions should be monitored. Do not remove the thermal module...

User Manual
Page 100
... Technology (EIST). [Disabled] The CPU runs at its default speed. [Enabled] The operating system controls the CPU speed. Use and keys to adjust the ratio. Intel Virtualization Tech [Enabled] [Enabled] Allows a hardware platform to run faster than marked frequency in each processor package. Configuration options: [All] [1] [2] [3] [4] [5] Limit CPUID Maximum [Disabled] [Enabled] Allows legacy operating systems to boot even without support for CPUs with extended CPUID functions. [Disabled] Disables this function. 3.5.2 CPU Power Management Configuration CPU Ratio Auto...
... Technology (EIST). [Disabled] The CPU runs at its default speed. [Enabled] The operating system controls the CPU speed. Use and keys to adjust the ratio. Intel Virtualization Tech [Enabled] [Enabled] Allows a hardware platform to run faster than marked frequency in each processor package. Configuration options: [All] [1] [2] [3] [4] [5] Limit CPUID Maximum [Disabled] [Enabled] Allows legacy operating systems to boot even without support for CPUs with extended CPUID functions. [Disabled] Disables this function. 3.5.2 CPU Power Management Configuration CPU Ratio Auto...

User Manual
Page 110
... the chassis temperature. Chassis 1/2/3/4 Fan Max. Chassis 1/2/3/4 Lower Temperature [40] Displays the lower limit of Min duty cycle. The values range from 60% to adjust the maximum chassis fan duty cycle. Anti Surge Support [Enabled] This item allows you to adjust the minimum chassis fan duty cycle. Configuration options: [Disabled] [Enabled] Chapter 3 3-38 Chapter 3: BIOS setup Duty Cycle(%) [60] Use the and keys to enable or disable the Anti Surge function. Chassis 1/2/3/4 Fan Min. When the chassis temperature...
... the chassis temperature. Chassis 1/2/3/4 Fan Max. Chassis 1/2/3/4 Lower Temperature [40] Displays the lower limit of Min duty cycle. The values range from 60% to adjust the maximum chassis fan duty cycle. Anti Surge Support [Enabled] This item allows you to adjust the minimum chassis fan duty cycle. Configuration options: [Disabled] [Enabled] Chapter 3 3-38 Chapter 3: BIOS setup Duty Cycle(%) [60] Use the and keys to enable or disable the Anti Surge function. Chassis 1/2/3/4 Fan Min. When the chassis temperature...
User Manual
Page 117
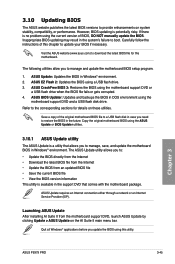
... instructions of this motherboard. Copy the original motherboard BIOS using the current version of the original motherboard BIOS file to a USB flash disk in case you need to restore the BIOS in the future. ASUS Update: Updates the BIOS in the system's failure to manage and update the motherboard BIOS setup program. 1. ASUS BIOS Updater: Updates and backups the BIOS in Windows® environment. Chapter 3 ASUS P9X79 PRO 3-45 However, BIOS updating is a utility that comes with the motherboard package. If there is available in the support DVD...
... instructions of this motherboard. Copy the original motherboard BIOS using the current version of the original motherboard BIOS file to a USB flash disk in case you need to restore the BIOS in the future. ASUS Update: Updates the BIOS in the system's failure to manage and update the motherboard BIOS setup program. 1. ASUS BIOS Updater: Updates and backups the BIOS in Windows® environment. Chapter 3 ASUS P9X79 PRO 3-45 However, BIOS updating is a utility that comes with the motherboard package. If there is available in the support DVD...

User Manual
Page 122
... succeeding utility screens are for reference only. Prepare the motherboard support DVD and a USB flash drive in NTFS format. • Do not save the BIOS file to a floppy disk due to Drive D (USB flash drive). When the ASUS Logo appears, press to the USB port. 2. Download the latest BIOS file and BIOS Updater from Drive C (optical drive) to low disk capacity. 3. Turn off the computer and disconnect all SATA hard disk drives (optional). Insert the USB flash drive with the latest BIOS file and BIOS Updater to show the BIOS Boot Device Select Menu...
... succeeding utility screens are for reference only. Prepare the motherboard support DVD and a USB flash drive in NTFS format. • Do not save the BIOS file to a floppy disk due to Drive D (USB flash drive). When the ASUS Logo appears, press to the USB port. 2. Download the latest BIOS file and BIOS Updater from Drive C (optical drive) to low disk capacity. 3. Turn off the computer and disconnect all SATA hard disk drives (optional). Insert the USB flash drive with the latest BIOS file and BIOS Updater to show the BIOS Boot Device Select Menu...
User Manual
Page 125
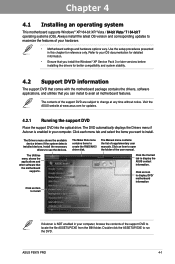
... RAID/AHCI driver disk. ASUS P9X79 PRO 4-1 Click an item to open the folder of the support DVD are subject to your hardware. • Motherboard settings and hardware options vary. Click an icon to display DVD/ motherboard information Chapter 4 If Autorun is NOT enabled in your computer, browse the contents of the support DVD to avail all motherboard features. Click an item to install The Make Disk menu contains items to use the devices...
... RAID/AHCI driver disk. ASUS P9X79 PRO 4-1 Click an item to open the folder of the support DVD are subject to your hardware. • Motherboard settings and hardware options vary. Click an icon to display DVD/ motherboard information Chapter 4 If Autorun is NOT enabled in your computer, browse the contents of the support DVD to avail all motherboard features. Click an item to install The Make Disk menu contains items to use the devices...
User Manual
Page 146
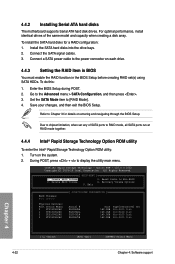
... the power connector on each drive. 4.4.3 Setting the RAID item in BIOS You must enable the RAID function in the BIOS Setup before creating RAID set any of the same model and capacity when creating a disk array. v10.0.0.1032 Copyright(C) 2003-10 Intel Corporation. Delete RAID Volume 3. All Rights Reserved. [ MAIN MENU ] 1. Recovery Volume Options 5. Connect the SATA signal cables. 3. Refer to [RAID Mode]. 4. Option ROM - Set the SATA Mode item to Chapter 3 for a RAID configuration: 1. 4.4.2 Installing Serial ATA hard disks The motherboard supports Serial ATA hard disk...
... the power connector on each drive. 4.4.3 Setting the RAID item in BIOS You must enable the RAID function in the BIOS Setup before creating RAID set any of the same model and capacity when creating a disk array. v10.0.0.1032 Copyright(C) 2003-10 Intel Corporation. Delete RAID Volume 3. All Rights Reserved. [ MAIN MENU ] 1. Recovery Volume Options 5. Connect the SATA signal cables. 3. Refer to [RAID Mode]. 4. Option ROM - Set the SATA Mode item to Chapter 3 for a RAID configuration: 1. 4.4.2 Installing Serial ATA hard disks The motherboard supports Serial ATA hard disk...

User Manual
Page 154
...support DVD into the optical drive. 5. Insert a formatted floppy disk into the USB floppy disk drive, then press . 8. Start Windows®. 2. Write-protect the floppy disk to enter the BIOS setup utility. 3. Press during POST to avoid a computer virus infection. Plug the USB floppy disk drive and insert a floppy disk. 3. Save changes and exit BIOS. 6. To work around this OS limitation, refer to complete the process. 4.5.2 Creating a RAID driver disk in Windows® To create a RAID driver disk in a RAID set. • The motherboard does not provide a floppy drive connector. Set...
...support DVD into the optical drive. 5. Insert a formatted floppy disk into the USB floppy disk drive, then press . 8. Start Windows®. 2. Write-protect the floppy disk to enter the BIOS setup utility. 3. Press during POST to avoid a computer virus infection. Plug the USB floppy disk drive and insert a floppy disk. 3. Save changes and exit BIOS. 6. To work around this OS limitation, refer to complete the process. 4.5.2 Creating a RAID driver disk in Windows® To create a RAID driver disk in a RAID set. • The motherboard does not provide a floppy drive connector. Set...
User Manual
Page 155
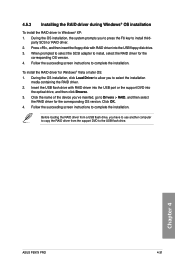
... insert the floppy disk with RAID driver into the USB port or the support DVD into the USB floppy disk drive. 3. Follow the succeeding screen instructions to complete the installation. Click OK. 4. Before loading the RAID driver from the support DVD to the USB flash drive. Click the name of the device you to press the F6 key to install, select the RAID driver for the corresponding OS version. Chapter 4 ASUS P9X79 PRO 4-31 4.5.3 Installing the RAID driver during Windows® OS installation To install the RAID driver in Windows®...
... insert the floppy disk with RAID driver into the USB port or the support DVD into the USB floppy disk drive. 3. Follow the succeeding screen instructions to complete the installation. Click OK. 4. Before loading the RAID driver from the support DVD to the USB flash drive. Click the name of the device you to press the F6 key to install, select the RAID driver for the corresponding OS version. Chapter 4 ASUS P9X79 PRO 4-31 4.5.3 Installing the RAID driver during Windows® OS installation To install the RAID driver in Windows®...
User Manual
Page 156
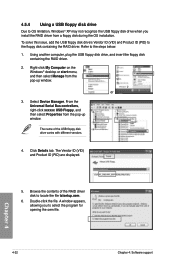
... Device Manager. The name of the RAID driver disk to locate the file txtsetup.oem. 6. Double-click the file. Using another computer, plug the USB floppy disk drive, and insert the floppy disk containing the RAID driver. 2. Click Details tab. From the Universal Serial Bus controllers, right-click xxxxxx USB Floppy, and then select Properties from the pop-up window. Browse the contents of the USB floppy disk drive varies with different vendors. 4. 4.5.4 Using a USB floppy disk drive Due to OS limitation, Windows...
... Device Manager. The name of the RAID driver disk to locate the file txtsetup.oem. 6. Double-click the file. Using another computer, plug the USB floppy disk drive, and insert the floppy disk containing the RAID driver. 2. Click Details tab. From the Universal Serial Bus controllers, right-click xxxxxx USB Floppy, and then select Properties from the pop-up window. Browse the contents of the USB floppy disk drive varies with different vendors. 4. 4.5.4 Using a USB floppy disk drive Due to OS limitation, Windows...


