User Manual
Page 5
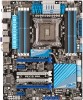
... EPU 4-10 4.3.5 FAN Xpert 4-11 4.3.6 Sensor Recorder 4-12 4.3.7 Probe II 4-13 4.3.8 BT GO 4-14 4.3.9 USB 3.0 Boost 4-15 4.3.10 ASUS SSD Caching 4-16 4.3.11 ASUS Update 4-17 4.3.11 MyLogo2 4-18 4.3.12 Audio configurations 4-20 4.4 RAID configurations 4-21 4.4.1 RAID definitions 4-21 4.4.2 ...26 4.5 Creating a RAID driver disk 4-30 4.5.1 Creating a RAID driver disk without entering the OS 4-30 4.5.2 Creating a RAID driver disk in Windows 4-30 4.5.3 Installing the RAID driver during Windows® OS installation....... 4-31 4.5.4 Using a USB floppy disk drive 4-32 ...
... EPU 4-10 4.3.5 FAN Xpert 4-11 4.3.6 Sensor Recorder 4-12 4.3.7 Probe II 4-13 4.3.8 BT GO 4-14 4.3.9 USB 3.0 Boost 4-15 4.3.10 ASUS SSD Caching 4-16 4.3.11 ASUS Update 4-17 4.3.11 MyLogo2 4-18 4.3.12 Audio configurations 4-20 4.4 RAID configurations 4-21 4.4.1 RAID definitions 4-21 4.4.2 ...26 4.5 Creating a RAID driver disk 4-30 4.5.1 Creating a RAID driver disk without entering the OS 4-30 4.5.2 Creating a RAID driver disk in Windows 4-30 4.5.3 Installing the RAID driver during Windows® OS installation....... 4-31 4.5.4 Using a USB floppy disk drive 4-32 ...
User Manual
Page 12
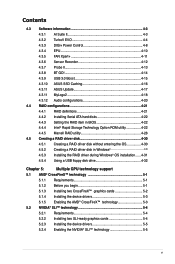
... CPU &PCH PLL voltage control SFS (Stepless Frequency Selection): - P9X79 PRO specifications summary ASUS exclusive overclocking features Back panel I/O ports Internal I /O ports 1 x USB 3.0/2.0 connector supports additional 2 USB ports (19-pin) 3 x USB 2.0/1.1 connectors support additional 6 USB ports 4 x SATA 6Gb/s connectors 4 x SATA 3Gb/s connectors... 2.0, WfM 2.0, SM BIOS 2.6, ACPI 2.0a, Multi-language BIOS, ASUS EZ Flash 2, ASUS CrashFree BIOS 3 WfM 2.0, DMI 2.0, WOL by PME, WOR by PME, PXE Drivers ASUS Utilities ASUS Update Anti-virus software (OEM version) ATX form factor: 12 in...
... CPU &PCH PLL voltage control SFS (Stepless Frequency Selection): - P9X79 PRO specifications summary ASUS exclusive overclocking features Back panel I/O ports Internal I /O ports 1 x USB 3.0/2.0 connector supports additional 2 USB ports (19-pin) 3 x USB 2.0/1.1 connectors support additional 6 USB ports 4 x SATA 6Gb/s connectors 4 x SATA 3Gb/s connectors... 2.0, WfM 2.0, SM BIOS 2.6, ACPI 2.0a, Multi-language BIOS, ASUS EZ Flash 2, ASUS CrashFree BIOS 3 WfM 2.0, DMI 2.0, WOL by PME, WOR by PME, PXE Drivers ASUS Utilities ASUS Update Anti-virus software (OEM version) ATX form factor: 12 in...
User Manual
Page 44
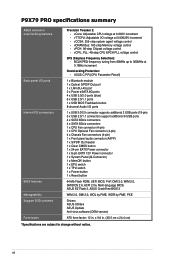
...module specific) ACPI module initialization CSM initialization Reserved for future AMI DXE codes Boot Device Selection (BDS) phase is started Driver connecting is started PCI Bus initialization is started PCI Bus Hot Plug Controller Initialization PCI Bus Enumeration PCI Bus Request Resources ...PCI Bus Assign Resources Console Output devices connect Console input devices connect Super IO Initialization USB initialization is started USB Reset USB Detect USB Enable Reserved for future AMI codes IDE initialization is started IDE Reset IDE Detect IDE Enable SCSI initialization...
...module specific) ACPI module initialization CSM initialization Reserved for future AMI DXE codes Boot Device Selection (BDS) phase is started Driver connecting is started PCI Bus initialization is started PCI Bus Hot Plug Controller Initialization PCI Bus Enumeration PCI Bus Request Resources ...PCI Bus Assign Resources Console Output devices connect Console input devices connect Super IO Initialization USB initialization is started USB Reset USB Detect USB Enable Reserved for future AMI codes IDE initialization is started IDE Reset IDE Detect IDE Enable SCSI initialization...
User Manual
Page 46
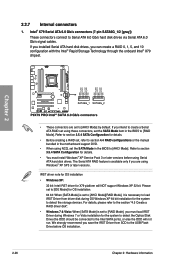
...174; XP Service Pack 3 or later versions before OS installation. 2-26 Chapter 2: Hardware information We strongly recommend you save the IRST Driver from driver disk during Windows 7 or Vista installation for the system to section 4.4 RAID configurations or the manual bundled in the BIOS to [AHCI ...load IRST Driver from SCD to Serial ATA 6.0 Gb/s hard disk drives via Serial ATA 6.0 Gb/s signal cables. Please set to [IDE Mode] for X79 platform will not run. Intel® X79 Serial ATA 6.0 Gb/s connectors (7-pin SATA6G_1/2 [gray]) These connectors connect to the USB Flash ...
...174; XP Service Pack 3 or later versions before OS installation. 2-26 Chapter 2: Hardware information We strongly recommend you save the IRST Driver from driver disk during Windows 7 or Vista installation for the system to section 4.4 RAID configurations or the manual bundled in the BIOS to [AHCI ...load IRST Driver from SCD to Serial ATA 6.0 Gb/s hard disk drives via Serial ATA 6.0 Gb/s signal cables. Please set to [IDE Mode] for X79 platform will not run. Intel® X79 Serial ATA 6.0 Gb/s connectors (7-pin SATA6G_1/2 [gray]) These connectors connect to the USB Flash ...
User Manual
Page 47
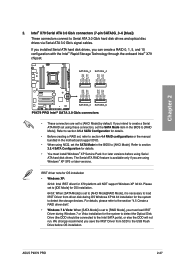
... 5, and 10 configuration with the Intel® Rapid Storage Technology through the onboard Intel® X79 chipset. ASUS P9X79 PRO 2-27 IRST driver note for OS installation • Windows XP: 32 bit: Intel IRST driver for the system to detect the Optical Disk Drive (the ODD should be connected to [AHCI Mode]. Please ...set to [IDE Mode] for OS installation. 64 bit: When [SATA Mode] is necessary to load IRST Driver from SCD to the USB Flash Drive before using NCQ, set the SATA Mode in the BIOS to Serial ATA 3.0 Gb/s hard disk drives and optical disc...
... 5, and 10 configuration with the Intel® Rapid Storage Technology through the onboard Intel® X79 chipset. ASUS P9X79 PRO 2-27 IRST driver note for OS installation • Windows XP: 32 bit: Intel IRST driver for the system to detect the Optical Disk Drive (the ODD should be connected to [AHCI Mode]. Please ...set to [IDE Mode] for OS installation. 64 bit: When [SATA Mode] is necessary to load IRST Driver from SCD to the USB Flash Drive before using NCQ, set the SATA Mode in the BIOS to Serial ATA 3.0 Gb/s hard disk drives and optical disc...
User Manual
Page 69
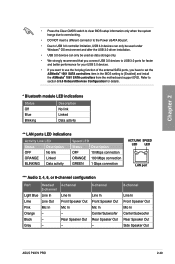
...NOT insert a different connector to the Power eSATA 6G port. • Due to USB 3.0 controller limitation, USB 3.0 devices can only be used under Windows® OS environment and after the USB 3.0 driver installation. • USB 3.0 devices can only be used as data storage only. • We strongly recommend ...Mic In Center/Subwoofer Rear Speaker Out - 8-channel Line In Front Speaker Out Mic In Center/Subwoofer Rear Speaker Out Side Speaker Out ASUS P9X79 PRO 2-49 Black - Refer to [Enabled] and install the ASMedia® 1061 SATA controllers from the motherboard support DVD. Gray - ...
...NOT insert a different connector to the Power eSATA 6G port. • Due to USB 3.0 controller limitation, USB 3.0 devices can only be used under Windows® OS environment and after the USB 3.0 driver installation. • USB 3.0 devices can only be used as data storage only. • We strongly recommend ...Mic In Center/Subwoofer Rear Speaker Out - 8-channel Line In Front Speaker Out Mic In Center/Subwoofer Rear Speaker Out Side Speaker Out ASUS P9X79 PRO 2-49 Black - Refer to [Enabled] and install the ASMedia® 1061 SATA controllers from the motherboard support DVD. Gray - ...

User Manual
Page 106
is disabled. is enabled. [Disabled] ASUS BT GO! Bluetooth Controller [Enabled] [Enabled] ASUS BT GO! ASM1061 Storage OPROM [Enabled] This item appears only when you set...Storage Controller [AHCI Mode] Allows you to use the function of the Marvell storage controller. Configuration options: [Enabled] [Disabled] Asmedia USB 3.0 Controller [Enabled] This item allows user to [HDMI] for HDMI audio output. Marvell Storage OPROM [Enabled] This item appears ...you set the previous item to [AHCI Mode] and install the ASM1061 Controller Driver from the motherboard support DVD.
is disabled. is enabled. [Disabled] ASUS BT GO! Bluetooth Controller [Enabled] [Enabled] ASUS BT GO! ASM1061 Storage OPROM [Enabled] This item appears only when you set...Storage Controller [AHCI Mode] Allows you to use the function of the Marvell storage controller. Configuration options: [Enabled] [Disabled] Asmedia USB 3.0 Controller [Enabled] This item allows user to [HDMI] for HDMI audio output. Marvell Storage OPROM [Enabled] This item appears ...you set the previous item to [AHCI Mode] and install the ASM1061 Controller Driver from the motherboard support DVD.

User Manual
Page 154
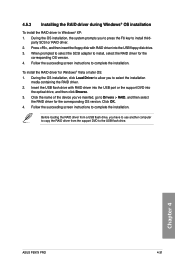
... drive as the primary boot device. 4. Chapter 4 4-30 Chapter 4: Software support Save changes and exit BIOS. 6. Plug the USB floppy disk drive and insert a floppy disk. 3. Press during POST to create a RAID driver disk. 7. Follow the succeeding screen instructions to avoid a computer virus infection. Write-protect the floppy disk to complete the...
... drive as the primary boot device. 4. Chapter 4 4-30 Chapter 4: Software support Save changes and exit BIOS. 6. Plug the USB floppy disk drive and insert a floppy disk. 3. Press during POST to create a RAID driver disk. 7. Follow the succeeding screen instructions to avoid a computer virus infection. Write-protect the floppy disk to complete the...
User Manual
Page 155
... support DVD to Drivers > RAID, and then select the RAID driver for the corresponding OS version. 4. Click OK. 4. Chapter 4 ASUS P9X79 PRO 4-31 4.5.3 Installing the RAID driver during Windows® OS installation To install the RAID driver in Windows® XP: 1. During the OS installation, the system prompts you 've inserted, go to the USB flash drive. Press...
... support DVD to Drivers > RAID, and then select the RAID driver for the corresponding OS version. 4. Click OK. 4. Chapter 4 ASUS P9X79 PRO 4-31 4.5.3 Installing the RAID driver during Windows® OS installation To install the RAID driver in Windows® XP: 1. During the OS installation, the system prompts you 've inserted, go to the USB flash drive. Press...
User Manual
Page 156
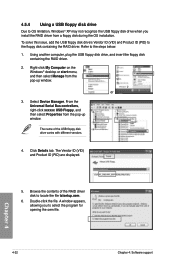
... to the steps below: 1. A window appears, allowing you install the RAID driver from the pop-up window. Chapter 4 4-32 Chapter 4: Software support or 3. From the Universal Serial Bus controllers, right-click xxxxxx USB Floppy, and then select Properties from a floppy disk during the OS installation. ...file. Select Device Manager. Click Details tab. Using another computer, plug the USB floppy disk drive, and insert the floppy disk containing the RAID driver. 2. Double-click the file. To solve this issue, add the USB floppy disk drive's Vendor ID (VID) and Product ID (PID) to ...
... to the steps below: 1. A window appears, allowing you install the RAID driver from the pop-up window. Chapter 4 4-32 Chapter 4: Software support or 3. From the Universal Serial Bus controllers, right-click xxxxxx USB Floppy, and then select Properties from a floppy disk during the OS installation. ...file. Select Device Manager. Click Details tab. Using another computer, plug the USB floppy disk drive, and insert the floppy disk containing the RAID driver. 2. Double-click the file. To solve this issue, add the USB floppy disk drive's Vendor ID (VID) and Product ID (PID) to ...


