User Manual
Page 5
... Recorder 4-12 4.3.7 Probe II 4-13 4.3.8 BT GO 4-14 4.3.9 USB 3.0 Boost 4-15 4.3.10 ASUS SSD Caching 4-16 4.3.11 ASUS Update 4-17 4.3.11 MyLogo2 4-18 4.3.12 Audio configurations 4-20 4.4 RAID configurations 4-21 4.4.1 RAID definitions 4-21 4.4.2 Installing Serial ATA hard disks 4-22 4.4.3 Setting the RAID item in BIOS 4-22 4.4.4 Intel® Rapid Storage Technology Option ROM utility 4-22...
... Recorder 4-12 4.3.7 Probe II 4-13 4.3.8 BT GO 4-14 4.3.9 USB 3.0 Boost 4-15 4.3.10 ASUS SSD Caching 4-16 4.3.11 ASUS Update 4-17 4.3.11 MyLogo2 4-18 4.3.12 Audio configurations 4-20 4.4 RAID configurations 4-21 4.4.1 RAID definitions 4-21 4.4.2 Installing Serial ATA hard disks 4-22 4.4.3 Setting the RAID item in BIOS 4-22 4.4.4 Intel® Rapid Storage Technology Option ROM utility 4-22...
User Manual
Page 10
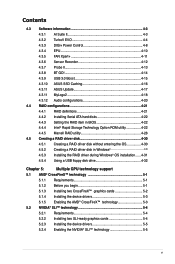
...ports at back panel with RAID 0, 1, 5, 10 support Marvell® 9128 SATA controllers - 2 x SATA 6Gb/s ports ASMedia® 1061 SATA controllers - 2 x Power eSATA 6Gb/s ports Intel® 82579V Gigabit LAN controller Bluetooth v2.1 + EDR ASUS BT GO! P9X79 PRO specifications summary CPU Chipset ...65533;lo�g��y Supports AMD® Quad-GPU CrossFireX™ Technology Intel® X79 Express Chipset - 2 x SATA 6Gb/s ports with RAID 0, 1, 5, 10 support - 4 x SATA 3Gb/s ports with 1 x additional VIA SuperSpeed USB hub controller (blue) Intel® X79 Express Chipset...
...ports at back panel with RAID 0, 1, 5, 10 support Marvell® 9128 SATA controllers - 2 x SATA 6Gb/s ports ASMedia® 1061 SATA controllers - 2 x Power eSATA 6Gb/s ports Intel® 82579V Gigabit LAN controller Bluetooth v2.1 + EDR ASUS BT GO! P9X79 PRO specifications summary CPU Chipset ...65533;lo�g��y Supports AMD® Quad-GPU CrossFireX™ Technology Intel® X79 Express Chipset - 2 x SATA 6Gb/s ports with RAID 0, 1, 5, 10 support - 4 x SATA 3Gb/s ports with 1 x additional VIA SuperSpeed USB hub controller (blue) Intel® X79 Express Chipset...
User Manual
Page 35
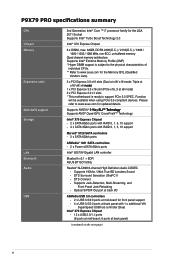
... On Chip USB #1 On Chip USB #2 PCIE x16_1 PCIE x1_1 A B C D E F - - - - shared - - shared - - - - - - - - - - - - - - - Intel 82579V LAN - - Marvell 9128 Hardware RAID Controller - - - shared - - - - - - - - - - - - - - - - shared - HD Audio - - - - - ASUS P9X79 PRO 2-15 IRQ assignments for details. shared - - - - - ASM 1042 USB3.0 #1 - - shared - - - - - - shared - - shared - - - - PCIE x16_3 shared - - - - PCIE x 1_2 shared - - - - - - - - - - - Refer...
... On Chip USB #1 On Chip USB #2 PCIE x16_1 PCIE x1_1 A B C D E F - - - - shared - - shared - - - - - - - - - - - - - - - Intel 82579V LAN - - Marvell 9128 Hardware RAID Controller - - - shared - - - - - - - - - - - - - - - - shared - HD Audio - - - - - ASUS P9X79 PRO 2-15 IRQ assignments for details. shared - - - - - ASM 1042 USB3.0 #1 - - shared - - - - - - shared - - shared - - - - PCIE x16_3 shared - - - - PCIE x 1_2 shared - - - - - - - - - - - Refer...
User Manual
Page 46
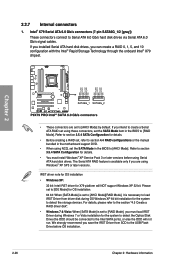
...2-26 Chapter 2: Hardware information If you installed Serial ATA hard disk drives, you intend to [AHCI Mode] by default. If you can create a RAID 0, 1, 5, and 10 configuration with the Intel® Rapid Storage Technology through the onboard Intel® X79 chipset. Refer to section 3.5.4 SATA Configuration ...Windows XP: 32 bit: Intel IRST driver for the system to detect the Optical Disk Drive (the ODD should be connected to section 4.4 RAID configurations or the manual bundled in the motherboard support DVD. • When using Serial ATA hard disk drives. Intel® X79 Serial ATA...
...2-26 Chapter 2: Hardware information If you installed Serial ATA hard disk drives, you intend to [AHCI Mode] by default. If you can create a RAID 0, 1, 5, and 10 configuration with the Intel® Rapid Storage Technology through the onboard Intel® X79 chipset. Refer to section 3.5.4 SATA Configuration ...Windows XP: 32 bit: Intel IRST driver for the system to detect the Optical Disk Drive (the ODD should be connected to section 4.4 RAID configurations or the manual bundled in the motherboard support DVD. • When using Serial ATA hard disk drives. Intel® X79 Serial ATA...
User Manual
Page 47
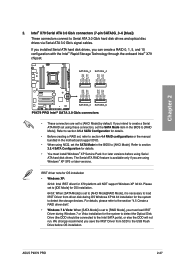
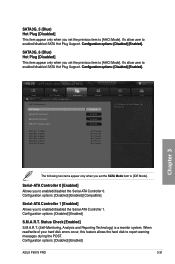
... bundled in the BIOS to section 3.5.4 SATA Configuration for X79 platform will not run. ASUS P9X79 PRO 2-27 If you intend to create a Serial ATA RAID set using NCQ, set to [RAID Mode], you can create a RAID 0, 1, 5, and 10 configuration with the Intel® Rapid Storage Technology through the onboard...Intel® X79 Serial ATA 3.0 Gb/s connectors (7-pin SATA3G_3-6 [blue]) These connectors connect to [AHCI Mode] by default. The Serial ATA RAID feature is set the SATA Mode in the motherboard support DVD. • When using these connectors, set to Serial ATA 3.0 Gb/s hard disk ...
... bundled in the BIOS to section 3.5.4 SATA Configuration for X79 platform will not run. ASUS P9X79 PRO 2-27 If you intend to create a Serial ATA RAID set using NCQ, set to [RAID Mode], you can create a RAID 0, 1, 5, and 10 configuration with the Intel® Rapid Storage Technology through the onboard...Intel® X79 Serial ATA 3.0 Gb/s connectors (7-pin SATA3G_3-6 [blue]) These connectors connect to [AHCI Mode] by default. The Serial ATA RAID feature is set the SATA Mode in the motherboard support DVD. • When using these connectors, set to Serial ATA 3.0 Gb/s hard disk ...

User Manual
Page 48
... support DVD and load the driver during POST to enter the Marvell RAID utility to create or delete a RAID configuration. • If you want to install a Windows operating system to a RAID configuration created using the Marvell SATA controller, you have to create a RAID driver disk using NCQ, set the Marvell Storage Controller item in...
... support DVD and load the driver during POST to enter the Marvell RAID utility to create or delete a RAID configuration. • If you want to install a Windows operating system to a RAID configuration created using the Marvell SATA controller, you have to create a RAID driver disk using NCQ, set the Marvell Storage Controller item in...
User Manual
Page 101
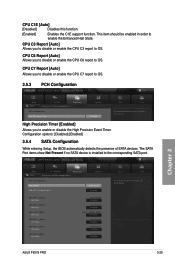
...UEFI BIOS Utility - The SATA Port items show Not Present if no SATA device is installed to enable the Enhanced Halt State. Chapter 3 ASUS P9X79 PRO 3-29 Configuration options: [Disabled] [Enabled] 3.5.4 SATA Configuration While entering Setup, the BIOS automatically detects the presence of SATA devices. CPU C1E... Hot Plug Not Present Disabled SATA 3G_6 (Blue) Hot Plug Not Present Disabled Boot Tool (1) IDE Mode. (2) AHCI Mode. (3) RAID Mode. UEFI BIOS Utility - High Precision Timer [Enabled] Allows you to disable or enable the CPU C3 report to enable or disable...
...UEFI BIOS Utility - The SATA Port items show Not Present if no SATA device is installed to enable the Enhanced Halt State. Chapter 3 ASUS P9X79 PRO 3-29 Configuration options: [Disabled] [Enabled] 3.5.4 SATA Configuration While entering Setup, the BIOS automatically detects the presence of SATA devices. CPU C1E... Hot Plug Not Present Disabled SATA 3G_6 (Blue) Hot Plug Not Present Disabled Boot Tool (1) IDE Mode. (2) AHCI Mode. (3) RAID Mode. UEFI BIOS Utility - High Precision Timer [Enabled] Allows you to disable or enable the CPU C3 report to enable or disable...
User Manual
Page 102
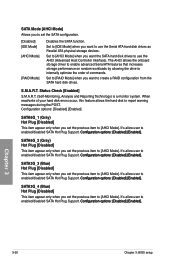
... the previous item to [AHCI Mode]. SATA3G_3 (Blue) Hot Plug [Disabled] This item appear only when you want to create a RAID configuration from the SATA hard disk drives. It's allow user to enabled/disabled SATA Hot Plug Support. �C�o�n��...��d�]�[�E�n��a�b�l�e�d�]�. Set to [RAID Mode] when you set the SATA configuration. [Disabled] [IDE Mode] [AHCI Mode] [RAID Mode] Disables the SATA function. S.M.A.R.T. SATA Mode [AHCI Mode] Allows you want to use the...
... the previous item to [AHCI Mode]. SATA3G_3 (Blue) Hot Plug [Disabled] This item appear only when you want to create a RAID configuration from the SATA hard disk drives. It's allow user to enabled/disabled SATA Hot Plug Support. �C�o�n��...��d�]�[�E�n��a�b�l�e�d�]�. Set to [RAID Mode] when you set the SATA configuration. [Disabled] [IDE Mode] [AHCI Mode] [RAID Mode] Disables the SATA function. S.M.A.R.T. SATA Mode [AHCI Mode] Allows you want to use the...
User Manual
Page 103
... hard disk to report warning messages during the POST. Configuration options: [Disabled] [Enabled] S.M.A.R.T. Configuration options: [Disabled] [Enabled] ASUS P9X79 PRO 3-31 Status Check Enabled SATA 6G_1 (Gray) SATA 6G_2 (Gray) SATA 3G_3 (Blue) SATA 3G_4 (Blue) SATA 3G_5 (Blue...Blue) Not Present Not Present Not Present Not Present Not Present Not Present Exit Boot Tool (1) IDE Mode. (2) AHCI Mode. (3) RAID Mode. UEFI BIOS Utility - Configuration options: [Disabled] [Enabled] [Compatible] Serial-ATA Controller 1 [Enabled] Allows you to enabled/...
... hard disk to report warning messages during the POST. Configuration options: [Disabled] [Enabled] S.M.A.R.T. Configuration options: [Disabled] [Enabled] ASUS P9X79 PRO 3-31 Status Check Enabled SATA 6G_1 (Gray) SATA 6G_2 (Gray) SATA 3G_3 (Blue) SATA 3G_4 (Blue) SATA 3G_5 (Blue...Blue) Not Present Not Present Not Present Not Present Not Present Not Present Exit Boot Tool (1) IDE Mode. (2) AHCI Mode. (3) RAID Mode. UEFI BIOS Utility - Configuration options: [Disabled] [Enabled] [Compatible] Serial-ATA Controller 1 [Enabled] Allows you to enabled/...

User Manual
Page 106
... Enables the Intel LAN controller. Configuration options: [Disabled] [Enabled] Chapter 3 3-34 Chapter 3: BIOS setup Bluetooth Controller [Enabled] [Enabled] ASUS BT GO! Configuration options: [Enabled] [Disabled] Asmedia USB 3.0 Controller [Enabled] This item allows user to [HDMI] for HDMI audio output.... Configuration options: �[D��is enabled. [Disabled] ASUS BT GO! is disabled. AHCI), we recommend that you to use the function of Marvell RAID. Configuration options: [Disabled] [Enabled] ASM1061 Storage Controller [AHCI Mode] Allows...
... Enables the Intel LAN controller. Configuration options: [Disabled] [Enabled] Chapter 3 3-34 Chapter 3: BIOS setup Bluetooth Controller [Enabled] [Enabled] ASUS BT GO! Configuration options: [Enabled] [Disabled] Asmedia USB 3.0 Controller [Enabled] This item allows user to [HDMI] for HDMI audio output.... Configuration options: �[D��is enabled. [Disabled] ASUS BT GO! is disabled. AHCI), we recommend that you to use the function of Marvell RAID. Configuration options: [Disabled] [Enabled] ASM1061 Storage Controller [AHCI Mode] Allows...
User Manual
Page 125
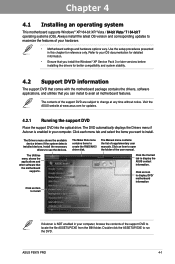
.... The Drivers menu shows the available device drivers if the system detects installed devices. Click the Contact tab to run the DVD. ASUS P9X79 PRO 4-1 Visit the ASUS website at any time without notice. Click each menu tab and select the items you install the Windows® XP Service Pack 3... in your computer. The Manual menu contains the list of your OS documentation for reference only. Install the necessary drivers to create the RAID/AHCI driver disk. Click an icon to install. Click an item to install The Make Disk menu contains items to use the devices....
.... The Drivers menu shows the available device drivers if the system detects installed devices. Click the Contact tab to run the DVD. ASUS P9X79 PRO 4-1 Visit the ASUS website at any time without notice. Click each menu tab and select the items you install the Windows® XP Service Pack 3... in your computer. The Manual menu contains the list of your OS documentation for reference only. Install the necessary drivers to create the RAID/AHCI driver disk. Click an icon to install. Click an item to install The Make Disk menu contains items to use the devices....
User Manual
Page 145
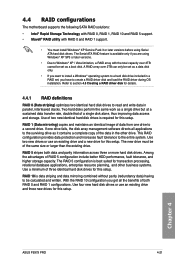
... drives for this setup. If one drive to be calculated and written. Chapter 4 ASUS P9X79 PRO 4-21 Use of two new identical hard disk drives is available only if you have to Windows® XP / Vista limitation, a RAID array with RAID 0 and RAID 1 support. • You must be of the same size or larger than the...
... drives for this setup. If one drive to be calculated and written. Chapter 4 ASUS P9X79 PRO 4-21 Use of two new identical hard disk drives is available only if you have to Windows® XP / Vista limitation, a RAID array with RAID 0 and RAID 1 support. • You must be of the same size or larger than the...
User Manual
Page 146
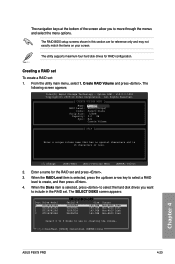
... the SATA signal cables. 3. To do this: 1. Turn on each drive. 4.4.3 Setting the RAID item in BIOS You must enable the RAID function in the BIOS Setup before creating RAID set any of the same model and capacity when creating a disk array. Intel(R) Rapid Storage Technology... ] Serial # 9LS0HJA4 9LS0F4HL 3LS0JYL8 9LS0BJ5H Size 149.0GB 149.0GB 149.0GB 149.0GB Type/Status(Vol ID) Non-RAID Disk Non-RAID Disk Non-RAID Disk Non-RAID Disk Chapter 4 [↑↓]-Select [ESC]-Exit [ENTER]-Select Menu 4-22 Chapter 4: Software support v10.0.0.1032 Copyright(C) 2003...
... the SATA signal cables. 3. To do this: 1. Turn on each drive. 4.4.3 Setting the RAID item in BIOS You must enable the RAID function in the BIOS Setup before creating RAID set any of the same model and capacity when creating a disk array. Intel(R) Rapid Storage Technology... ] Serial # 9LS0HJA4 9LS0F4HL 3LS0JYL8 9LS0BJ5H Size 149.0GB 149.0GB 149.0GB 149.0GB Type/Status(Vol ID) Non-RAID Disk Non-RAID Disk Non-RAID Disk Non-RAID Disk Chapter 4 [↑↓]-Select [ESC]-Exit [ENTER]-Select Menu 4-22 Chapter 4: Software support v10.0.0.1032 Copyright(C) 2003...
User Manual
Page 147
... setup screens shown in creating the volume. [↑↓]-Prev/Next [SPACE]-SelectDisk [ENTER]-Done Chapter 4 ASUS P9X79 PRO 4-23 When the RAID Level item is 16 characters or less. [↑↓]Change [TAB]-Next [ESC]-Previous Menu [ENTER]-Select 2. When the Disks item is ... 2 ST3160812AS 3 ST3160812AS [ SELECT DISKS ] Serial # 9LS0HJA4 9LS0F4HL 3LS0JYL8 9LS0BJ5H Size 149.0GB 149.0GB 149.0GB 149.0GB Status Non-RAID Disk Non-RAID Disk Non-RAID Disk Non-RAID Disk Select 2 to 6 disks to use in this section are for reference only and may not exactly match the items on your...
... setup screens shown in creating the volume. [↑↓]-Prev/Next [SPACE]-SelectDisk [ENTER]-Done Chapter 4 ASUS P9X79 PRO 4-23 When the RAID Level item is 16 characters or less. [↑↓]Change [TAB]-Next [ESC]-Previous Menu [ENTER]-Select 2. When the Disks item is ... 2 ST3160812AS 3 ST3160812AS [ SELECT DISKS ] Serial # 9LS0HJA4 9LS0F4HL 3LS0JYL8 9LS0BJ5H Size 149.0GB 149.0GB 149.0GB 149.0GB Status Non-RAID Disk Non-RAID Disk Non-RAID Disk Non-RAID Disk Select 2 to 6 disks to use in this section are for reference only and may not exactly match the items on your...
User Manual
Page 148
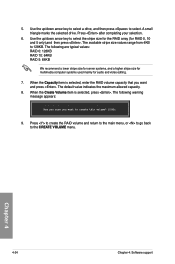
...The available stripe size values range from 4KB to the CREATE VOLUME menu. The default value indicates the maximum allowed capacity. 8. Press to create the RAID volume and return to the main menu, or to go back to 128KB. A small triangle marks the selected drive. Chapter 4 4-24 Chapter 4:... Software support 5. Are you sure you want to select the stripe size for the RAID array (for audio and video editing. 7. When the Create Volume item is selected, enter the RAID volume capacity that you want and press . The following warning message appears: WARNING: ALL DATA ON...
...The available stripe size values range from 4KB to the CREATE VOLUME menu. The default value indicates the maximum allowed capacity. 8. Press to create the RAID volume and return to the main menu, or to go back to 128KB. A small triangle marks the selected drive. Chapter 4 4-24 Chapter 4:... Software support 5. Are you sure you want to select the stripe size for the RAID array (for audio and video editing. 7. When the Create Volume item is selected, enter the RAID volume capacity that you want and press . The following warning message appears: WARNING: ALL DATA ON...
User Manual
Page 149
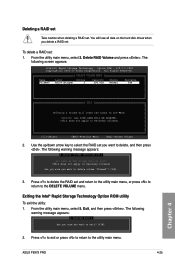
...IN THE VOLUME WILL BE LOST! (This does not apply to Recovery volumes) Are you sure you delete a RAID set. Exit, and then press . ASUS P9X79 PRO 4-25 Chapter 4 Delete RAID Volume and press . All Rights Reserved. [ DELETE VOLUME MENU ] Name Volume0 Level Drives RAID0(Stripe) 2 Capacity... Storage Technology - The following warning message appears: [ CONFIRM EXIT ] Are you sure you want to the utility main menu. To delete a RAID set . Option ROM - Press to exit or press to return to exit? (Y/N): 2. From the utility main menu, select 2. v10.0.0.1032 ...
...IN THE VOLUME WILL BE LOST! (This does not apply to Recovery volumes) Are you sure you delete a RAID set. Exit, and then press . ASUS P9X79 PRO 4-25 Chapter 4 Delete RAID Volume and press . All Rights Reserved. [ DELETE VOLUME MENU ] Name Volume0 Level Drives RAID0(Stripe) 2 Capacity... Storage Technology - The following warning message appears: [ CONFIRM EXIT ] Are you sure you want to the utility main menu. To delete a RAID set . Option ROM - Press to exit or press to return to exit? (Y/N): 2. From the utility main menu, select 2. v10.0.0.1032 ...
User Manual
Page 150
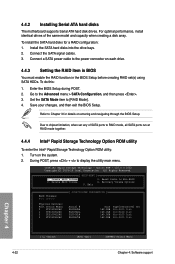
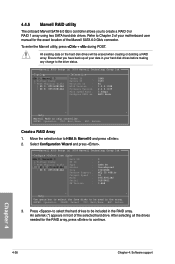
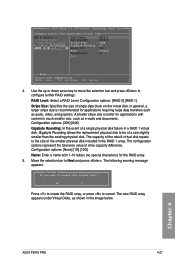
... Version : Firmware Version: PCIe Speed Rate : Configure SATA as: 1B4B 9130 B1 1.0.0.1028 2.2.0.1105 5.0Gbps AHCI Mode ▶ ▶ Help Marvell RAID on the hard disk drives will be used in the array. Move the selection bar to Chapter 2 of the selected hard drive. Select Configuration Wizard...9LS0F4HL 3.AAE ▶ ▶ Help Use space bar to select the free disks to continue. An asterisk (*) appears in the RAID array. 4.4.5 Marvell RAID utility The onboard Marvell SATA 6.0 Gb/s controller allows you have back up all the drives needed for the exact location of the ...
... Version : Firmware Version: PCIe Speed Rate : Configure SATA as: 1B4B 9130 B1 1.0.0.1028 2.2.0.1105 5.0Gbps AHCI Mode ▶ ▶ Help Marvell RAID on the hard disk drives will be used in the array. Move the selection bar to Chapter 2 of the selected hard drive. Select Configuration Wizard...9LS0F4HL 3.AAE ▶ ▶ Help Use space bar to select the free disks to continue. An asterisk (*) appears in the RAID array. 4.4.5 Marvell RAID utility The onboard Marvell SATA 6.0 Gb/s controller allows you have back up all the drives needed for the exact location of the ...
User Manual
Page 151
... : Yes Name : Default Threshold(%) : 90 Next ▶ ▶ Help Virtual disk configurations. Configuration options: [None] [1G] [10G] Name: Enter a name with content in the RAID 1 array. Chapter 4 ASUS P9X79 PRO 4-27 Use the up or down arrow key to move the selection bar and press to cancel. The configuration options represent the tolerance value...
... : Yes Name : Default Threshold(%) : 90 Next ▶ ▶ Help Virtual disk configurations. Configuration options: [None] [1G] [10G] Name: Enter a name with content in the RAID 1 array. Chapter 4 ASUS P9X79 PRO 4-27 Use the up or down arrow key to move the selection bar and press to cancel. The configuration options represent the tolerance value...
User Manual
Page 152
... 0 ID ├ Virtual Disks Name │ └ VD 0: New_VD Status │ ├ PD 0: ST3160[8D1e2lAeSte]Stripte Size │ └ PD 8: ST3160812AS RAID Mode └ Free Physical Disks Size BGA Status Number of PDs Members : 0 : New_VD : Functional : 64K : RAID0 : 304128MB : N/A : 2 : 0 8 ...Firmware Version: PCIe Speed Rate : Configure SATA as: 1B4B 9130 B1 1.0.0.1028 2.2.0.1105 5.0Gbps AHCI Mode ▶ ▶ Help Marvell RAID on chip controller. ENTER: Operation F10: Exit/Save ESC: Return 6. Press . ENTER: Operation F10: Exit/Save ESC: Return Chapter 4 ...
... 0 ID ├ Virtual Disks Name │ └ VD 0: New_VD Status │ ├ PD 0: ST3160[8D1e2lAeSte]Stripte Size │ └ PD 8: ST3160812AS RAID Mode └ Free Physical Disks Size BGA Status Number of PDs Members : 0 : New_VD : Functional : 64K : RAID0 : 304128MB : N/A : 2 : 0 8 ...Firmware Version: PCIe Speed Rate : Configure SATA as: 1B4B 9130 B1 1.0.0.1028 2.2.0.1105 5.0Gbps AHCI Mode ▶ ▶ Help Marvell RAID on chip controller. ENTER: Operation F10: Exit/Save ESC: Return 6. Press . ENTER: Operation F10: Exit/Save ESC: Return Chapter 4 ...

User Manual
Page 153
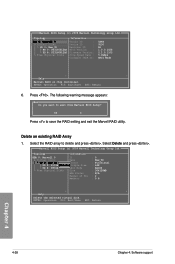
2. Yes No Press to delete the Master Boot Record (MBR) from the selected RAID array. 3. The following warning message appears: Delete MBR Do you want to delete MBR from Marvell BIOS Setup? The following warning message appears: Exit Do you want to delete this virtual disk ? Press . Yes No Press to save the RAID setting and exit the Marvell RAID utility. Yes No Press to exit from this virtual disk ? The following warning message appears: Delete Virtual Disk Do you want to delete the selected RAID array. Chapter 4 ASUS P9X79 PRO 4-29
2. Yes No Press to delete the Master Boot Record (MBR) from the selected RAID array. 3. The following warning message appears: Delete MBR Do you want to delete MBR from Marvell BIOS Setup? The following warning message appears: Exit Do you want to delete this virtual disk ? Press . Yes No Press to save the RAID setting and exit the Marvell RAID utility. Yes No Press to exit from this virtual disk ? The following warning message appears: Delete Virtual Disk Do you want to delete the selected RAID array. Chapter 4 ASUS P9X79 PRO 4-29


