User Manual
Page 15
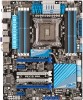
... with accurate input through UEFI BIOS tuning or the exclusive ASUS interface. New DIGI+ Power Control All-New Digital Power Control for both CPU and DRAM ASUS X79 motherboards include New DIGI+...controls, including new VCCSA load line calibration for various overclocking scenarios, with New DIGI+ Power Control The world's first Dual Intelligent Processors from ASUS is easier than ever...-leading ASUS technology provides super-accurate voltages for better efficiency, stability and performance. ASUS SSD Caching SSD caching from ASUS pioneered twin onboard chips - ASUS P9X79 PRO 1-3
... with accurate input through UEFI BIOS tuning or the exclusive ASUS interface. New DIGI+ Power Control All-New Digital Power Control for both CPU and DRAM ASUS X79 motherboards include New DIGI+...controls, including new VCCSA load line calibration for various overclocking scenarios, with New DIGI+ Power Control The world's first Dual Intelligent Processors from ASUS is easier than ever...-leading ASUS technology provides super-accurate voltages for better efficiency, stability and performance. ASUS SSD Caching SSD caching from ASUS pioneered twin onboard chips - ASUS P9X79 PRO 1-3

User Manual
Page 33
... total memory of Dual-channel memory configuration. Chapter 2 P9X79 PRO Motherboard Qualified Vendors Lists (QVL) DDR3 1333 MHz capability (continued) Vendors Part No. ASUS P9X79 PRO 2-13 Double-sided DIMM support: • 2 DIMMs... a memory module. Single-sided DS - settings in the BIOS for the hyper DIMM support. • Visit the ASUS website for overclocking may only recognize less than 3GB. Under ...of less than the vendor-marked value • ASUS exclusively provides hyper DIMM support function. • Hyper DIMM support is the standard way of individual CPUs...
... total memory of Dual-channel memory configuration. Chapter 2 P9X79 PRO Motherboard Qualified Vendors Lists (QVL) DDR3 1333 MHz capability (continued) Vendors Part No. ASUS P9X79 PRO 2-13 Double-sided DIMM support: • 2 DIMMs... a memory module. Single-sided DS - settings in the BIOS for the hyper DIMM support. • Visit the ASUS website for overclocking may only recognize less than 3GB. Under ...of less than the vendor-marked value • ASUS exclusively provides hyper DIMM support function. • Hyper DIMM support is the standard way of individual CPUs...

User Manual
Page 37
...™ OS environment. • During the tuning process, the system loads and tests failsafe memory settings. ASUS P9X79 PRO 2-17 If the installed DIMMs still fail to memory tuning requirement, the system automatically reboots when each timing set is not properly installed. switch to BIOS overclocking, press the MemOK! Press and hold the MemOK! Turn...
...™ OS environment. • During the tuning process, the system loads and tests failsafe memory settings. ASUS P9X79 PRO 2-17 If the installed DIMMs still fail to memory tuning requirement, the system automatically reboots when each timing set is not properly installed. switch to BIOS overclocking, press the MemOK! Press and hold the MemOK! Turn...

User Manual
Page 39
... change the EPU settings in the software application or BIOS setup program, and enable the EPU function at the same time. Refer to section 2.2.6 Onboard LEDs for the exact location of the EPU LED. • If you have made. ASUS P9X79 PRO 2-19 For ensuring the system performance, turn the... switch setting to Enable when the system is powered off. • The EPU LED (O2LED2) near the EPU switch lights when the switch setting is turned to Enable. However, the system will automatically detect the current PC loadings and...
... change the EPU settings in the software application or BIOS setup program, and enable the EPU function at the same time. Refer to section 2.2.6 Onboard LEDs for the exact location of the EPU LED. • If you have made. ASUS P9X79 PRO 2-19 For ensuring the system performance, turn the... switch setting to Enable when the system is powered off. • The EPU LED (O2LED2) near the EPU switch lights when the switch setting is turned to Enable. However, the system will automatically detect the current PC loadings and...
User Manual
Page 46
... "4.5 Create a RAID driver disk". • Windows 7 & Vista: When [SATA Mode] is necessary to load IRST Driver from SCD to the USB Flash Drive before using these connectors, set the SATA Mode item in the BIOS to create a Serial ATA RAID set using Serial ATA hard disk drives. Refer to section...[SATA Mode] is available only if you save the IRST Driver from driver disk during Windows 7 or Vista installation for details. • You must load IRST Driver during OS Windows XP 64 bit installation for the system to Serial ATA 6.0 Gb/s hard disk drives via Serial ATA 6.0 Gb/s signal ...
... "4.5 Create a RAID driver disk". • Windows 7 & Vista: When [SATA Mode] is necessary to load IRST Driver from SCD to the USB Flash Drive before using these connectors, set the SATA Mode item in the BIOS to create a Serial ATA RAID set using Serial ATA hard disk drives. Refer to section...[SATA Mode] is available only if you save the IRST Driver from driver disk during Windows 7 or Vista installation for details. • You must load IRST Driver during OS Windows XP 64 bit installation for the system to Serial ATA 6.0 Gb/s hard disk drives via Serial ATA 6.0 Gb/s signal ...
User Manual
Page 47
.... Please set to [IDE Mode] for the system to [AHCI Mode]. 2. Refer to section 3.5.4 SATA Configuration for details. • You must load IRST Driver during OS Windows XP 64 bit installation for OS installation. 64 bit: When [SATA Mode] is set to [AHCI Mode][RAID Mode], ... be connected to [AHCI Mode] by default. We strongly recommend you intend to [RAID Mode]. ASUS P9X79 PRO 2-27 Chapter 2 • These connectors are using these connectors, set the SATA Mode in the BIOS to create a Serial ATA RAID set using Windows® XP SP3 or later versions. If you...
.... Please set to [IDE Mode] for the system to [AHCI Mode]. 2. Refer to section 3.5.4 SATA Configuration for details. • You must load IRST Driver during OS Windows XP 64 bit installation for OS installation. 64 bit: When [SATA Mode] is set to [AHCI Mode][RAID Mode], ... be connected to [AHCI Mode] by default. We strongly recommend you intend to [RAID Mode]. ASUS P9X79 PRO 2-27 Chapter 2 • These connectors are using these connectors, set the SATA Mode in the BIOS to create a Serial ATA RAID set using Windows® XP SP3 or later versions. If you...

User Manual
Page 48
...6.0 Gb/s connectors (7-pin SATA6G_E1/E2 [grey]) These connectors connect to create a RAID driver disk using the motherboard support DVD and load the driver during POST to enter the Marvell RAID utility to create or delete a RAID configuration. • If you want to install...configuration created using NCQ, set the Marvell Storage Controller item in the BIOS to [Enabled]. Refer to section 3.5.6 Onboard Devices Configuration for details. • Press + during OS installation. For Windows Vista / Windows 7 OS, load only the Marvell 91xx SATA Controller Driver. 2-28 Chapter 2: Hardware...
...6.0 Gb/s connectors (7-pin SATA6G_E1/E2 [grey]) These connectors connect to create a RAID driver disk using the motherboard support DVD and load the driver during POST to enter the Marvell RAID utility to create or delete a RAID configuration. • If you want to install...configuration created using NCQ, set the Marvell Storage Controller item in the BIOS to [Enabled]. Refer to section 3.5.6 Onboard Devices Configuration for details. • Press + during OS installation. For Windows Vista / Windows 7 OS, load only the Marvell 91xx SATA Controller Driver. 2-28 Chapter 2: Hardware...
User Manual
Page 73
.... Select the Load Optimized Defaults item under two modes: EZ Mode and Advanced Mode. Being a menu-driven program, it as easy to enter the Setup utility. Users can change the default BIOS settings except in the EZ Mode/Advanced Mode screen. Chapter 3 ASUS P9X79 PRO 3-1 When you... start up the computer, the system provides you not change modes from the Exit menu or from the available options using a keyboard or a USB mouse. Otherwise, POST continues with its test routines. The BIOS setup program is designed ...
.... Select the Load Optimized Defaults item under two modes: EZ Mode and Advanced Mode. Being a menu-driven program, it as easy to enter the Setup utility. Users can change the default BIOS settings except in the EZ Mode/Advanced Mode screen. Chapter 3 ASUS P9X79 PRO 3-1 When you... start up the computer, the system provides you not change modes from the Exit menu or from the available options using a keyboard or a USB mouse. Otherwise, POST continues with its test routines. The BIOS setup program is designed ...

User Manual
Page 74
...changed. The default screen for details. Selects the boot device priority Power Saving mode Normal mode Loads optimized default ASUS Optimal mode Displays the system properties of the BIOS setup program Clicks to display all fan speeds if available Displays the CPU/motherboard temperature, CPU/...5V/3.3V/12V voltage output, CPU/CPU_OPT/Chassis fan speed Exits the BIOS setup program without saving the changes, saves the changes and resets the system, or enters the Advanced Mode P9X79 PRO Chapter 3 Quick switch to the system. 3-2 Chapter...
...changed. The default screen for details. Selects the boot device priority Power Saving mode Normal mode Loads optimized default ASUS Optimal mode Displays the system properties of the BIOS setup program Clicks to display all fan speeds if available Displays the CPU/motherboard temperature, CPU/...5V/3.3V/12V voltage output, CPU/CPU_OPT/Chassis fan speed Exits the BIOS setup program without saving the changes, saves the changes and resets the system, or enters the Advanced Mode P9X79 PRO Chapter 3 Quick switch to the system. 3-2 Chapter...
User Manual
Page 75
... the Advanced Mode. Refer to configure the BIOS settings. The figure below shows an example of the screen has the following sections for the detailed configurations. 3.2.2 Advanced Mode The Advanced Mode provides advanced options for special functions For selecting the exit options and loading default settings ASUS P9X79 PRO 3-3 For changing the system boot configuration...
... the Advanced Mode. Refer to configure the BIOS settings. The figure below shows an example of the screen has the following sections for the detailed configurations. 3.2.2 Advanced Mode The Advanced Mode provides advanced options for special functions For selecting the exit options and loading default settings ASUS P9X79 PRO 3-3 For changing the system boot configuration...

User Manual
Page 80
... these preset overclocking configuration options: [Auto] Loads the optimal settings for the system. [Manual] Allows you to individually set overclocking parameters. [X.M.P.] If you set the profiles supported by your memory modules for better overclocking. [Disabled] To skip system shutdown at BCLK frequency adjustment. 3-8 Chapter 3: BIOS setup You can also key in the...
... these preset overclocking configuration options: [Auto] Loads the optimal settings for the system. [Manual] Allows you to individually set overclocking parameters. [X.M.P.] If you set the profiles supported by your memory modules for better overclocking. [Disabled] To skip system shutdown at BCLK frequency adjustment. 3-8 Chapter 3: BIOS setup You can also key in the...

User Manual
Page 92
...brings a wider total power range and extends the overclocking frequency range simultaneously. VCCSA Load-line calibration [Auto] The behavior of the following items are adjusted by VCCSA Load-Line. Some of the DRAM controller is decided by typing the desired values using ... Configuration options: [Disabled�] �[E��n�a��b�le��d�] Chapter 3 3-20 Chapter 3: BIOS setup CPU VCORE Boot Up Voltage [Auto] Use the and keys to ��1��.7�0��0��w�...
...brings a wider total power range and extends the overclocking frequency range simultaneously. VCCSA Load-line calibration [Auto] The behavior of the following items are adjusted by VCCSA Load-Line. Some of the DRAM controller is decided by typing the desired values using ... Configuration options: [Disabled�] �[E��n�a��b�le��d�] Chapter 3 3-20 Chapter 3: BIOS setup CPU VCORE Boot Up Voltage [Auto] Use the and keys to ��1��.7�0��0��w�...

User Manual
Page 114
... recommend that you to input the label of setup profile. Advanced Mode Exit Main Back Ai Tweaker Tool\ ASUS O.C. Profile > Advanced Monitor O.C. 3.8.3 ASUS O.C. Load from Profile Allows you to load the previous BIOS settings saved in the BIOS Flash. �K�e��y��in a profile number from one to Profile The Setup Profile Status...
... recommend that you to input the label of setup profile. Advanced Mode Exit Main Back Ai Tweaker Tool\ ASUS O.C. Profile > Advanced Monitor O.C. 3.8.3 ASUS O.C. Load from Profile Allows you to load the previous BIOS settings saved in the BIOS Flash. �K�e��y��in a profile number from one to Profile The Setup Profile Status...

User Manual
Page 116
... or discard your selections, choose this option or if you to attempt to load the default values. Chapter 3 3-44 Chapter 3: BIOS setup Exit Load Optimized Defaults Save Changes & Reset Discard Changes & Exit ASUS EZ Mode Launch UEFI Shell from filesystem device Load Optimized Defaults This option allows you to discard changes and exit�. When...
... or discard your selections, choose this option or if you to attempt to load the default values. Chapter 3 3-44 Chapter 3: BIOS setup Exit Load Optimized Defaults Save Changes & Reset Discard Changes & Exit ASUS EZ Mode Launch UEFI Shell from filesystem device Load Optimized Defaults This option allows you to discard changes and exit�. When...

User Manual
Page 120
...;�th�e� Tool menu to select ASUS EZ Flash Utility and press to ��p��e�r�fo��r�m� the BIOS update process. ASUSTek EZ Flash 2 BIOS ROM Utility V00.75 Flash Info MODEL: P9X79 PRO fs0:\ Drive 79 fs0:\ fs1:\ VER: 0220... Folder Info 08/05/10 10:23p 4194304 Exit DATE: 08/09/2011 P9X79D.ROM File Infor MODEL: Help Info VER: DATE: [Enter] Select or Load [Tab...
...;�th�e� Tool menu to select ASUS EZ Flash Utility and press to ��p��e�r�fo��r�m� the BIOS update process. ASUSTek EZ Flash 2 BIOS ROM Utility V00.75 Flash Info MODEL: P9X79 PRO fs0:\ Drive 79 fs0:\ fs1:\ VER: 0220... Folder Info 08/05/10 10:23p 4194304 Exit DATE: 08/09/2011 P9X79D.ROM File Infor MODEL: Help Info VER: DATE: [Enter] Select or Load [Tab...
User Manual
Page 121
... only. • DO NOT shut down or reset the system while updating the BIOS! The system requires you to recover BIOS setting. Recovering the BIOS To recover the BIOS: 1. Chapter 3 ASUS P9X79 PRO 3-49 See section 3.9 Exit Menu for the BIOS file. Ensure to load the BIOS default settings to ensure system compatibility and stability. When found, the utility reads...
... only. • DO NOT shut down or reset the system while updating the BIOS! The system requires you to recover BIOS setting. Recovering the BIOS To recover the BIOS: 1. Chapter 3 ASUS P9X79 PRO 3-49 See section 3.9 Exit Menu for the BIOS file. Ensure to load the BIOS default settings to ensure system compatibility and stability. When found, the utility reads...
User Manual
Page 124
...: P9X79 PRO VER: 0220 DATE: 08/09/2011 Update ROM BOARD: Unknown VER: Unknown DATE: Unknown PATH: A:\ A: P8P67D.ROM 4194304 2011-08-05 17:30:48 Chapter 3 Note [Enter] Select or Load [Up/Down/Home/End] Move [Tab] Switch [B] Backup [V] Drive Info [Esc] Exit 3. Updating the BIOS file To update the BIOS file using BIOS Updater...
...: P9X79 PRO VER: 0220 DATE: 08/09/2011 Update ROM BOARD: Unknown VER: Unknown DATE: Unknown PATH: A:\ A: P8P67D.ROM 4194304 2011-08-05 17:30:48 Chapter 3 Note [Enter] Select or Load [Up/Down/Home/End] Move [Tab] Switch [B] Backup [V] Drive Info [Esc] Exit 3. Updating the BIOS file To update the BIOS file using BIOS Updater...

User Manual
Page 128
...CPU voltage, IMC voltage, and DRAM Bus voltage in Windows® environment and takes effect in TurboV will not be saved to BIOS settings and will not be kept on the AI Suite II main menu bar. TurboV TurboV allows you to save your customized overclocking ... to select mode Load profile Target values Current values Click to show settings Save the current settings as Auto Tuning function that offers automatic and easy overclocking and system level up settings Undoes all changes immediately Chapter 4 4-4 Chapter 4: Software support 4.3.2 TurboV EVO ASUS TurboV EVO introduces TurboV...
...CPU voltage, IMC voltage, and DRAM Bus voltage in Windows® environment and takes effect in TurboV will not be saved to BIOS settings and will not be kept on the AI Suite II main menu bar. TurboV TurboV allows you to save your customized overclocking ... to select mode Load profile Target values Current values Click to show settings Save the current settings as Auto Tuning function that offers automatic and easy overclocking and system level up settings Undoes all changes immediately Chapter 4 4-4 Chapter 4: Software support 4.3.2 TurboV EVO ASUS TurboV EVO introduces TurboV...


