User Manual
Page 4
...Updating BIOS 3-45 3.10.1 ASUS Update utility 3-45 3.10.2 ASUS EZ Flash 2 utility 3-48 3.10.3 ASUS CrashFree BIOS 3 utility 3-49 3.10.4 ASUS BIOS Updater 3-50 Chapter 4: Software support 4.1 Installing an operating system 4-1 4.2 Support DVD information 4-1 4.2.1 Running the support DVD 4-1 4.2.2 Obtaining the software manuals 4-2 iv Contents 2.4 Starting up for the first time 2-52 2.5 Turning off the computer 2-52 Chapter 3: BIOS setup 3.1 Knowing BIOS 3-1 3.2 BIOS...39 3.8 Tools menu 3-40 3.8.1 ASUS EZ Flash 2 Utility 3-40 3.8.2 ASUS DRAM SPD Information 3-41...
...Updating BIOS 3-45 3.10.1 ASUS Update utility 3-45 3.10.2 ASUS EZ Flash 2 utility 3-48 3.10.3 ASUS CrashFree BIOS 3 utility 3-49 3.10.4 ASUS BIOS Updater 3-50 Chapter 4: Software support 4.1 Installing an operating system 4-1 4.2 Support DVD information 4-1 4.2.1 Running the support DVD 4-1 4.2.2 Obtaining the software manuals 4-2 iv Contents 2.4 Starting up for the first time 2-52 2.5 Turning off the computer 2-52 Chapter 3: BIOS setup 3.1 Knowing BIOS 3-1 3.2 BIOS...39 3.8 Tools menu 3-40 3.8.1 ASUS EZ Flash 2 Utility 3-40 3.8.2 ASUS DRAM SPD Information 3-41...
User Manual
Page 5
...FAN Xpert 4-11 4.3.6 Sensor Recorder 4-12 4.3.7 Probe II 4-13 4.3.8 BT GO 4-14 4.3.9 USB 3.0 Boost 4-15 4.3.10 ASUS SSD Caching 4-16 4.3.11 ASUS Update 4-17 4.3.11 MyLogo2 4-18 4.3.12 Audio configurations 4-20 4.4 RAID configurations 4-21 4.4.1 RAID definitions 4-21 4.4.2 Installing Serial ATA... hard disks 4-22 4.4.3 Setting the RAID item in BIOS 4-22 4.4.4 Intel® Rapid Storage ...
...FAN Xpert 4-11 4.3.6 Sensor Recorder 4-12 4.3.7 Probe II 4-13 4.3.8 BT GO 4-14 4.3.9 USB 3.0 Boost 4-15 4.3.10 ASUS SSD Caching 4-16 4.3.11 ASUS Update 4-17 4.3.11 MyLogo2 4-18 4.3.12 Audio configurations 4-20 4.4 RAID configurations 4-21 4.4.1 RAID definitions 4-21 4.4.2 Installing Serial ATA... hard disks 4-22 4.4.3 Setting the RAID item in BIOS 4-22 4.4.4 Intel® Rapid Storage ...

User Manual
Page 8
... menus. It includes description of the standard package. Detailed descriptions of the BIOS parameters are not part of the switches, jumpers, and connectors on ASUS hardware and software products. ASUS websites The ASUS website provides updated information on the motherboard. • Chapter 3: BIOS setup This chapter tells how to install and configure multiple AMD® CrossFireX...
... menus. It includes description of the standard package. Detailed descriptions of the BIOS parameters are not part of the switches, jumpers, and connectors on ASUS hardware and software products. ASUS websites The ASUS website provides updated information on the motherboard. • Chapter 3: BIOS setup This chapter tells how to install and configure multiple AMD® CrossFireX...
User Manual
Page 12
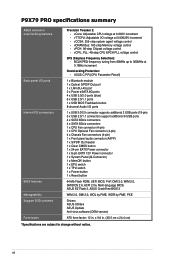
..., Multi-language BIOS, ASUS EZ Flash 2, ASUS CrashFree BIOS 3 WfM 2.0, DMI 2.0, WOL by PME, WOR by PME, PXE Drivers ASUS Utilities ASUS Update Anti-virus software (OEM version) ATX form factor: 12 in . (30.5 cm x 24.4 cm) *Specifications are subject to 300MHz at 0.005V increment - vCCSA: 255-step system agent voltage control - P9X79 PRO specifications summary ASUS exclusive overclocking features...
..., Multi-language BIOS, ASUS EZ Flash 2, ASUS CrashFree BIOS 3 WfM 2.0, DMI 2.0, WOL by PME, WOR by PME, PXE Drivers ASUS Utilities ASUS Update Anti-virus software (OEM version) ATX form factor: 12 in . (30.5 cm x 24.4 cm) *Specifications are subject to 300MHz at 0.005V increment - vCCSA: 255-step system agent voltage control - P9X79 PRO specifications summary ASUS exclusive overclocking features...

User Manual
Page 18
... allows you to install. F12 BIOS snapshot hotkey for complete insight. USB BIOS Flashback USB BIOS Flashback offers the most accessed info - ASUS Q-Design ASUS Q-Design enhances your motherboard against Electronic Magnetic Interference (EMI). making it against static electricity and shields it convenient and easy to update the BIOS without using standby power. All of connecting the...
... allows you to install. F12 BIOS snapshot hotkey for complete insight. USB BIOS Flashback USB BIOS Flashback offers the most accessed info - ASUS Q-Design ASUS Q-Design enhances your motherboard against Electronic Magnetic Interference (EMI). making it against static electricity and shields it convenient and easy to update the BIOS without using standby power. All of connecting the...

User Manual
Page 37
...test the next set of the DRAM_LED increases, indicating different test processes. • Due to test one set is not properly installed. ASUS P9X79 PRO 2-17 MemOK! Replace the DIMMs with the motherboard may cause system boot failure, and the DRAM_LED near the MemOK! The blinking speed of...) in this user manual or on the computer. switch Installing DIMMs that you download and update to the latest BIOS version from the ASUS website at www.asus.com. • If you that the BIOS has been restored to section 2.2.6 Onboard LEDs for successful boot. To stop memory tuning, ...
...test the next set of the DRAM_LED increases, indicating different test processes. • Due to test one set is not properly installed. ASUS P9X79 PRO 2-17 MemOK! Replace the DIMMs with the motherboard may cause system boot failure, and the DRAM_LED near the MemOK! The blinking speed of...) in this user manual or on the computer. switch Installing DIMMs that you download and update to the latest BIOS version from the ASUS website at www.asus.com. • If you that the BIOS has been restored to section 2.2.6 Onboard LEDs for successful boot. To stop memory tuning, ...

User Manual
Page 67
.... Worry-free overclocking for 3 seconds, and the light will begin to complete BIOS update. 2. Error in file name or incompatibility in the root directory. 2 On the rear I/O port, plug the USB disk to turn off the light. 3. ASUS P9X79 PRO 2-47 Rename it P9X79PRO.ROM, save the program to a USB portable disk,... and place it in file format.If this means that the BIOS Flashback is the case, please restart the system to the USB port with the updating speed. 1. In case of the...
.... Worry-free overclocking for 3 seconds, and the light will begin to complete BIOS update. 2. Error in file name or incompatibility in the root directory. 2 On the rear I/O port, plug the USB disk to turn off the light. 3. ASUS P9X79 PRO 2-47 Rename it P9X79PRO.ROM, save the program to a USB portable disk,... and place it in file format.If this means that the BIOS Flashback is the case, please restart the system to the USB port with the updating speed. 1. In case of the...
User Manual
Page 73
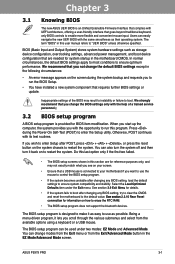
...to ensure optimum performance. Select the Load Optimized Defaults item under two modes: EZ Mode and Advanced Mode. Chapter 3 ASUS P9X79 PRO 3-1 The term "BIOS" in the following circumstances: • An error message appears on how to restart the system. Press during the system... Chapter 3 Chapter 3: 3.1 Knowing BIOS BIOS setup The new ASUS UEFI BIOS is an Unified Extensible Firmware Interface that complies with the opportunity to run the BIOS Setup. • You have installed a new system component that requires further BIOS settings or update. When you start up the computer,...
...to ensure optimum performance. Select the Load Optimized Defaults item under two modes: EZ Mode and Advanced Mode. Chapter 3 ASUS P9X79 PRO 3-1 The term "BIOS" in the following circumstances: • An error message appears on how to restart the system. Press during the system... Chapter 3 Chapter 3: 3.1 Knowing BIOS BIOS setup The new ASUS UEFI BIOS is an Unified Extensible Firmware Interface that complies with the opportunity to run the BIOS Setup. • You have installed a new system component that requires further BIOS settings or update. When you start up the computer,...

User Manual
Page 112
... special functions. Boot Override These items displays the available devices. Profile > ASUS Drive Xpert Monitor Boot Tool Be used to update BIOS Chapter 3 3.8.1 ASUS EZ Flash 2 Utility Allows you to display the submenu. When you to section 3.10.2 ASUS EZ Flash 2 utility. 3-40 Chapter 3: BIOS setup The number of device items that appears on the screen...
... special functions. Boot Override These items displays the available devices. Profile > ASUS Drive Xpert Monitor Boot Tool Be used to update BIOS Chapter 3 3.8.1 ASUS EZ Flash 2 Utility Allows you to display the submenu. When you to section 3.10.2 ASUS EZ Flash 2 utility. 3-40 Chapter 3: BIOS setup The number of device items that appears on the screen...

User Manual
Page 114
.... • DO NOT shut down or reset the system while updating the BIOS to eight, press , and then select Yes. Chapter 3 3-42 Chapter 3: BIOS setup 3.8.3 ASUS O.C. Advanced Mode Exit Main Back Ai Tweaker Tool\ ASUS O.C. Load from Profile Allows you to save the current BIOS settings to Profile The Setup Profile Status items show Not Installed...
.... • DO NOT shut down or reset the system while updating the BIOS to eight, press , and then select Yes. Chapter 3 3-42 Chapter 3: BIOS setup 3.8.3 ASUS O.C. Advanced Mode Exit Main Back Ai Tweaker Tool\ ASUS O.C. Load from Profile Allows you to save the current BIOS settings to Profile The Setup Profile Status items show Not Installed...
User Manual
Page 117
... installing AI Suite II from an updated BIOS file • Save the current BIOS file • View the BIOS version information This utility is a utility that comes with the motherboard package. Chapter 3 ASUS P9X79 PRO 3-45 Carefully follow the instructions of this utility. Save a copy of BIOS, DO NOT manually update the BIOS. However, BIOS updating is no problem using the current...
... installing AI Suite II from an updated BIOS file • Save the current BIOS file • View the BIOS version information This utility is a utility that comes with the motherboard package. Chapter 3 ASUS P9X79 PRO 3-45 Carefully follow the instructions of this utility. Save a copy of BIOS, DO NOT manually update the BIOS. However, BIOS updating is no problem using the current...

User Manual
Page 118
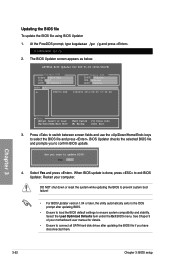
... to continue. 5. Click Next. Click Yes if you want to download. Updating the BIOS through the Internet To update the BIOS through the Internet: 1. Chapter 3 4. From the ASUS Update screen, select Update BIOS from Internet, and then click Next. 2. If you to complete the update process. 3-46 Chapter 3: BIOS setup Follow the onscreen instructions to avoid network traffic. You can...
... to continue. 5. Click Next. Click Yes if you want to download. Updating the BIOS through the Internet To update the BIOS through the Internet: 1. Chapter 3 4. From the ASUS Update screen, select Update BIOS from Internet, and then click Next. 2. If you to complete the update process. 3-46 Chapter 3: BIOS setup Follow the onscreen instructions to avoid network traffic. You can...

User Manual
Page 119
... change the BIOS boot logo. ASUS P9X79 PRO 3-47 The actual BIOS information vary by models. • Refer to continue. 4. You can decide whether to complete the update process. • The screenshots in the support DVD or visit the ASUS website at www.asus.com for ...in this section are for detailed software configuration. Locate the BIOS file from file, and then click Next. 2. Chapter 3 3. Updating the BIOS through a BIOS file To update the BIOS through a BIOS file: 1. From the ASUS Update screen, select Update BIOS from the Open window, click Open, and click Next....
... change the BIOS boot logo. ASUS P9X79 PRO 3-47 The actual BIOS information vary by models. • Refer to continue. 4. You can decide whether to complete the update process. • The screenshots in the support DVD or visit the ASUS website at www.asus.com for ...in this section are for detailed software configuration. Locate the BIOS file from file, and then click Next. 2. Chapter 3 3. Updating the BIOS through a BIOS file To update the BIOS through a BIOS file: 1. From the ASUS Update screen, select Update BIOS from the Open window, click Open, and click Next....

User Manual
Page 120
...update the BIOS without having to use a bootable floppy disk or an OS‑based utility. Press the Up/Down arrow keys to find the BIOS file, and then press ��to enable it. Chapter 3 3-48 Chapter 3: BIOS setup ASUSTek EZ Flash 2 BIOS ROM Utility V00.75 Flash Info MODEL: P9X79 PRO...65533;fo��r�m� the BIOS update process. To update the BIOS using this utility, download the latest BIOS from the ASUS website at www.asus.com. Press to switch to the Drive field. 4. Reboot the system when the update process is done. Press to switch to...
...update the BIOS without having to use a bootable floppy disk or an OS‑based utility. Press the Up/Down arrow keys to find the BIOS file, and then press ��to enable it. Chapter 3 3-48 Chapter 3: BIOS setup ASUSTek EZ Flash 2 BIOS ROM Utility V00.75 Flash Info MODEL: P9X79 PRO...65533;fo��r�m� the BIOS update process. To update the BIOS using this utility, download the latest BIOS from the ASUS website at www.asus.com. Press to switch to the Drive field. 4. Reboot the system when the update process is done. Press to switch to...
User Manual
Page 121
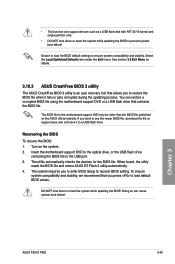
..., or the USB flash drive containing the BIOS file to ensure system compatibility and stability. Chapter 3 ASUS P9X79 PRO 3-49 The system requires you want to recover BIOS setting. DO NOT shut down or reset the system while updating the BIOS to load default BIOS values. Doing so can restore a corrupted BIOS file using the motherboard support DVD or...
..., or the USB flash drive containing the BIOS file to ensure system compatibility and stability. Chapter 3 ASUS P9X79 PRO 3-49 The system requires you want to recover BIOS setting. DO NOT shut down or reset the system while updating the BIOS to load default BIOS values. Doing so can restore a corrupted BIOS file using the motherboard support DVD or...

User Manual
Page 122
... only. Booting the system in FAT32/16 format and single partition. 2. When the ASUS Logo appears, press to Drive D (USB flash drive). Welcome to the USB port. 2. C:\>d: D:\> Chapter 3 3-50 Chapter 3: BIOS setup Before updating BIOS 1. Do not save the BIOS file and BIOS Updater to a hard disk drive or USB flash drive in DOS environment. Turn off... boot device ESC to boot using defaults 3. When the Make Disk menu appears, select the FreeDOS command prompt item by pressing the item number. 4. 3.10.4 ASUS BIOS Updater The ASUS BIOS Updater allows you can use as shown.
... only. Booting the system in FAT32/16 format and single partition. 2. When the ASUS Logo appears, press to Drive D (USB flash drive). Welcome to the USB port. 2. C:\>d: D:\> Chapter 3 3-50 Chapter 3: BIOS setup Before updating BIOS 1. Do not save the BIOS file and BIOS Updater to a hard disk drive or USB flash drive in DOS environment. Turn off... boot device ESC to boot using defaults 3. When the Make Disk menu appears, select the FreeDOS command prompt item by pressing the item number. 4. 3.10.4 ASUS BIOS Updater The ASUS BIOS Updater allows you can use as shown.

User Manual
Page 123
... DOS V1.18 [2011/04/29] Current ROM BOARD: P9X79 PRO VER: 0220 DATE: 08/09/2011 Update ROM BOARD: Unknown VER: Unknown DATE: Unknown PATH: A:\ BIOS backup is done! Note Saving BIOS: Chapter 3 ASUS P9X79 PRO 3-51 Backing up the current BIOS To backup the current BIOS file using the BIOS Updater Ensure that the USB flash drive is not write...
... DOS V1.18 [2011/04/29] Current ROM BOARD: P9X79 PRO VER: 0220 DATE: 08/09/2011 Update ROM BOARD: Unknown VER: Unknown DATE: Unknown PATH: A:\ BIOS backup is done! Note Saving BIOS: Chapter 3 ASUS P9X79 PRO 3-51 Backing up the current BIOS To backup the current BIOS file using the BIOS Updater Ensure that the USB flash drive is not write...
User Manual
Page 124
... disconnected them. 3-52 Chapter 3: BIOS setup BIOS Updater checks the selected BIOS file and prompts you to update BIOS? Select the Load Optimized Defaults item under the Exit BIOS menu. Updating the BIOS file To update the BIOS file using BIOS Updater 1. D:\>bupdater /pc /g 2. Restart your motherboard user manual for DOS V1.18 [2011/04/29] Current ROM BOARD: P9X79 PRO VER: 0220 DATE: 08...
... disconnected them. 3-52 Chapter 3: BIOS setup BIOS Updater checks the selected BIOS file and prompts you to update BIOS? Select the Load Optimized Defaults item under the Exit BIOS menu. Updating the BIOS file To update the BIOS file using BIOS Updater 1. D:\>bupdater /pc /g 2. Restart your motherboard user manual for DOS V1.18 [2011/04/29] Current ROM BOARD: P9X79 PRO VER: 0220 DATE: 08...
User Manual
Page 127
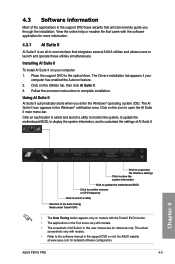
...reference only. Chapter 4 Click to customize the interface settings Click to show the system information Click to update the motherboard BIOS Click to monitor sensors or CPU frequency Click to select a utility Shortcut to launch and operate these ... system (OS). Click on each button to select and launch a utility, to monitor the system, to update the motherboard BIOS, to display the system information, and to open the AI Suite II main menu bar. Installing AI Suite...has enabled the Autorun feature. 2. Place the support DVD to complete installation. ASUS P9X79 PRO 4-3
...reference only. Chapter 4 Click to customize the interface settings Click to show the system information Click to update the motherboard BIOS Click to monitor sensors or CPU frequency Click to select a utility Shortcut to launch and operate these ... system (OS). Click on each button to select and launch a utility, to monitor the system, to update the motherboard BIOS, to display the system information, and to open the AI Suite II main menu bar. Installing AI Suite...has enabled the Autorun feature. 2. Place the support DVD to complete installation. ASUS P9X79 PRO 4-3

User Manual
Page 141
... later use . ASUS P9X79 PRO 4-17 Chapter 4 Launching ASUS Update After installing AI Suite II from the motherboard support DVD, launch ASUS Update by following the directions on this convenient updating feature. Click on Next and follow the instructions to complete your request. • Update BIOS from Internet Download the latest BIOS utility from the ASUS service website (www.asus.com) and follow...
... later use . ASUS P9X79 PRO 4-17 Chapter 4 Launching ASUS Update After installing AI Suite II from the motherboard support DVD, launch ASUS Update by following the directions on this convenient updating feature. Click on Next and follow the instructions to complete your request. • Update BIOS from Internet Download the latest BIOS utility from the ASUS service website (www.asus.com) and follow...


