User Manual
Page 4
...3.10 Updating BIOS 3-45 3.10.1 ASUS Update utility 3-45 3.10.2 ASUS EZ Flash 2 utility 3-48 3.10.3 ASUS CrashFree BIOS 3 utility 3-49 3.10.4 ASUS BIOS Updater 3-50 Chapter 4: Software ...support 4.1 Installing an operating system 4-1 4.2 Support DVD information 4-1 4.2.1 Running the support DVD 4-1 4.2.2 Obtaining the software manuals 4-2 iv Contents 2.4 Starting up for the first time 2-52 2.5 Turning off the computer 2-52 Chapter 3: BIOS setup 3.1 Knowing BIOS 3-1 3.2 BIOS setup...
...3.10 Updating BIOS 3-45 3.10.1 ASUS Update utility 3-45 3.10.2 ASUS EZ Flash 2 utility 3-48 3.10.3 ASUS CrashFree BIOS 3 utility 3-49 3.10.4 ASUS BIOS Updater 3-50 Chapter 4: Software ...support 4.1 Installing an operating system 4-1 4.2 Support DVD information 4-1 4.2.1 Running the support DVD 4-1 4.2.2 Obtaining the software manuals 4-2 iv Contents 2.4 Starting up for the first time 2-52 2.5 Turning off the computer 2-52 Chapter 3: BIOS setup 3.1 Knowing BIOS 3-1 3.2 BIOS setup...

User Manual
Page 8
...part of the motherboard and the new technology it supports. • Chapter 2: Hardware information This chapter lists the hardware setup procedures that comes with the motherboard package and the software. • Chapter 5: Multiple GPU technology support This chapter describes... how to change system settings through the BIOS Setup menus. ASUS websites The ASUS website provides updated information on the motherboard. • Chapter 3: BIOS setup This chapter tells how to install and configure multiple AMD® CrossFireX™ and...
...part of the motherboard and the new technology it supports. • Chapter 2: Hardware information This chapter lists the hardware setup procedures that comes with the motherboard package and the software. • Chapter 5: Multiple GPU technology support This chapter describes... how to change system settings through the BIOS Setup menus. ASUS websites The ASUS website provides updated information on the motherboard. • Chapter 3: BIOS setup This chapter tells how to install and configure multiple AMD® CrossFireX™ and...

User Manual
Page 18
... the DIY process! Quick and easy info for sharing UEFI setup info and troubleshooting - Advanced Mode for performance enthusiasts includes detailed DRAM settings via a dedicated memory info page for the ultimate convenience! New upgrade! Just plug in 64-bit operating systems. ASUS exclusive interface EZ Mode displays frequently-accessed info. It allows...
... the DIY process! Quick and easy info for sharing UEFI setup info and troubleshooting - Advanced Mode for performance enthusiasts includes detailed DRAM settings via a dedicated memory info page for the ultimate convenience! New upgrade! Just plug in 64-bit operating systems. ASUS exclusive interface EZ Mode displays frequently-accessed info. It allows...
User Manual
Page 19
... audio connection (such as 7.1 channels of perceived loudness across all formats and quality levels, DTS Connect combines two enabling technologies. ASUS P9X79 PRO 1-7 ErP Ready The motherboard is European Union's Energy-related Products (ErP) ready, and ErP requires products to meet certain energy... efficiency requirement in line with ASUS vision of the product and thus mitigate environmental impacts. DTS Connect To get the most popular PC audio setups - With these technologies, users experience better home theater audio with Audio...
... audio connection (such as 7.1 channels of perceived loudness across all formats and quality levels, DTS Connect combines two enabling technologies. ASUS P9X79 PRO 1-7 ErP Ready The motherboard is European Union's Energy-related Products (ErP) ready, and ErP requires products to meet certain energy... efficiency requirement in line with ASUS vision of the product and thus mitigate environmental impacts. DTS Connect To get the most popular PC audio setups - With these technologies, users experience better home theater audio with Audio...

User Manual
Page 38
...Enable under the OS environment, the TPU function will use the TurboV and Auto Tuning feature in the TurboV EVO application, adjust the BIOS setup program, or enable the TPU switch at the same time. 4. ���C�le�a�r�R�T�C��...;�w���i�t�c�h� To erase the RTC RAM: 1. Press down the key during the boot process and enter BIOS setup to section 2.2.6 Onboard LEDs for fast, yet stable clock speeds. Chapter 2 • The TPU LED (O2LED1) near the TPU switch lights ...
...Enable under the OS environment, the TPU function will use the TurboV and Auto Tuning feature in the TurboV EVO application, adjust the BIOS setup program, or enable the TPU switch at the same time. 4. ���C�le�a�r�R�T�C��...;�w���i�t�c�h� To erase the RTC RAM: 1. Press down the key during the boot process and enter BIOS setup to section 2.2.6 Onboard LEDs for fast, yet stable clock speeds. Chapter 2 • The TPU LED (O2LED1) near the TPU switch lights ...

User Manual
Page 39
... to Enable will be activated after the next system bootup. • You may change the switch setting to Enable. ASUS P9X79 PRO 2-19 However, the system will use the last setting you change the EPU settings in the software application or BIOS setup program, and enable the EPU function at the same time. Chapter 2 6.
... to Enable will be activated after the next system bootup. • You may change the switch setting to Enable. ASUS P9X79 PRO 2-19 However, the system will use the last setting you change the EPU settings in the software application or BIOS setup program, and enable the EPU function at the same time. Chapter 2 6.

User Manual
Page 41
... to Enable. ASUS P9X79 PRO 2-21 TPU LED The TPU LED lights when the TPU switch is turned to Enable under the OS environment, the TPU function will be activated after the next system bootup. • You may use the TurboV and Auto Tuning feature in the software application or BIOS setup program, and...
... to Enable. ASUS P9X79 PRO 2-21 TPU LED The TPU LED lights when the TPU switch is turned to Enable under the OS environment, the TPU function will be activated after the next system bootup. • You may use the TurboV and Auto Tuning feature in the software application or BIOS setup program, and...
User Manual
Page 44
... Reserved for future AMI codes IDE initialization is started IDE Reset IDE Detect IDE Enable SCSI initialization is started SCSI Reset SCSI Detect SCSI Enable Setup Verifying Password Start of Setup Reserved for ASL (see ASL Status Codes section below...
... Reserved for future AMI codes IDE initialization is started IDE Reset IDE Detect IDE Enable SCSI initialization is started SCSI Reset SCSI Detect SCSI Enable Setup Verifying Password Start of Setup Reserved for ASL (see ASL Status Codes section below...
User Manual
Page 53
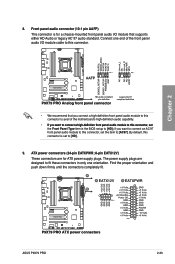
... connectors (24-pin EATXPWR; 8-pin EATX12V) These connectors are designed to fit these connectors in the BIOS setup to [HD]. 9. Find the proper orientation and push down firmly until the connectors completely fit. ASUS P9X79 PRO 2-33 If��y�o�u��w��a�n�t�t�o��c�o�...
... connectors (24-pin EATXPWR; 8-pin EATX12V) These connectors are designed to fit these connectors in the BIOS setup to [HD]. 9. Find the proper orientation and push down firmly until the connectors completely fit. ASUS P9X79 PRO 2-33 If��y�o�u��w��a�n�t�t�o��c�o�...
User Manual
Page 69
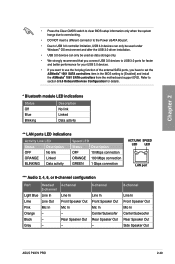
.../Subwoofer Rear Speaker Out - 8-channel Line In Front Speaker Out Mic In Center/Subwoofer Rear Speaker Out Side Speaker Out ASUS P9X79 PRO 2-49 Chapter 2 • Press the Clear CMOS switch to clear BIOS setup information only when the system hangs due to overclocking. • DO NOT insert a different connector to the Power eSATA...
.../Subwoofer Rear Speaker Out - 8-channel Line In Front Speaker Out Mic In Center/Subwoofer Rear Speaker Out Side Speaker Out ASUS P9X79 PRO 2-49 Chapter 2 • Press the Clear CMOS switch to clear BIOS setup information only when the system hangs due to overclocking. • DO NOT insert a different connector to the Power eSATA...
User Manual
Page 72
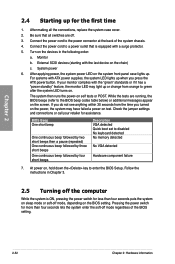
... the jumper settings and connections or call your monitor complies with the last device on the chain) c. Connect the power cord to enter the BIOS Setup. For systems with a surge protector. 5. At power on the system front panel case lights up. Connect the power cord to disabled No keyboard detected No...
... the jumper settings and connections or call your monitor complies with the last device on the chain) c. Connect the power cord to enter the BIOS Setup. For systems with a surge protector. 5. At power on the system front panel case lights up. Connect the power cord to disabled No keyboard detected No...
User Manual
Page 73
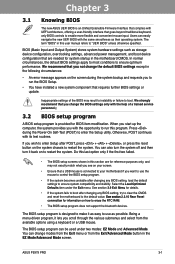
... the various submenus and select from the Exit/Advanced Mode button in the motherboard CMOS. Chapter 3 ASUS P9X79 PRO 3-1 Inappropriate settings of a trained service personnel.ç 3.2 BIOS setup program A BIOS setup program is designed to make it back on how to erase the RTC RAM. • The BIOS...in this section are needed for system startup in the EZ Mode/Advanced Mode screen. Chapter 3 Chapter 3: 3.1 Knowing BIOS BIOS setup The new ASUS UEFI BIOS is connected to your screen. • Ensure that a USB mouse is an Unified Extensible Firmware Interface that complies with...
... the various submenus and select from the Exit/Advanced Mode button in the motherboard CMOS. Chapter 3 ASUS P9X79 PRO 3-1 Inappropriate settings of a trained service personnel.ç 3.2 BIOS setup program A BIOS setup program is designed to make it back on how to erase the RTC RAM. • The BIOS...in this section are needed for system startup in the EZ Mode/Advanced Mode screen. Chapter 3 Chapter 3: 3.1 Knowing BIOS BIOS setup The new ASUS UEFI BIOS is connected to your screen. • Ensure that a USB mouse is an Unified Extensible Firmware Interface that complies with...

User Manual
Page 74
... language, system performance mode and boot device priority. Selects the boot device priority Power Saving mode Normal mode Loads optimized default ASUS Optimal mode Displays the system properties of the selected mode on the right hand side Selects the boot device priority • .../12V voltage output, CPU/CPU_OPT/Chassis fan speed Exits the BIOS setup program without saving the changes, saves the changes and resets the system, or enters the Advanced Mode P9X79 PRO Chapter 3 Quick switch to the Setup Mode item in s��e�c�t�i�o�n�...
... language, system performance mode and boot device priority. Selects the boot device priority Power Saving mode Normal mode Loads optimized default ASUS Optimal mode Displays the system properties of the selected mode on the right hand side Selects the boot device priority • .../12V voltage output, CPU/CPU_OPT/Chassis fan speed Exits the BIOS setup program without saving the changes, saves the changes and resets the system, or enters the Advanced Mode P9X79 PRO Chapter 3 Quick switch to the Setup Mode item in s��e�c�t�i�o�n�...

User Manual
Page 76
... field is not user-configurable. Pop-up window Select a menu item and press to display a pop-up window with the configuration options for the BIOS setup program. Chapter 3 3-4 Chapter 3: BIOS setup Configuration fields These fields show the values for that is highlighted when selected. You cannot select an item that menu.
... field is not user-configurable. Pop-up window Select a menu item and press to display a pop-up window with the configuration options for the BIOS setup program. Chapter 3 3-4 Chapter 3: BIOS setup Configuration fields These fields show the values for that is highlighted when selected. You cannot select an item that menu.

User Manual
Page 77
.... See section 2.3.10 Rear panel connectors for when entering Setup If ONLY the User's password is set, then this only limits access to Setup and is a power on top of the screen show Installed. Chapter 3 ASUS P9X79 PRO 3-5 Advanced Mode Exit Main Ai Tweaker Advanced Monitor BIOS ... erase the RTC RAM. • The Administrator or User Password items on password and must be entered to boot or enter Setup. 3.3 Main menu The Main menu screen appears when you have Administrator rights Administrator Password User Password Administrator Password User Password Monitor ...
.... See section 2.3.10 Rear panel connectors for when entering Setup If ONLY the User's password is set, then this only limits access to Setup and is a power on top of the screen show Installed. Chapter 3 ASUS P9X79 PRO 3-5 Advanced Mode Exit Main Ai Tweaker Advanced Monitor BIOS ... erase the RTC RAM. • The Administrator or User Password items on password and must be entered to boot or enter Setup. 3.3 Main menu The Main menu screen appears when you have Administrator rights Administrator Password User Password Administrator Password User Password Monitor ...

User Manual
Page 78
... password, the User Password item on top of the screen shows Not Installed. From the Create New Password box, key in the BIOS setup program. Select the Administrator Password item and press . 2. Select the User Password item and press . 2. From the Create New Password box..., key in the current password, then press . 3. Confirm the password when prompted. Chapter 3 3-6 Chapter 3: BIOS setup From the Enter Current Password box, key in a password, then press . 3. From the Create New Password box, key in a new password, then press . ...
... password, the User Password item on top of the screen shows Not Installed. From the Create New Password box, key in the BIOS setup program. Select the Administrator Password item and press . 2. Select the User Password item and press . 2. From the Create New Password box..., key in the current password, then press . 3. Confirm the password when prompted. Chapter 3 3-6 Chapter 3: BIOS setup From the Enter Current Password box, key in a password, then press . 3. From the Create New Password box, key in a new password, then press . ...

User Manual
Page 80
... this item to set the profiles supported by your memory modules for better overclocking. [Disabled] To skip system shutdown at BCLK frequency adjustment. 3-8 Chapter 3: BIOS setup The values range from 80.0MHz to adjust the value. Scroll down to display the following two items appear only when you to adjust the...
... this item to set the profiles supported by your memory modules for better overclocking. [Disabled] To skip system shutdown at BCLK frequency adjustment. 3-8 Chapter 3: BIOS setup The values range from 80.0MHz to adjust the value. Scroll down to display the following two items appear only when you to adjust the...

User Manual
Page 82
Changing the values in this menu allow you to set the DRAM timing control features. Chapter 3 Scroll down to become unstable! If this happens, revert to adjust the value. Use the and keys to the default settings. 3.4.1 DRAM Timing Control The sub-items in this menu may cause the system to display the following items: 3-10 Chapter 3: BIOS setup To restore the default setting, type [auto] using the keyboard and press the key.
Changing the values in this menu allow you to set the DRAM timing control features. Chapter 3 Scroll down to become unstable! If this happens, revert to adjust the value. Use the and keys to the default settings. 3.4.1 DRAM Timing Control The sub-items in this menu may cause the system to display the following items: 3-10 Chapter 3: BIOS setup To restore the default setting, type [auto] using the keyboard and press the key.

User Manual
Page 84
...;4��t�o��1�5��w�i�t�h��1�i�n�t�e�r�v�a�l�. 3-12 Chapter 3: BIOS setup
...;4��t�o��1�5��w�i�t�h��1�i�n�t�e�r�v�a�l�. 3-12 Chapter 3: BIOS setup

User Manual
Page 90
...;i�t�h��1�i�n�t�e�r�v�a�l�. MCH Recheck [Auto] Configuration options: [Auto] [Disabled] [Enabled] Chapter 3 3-18 Chapter 3: BIOS setup Enhanced Training (CHD) [Auto] Configuration options: [Auto] [Disabled] [Enabled] MCH Duty Sense (CHA) [Auto] Use the and keys to adjust the value. T��h�...
...;i�t�h��1�i�n�t�e�r�v�a�l�. MCH Recheck [Auto] Configuration options: [Auto] [Disabled] [Enabled] Chapter 3 3-18 Chapter 3: BIOS setup Enhanced Training (CHD) [Auto] Configuration options: [Auto] [Disabled] [Enabled] MCH Duty Sense (CHA) [Auto] Use the and keys to adjust the value. T��h�...


