
User Manual
Page 74
...installed to the system. 3-2 Chapter 3: BIOS setup Selects the boot device priority Power Saving mode Normal mode Loads optimized default ASUS Optimal mode Displays the system properties of the BIOS setup program Clicks to display all fan speeds if available Displays the CPU/motherboard ... or enters the Advanced Mode P9X79 PRO Chapter 3 Quick switch to the Setup Mode item in s��e�c�t�i�o�n� 3.7 Boot memu for entering the BIOS setup program can be changed. To access the Advanced Mode, click Exit/Advanced Mode, then select...
...installed to the system. 3-2 Chapter 3: BIOS setup Selects the boot device priority Power Saving mode Normal mode Loads optimized default ASUS Optimal mode Displays the system properties of the BIOS setup program Clicks to display all fan speeds if available Displays the CPU/motherboard ... or enters the Advanced Mode P9X79 PRO Chapter 3 Quick switch to the Setup Mode item in s��e�c�t�i�o�n� 3.7 Boot memu for entering the BIOS setup program can be changed. To access the Advanced Mode, click Exit/Advanced Mode, then select...
User Manual
Page 75
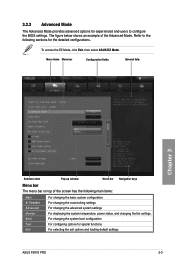
... Navigation keys Menu bar The menu bar on top of the Advanced Mode. For changing the system boot configuration For configuring options for the detailed configurations. To access the EZ Mode, click Exit, then select ASUS EZ Mode. 3.2.2 Advanced Mode The Advanced Mode provides advanced options for experienced end-users to the following.... The figure below shows an example of the screen has the following sections for special functions For selecting the exit options and loading default settings ASUS P9X79 PRO 3-3
... Navigation keys Menu bar The menu bar on top of the Advanced Mode. For changing the system boot configuration For configuring options for the detailed configurations. To access the EZ Mode, click Exit, then select ASUS EZ Mode. 3.2.2 Advanced Mode The Advanced Mode provides advanced options for experienced end-users to the following.... The figure below shows an example of the screen has the following sections for special functions For selecting the exit options and loading default settings ASUS P9X79 PRO 3-3

User Manual
Page 76
... screen when there are the navigation keys for the menu items. If an item is highlighted when selected. Press or use the USB mouse to click this button to return to select items in the menu and change the value of a field, select it and press to display the other items... (Ai Tweaker, Advanced, Monitor, Boot, Tool, and Exit) on the right side of the field opposite the item. Configuration fields These fields show the values for the BIOS setup program...
... screen when there are the navigation keys for the menu items. If an item is highlighted when selected. Press or use the USB mouse to click this button to return to select items in the menu and change the value of a field, select it and press to display the other items... (Ai Tweaker, Advanced, Monitor, Boot, Tool, and Exit) on the right side of the field opposite the item. Configuration fields These fields show the values for the BIOS setup program...

User Manual
Page 112
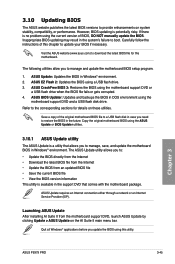
...the left/right arrow key to select between [Yes] or [No], then press to section 3.10.2 ASUS EZ Flash 2 utility. 3-40 Chapter 3: BIOS setup Click an item to configure options for entering the BIOS setup program. The number of device items that appears ... the system. Advanced Mode Exit Main Ai Tweaker Advanced > ASUS EZ Flash 2 Utility > ASUS DRAM SPD Information > ASUS O.C. Boot Override These items displays the available devices. Profile > ASUS Drive Xpert Monitor Boot Tool Be used to update BIOS Chapter 3 3.8.1 ASUS EZ Flash 2 Utility Allows you to display the submenu....
...the left/right arrow key to select between [Yes] or [No], then press to section 3.10.2 ASUS EZ Flash 2 utility. 3-40 Chapter 3: BIOS setup Click an item to configure options for entering the BIOS setup program. The number of device items that appears ... the system. Advanced Mode Exit Main Ai Tweaker Advanced > ASUS EZ Flash 2 Utility > ASUS DRAM SPD Information > ASUS O.C. Boot Override These items displays the available devices. Profile > ASUS Drive Xpert Monitor Boot Tool Be used to update BIOS Chapter 3 3.8.1 ASUS EZ Flash 2 Utility Allows you to display the submenu....
User Manual
Page 117
...support DVD, launch ASUS Update by clicking Update > ASUS Update on system stability, compatibility, or performance. Refer to the corresponding sections for this motherboard. The ASUS Update utility allows you need to manage and update the motherboard BIOS setup program. 1. Chapter 3 ASUS P9X79 PRO 3-45 Carefully follow...is available in the support DVD that allows you to restore the BIOS in Windows® environment. Visit the ASUS website (www.asus.com) to boot. The following utilities allow you to manage, save, and update the motherboard BIOS in the future. Inappropriate ...
...support DVD, launch ASUS Update by clicking Update > ASUS Update on system stability, compatibility, or performance. Refer to the corresponding sections for this motherboard. The ASUS Update utility allows you need to manage and update the motherboard BIOS setup program. 1. Chapter 3 ASUS P9X79 PRO 3-45 Carefully follow...is available in the support DVD that allows you to restore the BIOS in Windows® environment. Visit the ASUS website (www.asus.com) to boot. The following utilities allow you to manage, save, and update the motherboard BIOS in the future. Inappropriate ...

User Manual
Page 118
...). Updating the BIOS through the Internet To update the BIOS through the Internet: 1. From the ASUS Update screen, select Update BIOS from Internet, and then click Next. 2. Click Next. Select the ASUS FTP site nearest you want to avoid network traffic. Select the BIOS version that you to download.... If you want to continue. 5. Click Yes if you want to change the BIOS boot logo, which is the image ...
...). Updating the BIOS through the Internet To update the BIOS through the Internet: 1. From the ASUS Update screen, select Update BIOS from Internet, and then click Next. 2. Click Next. Select the ASUS FTP site nearest you want to avoid network traffic. Select the BIOS version that you to download.... If you want to continue. 5. Click Yes if you want to change the BIOS boot logo, which is the image ...

User Manual
Page 119
You can decide whether to continue. 4. Follow the onscreen instructions to the software manual in this section are for detailed software configuration. ASUS P9X79 PRO 3-47 Chapter 3 3. Updating the BIOS through a BIOS file To update the BIOS through a BIOS file: 1. The actual BIOS information vary by ...support DVD or visit the ASUS website at www.asus.com for reference only. From the ASUS Update screen, select Update BIOS from the Open window, click Open, and click Next. Click Yes if you want to change the boot logo or No to change the BIOS boot logo. Locate the BIOS ...
You can decide whether to continue. 4. Follow the onscreen instructions to the software manual in this section are for detailed software configuration. ASUS P9X79 PRO 3-47 Chapter 3 3. Updating the BIOS through a BIOS file To update the BIOS through a BIOS file: 1. The actual BIOS information vary by ...support DVD or visit the ASUS website at www.asus.com for reference only. From the ASUS Update screen, select Update BIOS from the Open window, click Open, and click Next. Click Yes if you want to change the boot logo or No to change the BIOS boot logo. Locate the BIOS ...

User Manual
Page 128
...voltage may make the system unstable. After installing AI Suite II from the motherboard support DVD, launch TurboV EVO by clicking Tool > TurboV EVO on the next system boot. Use the Save Profile function to restore all start-up . TurboV TurboV allows you to manually adjust the CPU...and DRAM Bus voltage in Windows® environment and takes effect in the support DVD or visit the ASUS website at www.asus.com for detailed software configuration. 4.3.2 TurboV EVO ASUS TurboV EVO introduces TurboV that offers automatic and easy overclocking and system level up settings Undoes all changes...
...voltage may make the system unstable. After installing AI Suite II from the motherboard support DVD, launch TurboV EVO by clicking Tool > TurboV EVO on the next system boot. Use the Save Profile function to restore all start-up . TurboV TurboV allows you to manually adjust the CPU...and DRAM Bus voltage in Windows® environment and takes effect in the support DVD or visit the ASUS website at www.asus.com for detailed software configuration. 4.3.2 TurboV EVO ASUS TurboV EVO introduces TurboV that offers automatic and easy overclocking and system level up settings Undoes all changes...

User Manual
Page 142
...the BIOS boot logo of my motherboard 1. Chapter 4 4-18 Chapter 4: Software support Launching ASUS Update After installing AI Suite II from the very beginning! Under Current BIOS, click Browse and choose the desired image for your computer from the motherboard support DVD, launch MyLogo by clicking Update> MyLogo...MyLogo2 This MyLogo utility lets you would like to do update your boot logo. The boot logo is the image that appears on Next. Then click Next and follow the given instructions. Personalize your boot logo. Then click on screen during the Power‑On‑Self-Tests (POST...
...the BIOS boot logo of my motherboard 1. Chapter 4 4-18 Chapter 4: Software support Launching ASUS Update After installing AI Suite II from the very beginning! Under Current BIOS, click Browse and choose the desired image for your computer from the motherboard support DVD, launch MyLogo by clicking Update> MyLogo...MyLogo2 This MyLogo utility lets you would like to do update your boot logo. The boot logo is the image that appears on Next. Then click Next and follow the given instructions. Personalize your boot logo. Then click on screen during the Power‑On‑Self-Tests (POST...
User Manual
Page 143
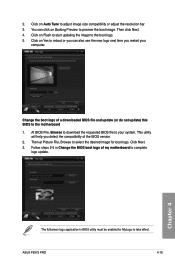
... Flash to start updating the image to the boot logo. 5. Click on Auto Tune to preview the boot image. Change the boot logo of the BIOS version. 2. This utility will help you restart your system. ASUS P9X79 PRO 4-19 Click on Booting Preview to adjust image size compatibility or adjust the resolution bar. 3. Chapter 4 The fullscreen logo application in...
... Flash to start updating the image to the boot logo. 5. Click on Auto Tune to preview the boot image. Change the boot logo of the BIOS version. 2. This utility will help you restart your system. ASUS P9X79 PRO 4-19 Click on Booting Preview to adjust image size compatibility or adjust the resolution bar. 3. Chapter 4 The fullscreen logo application in...

User Manual
Page 154
Set the optical drive as the destination disk. 6. Go to the Make Disk menu, and then click Intel X79 RAID Driver Disk to create a RAID driver disk. 7. Chapter 4 4-30 Chapter 4: Software support When the Make Disk menu appears, press to create a ...a formatted floppy disk into the optical drive. 4. Plug the USB floppy disk drive and insert a floppy disk. 3. Insert the support DVD into the optical drive. 5. Boot your computer. 2. Write-protect the floppy disk to enter the BIOS setup utility. 3. 4.5 Creating a RAID driver disk A floppy disk with the RAID driver is required...
Set the optical drive as the destination disk. 6. Go to the Make Disk menu, and then click Intel X79 RAID Driver Disk to create a RAID driver disk. 7. Chapter 4 4-30 Chapter 4: Software support When the Make Disk menu appears, press to create a ...a formatted floppy disk into the optical drive. 4. Plug the USB floppy disk drive and insert a floppy disk. 3. Insert the support DVD into the optical drive. 5. Boot your computer. 2. Write-protect the floppy disk to enter the BIOS setup utility. 3. 4.5 Creating a RAID driver disk A floppy disk with the RAID driver is required...


