Aspire 4810T, 4810TG, 4810TZ and 4410TZG Service Guide
Page 81
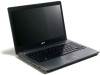
...on page 48. 9. See "Removing the RTC Battery" on page 48. 8. See "Removing the DIMM" on both side of the hinges. Remove the hinge caps on page 46. 6. See "Removing the Lower Cover" on page 47. 7. See "Removing the Hard Disk Drive Module" on page 45. 4. See "Removing the LCD Module" on page...on page 59. 13. See "Removing the Keyboard" on page 72. 14. See "Removing the LCD Bezel" on page 51. 10. See "Removing the Lower Cover" on page 44. 2. See "Separating the Upper Case from the LCD panel. See "Removing the Battery Pack" on page 45. 3. 15. Removing the LCD ...
...on page 48. 9. See "Removing the RTC Battery" on page 48. 8. See "Removing the DIMM" on both side of the hinges. Remove the hinge caps on page 46. 6. See "Removing the Lower Cover" on page 47. 7. See "Removing the Hard Disk Drive Module" on page 45. 4. See "Removing the LCD Module" on page...on page 59. 13. See "Removing the Keyboard" on page 72. 14. See "Removing the LCD Bezel" on page 51. 10. See "Removing the Lower Cover" on page 44. 2. See "Separating the Upper Case from the LCD panel. See "Removing the Battery Pack" on page 45. 3. 15. Removing the LCD ...

Aspire 4810T, 4810TG, 4810TZ and 4410TZG Service Guide
Page 82
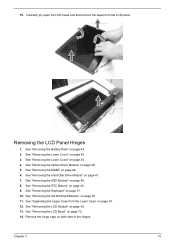
...Removing the SSD Module" on page 59. 13. See "Removing the Lower Cover" on page 51. 10. See "Removing the Keyboard" on page 45. 4. See "Removing the LCD Bezel" on page 73. 74 Chapter 3 See "Removing the LCD Panel Hinges" on page 72. 14. See "Removing the Battery Pack" on page... 46. 6. See "Removing the DIMM" on page 44. 2. See "Removing the WLAN Board Module" on page 45. 3. See "Removing the Lower Cover" on page 52. 11.
...Removing the SSD Module" on page 59. 13. See "Removing the Lower Cover" on page 51. 10. See "Removing the Keyboard" on page 45. 4. See "Removing the LCD Bezel" on page 73. 74 Chapter 3 See "Removing the LCD Panel Hinges" on page 72. 14. See "Removing the Battery Pack" on page... 46. 6. See "Removing the DIMM" on page 44. 2. See "Removing the WLAN Board Module" on page 45. 3. See "Removing the Lower Cover" on page 52. 11.

Aspire 4810T, 4810TG, 4810TZ and 4410TZG Service Guide
Page 122
Part Name Acer Part No. 2 CAMERA 1.0M SUYIN CN1014-S36D-OV05 LAVENDER_G 56.18007.273 2 CAMERA 1.0M CHICONY CNF911321004970L 56.18012.113 CASE/COVER/BRACKET ASSEMBLY 2 DVD-RW SUPER-MULTI BEZEL FOR GBAS 2 DVD-RW SUPER-MULTI BEZEL NONE GBAS 42.PBA01.002 42.PBA01.003 2 HDD BRACKET 2.5 2 ...CAP RIGHT 42.PBA01.005 2 LED LCD BEZEL CAP LEFT 42.PBA01.004 2 LED LCD COVER 14" ALUMINUM SLIVER W/ANTENNA*2 60.PBA01.005 & MICROPHONE 2 LED LCD HINGE LEFT 2 LED LCD HINGE LEFT 2 LED LCD HINGE RIGHT 2 LED LCD HINGE RIGHT 34.4CQ06.101 34.4CQ06.001 34.4CQ07.101 34.4CQ07.001 114 Chapter 6 Category...
Part Name Acer Part No. 2 CAMERA 1.0M SUYIN CN1014-S36D-OV05 LAVENDER_G 56.18007.273 2 CAMERA 1.0M CHICONY CNF911321004970L 56.18012.113 CASE/COVER/BRACKET ASSEMBLY 2 DVD-RW SUPER-MULTI BEZEL FOR GBAS 2 DVD-RW SUPER-MULTI BEZEL NONE GBAS 42.PBA01.002 42.PBA01.003 2 HDD BRACKET 2.5 2 ...CAP RIGHT 42.PBA01.005 2 LED LCD BEZEL CAP LEFT 42.PBA01.004 2 LED LCD COVER 14" ALUMINUM SLIVER W/ANTENNA*2 60.PBA01.005 & MICROPHONE 2 LED LCD HINGE LEFT 2 LED LCD HINGE LEFT 2 LED LCD HINGE RIGHT 2 LED LCD HINGE RIGHT 34.4CQ06.101 34.4CQ06.001 34.4CQ07.101 34.4CQ07.001 114 Chapter 6 Category...


