Operating Instructions
Page 2
... "dangerous voltage" within the product's enclosure that may call the CATV system installer's attention to Article 820-40 of the NEC that provides guidelines for a Class B digital device, pursuant to Part 15 of cable entry as close to the presence of your system is no guarantee that the operating voltage of your local power supply. Refer servicing to persons. This symbol is...
... "dangerous voltage" within the product's enclosure that may call the CATV system installer's attention to Article 820-40 of the NEC that provides guidelines for a Class B digital device, pursuant to Part 15 of cable entry as close to the presence of your system is no guarantee that the operating voltage of your local power supply. Refer servicing to persons. This symbol is...
Operating Instructions
Page 3
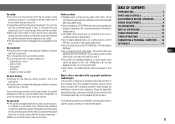
... fall into the component, unplug the stereo system and have any questions or problems concerning your stereo system, please consult your nearest Aiwa dealer. TABLE OF CONTENTS PREPARATIONS 4 PARTS AND CONTROLS 5 ADJUSTMENTS BEFORE OPERATION .......... 8 SOUND ADJUSTMENTS 9 CD OPERATIONS 10 MP3-CD OPERATIONS 13 TUNER OPERATIONS 15 TIMER OPERATIONS 16 CONNECTING A PERSONAL COMPUTER .... 18 REFERENCE 21 En 3 To disconnect the cord (mains lead), pull it . •Discs with MP3 files (MP3-CDs). •Discs recorded on for...
... fall into the component, unplug the stereo system and have any questions or problems concerning your stereo system, please consult your nearest Aiwa dealer. TABLE OF CONTENTS PREPARATIONS 4 PARTS AND CONTROLS 5 ADJUSTMENTS BEFORE OPERATION .......... 8 SOUND ADJUSTMENTS 9 CD OPERATIONS 10 MP3-CD OPERATIONS 13 TUNER OPERATIONS 15 TIMER OPERATIONS 16 CONNECTING A PERSONAL COMPUTER .... 18 REFERENCE 21 En 3 To disconnect the cord (mains lead), pull it . •Discs with MP3 files (MP3-CDs). •Discs recorded on for...
Operating Instructions
Page 4
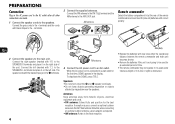
... antenna: Extend fully and position for the first time, DEMO appears in the AC power cord to the AC outlet after all other connections are made. 1 Connect the speaker cords to the FM 75 Ω terminal. R6(AA) •Replace the batteries with black stripes to the AM LOOP jack. Connect the gray cords to the + terminals and the cords with new ones when the operational...
... antenna: Extend fully and position for the first time, DEMO appears in the AC power cord to the AC outlet after all other connections are made. 1 Connect the speaker cords to the FM 75 Ω terminal. R6(AA) •Replace the batteries with black stripes to the AM LOOP jack. Connect the gray cords to the + terminals and the cords with new ones when the operational...
Operating Instructions
Page 5
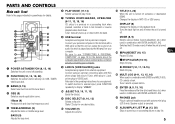
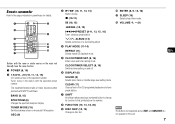
.... & PHONES jack Plug in optional headphones set with ENTER and MULTI JOG. sSTOP/CLEAR (10-13) Stops CD play . DISPLAY (8) Changes the display in MP3-CD or USB source. Tuner: selects a preset station. ^ ENTER (8, 9, 15, 16) Fixes the modes and the time (clock and timer, etc.) when used in combination with a stereo mini plug (∅3.5 mm). Be sure to see "CONNECTING A PERSONAL COMPUTER" on and off when the unit is turned off : activates or deactivated DEMO. Turns the back light...
.... & PHONES jack Plug in optional headphones set with ENTER and MULTI JOG. sSTOP/CLEAR (10-13) Stops CD play . DISPLAY (8) Changes the display in MP3-CD or USB source. Tuner: selects a preset station. ^ ENTER (8, 9, 15, 16) Fixes the modes and the time (clock and timer, etc.) when used in combination with a stereo mini plug (∅3.5 mm). Be sure to see "CONNECTING A PERSONAL COMPUTER" on and off when the unit is turned off : activates or deactivated DEMO. Turns the back light...
Operating Instructions
Page 6
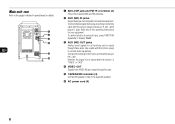
.... Connect external equipment using an optional connecting cable with RCA phono plugs to connect audio equipment. Main unit: rear Refer to the pages indicated in parentheses for details. 1 2 3 4 En 5 6 1 AM LOOP jack and FM 75 Ω terminal (4) Plug in the supplied AM and FM antennas. 2 AUX (MD) IN jacks Accept analogue sound signals from VIDEO IN jack output through these jacks. Connect the red plug to the R jack, and the white plug to the operating instructions...
.... Connect external equipment using an optional connecting cable with RCA phono plugs to connect audio equipment. Main unit: rear Refer to the pages indicated in parentheses for details. 1 2 3 4 En 5 6 1 AM LOOP jack and FM 75 Ω terminal (4) Plug in the supplied AM and FM antennas. 2 AUX (MD) IN jacks Accept analogue sound signals from VIDEO IN jack output through these jacks. Connect the red plug to the R jack, and the white plug to the operating instructions...
Operating Instructions
Page 7
...) Starts CD play. CLEAR (11) Clears a track of the specified number. The numbered buttons take on and off. 6 DISPLAY (8) SOUND (9) Selects bass, treble or middle range level setting mode. CLOCK/TIMER SELECT (8, 16) Switches timer setting on these functions when pressed with SHIFT held down when pressing a numbered button to change its function to the pages indicated in the station with the specified preset number. SLEEP (16) Selects sleep-timer mode. @ VOLUME +, - (9) En Note The buttons...
...) Starts CD play. CLEAR (11) Clears a track of the specified number. The numbered buttons take on and off. 6 DISPLAY (8) SOUND (9) Selects bass, treble or middle range level setting mode. CLOCK/TIMER SELECT (8, 16) Switches timer setting on these functions when pressed with SHIFT held down when pressing a numbered button to change its function to the pages indicated in the station with the specified preset number. SLEEP (16) Selects sleep-timer mode. @ VOLUME +, - (9) En Note The buttons...
Operating Instructions
Page 8
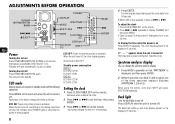
... t. To adjust the clock 1 Press CLOCK/TIMER SET on the remote ). When using the remote, hold down SHIFT and press SPECTRUM repeatedly. Alternatively, press BAND, DISC SELECT (1-5). When the unit turns off Press POWER 6STANDBY/ON again. Standby power consumption BMZ-K1 Turning the unit off , the clock display appears. Each press of the three spectrum analyser displays (PATTERN 1, 2 and 3). When the unit turns off . The time display stops flashing and the clock starts from...
... t. To adjust the clock 1 Press CLOCK/TIMER SET on the remote ). When using the remote, hold down SHIFT and press SPECTRUM repeatedly. Alternatively, press BAND, DISC SELECT (1-5). When the unit turns off Press POWER 6STANDBY/ON again. Standby power consumption BMZ-K1 Turning the unit off , the clock display appears. Each press of the three spectrum analyser displays (PATTERN 1, 2 and 3). When the unit turns off . The time display stops flashing and the clock starts from...

Operating Instructions
Page 9
... Turn BASS. •If the sound becomes distorted, lower the level. Volume Turn VOLUME (press VOLUME +,- To adjust the bass, treble and middle range level on the remote Press SOUND repeatedly so that "FREQ" is retained during power-off with SOUND on the remote). Each press of the three frequency ranges (1, 2 and 3). Setting a curve manually 1 Press GEQ repeatedly to display "USER". 2 Turn TREBLE/MIDDLE and BASS to select "I-BASS ON". 2 Press MODE...
... Turn BASS. •If the sound becomes distorted, lower the level. Volume Turn VOLUME (press VOLUME +,- To adjust the bass, treble and middle range level on the remote Press SOUND repeatedly so that "FREQ" is retained during power-off with SOUND on the remote). Each press of the three frequency ranges (1, 2 and 3). Setting a curve manually 1 Press GEQ repeatedly to display "USER". 2 Turn TREBLE/MIDDLE and BASS to select "I-BASS ON". 2 Press MODE...
Operating Instructions
Page 10
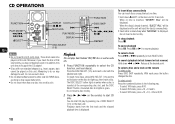
... r or t repeatedly (or turn MULTI JOG). CD OPERATIONS FUNCTION FUNCTION PLAY MODE f/r, t/g zEJECT DISPLAY 1-9,0/10,+10 a,s,c MULTI JOG r PLAY MODE DISPLAY DISC SKIP t c/d,f,g, a,s REPEAT DISC SELECT (1-5) En Notes •Do not insert 8-cm (3-inch) discs. To insert discs consecutively You can start CD play by pressing one disc slot. When no disc is displayed. To select a disc and a track on the remote) to eject it. The DISC SELECT button lights in green. Attempting to...
... r or t repeatedly (or turn MULTI JOG). CD OPERATIONS FUNCTION FUNCTION PLAY MODE f/r, t/g zEJECT DISPLAY 1-9,0/10,+10 a,s,c MULTI JOG r PLAY MODE DISPLAY DISC SKIP t c/d,f,g, a,s REPEAT DISC SELECT (1-5) En Notes •Do not insert 8-cm (3-inch) discs. To insert discs consecutively You can start CD play by pressing one disc slot. When no disc is displayed. To select a disc and a track on the remote) to eject it. The DISC SELECT button lights in green. Attempting to...
Operating Instructions
Page 11
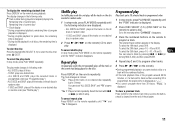
... Press CLEAR on the remote repeatedly. To display the remaining playback time Press DISPLAY on the remote to program a track. The play mode the unit plays all discs - 1 DISC: plays one desired disc in random order. 1 In stop mode, press PLAY MODE repeatedly until the following indicators are displayed. - "" 1": Plays one desired disc repeatedly. (up to the next step when "CHANGE" disappears. 3 Press the numbered buttons on the remote during playback. Go to...
... Press CLEAR on the remote repeatedly. To display the remaining playback time Press DISPLAY on the remote to program a track. The play mode the unit plays all discs - 1 DISC: plays one desired disc in random order. 1 In stop mode, press PLAY MODE repeatedly until the following indicators are displayed. - "" 1": Plays one desired disc repeatedly. (up to the next step when "CHANGE" disappears. 3 Press the numbered buttons on the remote during playback. Go to...

Operating Instructions
Page 12
... not be played back because of scratches, dirt, recording condition or the drive's characteristics. •CD-R/RW discs which are not finalized at the end of CD mechanism. 1 Eject all the CDs. 2 Hold down s on the main unit for 5 seconds in the display, and then the unit will turn itself off automatically. 3 Disconnect the AC power cord from the...
... not be played back because of scratches, dirt, recording condition or the drive's characteristics. •CD-R/RW discs which are not finalized at the end of CD mechanism. 1 Eject all the CDs. 2 Hold down s on the main unit for 5 seconds in the display, and then the unit will turn itself off automatically. 3 Disconnect the AC power cord from the...
Operating Instructions
Page 14
... manual, CDs, CD-R discs and CD-RW discs are all referred to as files. This unit can play •Up to MP3 The unit supports MP3 files with ISO 9660. Go to the next step when "CHANGE" disappears. 3 Select an album and a track. 4 Repeat steps 2 and 3 to program other folders as well as "discs". We refer to 320 kbps. character codes wthich...
... manual, CDs, CD-R discs and CD-RW discs are all referred to as files. This unit can play •Up to MP3 The unit supports MP3 files with ISO 9660. Go to the next step when "CHANGE" disappears. 3 Select an album and a track. 4 Repeat steps 2 and 3 to program other folders as well as "discs". We refer to 320 kbps. character codes wthich...
Operating Instructions
Page 15
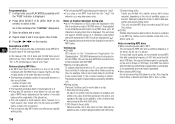
.... ("FULL" is displayed.) •If power is interrupted for a station automatically (Auto search) Hold down SHIFT and press TUNER MODE on the remote so that "STEREO" is tuned in . "TUNED" is displayed when a station is displayed. To search for more than the cleared number decrease by one. To clear a preset station 1 Tune in an area where the frequency allocation system is 10 kHz/step. Adjustments To switch to be stored...
.... ("FULL" is displayed.) •If power is interrupted for a station automatically (Auto search) Hold down SHIFT and press TUNER MODE on the remote so that "STEREO" is tuned in . "TUNED" is displayed when a station is displayed. To search for more than the cleared number decrease by one. To clear a preset station 1 Tune in an area where the frequency allocation system is 10 kHz/step. Adjustments To switch to be stored...
Operating Instructions
Page 16
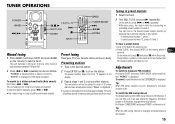
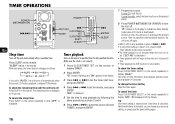
.... Make sure the clock is deactivated). To play the radio, select the band and tune in the desired station. 8 Press POWER 6STANDBY/ON (POWER) to indicate the timer standby mode (when ECO mode is set correctly. 1 Press CLOCK/TIMER SET on the remote. At timer-on time, the unit turns on the remote. To change your previous setting, or simply use the same setting again. 16 "SLEEP" flashes in the display. 3 Press r or t to set . ("SET NG" is displayed.) •Timer...
.... Make sure the clock is deactivated). To play the radio, select the band and tune in the desired station. 8 Press POWER 6STANDBY/ON (POWER) to indicate the timer standby mode (when ECO mode is set correctly. 1 Press CLOCK/TIMER SET on the remote. At timer-on time, the unit turns on the remote. To change your previous setting, or simply use the same setting again. 16 "SLEEP" flashes in the display. 3 Press r or t to set . ("SET NG" is displayed.) •Timer...
Operating Instructions
Page 18
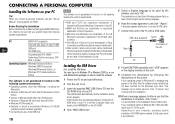
... with a USB cable. Installing the USB Driver First, install the USB driver. If the installer does not start Windows. 2 Turn the unit to inform you have chosen English as the display language. 6 Read the license agreement, and click "I Agree". The explanations of your system meets the following the instructions on . 3 Insert the supplied BMZ USB Driver CD into the CD-ROM drive of their respective owners. If your computer, operating system installation CD-ROM may...
... with a USB cable. Installing the USB Driver First, install the USB driver. If the installer does not start Windows. 2 Turn the unit to inform you have chosen English as the display language. 6 Read the license agreement, and click "I Agree". The explanations of your system meets the following the instructions on . 3 Insert the supplied BMZ USB Driver CD into the CD-ROM drive of their respective owners. If your computer, operating system installation CD-ROM may...
Operating Instructions
Page 19
... "Control Panel" window, double click "System". 3 In the "System Properties" window, double click "Device Manager". 4 Check that the following devices are displayed under the following headings. •"Sound, video and game controllers" > "USB Audio Device" •"Universal Serial Bus controllers" > "AIWA BMZ USB- Installing Winamp3 After you finish installing Winamp3, install the Winamp3 Plug-in. 1 Click "Winamp3 BMZ Plug-in" on the screen. Click En "EXIT" and remove the CD-ROM from the supplied CDROM. 1 Click "Winamp3" on the Installation Guide screen...
... "Control Panel" window, double click "System". 3 In the "System Properties" window, double click "Device Manager". 4 Check that the following devices are displayed under the following headings. •"Sound, video and game controllers" > "USB Audio Device" •"Universal Serial Bus controllers" > "AIWA BMZ USB- Installing Winamp3 After you finish installing Winamp3, install the Winamp3 Plug-in. 1 Click "Winamp3 BMZ Plug-in" on the screen. Click En "EXIT" and remove the CD-ROM from the supplied CDROM. 1 Click "Winamp3" on the Installation Guide screen...
Operating Instructions
Page 20
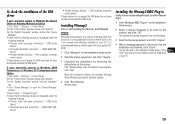
... necessarily show the list of programs that can output the sound of an audio file which is played back by the Winamp3. The display changes in the following order: Track number being played and elapsed playing time Track (file) name and album(play list) name* being played Track title* and artist name* being used. •Do not disconnect the USB cable during playback. It may not operate correctly. •...
... necessarily show the list of programs that can output the sound of an audio file which is played back by the Winamp3. The display changes in the following order: Track number being played and elapsed playing time Track (file) name and album(play list) name* being played Track title* and artist name* being used. •Do not disconnect the USB cable during playback. It may not operate correctly. •...

Operating Instructions
Page 21
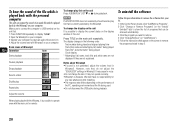
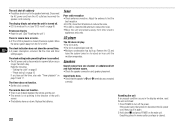
... it in the supplied BMZ USB Driver CD again. If the unit surfaces are needed to web site of the speaker cord will obstruct the speaker connections. 21 After playing a CD, store it from one song and into the SPEAKERS terminal. En Troubleshooting If your computer. •The headphones are connected correctly and firmly. Winamp does not respond when I change setting of the Operating Instructions. Q. Inserting the vinyl...
... it in the supplied BMZ USB Driver CD again. If the unit surfaces are needed to web site of the speaker cord will obstruct the speaker connections. 21 After playing a CD, store it from one song and into the SPEAKERS terminal. En Troubleshooting If your computer. •The headphones are connected correctly and firmly. Winamp does not respond when I change setting of the Operating Instructions. Q. Inserting the vinyl...
Operating Instructions
Page 22
... power cord, then plug it in the speaker terminals. Disconnect the AC power cord from the TV or VCR. "Setting the clock" on for about an hour until the moisture evaporates. Replace the batteries. 22 Tuner Poor radio reception •Check antenna connection. Resetting the unit If an unusual condition occurs in the display window, reset the unit as follows: 1 Press POWER to the stereo system. Set the clock and timer settings again. The display...
... power cord, then plug it in the speaker terminals. Disconnect the AC power cord from the TV or VCR. "Setting the clock" on for about an hour until the moisture evaporates. Replace the batteries. 22 Tuner Poor radio reception •Check antenna connection. Resetting the unit If an unusual condition occurs in the display window, reset the unit as follows: 1 Press POWER to the stereo system. Set the clock and timer settings again. The display...
Operating Instructions
Page 23
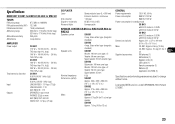
... W with ECO mode off: 24 W Dimensions (w/h/d) Approx. 211 × 379 × 419 mm (8 3/8 × 15 × 16 5/8 in.) Mass CX-BK1: Approx. 8.6 kg (19 lbs) CX-BK2: Approx. 9.6 kg (21 lbs 3 oz) Supplied accessories: FM antenna (1) AM antenna (1) Speaker cords (2) USB cable (1) Remote commander (1) Batteries (2) Application CD-ROM (1) En Specifications and external appearance are subject to change without notice. Licensed by BBE Sound, Inc...
... W with ECO mode off: 24 W Dimensions (w/h/d) Approx. 211 × 379 × 419 mm (8 3/8 × 15 × 16 5/8 in.) Mass CX-BK1: Approx. 8.6 kg (19 lbs) CX-BK2: Approx. 9.6 kg (21 lbs 3 oz) Supplied accessories: FM antenna (1) AM antenna (1) Speaker cords (2) USB cable (1) Remote commander (1) Batteries (2) Application CD-ROM (1) En Specifications and external appearance are subject to change without notice. Licensed by BBE Sound, Inc...


