Operating Instructions
Page 4
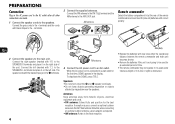
...+ terminals and the cords with the black stripes go to the 9 terminals. 4 FM antenna 4 Connect the AC power cord to the - En 2 Connect the speakers to find best reception. Antennas Keep antennas away from metallic objects, electrical equipment and cords. •FM antenna: Extend fully and position for the first... time, DEMO appears in the AC power cord to the AC outlet after all other connections are made. 1 Connect the speaker cords to be used under intense sunlight or if its line of the unit. R6(AA) •Replace the batteries with correct polarity. The...
...+ terminals and the cords with the black stripes go to the 9 terminals. 4 FM antenna 4 Connect the AC power cord to the - En 2 Connect the speakers to find best reception. Antennas Keep antennas away from metallic objects, electrical equipment and cords. •FM antenna: Extend fully and position for the first... time, DEMO appears in the AC power cord to the AC outlet after all other connections are made. 1 Connect the speaker cords to be used under intense sunlight or if its line of the unit. R6(AA) •Replace the batteries with correct polarity. The...
Operating Instructions
Page 5
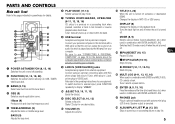
... (sound adjustment, etc.) when used in fast forward or reverse playback when held down within the band. 8 USB terminal Accepts sound signals from external equipment. Speaker output is turned off . PARTS AND CONTROLS Main unit: front Refer to the pages indicated in parentheses for details. @ 1 2 # 3 $ 4 % 5 6 ^ 7 8 & 9 * 0 ! 1 POWER 6STANDBY/ON (8, 15, 16) Switches...
... (sound adjustment, etc.) when used in fast forward or reverse playback when held down within the band. 8 USB terminal Accepts sound signals from external equipment. Speaker output is turned off . PARTS AND CONTROLS Main unit: front Refer to the pages indicated in parentheses for details. @ 1 2 # 3 $ 4 % 5 6 ^ 7 8 & 9 * 0 ! 1 POWER 6STANDBY/ON (8, 15, 16) Switches...
Operating Instructions
Page 6
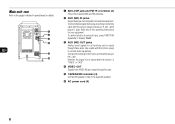
... operating instructions for your equipment. Refer also to the pages indicated in parentheses for all functions can be output through this jack. 5 #SPEAKER terminals (4) Connect the speaker cords of the supplied speakers. 6 AC power cord (4) 6 To switch function to external input, press FUNCTION repeatedly to the L jack. Connect the red plug to the...
... operating instructions for your equipment. Refer also to the pages indicated in parentheses for all functions can be output through this jack. 5 #SPEAKER terminals (4) Connect the speaker cords of the supplied speakers. 6 AC power cord (4) 6 To switch function to external input, press FUNCTION repeatedly to the L jack. Connect the red plug to the...

Operating Instructions
Page 21
...-in may not be installed, or another plug-in may be set to delete the BMZ USB Driver and Winamp3, and install them again. Click the Add and Delete Applications icon in . A. Or, the PC speakers may be muted, or audio output may be installed on . Check under "Multimedia" or "Sound and... and dry cloth. If the unit surfaces are connected correctly and firmly. After playing a CD, store it from the PC. En Troubleshooting If your nearest Aiwa dealer. First check that is not installed. Inserting the vinyl portion of the USB port.
...-in may not be installed, or another plug-in may be set to delete the BMZ USB Driver and Winamp3, and install them again. Click the Add and Delete Applications icon in . A. Or, the PC speakers may be muted, or audio output may be installed on . Check under "Multimedia" or "Sound and... and dry cloth. If the unit surfaces are connected correctly and firmly. After playing a CD, store it from the PC. En Troubleshooting If your nearest Aiwa dealer. First check that is not installed. Inserting the vinyl portion of the USB port.
Operating Instructions
Page 22
... - If the power cannot be turned off . •ECO is inserted label side left and right volume occurs. •Check the speaker connection and speaker placement. Move the stereo system away from one channel or unbalanced left . •Moisture condensation has built up. Remove the CD and ...disconnected or a power failure occurs longer than half a day. Set the clock and timer settings again. Sound lacks bass. •Check that the speaker's 0 and 9 terminals are connected correctly. The unit shut off the power. The timer does not function. •Set the clock correctly. ...
... - If the power cannot be turned off . •ECO is inserted label side left and right volume occurs. •Check the speaker connection and speaker placement. Move the stereo system away from one channel or unbalanced left . •Moisture condensation has built up. Remove the CD and ...disconnected or a power failure occurs longer than half a day. Set the clock and timer settings again. Sound lacks bass. •Check that the speaker's 0 and 9 terminals are connected correctly. The unit shut off the power. The timer does not function. •Set the clock correctly. ...
Operating Instructions
Page 23
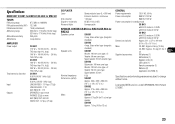
...noise ratio Wow and flutter Semiconductor laser (λ = 800 nm) Emission duration: continuous 1 bit dual 85 dB (1 kHz, 0 dB) Unmeasurable SPEAKER SYSTEM SX-BK1 for BMZ-K1/SX-BK2 for BMZ-K2 Speakers system SX-BK1 3 way, Bass-reflex type (magnetic shielded) SX-BK2 4 way, Bass-reflex type (magnetic shielded...; 15 1/4 in.) Mass SX-BK1 Approx. 6.7 kg (14 lbs 11 oz) net per speaker SX-BK2 Approx. 7.6 kg (16 lbs 13 oz) GENERAL Power requirements 120 V AC, 60 Hz Power consumption BMZ-K1: 120 W BMZ-K2: 145 W Power consumption in standby mode CX-BK1 with ECO mode on: 0.25 W ...
...noise ratio Wow and flutter Semiconductor laser (λ = 800 nm) Emission duration: continuous 1 bit dual 85 dB (1 kHz, 0 dB) Unmeasurable SPEAKER SYSTEM SX-BK1 for BMZ-K1/SX-BK2 for BMZ-K2 Speakers system SX-BK1 3 way, Bass-reflex type (magnetic shielded) SX-BK2 4 way, Bass-reflex type (magnetic shielded...; 15 1/4 in.) Mass SX-BK1 Approx. 6.7 kg (14 lbs 11 oz) net per speaker SX-BK2 Approx. 7.6 kg (16 lbs 13 oz) GENERAL Power requirements 120 V AC, 60 Hz Power consumption BMZ-K1: 120 W BMZ-K2: 145 W Power consumption in standby mode CX-BK1 with ECO mode on: 0.25 W ...

