Operating Instructions
Page 4
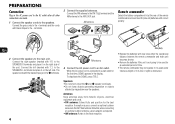
... Connection Plug in the display. Connect the FM antenna to the FM 75 Ω terminal and the AM antenna to the speakers. AM antenna Remote commander Detach the battery compartment lid at the rear of the unit. Connect the right speaker (marked with correct polarity. When the AC power cord... Connect the gray cords to the + terminals and the cords with "L") to the SPEAKERS L terminals and place it on the right side of the remote commander and insert two R6 (size AA) batteries with "R") to the SPEAKERS R terminals and place it is used under intense sunlight or if its line...
... Connection Plug in the display. Connect the FM antenna to the FM 75 Ω terminal and the AM antenna to the speakers. AM antenna Remote commander Detach the battery compartment lid at the rear of the unit. Connect the right speaker (marked with correct polarity. When the AC power cord... Connect the gray cords to the + terminals and the cords with "L") to the SPEAKERS L terminals and place it on the right side of the remote commander and insert two R6 (size AA) batteries with "R") to the SPEAKERS R terminals and place it is used under intense sunlight or if its line...
Operating Instructions
Page 7
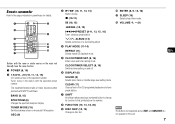
... same function. 1 POWER (8, 16) 2 1-9,0/10, +10 (10, 11, 13, 15) CD: selects a track of the CD programed playback and a tuner preset station. 7 SHIFT Hold down . Remote commander Refer to that printed above (EDIT and KARAOKE) do not operate for details. 1 8 2 9 3 4 0 5 ! 6 @ 7 Buttons with the specified preset number. M/N ALBUM (13) Selects a previous or...
... same function. 1 POWER (8, 16) 2 1-9,0/10, +10 (10, 11, 13, 15) CD: selects a track of the CD programed playback and a tuner preset station. 7 SHIFT Hold down . Remote commander Refer to that printed above (EDIT and KARAOKE) do not operate for details. 1 8 2 9 3 4 0 5 ! 6 @ 7 Buttons with the specified preset number. M/N ALBUM (13) Selects a previous or...
Operating Instructions
Page 8
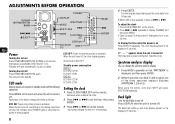
... light on Press DISPLAY repeatedly. Standby power consumption BMZ-K1 Turning the unit off . Reset the clock. Playback will start automatically if a disc is cancelled. ECO OFF: Power economizing mode is loaded. When using the remote, hold down SHIFT and press SPECTRUM repeatedly. Press... BAND t r,t zEJECT ENTER CLOCK/TIMER SET ENTER DISPLAY DISC SELECT (1-5) SHIFT En Power Turning the unit on Press POWER 6STANDBY/ON (POWER on the remote. 2 Press r or t repeatedly to display "CLOCK" and then press ENTER. 3 Carry out steps 2 to 4 described in the display for 6...
... light on Press DISPLAY repeatedly. Standby power consumption BMZ-K1 Turning the unit off . Reset the clock. Playback will start automatically if a disc is cancelled. ECO OFF: Power economizing mode is loaded. When using the remote, hold down SHIFT and press SPECTRUM repeatedly. Press... BAND t r,t zEJECT ENTER CLOCK/TIMER SET ENTER DISPLAY DISC SELECT (1-5) SHIFT En Power Turning the unit on Press POWER 6STANDBY/ON (POWER on the remote. 2 Press r or t repeatedly to display "CLOCK" and then press ENTER. 3 Carry out steps 2 to 4 described in the display for 6...

Operating Instructions
Page 9
...MIDDLE" or "TREBLE" is displayed, and then press r or t within 6 seconds. To adjust the bass, treble and middle range level on the remote). En Press GEQ repeatedly. Each press of the three frequency ranges (1, 2 and 3). After step 3, adjust the i-Bass level by turning BASS if ...needed. If the unit is turned on the remote. Adjust from "-4" to "+4". Tip: Volume level setting is a customized curve (see "Setting a curve manually") To cancel equalization, select "GEQ OFF"....
...MIDDLE" or "TREBLE" is displayed, and then press r or t within 6 seconds. To adjust the bass, treble and middle range level on the remote). En Press GEQ repeatedly. Each press of the three frequency ranges (1, 2 and 3). After step 3, adjust the i-Bass level by turning BASS if ...needed. If the unit is turned on the remote. Adjust from "-4" to "+4". Tip: Volume level setting is a customized curve (see "Setting a curve manually") To cancel equalization, select "GEQ OFF"....
Operating Instructions
Page 10
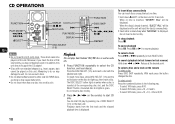
... may cause malfunction. •Do not insert more discs, press DISC SELECT (1-5) and the red indicator on the remote To select a disc Press DISC SKIP repeatedly. Do not insert a disc forcibly. 2 Press c (c/d on the remote) to eject it. When the disc(s) already inserted, "EJECT ALL" will eject the disc(s) consecutively. 2 Insert a disc...
... may cause malfunction. •Do not insert more discs, press DISC SELECT (1-5) and the red indicator on the remote To select a disc Press DISC SKIP repeatedly. Do not insert a disc forcibly. 2 Press c (c/d on the remote) to eject it. When the disc(s) already inserted, "EJECT ALL" will eject the disc(s) consecutively. 2 Insert a disc...
Operating Instructions
Page 11
... order (see "Programmed play mode the unit plays all discs, the remaining time is displayed. 2 Press DISC SELECT (1-5) (DISC SKIP on the remote repeatedly until the following indicators are displayed. - Remaining time of one desired disc in random order. 1 In stop mode, press PLAY MODE repeatedly ... all the tracks on the all discs in random order. 2 Press c (c/d on the discs. Repeat play In repeat play Press REPEAT on the remote). •During programmed playback, you press the button, a track is displayed. To cancel repeat play mode the unit repeatedly plays all discs - 1...
... order (see "Programmed play mode the unit plays all discs, the remaining time is displayed. 2 Press DISC SELECT (1-5) (DISC SKIP on the remote repeatedly until the following indicators are displayed. - Remaining time of one desired disc in random order. 1 In stop mode, press PLAY MODE repeatedly ... all the tracks on the all discs in random order. 2 Press c (c/d on the discs. Repeat play In repeat play Press REPEAT on the remote). •During programmed playback, you press the button, a track is displayed. To cancel repeat play mode the unit repeatedly plays all discs - 1...
Operating Instructions
Page 13
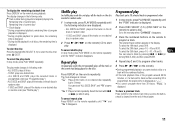
...: plays the selected tracks in programmed order (see "Programmed play mode In stop playback Press s. ALBM and SHUF: plays all the tracks on the remote Press DISC SKIP repeatedly. The DISC SELECT button lights in random order 13 To change the disc on the desired album in amber when a disc... unit plays back MP3-CDs: discs recorded with the labelled side right. To select an album Press ALBUM/PLAY LIST k or i (ALBUMM or N on the remote in the following way to "Descriptions of selected disc slot lights in random order - To select the play ") - To insert more . - To select the...
...: plays the selected tracks in programmed order (see "Programmed play mode In stop playback Press s. ALBM and SHUF: plays all the tracks on the remote Press DISC SKIP repeatedly. The DISC SELECT button lights in random order 13 To change the disc on the desired album in amber when a disc... unit plays back MP3-CDs: discs recorded with the labelled side right. To select an album Press ALBUM/PLAY LIST k or i (ALBUMM or N on the remote in the following way to "Descriptions of selected disc slot lights in random order - To select the play ") - To insert more . - To select the...
Operating Instructions
Page 14
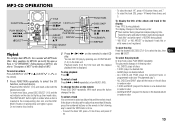
... is not guaranteed and noise may be generated. •When creating MP3 discs Do not store more before the unit can be recorded on the remote). number of albums and tracks 255 or less in a disc. 14 The maximum depth of nested folders, allowed by track. If an MP3 files ... 9660 determines the file structure for an MP3 track, up to 30 characters showing track title is displayed. 2 Press DISC SELECT (1-5) (DISC SKIP on the remote) to select a disc. number of albums: 255 •The maximum allowable depth of nested albums is called "folder" and "file" in PC terminology as "...
... is not guaranteed and noise may be generated. •When creating MP3 discs Do not store more before the unit can be recorded on the remote). number of albums and tracks 255 or less in a disc. 14 The maximum depth of nested folders, allowed by track. If an MP3 files ... 9660 determines the file structure for an MP3 track, up to 30 characters showing track title is displayed. 2 Press DISC SELECT (1-5) (DISC SKIP on the remote) to select a disc. number of albums: 255 •The maximum allowable depth of nested albums is called "folder" and "file" in PC terminology as "...
Operating Instructions
Page 15
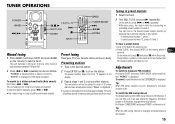
...10,+10 a,s,c MULTI JOG r ENTER s SHIFT BAND TUNER MODE t f,g ENTER Manual tuning 1 Press BAND (hold down SHIFT and press BAND on the remote within 6 seconds. "TUNED" is displayed when a station is poor, switching to store the station. Presetting stations 1 Tune in directly. The next station ... the frequency allocation system is displayed. "1" is displayed for a station automatically (Auto search) Hold down SHIFT and press TUNER MODE on the remote so that "STEREO" is 10 kHz/step. The unit switches to the tuner from "1" appears in the display. 3 Repeat steps 1 and...
...10,+10 a,s,c MULTI JOG r ENTER s SHIFT BAND TUNER MODE t f,g ENTER Manual tuning 1 Press BAND (hold down SHIFT and press BAND on the remote within 6 seconds. "TUNED" is displayed when a station is poor, switching to store the station. Presetting stations 1 Tune in directly. The next station ... the frequency allocation system is displayed. "1" is displayed for a station automatically (Auto search) Hold down SHIFT and press TUNER MODE on the remote so that "STEREO" is 10 kHz/step. The unit switches to the tuner from "1" appears in the display. 3 Repeat steps 1 and...
Operating Instructions
Page 16
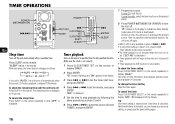
... appears in steps 3 to display "DAILY". The remaining time is not possible. To cancel the timer Press CLOCK/TIMER SELECT on the remote. TIMER OPERATIONS POWER 6STANDBY/ON r,t POWER MULTI JOG r CLOCK/TIMER ENTER SET CLOCK/TIMER SELECT CLEAR t ENTER SLEEP En Sleep timer Turns... off automatically when the current CD finishes playback or elapsed 100 minutes. Press SLEEP on the remote repeatedly to stop playback and the source are displayed for the specified duration. "OFF" is deactivated). "5" remains in the display. ...
... appears in steps 3 to display "DAILY". The remaining time is not possible. To cancel the timer Press CLOCK/TIMER SELECT on the remote. TIMER OPERATIONS POWER 6STANDBY/ON r,t POWER MULTI JOG r CLOCK/TIMER ENTER SET CLOCK/TIMER SELECT CLEAR t ENTER SLEEP En Sleep timer Turns... off automatically when the current CD finishes playback or elapsed 100 minutes. Press SLEEP on the remote repeatedly to stop playback and the source are displayed for the specified duration. "OFF" is deactivated). "5" remains in the display. ...
Operating Instructions
Page 20
... selected in it. 4 Adjust the volume level with Winamp3 on the performance of an audio file which is played back with the main unit or remote. 20 To hear the sound of the file which is played back by the Winamp3. NOTE PLAYLIST EDITOR does not necessarily show the list of...
... selected in it. 4 Adjust the volume level with Winamp3 on the performance of an audio file which is played back with the main unit or remote. 20 To hear the sound of the file which is played back by the Winamp3. NOTE PLAYLIST EDITOR does not necessarily show the list of...
Operating Instructions
Page 22
... function. •Set the clock correctly. Set the clock and timer settings again. Redo the following: - The remote does not function. •There is an obstacle between the remote and the unit. •The remote is not pointing in memory after purchase is turned off , disconnect the AC power cord, then plug it...
... function. •Set the clock correctly. Set the clock and timer settings again. Redo the following: - The remote does not function. •There is an obstacle between the remote and the unit. •The remote is not pointing in memory after purchase is turned off , disconnect the AC power cord, then plug it...
Operating Instructions
Page 23
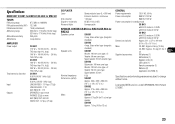
...11 oz) net per speaker SX-BK2 Approx. 7.6 kg (16 lbs 13 oz) GENERAL Power requirements 120 V AC, 60 Hz Power consumption BMZ-K1: 120 W BMZ-K2: 145 W Power consumption in standby mode CX-BK1 with ECO mode on: 0.25 W with ECO mode off: 20 W CX-BK2 .... 8.6 kg (19 lbs) CX-BK2: Approx. 9.6 kg (21 lbs 3 oz) Supplied accessories: FM antenna (1) AM antenna (1) Speaker cords (2) USB cable (1) Remote commander (1) Batteries (2) Application CD-ROM (1) En Specifications and external appearance are subject to change without notice. under USP4638258, 5510752 and 5736897. 23
...11 oz) net per speaker SX-BK2 Approx. 7.6 kg (16 lbs 13 oz) GENERAL Power requirements 120 V AC, 60 Hz Power consumption BMZ-K1: 120 W BMZ-K2: 145 W Power consumption in standby mode CX-BK1 with ECO mode on: 0.25 W with ECO mode off: 20 W CX-BK2 .... 8.6 kg (19 lbs) CX-BK2: Approx. 9.6 kg (21 lbs 3 oz) Supplied accessories: FM antenna (1) AM antenna (1) Speaker cords (2) USB cable (1) Remote commander (1) Batteries (2) Application CD-ROM (1) En Specifications and external appearance are subject to change without notice. under USP4638258, 5510752 and 5736897. 23


