
AIWA CX-NA71 Support Question
AIWA CX-NA71 Support Question
Find answers below for this question about AIWA CX-NA71.Need a AIWA CX-NA71 manual? We have 1 online manual for this item!
Question posted by cyrilpcolin on January 26th, 2023
How To Connect Loudspeakers
The person who posted this question about this AIWA product did not include a detailed explanation. Please use the "Request More Information" button to the right if more details would help you to answer this question.
Current Answers
Answer #1: Posted by SonuKumar on January 26th, 2023 9:09 PM
SonuKumar

Member since:
May 9th, 2021 Points: 16,604,810

Member since:
May 9th, 2021 Points: 16,604,810
To connect loudspeakers to the AIWA CX-NA71, you will need to follow these steps:
- Connect the left and right speakers to the "SPEAKERS" terminals on the back of the AIWA CX-NA71. The left speaker should be connected to the "L" terminal, and the right speaker should be connected to the "R" terminal.
- Turn the volume knob on the AIWA CX-NA71 to the "MIN" position.
- Turn on the power to the AIWA CX-NA71 and the speakers.
- Adjust the volume to your desired level using the volume knob on the AIWA CX-NA71.
Note: Be sure to use speaker wire that is the correct gauge for your speakers and check the manual of your specific model for any additional instructions or precautions.
Also, ensure that the polarity of the speaker connections is correct, meaning the positive terminal on the amplifier should be connected to the positive terminal on the speaker, and the negative terminal on the amplifier should be connected to the negative terminal on the speaker. This will ensure that the speakers are producing sound in the correct phase, and you will not experience any loss in sound quality.
Please respond to my effort to provide you with the best possible solution by using the "Acceptable Solution" and/or the "Helpful" buttons when the answer has proven to be helpful.
Regards,
Sonu
Your search handyman for all e-support needs!!
Related AIWA CX-NA71 Manual Pages
Operating Instructions - Page 2
...ELECTRIC SHOCK,
DO NOT REMOVE COVER (OR BACK).
Connect the equipment into a power outlet.
3 AC power cord - Place the unit on -
The heating system has just been turned on a flat, even surface....(41 'F) or greater than 35°C (95"F). 3 Mounting surface -
The unit is connected, -
All warnings and cautions in a residential installation. Allow 10 cm (4 in.) clearance from...
Operating Instructions - Page 3
... THE UNIT YOURSELF. The unit does not seem to rain or water -
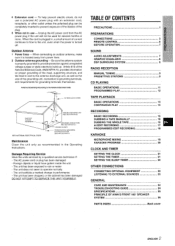
TABLE OF CONTENTS
Precautions l
PREPARATIONS
CONNECTIONS
m
3
REMOTE CONTROL 6
BEFORE OPERATION 7
SOUND
AUDIO ADJUSTMENTS 7 GRAPHIC EQUALIZER 8 DSP SURROUND SYSTEM 8
RADIO RECEPTION
MANUAL TUNING 9 PRESETTING STATIONS s 9
CD PLAYING
BASIC OPERATIONS 11 PROGRAMMED PLAY 12
TAPE PLAYBACK
BASIC...
Operating Instructions - Page 4
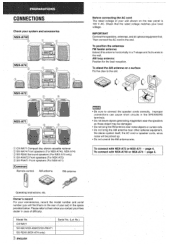
... objects or curtain rails. IMPORTANT Connect the speakers, antennas, and all optional equipment first.
q Do not bring the FM antenna near other optional equipment,
the stereo system itself, the AC cord or speaker cords, since noise will find them on a surface Fix the claw to the slot.
~ CX-NA71 Compact disc stereo cassette reciever @ SX-NA74...
Operating Instructions - Page 5
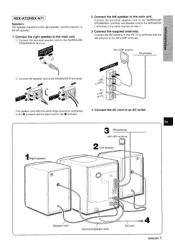
... antenna
AM LOOP antenna
2 a Left speaker
1
m
Speaker cord
/ Surround speaker cord
AC cord
4 ENGLISH
Connect the surround speaker cord to the SURROUND SPEAKERS L terminal, and speaker cord ito the SPEAKERS L terminals in the same manner as step 1.
3 Connect the suppllied antenlnas. I NSX-A72/NSX-A71 I
Speakers The speaker marked R is the right...
Operating Instructions - Page 6
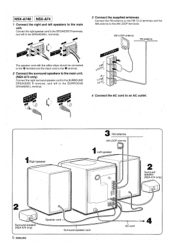
... cord to the SURROUND SPEAKERS R terminal, and left to the SPEAKERS L terminals.
3 Connect thesupplied antennas. Connect the right speaker cord to the SPEAKERS R terminals, and left speakers to the main unit. o
4 Connect the AC cord to the AM LOOP terminals. Connect the FM antenna to the FM 75 Q terminals and the AM antenna to...
Operating Instructions - Page 7
... this manual refer mainly to intense light, such as those of a television, etc.)
u
To connect other optional equipment+ page 23.
Other remote contr& are used for an extended period of time,...
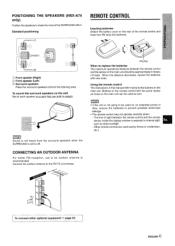
REMOTE CONTROL
Inserting batteries Detach the battery cover on the main unit. speakers
when the
CONNECTING AN OUTDOOR ANTENNA
For better FM reception, use of the remote control and insert two ...
Operating Instructions - Page 8

... To turn the unit off with the volume level set to 17or more. SUPER T-BASS SYSTEM
The T-BASS system enhances the realism of the inserted disc or tape begins, or the previously tuned station is... it is pressed, the level changes. In this case, cancel the T-BASS system. Playback of low-frequency sound. When the power is connected w' one of the three levels, or the off , the DEMO mode is...
Operating Instructions - Page 9
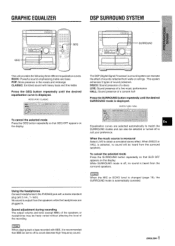
...the desired SURROUND mode is monaural Select LIVE to obtain a simulated stereo effect.
DISCO: Sound presence of a disco LIVE: Sound presence of... until the desired
The DSP (Digital Signal Processor) surround system can also be set to suit your preference.
No sound... equalization curve is automatically canceled,
Using the headphones Connect headphones to the PHONES jack with BBE, it ...
Operating Instructions - Page 13
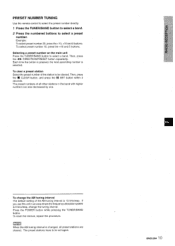
... the s CLEAR button, and press the II SET button within 4 seconds. To reset the interval, repeat this unit in an area where the frequency allocation system is changed, all other stations in the band with higher numbers are cleared. The preset numbers of all preset stations are also decreased by one...
Operating Instructions - Page 15
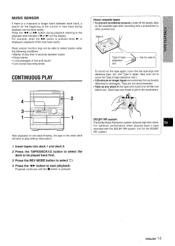
.... Music sensor function may break cx jam in the tape with a pencil or similar tool before use. DOLBY NR system The Dolby Noise Reduction system reduces tape hiss noise. Slack ...button to start playback.
button is pressed while F is pressed. After playback on the DOLBY NR system.
.> ENGLISH 14 Press the < or -
Playback continues until the s button is displayed, playback...
Operating Instructions - Page 16
... C,D, playback and recording start simultaneously.
15 ENGLISH
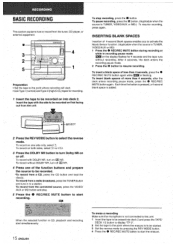
To erase a recording Make sure the microphone is not connected to this unit. 1 Insert the tape to be erased into deck 2 and press the TAPE/ ...the recording pause mode. 2 Press the 11 button to a station. recorded. 'To record from the connected source, press the VIDEO/ AUX or MD buttpn and play.
5 Press the ~ recording.
To record ...
Operating Instructions - Page 20
... selected cyclically.
0
@
~E~q#,@E@~ q%
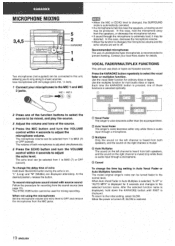
Two microphones (not supplied) can use of these functions is extremely loud, it may be connected to this unit, allowing you to sing along to select the vocal
fader or multiplex function. I MICROPHONE MIXING
i
!
8 ...Use microphones with mini plugs (03.5 mm, '/8 inch).
1 Connect your local Aiwa dealer for details. Use the vocal fader function ...
Operating Instructions - Page 23
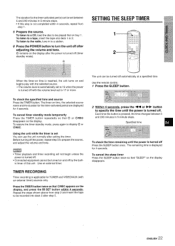
... tone. @ remains on the display after the power is turned off (timer
standby mode). To check the specified time and source Press the TIMER button. q Connected equipment cannot be turned off automatically
at a specified time. To listen to a CD, load the disc to prepare the source, and adjust the volume and...
Operating Instructions - Page 24
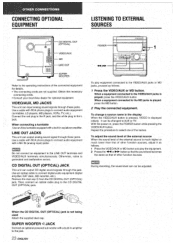
...(OPTICAL) JACK
m
During recording, the sound level can 'be adjusted.
. Then, connect an optical cable plug to the LINE OUT terminals and
VI DEO/AUX terminals simultaneously. ...the dust cap @ from the CD DIGITAL OUT (OPTICAL) jack. Repeat the procedure to connect audio equipment
2' Play the connected equipment.
(turntables, LD players, MD players, VCRS, TV, etc.).
VIDEO/AUX, MD...
Operating Instructions - Page 25
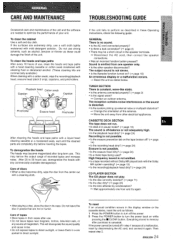
...only), capstans, and pinchrollers,
GENERAL There is canceled. q Is the system picking up external noise or multipath distortion?
+ Change the orientation of ...is not emitt(ed.
High frequency sound is not stereo. q Is the disc correctly inserted? (+ page 11) ... q Is a metal tape being used? q Is there a bad connection? (-+ page 3) q There may be turned off in the display window...
Operating Instructions - Page 26
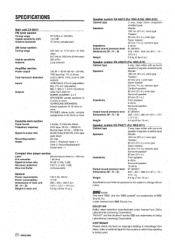
...accepts headphones of 32 ohms or more
Cassette deck section
Track format Frequency response
Signal-to-noise ratio
Recording system Heads
4 tracks, 2 channels stereo CrOz tape: 50 Hz -16000 Hz Normal tape: 50 Hz - 15000 Hz 60 dB (Dolby B... of main unit (W XHXD) Weight of Dolby Laboratories Licensing Corporation. SPECIFICATIONS
~
Main unit CX-NA71
FM tuner section
Tuning range
.
Operating Instructions - Page 27
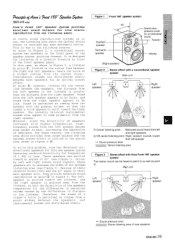
... well as coming from the right speaker. Driven by the differences in distance to hear, increasing the impression
of imbalance. As shown in Figure 2, a conventional stereo
system has speakers on the center line between the speakers, and instrumental sounds are pointed inward at point@ in Figure 3. The normally balanced instrumental
sounds also...
Similar Questions

How Do You Repair The Volume Control On The Aiwa Stereo Model No. Cx-na71 ?
Once the volume is up and you try to turn it back down, the volume continues to go up.
Once the volume is up and you try to turn it back down, the volume continues to go up.
(Posted by Anonymous-120754 10 years ago)

I Dont Have A Remote For My Aiwa Cx - Na222 Digital Audio System.
(Posted by littlemissbitchrpt 11 years ago)

Cx-na71 When Sound Is Turned Up, The Numbers Go 0 1 2 Then Back To 0 And No Soun
When the sound is turned up it goes 0 1 2 then 0 and no sound.
When the sound is turned up it goes 0 1 2 then 0 and no sound.
(Posted by btdia1 11 years ago)

Remote Working Intermittently, New Batteries Doesn't Help. Aiwa Cx-na71
Remote doesn't work consistently. Aiwa CX-Na71 stereo. Remote is RC-7ASO8. What are my options?
Remote doesn't work consistently. Aiwa CX-Na71 stereo. Remote is RC-7ASO8. What are my options?
(Posted by Meredieth 11 years ago)