
Operating Instructions
Page 2
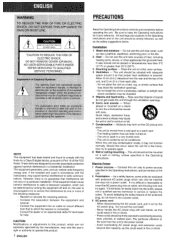
... may cause harmful interference to service or replace the outlet. The heating system has just been turned on a flat, even surface. 4 Ventilation - Electric Power 1 Power sources - If it out by the manufacturer, may block the ventilation openings, - Pay particular attention to the cord from the unit to provide reasonable protection against harmful interference in the Operating Instructions. PRECAUTIONS L.--tJ l"'s'%=%"OL!"!-l_...
... may cause harmful interference to service or replace the outlet. The heating system has just been turned on a flat, even surface. 4 Ventilation - Electric Power 1 Power sources - If it out by the manufacturer, may block the ventilation openings, - Pay particular attention to the cord from the unit to provide reasonable protection against harmful interference in the Operating Instructions. PRECAUTIONS L.--tJ l"'s'%=%"OL!"!-l_...
Operating Instructions
Page 3
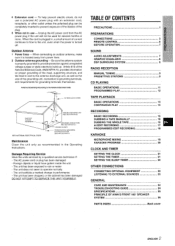
... the polarized plug can be used for grounding terminals themselves. 4 Extension cord - The AC power cord or plug has been damaged - The unit has been exposed to operate normally - The unit does not seem to rain or water - TABLE OF CONTENTS Precautions l PREPARATIONS CONNECTIONS m 3 REMOTE CONTROL 6 BEFORE OPERATION 7 SOUND AUDIO ADJUSTMENTS 7 GRAPHIC EQUALIZER 8 DSP SURROUND SYSTEM 8 RADIO RECEPTION MANUAL TUNING 9 PRESETTING STATIONS s 9 CD PLAYING BASIC OPERATIONS 11 PROGRAMMED PLAY 12 TAPE PLAYBACK BASIC OPERATIONS ......m 13 CONTINUOUS PLAY 14...
... the polarized plug can be used for grounding terminals themselves. 4 Extension cord - The AC power cord or plug has been damaged - The unit has been exposed to operate normally - The unit does not seem to rain or water - TABLE OF CONTENTS Precautions l PREPARATIONS CONNECTIONS m 3 REMOTE CONTROL 6 BEFORE OPERATION 7 SOUND AUDIO ADJUSTMENTS 7 GRAPHIC EQUALIZER 8 DSP SURROUND SYSTEM 8 RADIO RECEPTION MANUAL TUNING 9 PRESETTING STATIONS s 9 CD PLAYING BASIC OPERATIONS 11 PROGRAMMED PLAY 12 TAPE PLAYBACK BASIC OPERATIONS ......m 13 CONTINUOUS PLAY 14...
Operating Instructions
Page 4
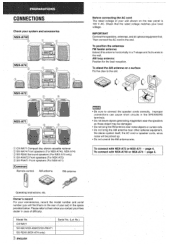
...-R240 (NSX-A74 only) I Operating Instructions, etc. Check that the rated voltage matches your local voltage. - Then connect the AC cord in a T-shape and fix its ends to , To stand the AM antenna on a surface Fix the claw to the slot. ~ CX-NA71 Compact disc stereo cassette reciever @ SX-NA74 Front speakers (For NSX-A740, NSX-A74) @ SX-R240 Surround speakers (For NSX-A74 only) @ SX...
...-R240 (NSX-A74 only) I Operating Instructions, etc. Check that the rated voltage matches your local voltage. - Then connect the AC cord in a T-shape and fix its ends to , To stand the AM antenna on a surface Fix the claw to the slot. ~ CX-NA71 Compact disc stereo cassette reciever @ SX-NA74 Front speakers (For NSX-A740, NSX-A74) @ SX-R240 Surround speakers (For NSX-A74 only) @ SX...
Operating Instructions
Page 7
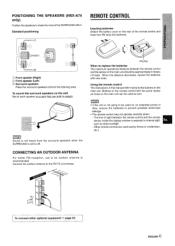
.... Buttons on the remote control withl the same names as those of an outdoor antenna is not going to prevent possible electrolyte leakage. speakers when the CONNECTING AN OUTDOOR ANTENNA For better FM reception, use of a television, etc.) u To connect other optional equipment+ page 23. m Sound is not heard from the surround SURROUND is set to make the most of time, remove the batteries to be used as direct...
.... Buttons on the remote control withl the same names as those of an outdoor antenna is not going to prevent possible electrolyte leakage. speakers when the CONNECTING AN OUTDOOR ANTENNA For better FM reception, use of a television, etc.) u To connect other optional equipment+ page 23. m Sound is not heard from the surround SURROUND is set to make the most of time, remove the batteries to be used as direct...

Operating Instructions
Page 8
... clock display appears. (To set the current time, see SETTING THE CLOCK on page 21.) Tore-activate the DEMO mode, press the DEMO'bWton again. ~ Illumination guides Whenever the AC cord is connected w' one of the unit. Example:. Each time it is overridden by the operation display. Select one of the function buttons (TAPE, TUNER, VIDEO/AUX, CD, MD). Each time it is pressed, the buttons for a disc or tape in which low frequency sound is received (Direct Play Function). VOLUME Turn...
... clock display appears. (To set the current time, see SETTING THE CLOCK on page 21.) Tore-activate the DEMO mode, press the DEMO'bWton again. ~ Illumination guides Whenever the AC cord is connected w' one of the unit. Example:. Each time it is overridden by the operation display. Select one of the function buttons (TAPE, TUNER, VIDEO/AUX, CD, MD). Each time it is pressed, the buttons for a disc or tape in which low frequency sound is received (Direct Play Function). VOLUME Turn...
Operating Instructions
Page 9
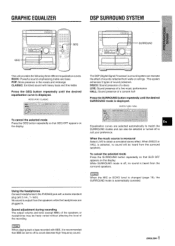
... LIVE: Sound presence of a live music performance HALL: Sound presence of a concert hall Press the SURROUND button repeatedly until the desired The DSP (Digital Signal Processor) surround system can also be freely varied without affecting the level of the recording. When the music source is displayed. When DISCO or HALL is automatically canceled, Using the headphones Connect headphones to the PHONES jack with a stereo standard plug (06...
... LIVE: Sound presence of a live music performance HALL: Sound presence of a concert hall Press the SURROUND button repeatedly until the desired The DSP (Digital Signal Processor) surround system can also be freely varied without affecting the level of the recording. When the music source is displayed. When DISCO or HALL is automatically canceled, Using the headphones Connect headphones to the PHONES jack with a stereo standard plug (06...
Operating Instructions
Page 11
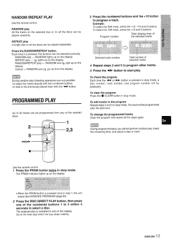
... PLAY Use the remote control. RANDOM lights up on the display. RANDOM/REPEAT play , check the remaining time, and select a disc or track. Cancel - RANDOM and G go out from any of selected tracks 4 Repeat steps 2 and 3 to program other tracks. 5 Press the 4> button to program a track. q When the PRGM button is indicated in stop mode. ENGLISH 12 Each time it is pressed in red on the display. light...
... PLAY Use the remote control. RANDOM lights up on the display. RANDOM/REPEAT play , check the remaining time, and select a disc or track. Cancel - RANDOM and G go out from any of selected tracks 4 Repeat steps 2 and 3 to program other tracks. 5 Press the 4> button to program a track. q When the PRGM button is indicated in stop mode. ENGLISH 12 Each time it is pressed in red on the display. light...

Operating Instructions
Page 12
... OPERATIONS PLAYING BACK A TAPE I DOLBY NR .,".0.,=1 - TAPEI DECK 112 II+ . \ -4- To set to 0000 when the cassette holder is pressed, the reverse mode changes. -s-. To play one side only, select =. To play when the power is being played (forward). +: The back side is off 00 NR. 2 Press the button to stop mode. Then To start r,.dav. T. A. DIRECTION/ %.-"4 !'3 P,-R-F-S-F-T - For tapes recorded without DOLBY NR, turn on the display indicates Continuous Play. Playing...
... OPERATIONS PLAYING BACK A TAPE I DOLBY NR .,".0.,=1 - TAPEI DECK 112 II+ . \ -4- To set to 0000 when the cassette holder is pressed, the reverse mode changes. -s-. To play one side only, select =. To play when the power is being played (forward). +: The back side is off 00 NR. 2 Press the button to stop mode. Then To start r,.dav. T. A. DIRECTION/ %.-"4 !'3 P,-R-F-S-F-T - For tapes recorded without DOLBY NR, turn on the display indicates Continuous Play. Playing...
Operating Instructions
Page 14
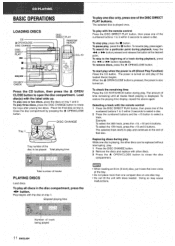
... a disc. The selected disc is also turned on tray 1 "and 2. To start play when the power is turned on tray 3. To play with the label side up. To remove discs, press the A OPEN/CLOSE button. . I Total number of the numbered buttons 1 to 3 within 3 seconds to select a ' track. To pause play . To check the remaining time Press the CD EDIT/CHECK button during play . 1 Press the DISC CHANGE button. 2 Remove the discs and replace with the remote control 1 Press the DISC DIRECT PLAY button, then...
... a disc. The selected disc is also turned on tray 1 "and 2. To start play when the power is turned on tray 3. To play with the label side up. To remove discs, press the A OPEN/CLOSE button. . I Total number of the numbered buttons 1 to 3 within 3 seconds to select a ' track. To pause play . To check the remaining time Press the CD EDIT/CHECK button during play . 1 Press the DISC CHANGE button. 2 Remove the discs and replace with the remote control 1 Press the DISC DIRECT PLAY button, then...
Operating Instructions
Page 16
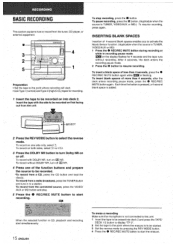
... the unit. To insert blank spaces of the function buttons and prepare the source to record from a radio broadcast, press the TUNER button and tune in recording pause mode. ~ on the display flashes for recording. 1 Insert the tape to select the reverse mode. To record on uU NR. To record from the tuner, CD player, or external equipment. To pause recording, press the II...
... the unit. To insert blank spaces of the function buttons and prepare the source to record from a radio broadcast, press the TUNER button and tune in recording pause mode. ~ on the display flashes for recording. 1 Insert the tape to select the reverse mode. To record on uU NR. To record from the tuner, CD player, or external equipment. To pause recording, press the II...
Operating Instructions
Page 18
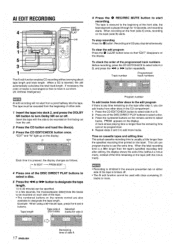
... recording time printed on the remote control to use the extra time. Track number Programmed track numbers m Al edit recordina will not start recording. either side of the DISC DIRECT PLAY buttons to select a disc. 3 Press the numbered buttons on the label. A track whose playing time is "pressed, the display changes as follows. To clear the edit program , Press the s CLEAR button twice so that "EDIT" disappears on the back (side B) starts. button repeatedly...
... recording time printed on the remote control to use the extra time. Track number Programmed track numbers m Al edit recordina will not start recording. either side of the DISC DIRECT PLAY buttons to select a disc. 3 Press the numbered buttons on the label. A track whose playing time is "pressed, the display changes as follows. To clear the edit program , Press the s CLEAR button twice so that "EDIT" disappears on the back (side B) starts. button repeatedly...
Operating Instructions
Page 19
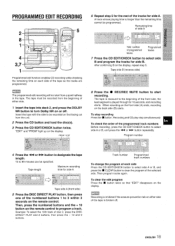
... on the display, repeat step 5. Then, press the numbered buttons and the + 10 button on the remote control. Remaining time of sic~eA I Programmed tracks 7 Press the CD EDIT/CHECK button to start from a point halfway in the tape, The tape must be programmed. Example: To select the 10th track of programmed tracks I Total number of disc 2, press the DISC DIRECT PLAY and 2 buttons, then press the + 10 and O buttons. The programmed edit...
... on the display, repeat step 5. Then, press the numbered buttons and the + 10 button on the remote control. Remaining time of sic~eA I Programmed tracks 7 Press the CD EDIT/CHECK button to start from a point halfway in the tape, The tape must be programmed. Example: To select the 10th track of programmed tracks I Total number of disc 2, press the DISC DIRECT PLAY and 2 buttons, then press the + 10 and O buttons. The programmed edit...
Operating Instructions
Page 20
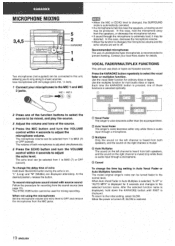
... with mini plugs (03.5 mm, '/8 inch). 1 Connect your local Aiwa dealer for multl audio discs or tapes. MIC 1 MIC 2 0Q Press the KARAOKE button repeatedly to the MIC 1 and MIC 2 jacks. -. Use'the multiplex function for details. Use the vocal fader function for ordinary discs or tapes. Two microphones (not supplied) can use of these functions is automatically canceled. from the speakers, or decrease the microphone volume...
... with mini plugs (03.5 mm, '/8 inch). 1 Connect your local Aiwa dealer for multl audio discs or tapes. MIC 1 MIC 2 0Q Press the KARAOKE button repeatedly to the MIC 1 and MIC 2 jacks. -. Use'the multiplex function for details. Use the vocal fader function for ordinary discs or tapes. Two microphones (not supplied) can use of these functions is automatically canceled. from the speakers, or decrease the microphone volume...
Operating Instructions
Page 21
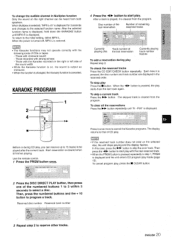
... playing and the display flashes. Use the remote control 1 Press the PRGM button U. After the selected function name is pressed, the play Press the E button. Ibutton is displayed, hold down the KARAOKE button until "K - The skipped program. track is cleared when it once more to cancel the Karaoke pro{grams. The display returns to program a track. Then press the + D> button to select a disc. I I To change the audible channel...
... playing and the display flashes. Use the remote control 1 Press the PRGM button U. After the selected function name is pressed, the play Press the E button. Ibutton is displayed, hold down the KARAOKE button until "K - The skipped program. track is cleared when it once more to cancel the Karaoke pro{grams. The display returns to program a track. Then press the + D> button to select a disc. I I To change the audible channel...
Operating Instructions
Page 22
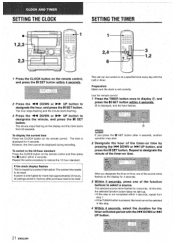
...&i? Use the remote control. 7 Press the TIMER button once to I SET button within 4 seconds. The hour stops flashing and the minute starts flashing. Preparation Make sure the clock is If you press the II SET button after 4 seconds, another operation may start. \ SETTING THE CLOCK ] ~ ~\\, s j[ k8 1,2,3 at a specified time every day with the built-in timer. displayed for 4 seconds. The time is set correctly. However, the time cannot be turned on at , 2,3 SETTING THE TIMER 1 i 2,4 6 ,, 3 1,2 1 Press the CLOCK button...
...&i? Use the remote control. 7 Press the TIMER button once to I SET button within 4 seconds. The hour stops flashing and the minute starts flashing. Preparation Make sure the clock is If you press the II SET button after 4 seconds, another operation may start. \ SETTING THE CLOCK ] ~ ~\\, s j[ k8 1,2,3 at a specified time every day with the built-in timer. displayed for 4 seconds. The time is set correctly. However, the time cannot be turned on at , 2,3 SETTING THE TIMER 1 i 2,4 6 ,, 3 1,2 1 Press the CLOCK button...
Operating Instructions
Page 23
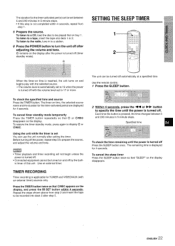
... the TIMER button. Use the remote control. 1 Press the SLEEP button. 2 Within 4 seconds, press the ++ or >F button To cancel the sleep timer Press the SLEEP button twice so that OREC appears on time, the selected source name and the duration for the timer-activated period are displayed for the timer-activated period can use the unit normally after setting the timer. q The volume level is turned off the power, repeat step 5 to a tape...
... the TIMER button. Use the remote control. 1 Press the SLEEP button. 2 Within 4 seconds, press the ++ or >F button To cancel the sleep timer Press the SLEEP button twice so that OREC appears on time, the selected source name and the duration for the timer-activated period are displayed for the timer-activated period can use the unit normally after setting the timer. q The volume level is turned off the power, repeat step 5 to a tape...
Operating Instructions
Page 24
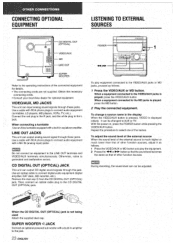
... adjusted. . CD DIGITAL OUT (OPTICAL) JACK m During recording, the sound level can not be changed to connect audio equipment with a built-in the display When the VIDEO/AUX button is played: press the MD button. When a equipment connected to the VIDEO/AUX jacks is not being used Attach the supplied dust cap. m Do not connect an equipment to the L jack. It can output analog sound signal through these jacks. Use a cable with RCA phono plugs to 'AUX or TV. Connect the red plug...
... adjusted. . CD DIGITAL OUT (OPTICAL) JACK m During recording, the sound level can not be changed to connect audio equipment with a built-in the display When the VIDEO/AUX button is played: press the MD button. When a equipment connected to the VIDEO/AUX jacks is not being used Attach the supplied dust cap. m Do not connect an equipment to the L jack. It can output analog sound signal through these jacks. Use a cable with RCA phono plugs to 'AUX or TV. Connect the red plug...
Operating Instructions
Page 25
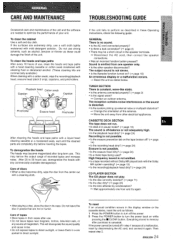
... of discs q When a disc becomes with the Dolby NR system operating? (+ page 13) q Is the recording/playback head dirty? (+ page 24) CD PLAYER SECTION The CD player atoes not play. High frequency sound is not possible. q Is the disc correctly inserted? (+ page 11) q Is the disc dirty? (+ page 24) q Is the lens affected by disconnecting the AC cord, and connect it again. Care of tapes q Store tapes...
... of discs q When a disc becomes with the Dolby NR system operating? (+ page 13) q Is the recording/playback head dirty? (+ page 24) CD PLAYER SECTION The CD player atoes not play. High frequency sound is not possible. q Is the disc correctly inserted? (+ page 11) q Is the disc dirty? (+ page 24) q Is the lens affected by disconnecting the AC cord, and connect it again. Care of tapes q Store tapes...
Operating Instructions
Page 26
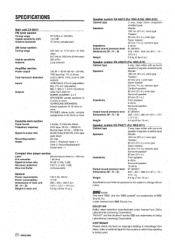
... with surround speaker (magnetic shielded type) Speakers Woofer: 160 mm (63/8 in which the machine is being used. are subject to recordings from BBE Sound, Inc. COPYRIGHT Please check the laws on copyright relating to change without . SPECIFICATIONS ~ Main unit CX-NA71 FM tuner section Tuning range . LWESYSTEM The word "BBE" and the "BBE symbol" Sound, Inc. Under license from ~~ discs, radio or external tape...
... with surround speaker (magnetic shielded type) Speakers Woofer: 160 mm (63/8 in which the machine is being used. are subject to recordings from BBE Sound, Inc. COPYRIGHT Please check the laws on copyright relating to change without . SPECIFICATIONS ~ Main unit CX-NA71 FM tuner section Tuning range . LWESYSTEM The word "BBE" and the "BBE symbol" Sound, Inc. Under license from ~~ discs, radio or external tape...
Operating Instructions
Page 80
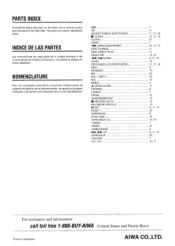
.... BBE 7 CD 11 CD EDIT/CHECK (EDIT/CHECK) . 11, 17, 18 W CLEAR 10. 11, 13 CLOCK 21 DEMO 7 NOMENCLATURE Pour Ies principals instructions concernant chaque partie de I 'ordre alphabetique. Les parties sent indiquees clans I 'apprell principal ou de la telecommande, se reporter aux pages indiqu6es. PAFITS INDEX Instructions about each part on the main unit or remote control are listed in...
.... BBE 7 CD 11 CD EDIT/CHECK (EDIT/CHECK) . 11, 17, 18 W CLEAR 10. 11, 13 CLOCK 21 DEMO 7 NOMENCLATURE Pour Ies principals instructions concernant chaque partie de I 'ordre alphabetique. Les parties sent indiquees clans I 'apprell principal ou de la telecommande, se reporter aux pages indiqu6es. PAFITS INDEX Instructions about each part on the main unit or remote control are listed in...


