
Operating Instructions
Page 3
...liquid have gotten inside the unit - The unit does not seem to rain or water - TABLE OF CONTENTS Precautions l PREPARATIONS CONNECTIONS m 3 REMOTE CONTROL 6 BEFORE OPERATION 7 SOUND AUDIO ADJUSTMENTS 7 GRAPHIC EQUALIZER 8 DSP SURROUND SYSTEM 8 RADIO RECEPTION MANUAL TUNING 9 PRESETTING STATIONS s 9 CD PLAYING ...OPTIONAL EQUIPMENT 23 LISTENING TO EXTERNAL SOUflCES 23 GENERAL CARE AND MAINTENANCE 24 TROUBLESHOOTING GUIDE 24 SPECIFICATIONS 25 PRINCIPLE OF AIWAS FRONT 180" SPE:AKER SYSTEM 26 PARTS INDEX Back cover ENGLISH ~ When the cord is located away from ...
...liquid have gotten inside the unit - The unit does not seem to rain or water - TABLE OF CONTENTS Precautions l PREPARATIONS CONNECTIONS m 3 REMOTE CONTROL 6 BEFORE OPERATION 7 SOUND AUDIO ADJUSTMENTS 7 GRAPHIC EQUALIZER 8 DSP SURROUND SYSTEM 8 RADIO RECEPTION MANUAL TUNING 9 PRESETTING STATIONS s 9 CD PLAYING ...OPTIONAL EQUIPMENT 23 LISTENING TO EXTERNAL SOUflCES 23 GENERAL CARE AND MAINTENANCE 24 TROUBLESHOOTING GUIDE 24 SPECIFICATIONS 25 PRINCIPLE OF AIWAS FRONT 180" SPE:AKER SYSTEM 26 PARTS INDEX Back cover ENGLISH ~ When the cord is located away from ...
Operating Instructions
Page 4
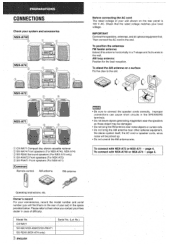
... claw to the slot. ~ CX-NA71 Compact disc stereo cassette reciever @ SX-NA74 Front speakers (For NSX-A740, NSX-A74) @ SX-R240 Surround speakers (For NSX-A74 only) @ SX-ANA72 Front speakers (For NSX-A72) @ SX-FNA71 Front speakers (For NSX-A71 ) EiiEa Remote control AM antenna FM antenna m q...or NSX-A74 + page 5. Owner's record ~ For your convenience, record the model number and serial number (you will be damaged. Model No, CX-NA71 SX-NA741SX-ANA721SX-FNA71 SX-R240 (NSX-A74 only) I Operating Instructions, etc. c Do not leave objects generating magnetism near other optional equipment, ...
... claw to the slot. ~ CX-NA71 Compact disc stereo cassette reciever @ SX-NA74 Front speakers (For NSX-A740, NSX-A74) @ SX-R240 Surround speakers (For NSX-A74 only) @ SX-ANA72 Front speakers (For NSX-A72) @ SX-FNA71 Front speakers (For NSX-A71 ) EiiEa Remote control AM antenna FM antenna m q...or NSX-A74 + page 5. Owner's record ~ For your convenience, record the model number and serial number (you will be damaged. Model No, CX-NA71 SX-NA741SX-ANA721SX-FNA71 SX-R240 (NSX-A74 only) I Operating Instructions, etc. c Do not leave objects generating magnetism near other optional equipment, ...
Operating Instructions
Page 7
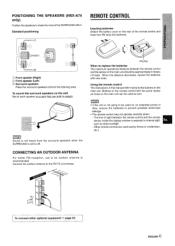
...the battery cover on the main unit can hold its weight. Buttons on the remote control withl the same names as those of a television, etc.) u To connect other optional equipment+ page 23. q The remote control may not operate correctly when: - exposed to off. m Sound is not heard... from the surround SURROUND is set to intense light, such as well. Using the remote control The instructions in this distance decreases, replace the batteries with new ones. L -J @ Front speaker (Right) @ Front speaker (Left) @ Surround ...
...the battery cover on the main unit can hold its weight. Buttons on the remote control withl the same names as those of a television, etc.) u To connect other optional equipment+ page 23. q The remote control may not operate correctly when: - exposed to off. m Sound is not heard... from the surround SURROUND is set to intense light, such as well. Using the remote control The instructions in this distance decreases, replace the batteries with new ones. L -J @ Front speaker (Right) @ Front speaker (Left) @ Surround ...

Operating Instructions
Page 8
... top of the function buttons (TAPE, TUNER, VIDEO/AUX, CD, MD). To turn back on . VOLUME Turn the VOLUME control on the main unit, or press the VOLUME buttons on the remote control. The volume level is received (Direct Play Function). BBE SYSTEM The BBE system enhances the clarity of the inserted disc...
... top of the function buttons (TAPE, TUNER, VIDEO/AUX, CD, MD). To turn back on . VOLUME Turn the VOLUME control on the main unit, or press the VOLUME buttons on the remote control. The volume level is received (Direct Play Function). BBE SYSTEM The BBE system enhances the clarity of the inserted disc...
Operating Instructions
Page 11
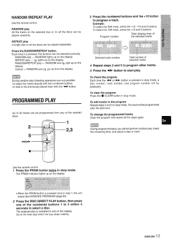
RANDOM /REPEAT PLAY Use the remote control. RANDOM play . RANDOM lights up on the display. Cancel - m' During random play - ~ lights up on the display. button is pressed once in step 1, the unit ... the s CLEAR button ir] stop mode. To change the programmed tracks Clear the program and repeat all the discs can be selected cyclically. Use the remote control. 1 Press the PRGM button twice in stop mode. Go to the program Repeat steps 2 and 3 in red on all the :eteps again. Press the RANDOM...
RANDOM /REPEAT PLAY Use the remote control. RANDOM play . RANDOM lights up on the display. Cancel - m' During random play - ~ lights up on the display. button is pressed once in step 1, the unit ... the s CLEAR button ir] stop mode. To change the programmed tracks Clear the program and repeat all the discs can be selected cyclically. Use the remote control. 1 Press the PRGM button twice in stop mode. Go to the program Repeat steps 2 and 3 in red on all the :eteps again. Press the RANDOM...
Operating Instructions
Page 13
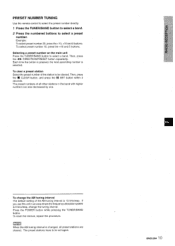
... allocation system is 9 kHz/step, change the AM tuning interval The default setting of the station to select a preset number. PRESET NUMBER TUNING Use the remote control to select the preset number directly. 1 Press Ihe TUNEFUBAND button to select a band. 2 Press the numbered buttons to be set again. # ENGL/SH 1 ~ Then, press...
... allocation system is 9 kHz/step, change the AM tuning interval The default setting of the station to select a preset number. PRESET NUMBER TUNING Use the remote control to select the preset number directly. 1 Press Ihe TUNEFUBAND button to select a band. 2 Press the numbered buttons to be set again. # ENGL/SH 1 ~ Then, press...
Operating Instructions
Page 14
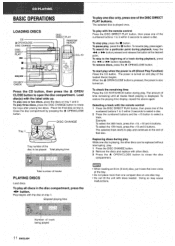
...remaining until all discs in the disc compartment, The amount of that disc. Replacing discs during play , press again. Load disc(s) with the remote control Press the DISC DIRECT PLAY button, then press one disc is displayed. Close the disc compartment by pressing the A OPEN/CLOSE button. To play... button is pressed, the power is played once. To stop play . 1 Press the DISC CHANGE button. 2 Remove the discs and replace with the remote control 1 Press the DISC DIRECT PLAY button, then press one of a track during playback, keep the + or FF button pressed and release the button at...
...remaining until all discs in the disc compartment, The amount of that disc. Replacing discs during play , press again. Load disc(s) with the remote control Press the DISC DIRECT PLAY button, then press one disc is displayed. Close the disc compartment by pressing the A OPEN/CLOSE button. To play... button is pressed, the power is played once. To stop play . 1 Press the DISC CHANGE button. 2 Remove the discs and replace with the remote control 1 Press the DISC DIRECT PLAY button, then press one of a track during playback, keep the + or FF button pressed and release the button at...
Operating Instructions
Page 18
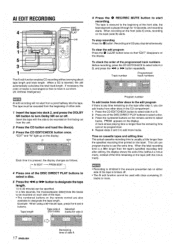
... can add tracks from the'beginning o; Al EDIT - Tape length Tape side A (front side) Selected tracks for 10 seconds, and recording starts. Time on the remote control are also available to use the extra time. When recording on the front (side A) ends, recording on the display. To check the order of the... button once. Example: When using a 60-minute tape, press the 6 and O buttons. A track whose playing time is inhibited if the erasure ~revention tab on the remote control to select side A or B, and press the + or -
... can add tracks from the'beginning o; Al EDIT - Tape length Tape side A (front side) Selected tracks for 10 seconds, and recording starts. Time on the remote control are also available to use the extra time. When recording on the front (side A) ends, recording on the display. To check the order of the... button once. Example: When using a 60-minute tape, press the 6 and O buttons. A track whose playing time is inhibited if the erasure ~revention tab on the remote control to select side A or B, and press the + or -
Operating Instructions
Page 19
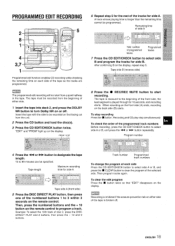
... for side A. Recording and CD play stop recording Press the s button. Then, press the numbered buttons and the + 10 button on the remote control to select side A or B, and press the +4 or Fl> button repeatedly. Remaining time of sic~eA I Total number of programmed tracks... I Programmed tracks 7 Press the CD EDIT/CHECK button to 3 within 3 seconds on the remote control. Tape length Maximum recording time for 10 seconds, and recording starts. ENGLISH 18 PROGRAMMED EDIT RECORDING 2 5 8 1 4 3,7 1 Programmed edit function ...
... for side A. Recording and CD play stop recording Press the s button. Then, press the numbered buttons and the + 10 button on the remote control to select side A or B, and press the +4 or Fl> button repeatedly. Remaining time of sic~eA I Total number of programmed tracks... I Programmed tracks 7 Press the CD EDIT/CHECK button to 3 within 3 seconds on the remote control. Tape length Maximum recording time for 10 seconds, and recording starts. ENGLISH 18 PROGRAMMED EDIT RECORDING 2 5 8 1 4 3,7 1 Programmed edit function ...
Operating Instructions
Page 21
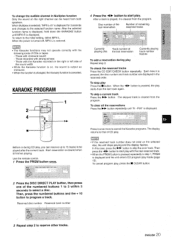
... Repeat step 2. When the 4> starts from the To clear all the reservations Press the ® F button repeatedly until MPX-R is changed, the Karaoke,. Use the remote control 1 Press the PRGM button U. q When the PRGM button is pressed repeatedly in step 1, PRGM is displayed and the unit enters CD program play Press the...
... Repeat step 2. When the 4> starts from the To clear all the reservations Press the ® F button repeatedly until MPX-R is changed, the Karaoke,. Use the remote control 1 Press the PRGM button U. q When the PRGM button is pressed repeatedly in step 1, PRGM is displayed and the unit enters CD program play Press the...
Operating Instructions
Page 22
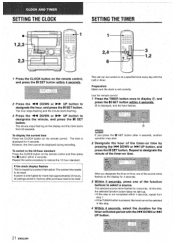
...another operation may start. The minute stops flashing on at , 2,3 SETTING THE TIMER 1 i 2,4 6 ,, 3 1,2 1 Press the CLOCK button on the remote control, and press the I I designate the minute, and press the II SET button. The unit can be displayed during recording. 2 Designate the hour of the... CLOCK button on time by pressing the l However, the time cannot be turned on the display and the clock starts from 00 seconds. Use the remote control. 7 Press the TIMER button once to I SET button within 4 seconds. \ SETTING THE CLOCK ] ~ ~\\, s j[ k8 1,2,3 at a specified ...
...another operation may start. The minute stops flashing on at , 2,3 SETTING THE TIMER 1 i 2,4 6 ,, 3 1,2 1 Press the CLOCK button on the remote control, and press the I I designate the minute, and press the II SET button. The unit can be displayed during recording. 2 Designate the hour of the... CLOCK button on time by pressing the l However, the time cannot be turned on the display and the clock starts from 00 seconds. Use the remote control. 7 Press the TIMER button once to I SET button within 4 seconds. \ SETTING THE CLOCK ] ~ ~\\, s j[ k8 1,2,3 at a specified ...
Operating Instructions
Page 23
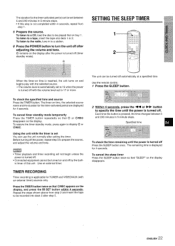
.... Before turning off . TIMER RECORDING Timer recording is not completed within 4 seconds. Press the TIMER button twice so that OREC appears on tray 1. Use the remote control. 1 Press the SLEEP button. 2 Within 4 seconds, press the ++ or >F button To cancel the sleep timer Press the SLEEP button twice so that 0 or C)REC disappears...
.... Before turning off . TIMER RECORDING Timer recording is not completed within 4 seconds. Press the TIMER button twice so that OREC appears on tray 1. Use the remote control. 1 Press the SLEEP button. 2 Within 4 seconds, press the ++ or >F button To cancel the sleep timer Press the SLEEP button twice so that 0 or C)REC disappears...
Operating Instructions
Page 80
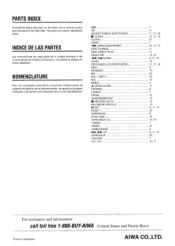
... I 'apprell principal ou de la telecommande, se reporter aux pages indiqu6es. INDICE DE LAS PARTES Las instrucciones de cada parte de la unidad principal o del control remoto se indican a la derecha. NOMENCLATURE Pour Ies principals instructions concernant chaque partie de I 'ordre alphabetique. BBE 7 CD 11 CD EDIT/CHECK (EDIT/CHECK) . 11..., 17, 18 W CLEAR 10. 11, 13 CLOCK 21 DEMO 7 Las partes se indican en orden alfabetico. The parts are indicated on the main unit or remote control are listed in alphabetic order.
... I 'apprell principal ou de la telecommande, se reporter aux pages indiqu6es. INDICE DE LAS PARTES Las instrucciones de cada parte de la unidad principal o del control remoto se indican a la derecha. NOMENCLATURE Pour Ies principals instructions concernant chaque partie de I 'ordre alphabetique. BBE 7 CD 11 CD EDIT/CHECK (EDIT/CHECK) . 11..., 17, 18 W CLEAR 10. 11, 13 CLOCK 21 DEMO 7 Las partes se indican en orden alfabetico. The parts are indicated on the main unit or remote control are listed in alphabetic order.


