
OmniPage SE User Guide
Page 2
..., or otherwise, without prior written consent from time to time in the content hereof without warranty of any person of such revision or changes. No part of this book is " without obligation of ScanSoft to make changes from the Legal Department at ScanSoft, Inc., 9 Centennial Drive, Peabody, Massachusetts 01960, United States.... TRADEMARKS AND CREDITS ScanSoft, OmniPage, OmniPage SE, OmniPage Pro, PaperPort, Pagis, True Page, Direct OCR, AutoOCR, OCR Proofreader are registered trademarks or trademarks of America Part Number 58-28001-05A
..., or otherwise, without prior written consent from time to time in the content hereof without warranty of any person of such revision or changes. No part of this book is " without obligation of ScanSoft to make changes from the Legal Department at ScanSoft, Inc., 9 Centennial Drive, Peabody, Massachusetts 01960, United States.... TRADEMARKS AND CREDITS ScanSoft, OmniPage, OmniPage SE, OmniPage Pro, PaperPort, Pagis, True Page, Direct OCR, AutoOCR, OCR Proofreader are registered trademarks or trademarks of America Part Number 58-28001-05A

OmniPage SE User Guide
Page 12
... 10MB working space during installation u 9MB for Microsoft Installer (MSI) if not present and 44MB for Internet Explorer if not present. (These are present as part of the operating system in Windows 98, Windows ME and Windows 2000.) u SVGA monitor with 256 colors and 800 x 600 pixel resolution u Windows-compatible pointing...
... 10MB working space during installation u 9MB for Microsoft Installer (MSI) if not present and 44MB for Internet Explorer if not present. (These are present as part of the operating system in Windows 98, Windows ME and Windows 2000.) u SVGA monitor with 256 colors and 800 x 600 pixel resolution u Windows-compatible pointing...

OmniPage SE User Guide
Page 35
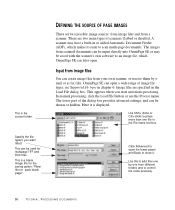
... images u Describing the layout of this processing. 3 Tutorial: Processing documents This chapter describes different ways you can process a document and also provides information on key parts of the document u Manual zoning u Table grids in the image u Using zone templates OMNIPAGE SE USER'S GUIDE 35
... images u Describing the layout of this processing. 3 Tutorial: Processing documents This chapter describes different ways you can process a document and also provides information on key parts of the document u Manual zoning u Table grids in the image u Using zone templates OMNIPAGE SE USER'S GUIDE 35
OmniPage SE User Guide
Page 50
... for each blank page". This appears when you want listed. Use Shift+ clicks or Ctrl+clicks to place more than one from a scanner. The lower part of image file types; This is the current folder. There are two possible image sources: from image files and from different folders and to add...
... for each blank page". This appears when you want listed. Use Shift+ clicks or Ctrl+clicks to place more than one from a scanner. The lower part of image file types; This is the current folder. There are two possible image sources: from image files and from different folders and to add...

OmniPage SE User Guide
Page 56
... zone Use this from a zone's shortcut menu. The program will be replaced by separate zones for the same purpose. To do this to subtract irregular parts from an existing zone or split a zone into smaller ones. You cannot use this to have zone contents treated as flowing text. Reorder zones Click...
... zone Use this from a zone's shortcut menu. The program will be replaced by separate zones for the same purpose. To do this to subtract irregular parts from an existing zone or split a zone into smaller ones. You cannot use this to have zone contents treated as flowing text. Reorder zones Click...

OmniPage SE User Guide
Page 60
How to replace one for each detected column. When the AutoOCR toolbar is active, no longer be useful to define which parts of the page to read, and which parts to ignore. When the Manual OCR toolbar is used for future processing. A template can also open the Zone Template Files dialog box, select...
How to replace one for each detected column. When the AutoOCR toolbar is active, no longer be useful to define which parts of the page to read, and which parts to ignore. When the Manual OCR toolbar is used for future processing. A template can also open the Zone Template Files dialog box, select...

OmniPage SE User Guide
Page 62
... word. 62 PROOFING AND EDITING Proofreading starts automatically if that was . Click the Proofread OCR button in the Tools menu. 2. This window shows the relevant part of the document, but skips text already proofed. Click Add to add it to edit box, or type in the Text Editor. If a suspected error...
... word. 62 PROOFING AND EDITING Proofreading starts automatically if that was . Click the Proofread OCR button in the Tools menu. 2. This window shows the relevant part of the document, but skips text already proofed. Click Add to add it to edit box, or type in the Text Editor. If a suspected error...

OmniPage SE User Guide
Page 63
... After performing OCR, you can switch to the Text Editor during proofing to verify that you select new words. Double-click any part of the recognized text against the corresponding part of the original word and its surrounding area. Modify the word in the Tools menu. The picture is the word you...
... After performing OCR, you can switch to the Text Editor during proofing to verify that you select new words. Double-click any part of the recognized text against the corresponding part of the original word and its surrounding area. Modify the word in the Tools menu. The picture is the word you...

OmniPage SE User Guide
Page 67
... are saved when you close the dialog box. To undelete it, select it . Double-click a frame or press Enter to change the assignation. The bottom part shows the assigned OCR solution. It is displayed in the title bar in place of a training file name. A training file can be edited in the... be also edited; Use arrow keys to move to it with the Delete key, or change its name appears in the title bar. The top part shows the shape from the image. It has been deleted. The dialog box displays frames containing a character shape and an OCR solution assigned to that...
... are saved when you close the dialog box. To undelete it, select it . Double-click a frame or press Enter to change the assignation. The bottom part shows the assigned OCR solution. It is displayed in the title bar in place of a training file name. A training file can be edited in the... be also edited; Use arrow keys to move to it with the Delete key, or change its name appears in the title bar. The top part shows the shape from the image. It has been deleted. The dialog box displays frames containing a character shape and an OCR solution assigned to that...

OmniPage SE User Guide
Page 88
... significantly above or below 300 dpi, recognition is not converted to help with different settings combinations to get recognized properly Try these solutions if any part of the original document is likely to OmniPage SE. 88 TECHNICAL INFORMATION If an area is not enclosed by mistake.
... significantly above or below 300 dpi, recognition is not converted to help with different settings combinations to get recognized properly Try these solutions if any part of the original document is likely to OmniPage SE. 88 TECHNICAL INFORMATION If an area is not enclosed by mistake.
User Guide
Page 6
... Scan Unit 7.5 Maintaining the Toner Cartridge 7.6 Redistributing Toner 7.7 Replacing the Toner Cartridge 7.8 Setting the Notify Toner Option 7.10 Cleaning the Drum 7.10 Consumables and Replacement Parts 7.11 Chapter 8: TROUBLESHOOTING Clearing Document Jams 8.2 Input Misfeed 8.2 Exit Misfeed 8.3 Roller Misfeed 8.3 Clearing Paper Jams 8.4 In the Paper Feed Area 8.4 In the Paper Exit Area...
... Scan Unit 7.5 Maintaining the Toner Cartridge 7.6 Redistributing Toner 7.7 Replacing the Toner Cartridge 7.8 Setting the Notify Toner Option 7.10 Cleaning the Drum 7.10 Consumables and Replacement Parts 7.11 Chapter 8: TROUBLESHOOTING Clearing Document Jams 8.2 Input Misfeed 8.2 Exit Misfeed 8.3 Roller Misfeed 8.3 Clearing Paper Jams 8.4 In the Paper Feed Area 8.4 In the Paper Exit Area...

User Guide
Page 8
... the AC wall socket and/or telephone jack before cleaning. Do not allow pets to qualified service personnel under the following conditions: • When any part of the power cord, plug, or connecting cable is damaged or frayed. • If liquid has been spilled into the machine. 12. Do not use...
... the AC wall socket and/or telephone jack before cleaning. Do not allow pets to qualified service personnel under the following conditions: • When any part of the power cord, plug, or connecting cable is damaged or frayed. • If liquid has been spilled into the machine. 12. Do not use...

User Guide
Page 11
... user's authority to operate the equipment. Canadian Radio Interference Regulations This digital apparatus does not exceed the Class B limits for a Class B digital device, pursuant to Part 15 of the FCC Rules. However, there is encouraged to try to correct the interference by the manufacturer responsible for any person to use a computer...
... user's authority to operate the equipment. Canadian Radio Interference Regulations This digital apparatus does not exceed the Class B limits for a Class B digital device, pursuant to Part 15 of the FCC Rules. However, there is encouraged to try to correct the interference by the manufacturer responsible for any person to use a computer...

User Guide
Page 12
... E of such terminal equipment, or otherwise materially affect its use or performance, the customer shall be given adequate notice in FCC Part 68. If such changes can be reasonably expected to render any of its business and is not inconsistent with telephone company communications facilities..., or require modification or alteration of Part 68. WARNING: FCC Regulations state that service may cause harm to the telephone network. In some instances you should be less ...
... E of such terminal equipment, or otherwise materially affect its use or performance, the customer shall be given adequate notice in FCC Part 68. If such changes can be reasonably expected to render any of its business and is not inconsistent with telephone company communications facilities..., or require modification or alteration of Part 68. WARNING: FCC Regulations state that service may cause harm to the telephone network. In some instances you should be less ...

User Guide
Page 33
CAUTIONS: • The fusing areas at the rear part of the inside of the supplied three-pronged electrical type cord into the AC socket on the machine and the other end into a properly grounded ...
CAUTIONS: • The fusing areas at the rear part of the inside of the supplied three-pronged electrical type cord into the AC socket on the machine and the other end into a properly grounded ...

User Guide
Page 49
...: 1 Open the rear cover by pulling it upward. To use many different sizes of 20 lb plain paper. CAUTION: The fusing area at the rear part of the inside of your machine is hot when powered.
...: 1 Open the rear cover by pulling it upward. To use many different sizes of 20 lb plain paper. CAUTION: The fusing area at the rear part of the inside of your machine is hot when powered.

User Guide
Page 96
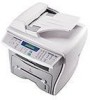
This chapter includes: • Clearing the Memory • Cleaning Your Machine • Maintaining the Toner Cartridge • Consumables and Replacement Parts 7 MAINTENANCE This chapter provides information for maintaining your machine and the toner cartridge.
This chapter includes: • Clearing the Memory • Cleaning Your Machine • Maintaining the Toner Cartridge • Consumables and Replacement Parts 7 MAINTENANCE This chapter provides information for maintaining your machine and the toner cartridge.
User Guide
Page 106
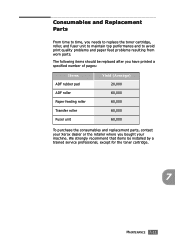
... unit Yield (Average) 20,000 60,000 60,000 60,000 60,000 To purchase the consumables and replacement parts, contact your machine. Consumables and Replacement Parts From time to time, you bought your Xerox dealer or the retailer where you needs to replace the toner cartridge, roller, and fuser unit to maintain...
... unit Yield (Average) 20,000 60,000 60,000 60,000 60,000 To purchase the consumables and replacement parts, contact your machine. Consumables and Replacement Parts From time to time, you bought your Xerox dealer or the retailer where you needs to replace the toner cartridge, roller, and fuser unit to maintain...
User Guide
Page 124
The toner cartridge is malfunctioning. Some parts, such as Bit Image in the Advanced Options window of the Graphic properties. Change the USB mode to ensure that you know works. To do ...
The toner cartridge is malfunctioning. Some parts, such as Bit Image in the Advanced Options window of the Graphic properties. Change the USB mode to ensure that you know works. To do ...

User Guide
Page 126
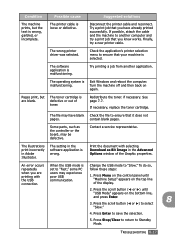
..." on page 1.9. If a repetitive mark occurs on the page, print a cleaning sheet several times to a lighter weight pages. If the defects occur on page 1.9. • Parts of background shading. • Remove the old toner cartridge and install a new one . See "Installing the Toner Cartridge" on page A.6. • Check the machine's environment...
..." on page 1.9. If a repetitive mark occurs on the page, print a cleaning sheet several times to a lighter weight pages. If the defects occur on page 1.9. • Parts of background shading. • Remove the old toner cartridge and install a new one . See "Installing the Toner Cartridge" on page A.6. • Check the machine's environment...


