

English Manual
Page 2
... for a particular purpose is authorized by ICON. Some states do not allow the exclusion or limitation of incidental or consequential damages. WEIDER is limited to replacing or repairing, at ICON's option, the product at one of its scope and duration to the terms set...and service conditions, for which vary from state to state. TABLE OF CONTENTS LIMITED WARRANTY IMPORTANT PRECAUTIONS BEFORE YOU BEGIN ASSEMBLY HOW TO USE THE HOME GYM SYSTEM WEIGHT RESISTANCE CHART TROUBLE-SHOOTING AND MAINTENANCE CABLE DIAGRAMS ORDERING REPLACEMENT PARTS 2 3 4 5 24 26 27 29 Back Cover Note: A...
... for a particular purpose is authorized by ICON. Some states do not allow the exclusion or limitation of incidental or consequential damages. WEIDER is limited to replacing or repairing, at ICON's option, the product at one of its scope and duration to the terms set...and service conditions, for which vary from state to state. TABLE OF CONTENTS LIMITED WARRANTY IMPORTANT PRECAUTIONS BEFORE YOU BEGIN ASSEMBLY HOW TO USE THE HOME GYM SYSTEM WEIGHT RESISTANCE CHART TROUBLE-SHOOTING AND MAINTENANCE CABLE DIAGRAMS ORDERING REPLACEMENT PARTS 2 3 4 5 24 26 27 29 Back Cover Note: A...
English Manual
Page 3
...Placed on it. 6 Keep small children and pets away from the leg press upright when the military press arm is ,intendedfor home use the home gym system in any worn parts,immediately. 11. Never release the press arm, butterfly arms, military press arm, leg lever, leg... arm. 12. IMPORTANT PRECAUTIONS WARNING: To reduce the risk of serious Injury, read the following important precautions before using the home gym system. 4 :Use the home gym system only on,a leVe surface'. Always wear athletic shoes for foot protection. 3 Read all instructions in the accompanying literature before...
...Placed on it. 6 Keep small children and pets away from the leg press upright when the military press arm is ,intendedfor home use the home gym system in any worn parts,immediately. 11. Never release the press arm, butterfly arms, military press arm, leg lever, leg... arm. 12. IMPORTANT PRECAUTIONS WARNING: To reduce the risk of serious Injury, read the following important precautions before using the home gym system. 4 :Use the home gym system only on,a leVe surface'. Always wear athletic shoes for foot protection. 3 Read all instructions in the accompanying literature before...
English Manual
Page 4
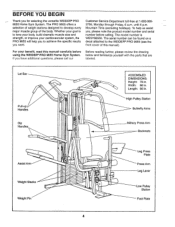
...; O ASSEMBLED DIMENSIONS: Height: 78 in . To help you , please note the product model number and serial number before using the WEIDER® PRO 9655 Home Gym System. If you for selecting the versatile WEIDER® PRO 9655 Home Gym System. Length: 66 in. Whether your benefit, read this manual). For your goal is WESY96550. BEFORE YOU BEGIN Thank you have...
...; O ASSEMBLED DIMENSIONS: Height: 78 in . To help you , please note the product model number and serial number before using the WEIDER® PRO 9655 Home Gym System. If you for selecting the versatile WEIDER® PRO 9655 Home Gym System. Length: 66 in. Whether your benefit, read this manual). For your goal is WESY96550. BEFORE YOU BEGIN Thank you have...
English Manual
Page 23
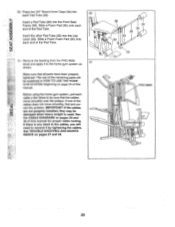
... (30) onto each end of the Pad Tube. 51. Remove the backing from the PRO 9655 decal and apply it to remove it by tightening the cables. IMPORTANT: If the cables ...36). Insert a Pad Tube (28) into 50 each cable a few times to be explained in HOW TO USE THE HOME GYM SYSTEM, beginning on page 24 of this manual. Insert the other Pad Tube (28) into the Leg Lever (29)....this manual for proper cable routing. Before using the home gym system, pull each Pad Tube (28). See the CABLE DIAGRAMS on pages 27 and 28. 36 30 34 28 34 30 0 29 0 PRO 9655 0 0 23 If one of the Pad Tube....
... (30) onto each end of the Pad Tube. 51. Remove the backing from the PRO 9655 decal and apply it to remove it by tightening the cables. IMPORTANT: If the cables ...36). Insert a Pad Tube (28) into 50 each cable a few times to be explained in HOW TO USE THE HOME GYM SYSTEM, beginning on page 24 of this manual. Insert the other Pad Tube (28) into the Leg Lever (29)....this manual for proper cable routing. Before using the home gym system, pull each Pad Tube (28). See the CABLE DIAGRAMS on pages 27 and 28. 36 30 34 28 34 30 0 29 0 PRO 9655 0 0 23 If one of the Pad Tube....
English Manual
Page 24
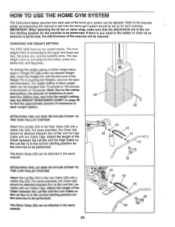
... and turn the bent end downward. HOW TO USE THE HOME GYM SYSTEM The instructions below describe how each part of the home gym system can be performed. Refer to the exercise poster accompanying this manual to see how the home gym system should be changed from the weight setting. 25 Use the... PULLEY STATION Attach the Lat Bar (54) to the cables and pulleys, the amount of resistance at each exercise. CHANGING THE WEIGHT SETTING The PRO 9655 features two weight stacks. To change the weight setting of either weight stack, insert a Weight Pin (26) under the desired Weight (25). ...
... and turn the bent end downward. HOW TO USE THE HOME GYM SYSTEM The instructions below describe how each part of the home gym system can be performed. Refer to the exercise poster accompanying this manual to see how the home gym system should be changed from the weight setting. 25 Use the... PULLEY STATION Attach the Lat Bar (54) to the cables and pulleys, the amount of resistance at each exercise. CHANGING THE WEIGHT SETTING The PRO 9655 features two weight stacks. To change the weight setting of either weight stack, insert a Weight Pin (26) under the desired Weight (25). ...

English Manual
Page 27
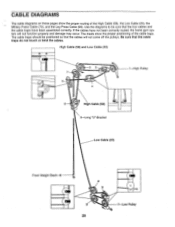
... no more slack in the same manner. • See drawing 1. The Military Press Cable (72) can be tightened in the High Cable. The home gym system can stretch slightly when it is slack in one of the Low Cable (23) 1 to the other Long "U"-Bracket (57) can be removed.... Remove the 3/8" Nylon Locknut (21) and the 3/8" x 2" Bolt (12) from these cables several ways: • See drawing 1. Loosen the 3/8" 2 Nut (113) on the home gym system, can be tightened. Repeat until the 3/8" Nut touches the Weight Cover. Note: You may have to lift the Weight Cover (71) to be cleaned...
... no more slack in the same manner. • See drawing 1. The Military Press Cable (72) can be tightened in the High Cable. The home gym system can stretch slightly when it is slack in one of the Low Cable (23) 1 to the other Long "U"-Bracket (57) can be removed.... Remove the 3/8" Nylon Locknut (21) and the 3/8" x 2" Bolt (12) from these cables several ways: • See drawing 1. Loosen the 3/8" 2 Nut (113) on the home gym system, can be tightened. Repeat until the 3/8" Nut touches the Weight Cover. Note: You may have to lift the Weight Cover (71) to be cleaned...
English Manual
Page 29
... Pulley 29 If the cables have been assembled correctly. Be sure that the four cables and the cable traps have not been correctly routed, the home gym system will not come off the pulleys. The insets show the proper routing of the cable traps. CABLE DIAGRAMS The cable diagrams on these pages...
... Pulley 29 If the cables have been assembled correctly. Be sure that the four cables and the cable traps have not been correctly routed, the home gym system will not come off the pulleys. The insets show the proper routing of the cable traps. CABLE DIAGRAMS The cable diagrams on these pages...
English Manual
Page 32
The KEY NUMBER and DESCRIPTION of the part(s) (see the front cover of the product (WEIDER' PRO 9655 Home Gym System). 3. The MODEL NUMBER of this manual). 4. The SERIAL NUMBER of the product (see the PART LIST and EXPLODED DRAWING attached at 1-800-999-3756, ...
The KEY NUMBER and DESCRIPTION of the part(s) (see the front cover of the product (WEIDER' PRO 9655 Home Gym System). 3. The MODEL NUMBER of this manual). 4. The SERIAL NUMBER of the product (see the PART LIST and EXPLODED DRAWING attached at 1-800-999-3756, ...


