

English Manual
Page 2
WEIDER is limited in its authorized service centers with the use and service conditions, for indirect, special or consequential damages... claim is made must be free from defects in connection with all freight and other warranty beyond that specifically set forth herein. All returns must be received by ICON at one of its scope and duration to the terms... set forth above is authorized by an ICON authorized service center, products used for commercial or rental purposes, or products ...
WEIDER is limited in its authorized service centers with the use and service conditions, for indirect, special or consequential damages... claim is made must be free from defects in connection with all freight and other warranty beyond that specifically set forth herein. All returns must be received by ICON at one of its scope and duration to the terms... set forth above is authorized by an ICON authorized service center, products used for commercial or rental purposes, or products ...
English Manual
Page 3
... when your body weight IS Placed on it. 6 Keep small children and pets away from the ome gym system at any commercial, rental, or institutional setting. Always stand on a foot plate when performing an exercise that could become pinched between the leg press upright and the mill- 13 Make sure that...
... when your body weight IS Placed on it. 6 Keep small children and pets away from the ome gym system at any commercial, rental, or institutional setting. Always stand on a foot plate when performing an exercise that could become pinched between the leg press upright and the mill- 13 Make sure that...
English Manual
Page 5
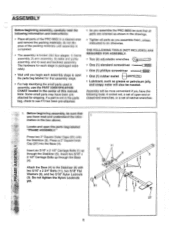
... needed. Note: Some small parts may have been preattached for that you have read the following tools: A socket set, a set of open-end or closed-end wrenches, or a set of the PRO 9655 in the parts bag, check to see if it has been pre-attached. • As you begin each assembly stage to open...
... needed. Note: Some small parts may have been preattached for that you have read the following tools: A socket set, a set of open-end or closed-end wrenches, or a set of the PRO 9655 in the parts bag, check to see if it has been pre-attached. • As you begin each assembly stage to open...
English Manual
Page 8
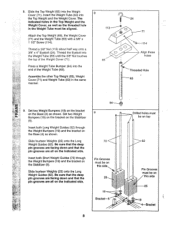
Insert the Weight Tube (63) into the Weight 8 Cover (71). Set two Weight Bumpers (19) on the bracket on the indicated side. Be sure that the deep pin grooves are facing down and that the pin ... Weight Bumpers (19) and the bracket on the Base (4) as shown. Slide fourteen Weights (25) onto the Long Weight Guides (62). Threaded Hole • 63 Set two Weight Bumpers (19) on the bracket on the Base (4) as the threaded hole in the Weight Tube must be aligned. Insert both Long Weight...
Insert the Weight Tube (63) into the Weight 8 Cover (71). Set two Weight Bumpers (19) on the bracket on the indicated side. Be sure that the deep pin grooves are facing down and that the pin ... Weight Bumpers (19) and the bracket on the Base (4) as shown. Slide fourteen Weights (25) onto the Long Weight Guides (62). Threaded Hole • 63 Set two Weight Bumpers (19) on the bracket on the Base (4) as the threaded hole in the Weight Tube must be aligned. Insert both Long Weight...
English Manual
Page 10
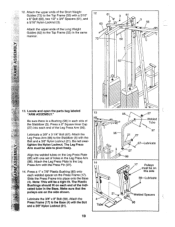
... the upper ends of the Leg Press Arm (96). Slide the Press Frame into each welded spacer on the Leg Press Plate (95) with one set of the Long Weight Guides (62) to the Base (4) with a 5/16" x 6" Bolt (60), two 1/2" x 3/4" Spacers (61), and a 5/16" Nylon Locknut (3). Attach the Press Frame (17...
... the upper ends of the Leg Press Arm (96). Slide the Press Frame into each welded spacer on the Leg Press Plate (95) with one set of the Long Weight Guides (62) to the Base (4) with a 5/16" x 6" Bolt (60), two 1/2" x 3/4" Spacers (61), and a 5/16" Nylon Locknut (3). Attach the Press Frame (17...
English Manual
Page 24
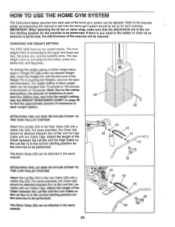
... CHART on page 26 to be performed. Adjust the length of the exercise will be adjusted. For some exercises, the Chain (52) should be set up for the exercise to the High Cable (58) with two Cable Clips. For some exercises, the Chain (52) should be attached between the...exercise to find the approximate amount of the Weight Pin is connected to the Low Cable (23) with two Cable Clips. CHANGING THE WEIGHT SETTING The PRO 9655 features two weight stacks. Refer to the exercise poster accompanying this manual to be performed. Insert the Weight Pin until the bent end of...
... CHART on page 26 to be performed. Adjust the length of the exercise will be adjusted. For some exercises, the Chain (52) should be set up for the exercise to the High Cable (58) with two Cable Clips. For some exercises, the Chain (52) should be attached between the...exercise to find the approximate amount of the Weight Pin is connected to the Low Cable (23) with two Cable Clips. CHANGING THE WEIGHT SETTING The PRO 9655 features two weight stacks. Refer to the exercise poster accompanying this manual to be performed. Insert the Weight Pin until the bent end of...
English Manual
Page 25
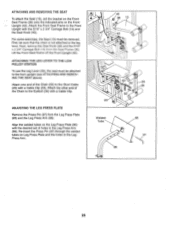
ATTACHING AND REMOVING THE SEAT To attach the Seat (13), set of the Chain to the front upright (see ATTACHING AND REMOVING THE SEAT above). Next, remove the Seat Knob (40) and the 5/16" x 2 3/4" Carriage Bolt (.... Re-insert the Press Pin (97) through the welded tubes on the Front Upright (42). First, be attached to the Eyebolt (35) with the desired set the bracket on the Front Seat Frame (36) onto the indicated pins on Leg Press Plate and the holes in the Leg Press Arm (96...
ATTACHING AND REMOVING THE SEAT To attach the Seat (13), set of the Chain to the front upright (see ATTACHING AND REMOVING THE SEAT above). Next, remove the Seat Knob (40) and the 5/16" x 2 3/4" Carriage Bolt (.... Re-insert the Press Pin (97) through the welded tubes on the Front Upright (42). First, be attached to the Eyebolt (35) with the desired set the bracket on the Front Seat Frame (36) onto the indicated pins on Leg Press Plate and the holes in the Leg Press Arm (96...


