
English Manual
Page 1
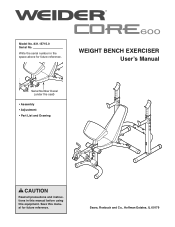
Sears, Roebuck and Co., Hoffman Estates, IL 60179 Write the serial number in this manual before using this manual for future reference. Save this equipment. Model No. 831.15715.0 Serial No. WEIGHT BENCH EXERCISER User's Manual Serial Number Decal (under the seat) • Assembly • Adjustment • Part List and Drawing CAUTION Read all precautions and instructions in the space above for future reference.
Sears, Roebuck and Co., Hoffman Estates, IL 60179 Write the serial number in this manual before using this manual for future reference. Save this equipment. Model No. 831.15715.0 Serial No. WEIGHT BENCH EXERCISER User's Manual Serial Number Decal (under the seat) • Assembly • Adjustment • Part List and Drawing CAUTION Read all precautions and instructions in the space above for future reference.
English Manual
Page 2
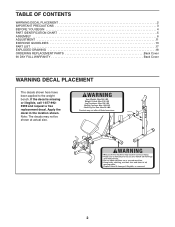
Apply the decal in the location shown. If the decal is missing or illegible, call 1-877-9925999 and request a free replacement decal. Note: The decals may not be shown at actual size. 2 TABLE OF CONTENTS WARNING DECAL PLACEMENT 2 IMPORTANT PRECAUTIONS 3 BEFORE YOU BEGIN 4 PART IDENTIFICATION CHART 5 ASSEMBLY 6 ADJUSTMENT 11 EXERCISE GUIDELINES 13 PART LIST 17 EXPLODED DRAWING 18 ORDERING REPLACEMENT PARTS Back Cover 90 DAY FULL WARRANTY Back Cover WARNING DECAL PLACEMENT The decals shown here have been applied to the weight bench.
Apply the decal in the location shown. If the decal is missing or illegible, call 1-877-9925999 and request a free replacement decal. Note: The decals may not be shown at actual size. 2 TABLE OF CONTENTS WARNING DECAL PLACEMENT 2 IMPORTANT PRECAUTIONS 3 BEFORE YOU BEGIN 4 PART IDENTIFICATION CHART 5 ASSEMBLY 6 ADJUSTMENT 11 EXERCISE GUIDELINES 13 PART LIST 17 EXPLODED DRAWING 18 ORDERING REPLACEMENT PARTS Back Cover 90 DAY FULL WARRANTY Back Cover WARNING DECAL PLACEMENT The decals shown here have been applied to the weight bench.
English Manual
Page 3
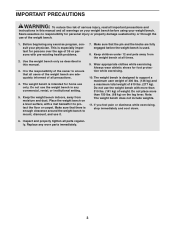
... manual and all warnings on the leg lever. Wear appropriate clothes while exercising. It is used. 8. Before beginning any worn parts immediately. 3 Do not place more than 150 lbs. (68 kg) on your weight bench before the weight bench is the responsibility of the owner to support a maximum user weight of 300 lbs. (136 kg) and a maximum total weight of 610 lbs. (277 kg). Sears...
... manual and all warnings on the leg lever. Wear appropriate clothes while exercising. It is used. 8. Before beginning any worn parts immediately. 3 Do not place more than 150 lbs. (68 kg) on your weight bench before the weight bench is the responsibility of the owner to support a maximum user weight of 300 lbs. (136 kg) and a maximum total weight of 610 lbs. (277 kg). Sears...
English Manual
Page 4
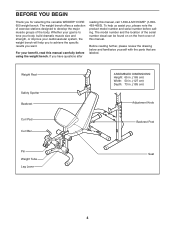
... Pad Curl Bar ASSEMBLED DIMENSIONS: Height: 65 in. (165 cm) Width: 50 in. (127 cm) Depth: 73 in. (185 cm) Adjustment Knob Backrest Post Pin Weight Tube Leg Lever Seat 4 To help you have questions after reading this manual. For your cardiovascular system, the weight bench will help us assist you for selecting the versatile WEIDER® CORE 600 weight bench. Before reading further, please review the drawing...
... Pad Curl Bar ASSEMBLED DIMENSIONS: Height: 65 in. (165 cm) Width: 50 in. (127 cm) Depth: 73 in. (185 cm) Adjustment Knob Backrest Post Pin Weight Tube Leg Lever Seat 4 To help you have questions after reading this manual. For your cardiovascular system, the weight bench will help us assist you for selecting the versatile WEIDER® CORE 600 weight bench. Before reading further, please review the drawing...
English Manual
Page 5
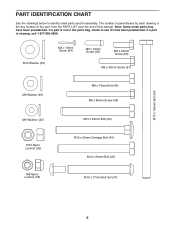
..., check to identify small parts used in parentheses by each drawing is the key number of the part, from the PART LIST near the end of this manual. M10 Washer (55) M4 x 19mm Screw (54) M5 x 19mm Screw (52) M6 x 20mm Screw (53) M6 x 40mm Screw (51) M10 x 165mm Bolt (50) M8 Washer (49) M8 x 70mm Bolt (46) M6 x 80mm Screw (48) M6 Washer (32...
..., check to identify small parts used in parentheses by each drawing is the key number of the part, from the PART LIST near the end of this manual. M10 Washer (55) M4 x 19mm Screw (54) M5 x 19mm Screw (52) M6 x 20mm Screw (53) M6 x 40mm Screw (51) M10 x 165mm Bolt (50) M8 Washer (49) M8 x 70mm Bolt (46) M6 x 80mm Screw (48) M6 Washer (32...
English Manual
Page 6
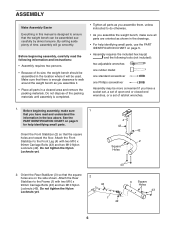
... to walk around the weight bench as shown in the drawings. • For help identifying small parts. ASSEMBLY Make Assembly Easier Everything in this manual is designed to the Front Leg (4) with two M10 x 90mm Carriage Bolts (43) and two M10 Nylon Locknuts (42). By setting aside plenty of its size, the weight bench should be used. Before beginning assembly, carefully read and understand the information...
... to walk around the weight bench as shown in the drawings. • For help identifying small parts. ASSEMBLY Make Assembly Easier Everything in this manual is designed to the Front Leg (4) with two M10 x 90mm Carriage Bolts (43) and two M10 Nylon Locknuts (42). By setting aside plenty of its size, the weight bench should be used. Before beginning assembly, carefully read and understand the information...

English Manual
Page 7
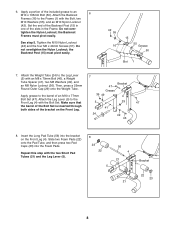
... 4 55 44 32 1 48 1 42 5. See steps 1 and 2. Attach the Backrest Post (15) to the Frame (1) with 4 two M10 x 85mm Bolts (44), two M10 Washers (55), and an M10 Nylon Locknut (42). Do not tighten the Screws yet. 55 42 55 Grease 50 51 16 32 15 7 Apply a portion of... included grease to the Frame (1) with two M6 x 80mm Screws (48) and two M6 Washers (32). 3 18 38 32 48 4. Attach the Seat (18) and the Seat Bracket (38) to the Backrest Frames (16) with four M6 x 40mm Screws (51) and four M6 Washers (32). 3. Attach the Front Leg (4) to an 5 M10 x 165mm Bolt (50...
... 4 55 44 32 1 48 1 42 5. See steps 1 and 2. Attach the Backrest Post (15) to the Frame (1) with 4 two M10 x 85mm Bolts (44), two M10 Washers (55), and an M10 Nylon Locknut (42). Do not tighten the Screws yet. 55 42 55 Grease 50 51 16 32 15 7 Apply a portion of... included grease to the Frame (1) with two M6 x 80mm Screws (48) and two M6 Washers (32). 3 18 38 32 48 4. Attach the Seat (18) and the Seat Bracket (38) to the Backrest Frames (16) with four M6 x 40mm Screws (51) and four M6 Washers (32). 3. Attach the Front Leg (4) to an 5 M10 x 165mm Bolt (50...
English Manual
Page 8
... Grease 50 Slot 1 7. See step 5. Attach the Weight Tube (24) to the barrel of the bracket on the Front Leg (4). Insert the Long Pad Tube (56) into the Foam Pads. Repeat this step with the Bolt, two M10 Washers (55), and an M10 Nylon Locknut (42). Tighten the M10 Nylon Locknut (42) and the four M6 x 40mm Screws (51). Set...
... Grease 50 Slot 1 7. See step 5. Attach the Weight Tube (24) to the barrel of the bracket on the Front Leg (4). Insert the Long Pad Tube (56) into the Foam Pads. Repeat this step with the Bolt, two M10 Washers (55), and an M10 Nylon Locknut (42). Tighten the M10 Nylon Locknut (42) and the four M6 x 40mm Screws (51). Set...

English Manual
Page 9
Attach the Curl Bar (17) to the Curl Bar (17) 9 with the Pin/Tether (35). Identify the Left Upright (11) by observing the positions of 11 the Bases (9) as shown. Attach the Bumper (39) to the Leg Lever (5) with an M4 x 19mm Screw (54). Orient one of the indicated holes. 9. Attach the Right Upright (...two M6 x 20mm Screws (53). 20 6 53 11. Attach the Base to the Leg Lever with two M10 x 90mm Carriage Bolts (43) and two M10 Nylon Locknuts (42). Then, attach the Tether to the Left Upright with an M4 x 19mm Screw (54). 17 39 54 5 54 35 10. Attach the Curl Pad ...
Attach the Curl Bar (17) to the Curl Bar (17) 9 with the Pin/Tether (35). Identify the Left Upright (11) by observing the positions of 11 the Bases (9) as shown. Attach the Bumper (39) to the Leg Lever (5) with an M4 x 19mm Screw (54). Orient one of the indicated holes. 9. Attach the Right Upright (...two M6 x 20mm Screws (53). 20 6 53 11. Attach the Base to the Leg Lever with two M10 x 90mm Carriage Bolts (43) and two M10 Nylon Locknuts (42). Then, attach the Tether to the Left Upright with an M4 x 19mm Screw (54). 17 39 54 5 54 35 10. Attach the Curl Pad ...
English Manual
Page 10
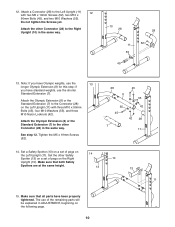
... tightened. Tighten the M5 x 19mm Screws (52). 28 45 8 55 55 42 45 42 28 7 11 14. Set a Safety Spotter (13) on a set of pegs on the Left Upright (11) with two M5 x 19mm Screws (52), two M10 x 90mm Bolts (45), and two M10 Washers (55). Attach the... other Connector (28) in the same way. 10 28 28 52 11 55 45 13. Make sure that all parts have Olympic weights, use the 13 longer Olympic Extension (8) for this step...
... tightened. Tighten the M5 x 19mm Screws (52). 28 45 8 55 55 42 45 42 28 7 11 14. Set a Safety Spotter (13) on a set of pegs on the Left Upright (11) with two M5 x 19mm Screws (52), two M10 x 90mm Bolts (45), and two M10 Washers (55). Attach the... other Connector (28) in the same way. 10 28 28 52 11 55 45 13. Make sure that all parts have Olympic weights, use the 13 longer Olympic Extension (8) for this step...
English Manual
Page 11
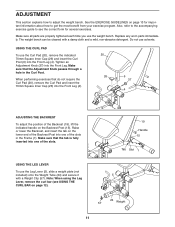
... page 13 for several exercises. Make sure that the Adjustment Knob passes through a hole in the Frame (1). Make sure all parts are properly tightened each time you use the Leg Lever (5), slide a weight plate (not included) onto the Weight Tube (24) and ...Weight 11 Note: When using the Leg Lever, remove the curl bar (see the correct form for important information about how to get the most benefit from your exercise program. Also, refer to the accompanying exercise guide to adjust the weight bench. ADJUSTMENT This section explains how to see USING THE CURL BAR on the lower...
... page 13 for several exercises. Make sure that the Adjustment Knob passes through a hole in the Frame (1). Make sure all parts are properly tightened each time you use the Leg Lever (5), slide a weight plate (not included) onto the Weight Tube (24) and ...Weight 11 Note: When using the Leg Lever, remove the curl bar (see the correct form for important information about how to get the most benefit from your exercise program. Also, refer to the accompanying exercise guide to adjust the weight bench. ADJUSTMENT This section explains how to see USING THE CURL BAR on the lower...

English Manual
Page 12
... the Pin (35) completely through the Leg Lever (5) and the Curl Bar. 5 17 35 ADJUSTING THE WEIGHT RESTS AND THE SAFETY SPOTTERS To adjust the height of the Leg Lever (5) and remove the Curl Bar. Make sure that the Adjustment Knobs are at the same height and that the Safety Spotters are fully tightened into each Upright (10, 11). USING THE CURL BAR When performing exercises...
... the Pin (35) completely through the Leg Lever (5) and the Curl Bar. 5 17 35 ADJUSTING THE WEIGHT RESTS AND THE SAFETY SPOTTERS To adjust the height of the Leg Lever (5) and remove the Curl Bar. Make sure that the Adjustment Knobs are at the same height and that the Safety Spotters are fully tightened into each Upright (10, 11). USING THE CURL BAR When performing exercises...
English Manual
Page 13
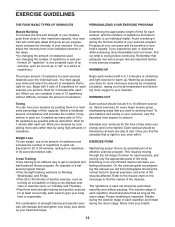
... training and aerobic exercise will continually adapt and grow as possible without discomfort. This requires moving only the appropriate parts of the body. Your muscles will reshape and strengthen your body, plus develop your body's signals. Progress at your own pace and be sensitive to your heart and lungs. WARMING UP The proper amount of resistance for each set . Schedule your workouts...
... training and aerobic exercise will continually adapt and grow as possible without discomfort. This requires moving only the appropriate parts of the body. Your muscles will reshape and strengthen your body, plus develop your body's signals. Progress at your own pace and be sensitive to your heart and lungs. WARMING UP The proper amount of resistance for each set . Schedule your workouts...
English Manual
Page 14
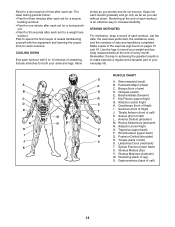
... (upper thigh) G. Soleus (front of leg) X. Trapezius (upper back) P. Hamstring (back of calf) L. List the date, the exercises performed, the resistance used, and the numbers of arm) S. Anterior Deltoid (shoulder) M. Rhomboideus (upper back) Q. Posterior Deltoid (shoulder) R. The ideal resting periods follow: • Rest for three minutes after each set for a muscle building workout. • Rest for one minute after...
... (upper thigh) G. Soleus (front of leg) X. Trapezius (upper back) P. Hamstring (back of calf) L. List the date, the exercises performed, the resistance used, and the numbers of arm) S. Anterior Deltoid (shoulder) M. Rhomboideus (upper back) Q. Posterior Deltoid (shoulder) R. The ideal resting periods follow: • Rest for three minutes after each set for a muscle building workout. • Rest for one minute after...
English Manual
Page 15
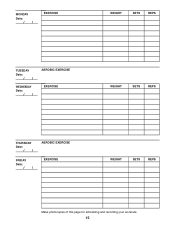
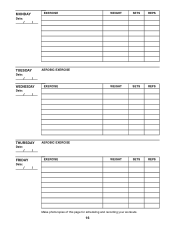
MONDAY Date: // EXERCISE WEIGHT SETS REPS TUESDAY Date: // WEDNESDAY Date: // AEROBIC EXERCISE EXERCISE WEIGHT SETS REPS THURSDAY Date: // FRIDAY Date: // AEROBIC EXERCISE EXERCISE WEIGHT SETS REPS Make photocopies of this page for scheduling and recording your workouts. 15
MONDAY Date: // EXERCISE WEIGHT SETS REPS TUESDAY Date: // WEDNESDAY Date: // AEROBIC EXERCISE EXERCISE WEIGHT SETS REPS THURSDAY Date: // FRIDAY Date: // AEROBIC EXERCISE EXERCISE WEIGHT SETS REPS Make photocopies of this page for scheduling and recording your workouts. 15
English Manual
Page 16
MONDAY Date: // EXERCISE WEIGHT SETS REPS TUESDAY Date: // WEDNESDAY Date: // AEROBIC EXERCISE EXERCISE WEIGHT SETS REPS THURSDAY Date: // FRIDAY Date: // AEROBIC EXERCISE EXERCISE WEIGHT SETS REPS Make photocopies of this page for scheduling and recording your workouts. 16
MONDAY Date: // EXERCISE WEIGHT SETS REPS TUESDAY Date: // WEDNESDAY Date: // AEROBIC EXERCISE EXERCISE WEIGHT SETS REPS THURSDAY Date: // FRIDAY Date: // AEROBIC EXERCISE EXERCISE WEIGHT SETS REPS Make photocopies of this page for scheduling and recording your workouts. 16
English Manual
Page 17
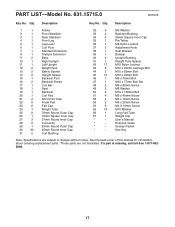
... Screw 54 6 M4 X 19mm Screw 55 18 M10 Washer 56 1 Long Pad Tube 57 1 Weight Clip * - See the back cover of this manual for information about ordering replacement parts. *These parts are subject to change without notice. PART LIST-Model No. 831.15715.0 R0707A Key No. Hex Key Note: Specifications are not illustrated. Qty. Grease Packet * - Exercise Guide * - If a part is missing, call toll-free 1-877-9925999. 17 Description Key No. Qty. User's Manual...
... Screw 54 6 M4 X 19mm Screw 55 18 M10 Washer 56 1 Long Pad Tube 57 1 Weight Clip * - See the back cover of this manual for information about ordering replacement parts. *These parts are subject to change without notice. PART LIST-Model No. 831.15715.0 R0707A Key No. Hex Key Note: Specifications are not illustrated. Qty. Grease Packet * - Exercise Guide * - If a part is missing, call toll-free 1-877-9925999. 17 Description Key No. Qty. User's Manual...

English Manual
Page 18
EXPLODED DRAWING-Model No. 831.15715.0 R0707A 19 34 16 42 55 32 51 16 20 6 42 55 34 55 55 50 32 51 30 17 31 23 22 31 23 22 27 36 41 49 24 49 30 46 57 18 53 33 50 33 15 30 23 30 26 22 4 39 54 47 55 27 44 42 5 21 29 22 38 25 42 37 42 32 47 48 42 32 1 48 42 3 56 22 23 27 21 25 2 35 22 23 54 43 25 43 25 18
EXPLODED DRAWING-Model No. 831.15715.0 R0707A 19 34 16 42 55 32 51 16 20 6 42 55 34 55 55 50 32 51 30 17 31 23 22 31 23 22 27 36 41 49 24 49 30 46 57 18 53 33 50 33 15 30 23 30 26 22 4 39 54 47 55 27 44 42 5 21 29 22 38 25 42 37 42 32 47 48 42 32 1 48 42 3 56 22 23 27 21 25 2 35 22 23 54 43 25 43 25 18

English Manual
Page 19
EXPLODED DRAWING-Model No. 831.15715.0 R0707A 12 54 54 40 14 37 30 54 13 10 55 45 42 9 25 30 42 43 7 45 30 52 25 45 28 55 55 42 55 42 45 55 55 42 8 55 45 42 13 55 45 42 9 25 12 54 40 14 37 28 30 52 11 25 42 43 19
EXPLODED DRAWING-Model No. 831.15715.0 R0707A 12 54 54 40 14 37 30 54 13 10 55 45 42 9 25 30 42 43 7 45 30 52 25 45 28 55 55 42 55 42 45 55 55 42 8 55 45 42 13 55 45 42 9 25 12 54 40 14 37 28 30 52 11 25 42 43 19
English Manual
Page 20
... the replacement parts, accessories, and user's manuals that you may also have other rights which vary from state to arrange for free repair (or replacement if repair proves impossible). This warranty gives you specific legal rights, and you need to do-it ! This warranty does not apply when the Weight Bench Exerciser is used commercially or for the location of purchase, call or go on a product serviced by Sears...
... the replacement parts, accessories, and user's manuals that you may also have other rights which vary from state to arrange for free repair (or replacement if repair proves impossible). This warranty gives you specific legal rights, and you need to do-it ! This warranty does not apply when the Weight Bench Exerciser is used commercially or for the location of purchase, call or go on a product serviced by Sears...


