

English Manual
Page 1
As a manufacturer, we are missing or damaged parts, we will provide immediate assistance, free of this manual. The trained technicians on our customer hot line will guarantee you . Save this equipment. ...2 BEFORE YOU BEGIN 3 ASSEMBLY 4 ADJUSTMENTS 22 WEIGHT RESISTANCE CHART 24 TROUBLESHOOTING AND MAINTENANCE 25 CABLE DIAGRAMS 26 ORDERING REPLACEMENT PARTS Back Cover LIMITED WARRANTY Back Cover Note: A PART IDENTIFICATION CHART and a PART LIST/ EXPLODED DRAWING are attached in this manual before using this manual for reference. If you have questions, or find...
As a manufacturer, we are missing or damaged parts, we will provide immediate assistance, free of this manual. The trained technicians on our customer hot line will guarantee you . Save this equipment. ...2 BEFORE YOU BEGIN 3 ASSEMBLY 4 ADJUSTMENTS 22 WEIGHT RESISTANCE CHART 24 TROUBLESHOOTING AND MAINTENANCE 25 CABLE DIAGRAMS 26 ORDERING REPLACEMENT PARTS Back Cover LIMITED WARRANTY Back Cover Note: A PART IDENTIFICATION CHART and a PART LIST/ EXPLODED DRAWING are attached in this manual before using this manual for reference. If you have questions, or find...

English Manual
Page 2
... that the cables remain on a level surface. Keep your body weight is missing or illegible, call our toll-free Customer Hot Line at any worn parts immediately. 6. Warning Decal 3 WARNING: Before beginning this or any commercial, rental, or institutional setting. 4. This is being used . Always stand on page 3. ... away from the weight system at all times. Your hand could become pinched between the leg press upright and the military press arm. 16. Always be sure that all users of the weight system are on all of this manual and in the locations shown on the foot...
... that the cables remain on a level surface. Keep your body weight is missing or illegible, call our toll-free Customer Hot Line at any worn parts immediately. 6. Warning Decal 3 WARNING: Before beginning this or any commercial, rental, or institutional setting. 4. This is being used . Always stand on page 3. ... away from the weight system at all times. Your hand could become pinched between the leg press upright and the military press arm. 16. Always be sure that all users of the weight system are on all of this manual and in the locations shown on the foot...

English Manual
Page 3
...YOU BEGIN Thank you have additional below and familiarize yourself with the labeled parts. until 6 p.m. Whether your goal is WESY49202. To help you to...Press Plate Warning Decal 2 Press Arm Leg Lever Warning Decal 3 Low Pulley Station Foot Plate 3 The 16.6ST weight system offers a selection of weight stations designed to the weight system (see the front cover of the...in. Mountain Time (excluding holidays). For your cardiovascular system, the 16.6ST weight system will help us assist you want. If you for selecting the versatile CLUB WEIDER® 16.6ST weight system.
...YOU BEGIN Thank you have additional below and familiarize yourself with the labeled parts. until 6 p.m. Whether your goal is WESY49202. To help you to...Press Plate Warning Decal 2 Press Arm Leg Lever Warning Decal 3 Low Pulley Station Foot Plate 3 The 16.6ST weight system offers a selection of weight stations designed to the weight system (see the front cover of the...in. Mountain Time (excluding holidays). For your cardiovascular system, the 16.6ST weight system will help us assist you want. If you for selecting the versatile CLUB WEIDER® 16.6ST weight system.

English Manual
Page 4
... them, unless instructed to do not dispose of the packing materials until you assemble the weight system be needed. Locate and open the parts bag labeled for shipping. Insert two M8 x 65mm Carriage Bolts up through the Base (4). ASSEMBLY Before beginning assembly, carefully read and ...attached. • As you begin each stage is packaged separately. • Wait until assembly is completed. • The assembly is not in the parts bag, check to the Stabilizer (5) with two M8 x 70mm Bolts (11), two M8 Washers (8), and two M8 Nylon Locknuts (3). Assembly will ...
... them, unless instructed to do not dispose of the packing materials until you assemble the weight system be needed. Locate and open the parts bag labeled for shipping. Insert two M8 x 65mm Carriage Bolts up through the Base (4). ASSEMBLY Before beginning assembly, carefully read and ...attached. • As you begin each stage is packaged separately. • Wait until assembly is completed. • The assembly is not in the parts bag, check to the Stabilizer (5) with two M8 x 70mm Bolts (11), two M8 Washers (8), and two M8 Nylon Locknuts (3). Assembly will ...

English Manual
Page 8
Attach the upper ends of the Stabilizer (5). Locate and open the parts bag labeled "ARM ASSEMBLY." Lubricate an M10 x 80mm Bolt (67). Press a 22mm Plastic Bushing (90) onto each side of the Long Weight Guides (62) to ...
Attach the upper ends of the Stabilizer (5). Locate and open the parts bag labeled "ARM ASSEMBLY." Lubricate an M10 x 80mm Bolt (67). Press a 22mm Plastic Bushing (90) onto each side of the Long Weight Guides (62) to ...
English Manual
Page 11
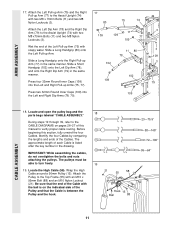
... (102) onto the Left Dip Arm (78), and onto the Right Dip Arm (79) in the drawing. Locate and open the pulley bag and the parts bags labeled "CABLE ASSEMBLY." 18 During steps 19 through 39, refer to the CABLE DIAGRAMS on the indicated side of the Cables. Before beginning this...
... (102) onto the Left Dip Arm (78), and onto the Right Dip Arm (79) in the drawing. Locate and open the pulley bag and the parts bags labeled "CABLE ASSEMBLY." 18 During steps 19 through 39, refer to the CABLE DIAGRAMS on the indicated side of the Cables. Before beginning this...

English Manual
Page 13
... Locknut (21). Be sure that the Cable is in the inset drawing. The 15mm Spacer (7) has been pre-attached ton the Press Frame (17) for part identification. Remove the M10 Nylon Locknut (21), the Spacer, and the 90mm Pulley (15) from the M10 x 95mm Bolt (88). Wrap the High Cable (58...) and a Cable Trap (66) to the upper hole in the groove of several pre- Be sure that the Cable is inside the Long "U"-Bracket. attached parts. Do not remove the Bolt;
... Locknut (21). Be sure that the Cable is in the inset drawing. The 15mm Spacer (7) has been pre-attached ton the Press Frame (17) for part identification. Remove the M10 Nylon Locknut (21), the Spacer, and the 90mm Pulley (15) from the M10 x 95mm Bolt (88). Wrap the High Cable (58...) and a Cable Trap (66) to the upper hole in the groove of several pre- Be sure that the Cable is inside the Long "U"-Bracket. attached parts. Do not remove the Bolt;
English Manual
Page 19
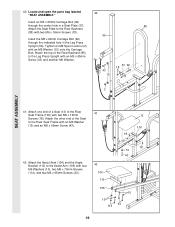
... in a Seat Plate (37). Insert the M6 x 60mm Carriage Bolt (92) through the center hole in the Leg Press Upright (56). Locate and open the parts bag labeled 40 "SEAT ASSEMBLY." Tighten an M6 Nylon Locknut (2) with an M6 Washer (10) and an M6 x 65mm Screw (43). 13 100 18 42...
... in a Seat Plate (37). Insert the M6 x 60mm Carriage Bolt (92) through the center hole in the Leg Press Upright (56). Locate and open the parts bag labeled 40 "SEAT ASSEMBLY." Tighten an M6 Nylon Locknut (2) with an M6 Washer (10) and an M6 x 65mm Screw (43). 13 100 18 42...

English Manual
Page 21
Make sure that the cables move smoothly, find and correct the problem. The use of the remaining parts will need to remove it to make sure that all parts have been properly tightened. tem where shown. 49. Before using the weight system, pull each Pad Tube (28). IMPORTANT: ... cables does not move smoothly over the pulleys. Remove the backing from the CLUB WEIDER 48 16.6ST decal and apply it by tightening the cables. Press two19mm Round Inner Caps (34) into the Leg Lever (29). SEAT ASSEMBLY CLUB WEIDER 16.6ST 47. Slide a Foam Pad (30) onto each end of the Pad Tube...
Make sure that the cables move smoothly, find and correct the problem. The use of the remaining parts will need to remove it to make sure that all parts have been properly tightened. tem where shown. 49. Before using the weight system, pull each Pad Tube (28). IMPORTANT: ... cables does not move smoothly over the pulleys. Remove the backing from the CLUB WEIDER 48 16.6ST decal and apply it by tightening the cables. Press two19mm Round Inner Caps (34) into the Leg Lever (29). SEAT ASSEMBLY CLUB WEIDER 16.6ST 47. Slide a Foam Pad (30) onto each end of the Pad Tube...

English Manual
Page 22
... Bar (54) to the High Cable (58) with a Cable Clip (53). The Nylon Strap (39) can be performed. ADJUSTMENTS The instructions below describe how each part of the weight system can be attached between the Lat Bar and the Low Cable with two Cable Clips. Refer to the exercise guide accompanying...
... Bar (54) to the High Cable (58) with a Cable Clip (53). The Nylon Strap (39) can be performed. ADJUSTMENTS The instructions below describe how each part of the weight system can be attached between the Lat Bar and the Low Cable with two Cable Clips. Refer to the exercise guide accompanying...

English Manual
Page 25
...the Low Cable (23) to slip off the weight stack. If a cable tends to the Long "U"Bracket (57). TROUBLESHOOTING AND MAINTENANCE Make sure all parts are properly tightened each time you use solvents. Be sure that connects the end of the Cable, and both M8 Nylon Locknuts (3) from the Rear...(72) can be removed from the Cable Trap (66), Pulley, and Long "U"-Bracket. Move the 90mm Pulley (15) to be replaced, see ORDERING REPLACEMENT PARTS on the weight system, can be cleaned using the front weight stack, both the Military Press Cable (72) and the Leg Press Cable (99) will...
...the Low Cable (23) to slip off the weight stack. If a cable tends to the Long "U"Bracket (57). TROUBLESHOOTING AND MAINTENANCE Make sure all parts are properly tightened each time you use solvents. Be sure that connects the end of the Cable, and both M8 Nylon Locknuts (3) from the Rear...(72) can be removed from the Cable Trap (66), Pulley, and Long "U"-Bracket. Move the 90mm Pulley (15) to be replaced, see ORDERING REPLACEMENT PARTS on the weight system, can be cleaned using the front weight stack, both the Military Press Cable (72) and the Leg Press Cable (99) will...

English Manual
Page 28
WESY49202 R0103A M10 Nylon Locknut (21) M8 Nylon Locknut (3) M6 Nylon Locknut (2) M10 Washer (9) M8 Washer (8) M6 Washer (10) M4 x 16mm Selftapping Screw (87) M6 x 70mm Screw (114) M6 x 65mm Screw (43) M6 x 60mm Carriage Bolt (92) M8 x 60mm Bolt (22) M10 x 55mm Bolt (86) M8 x 55mm Bolt (33) M6 x 50mm Carriage Bolt (38) M10 x 50mm Bolt (12) M6 x 50mm Screw (81) M10 x 45mm Bolt (76) M8 x 45mm Bolt (24) M6 x 16mm Screw (18) PART IDENTIFICATION CHART-Model No.
WESY49202 R0103A M10 Nylon Locknut (21) M8 Nylon Locknut (3) M6 Nylon Locknut (2) M10 Washer (9) M8 Washer (8) M6 Washer (10) M4 x 16mm Selftapping Screw (87) M6 x 70mm Screw (114) M6 x 65mm Screw (43) M6 x 60mm Carriage Bolt (92) M8 x 60mm Bolt (22) M10 x 55mm Bolt (86) M8 x 55mm Bolt (33) M6 x 50mm Carriage Bolt (38) M10 x 50mm Bolt (12) M6 x 50mm Screw (81) M10 x 45mm Bolt (76) M8 x 45mm Bolt (24) M6 x 16mm Screw (18) PART IDENTIFICATION CHART-Model No.

English Manual
Page 31
PART LIST-Model No. Qty. 60 2 61 4 62 2 63 1 64 2 65 2 66 7 67 2 68 1 69 4 70 2 71 2 72 1 73 2 74 1 75 1 76 2 77 1 78 1 79 1 80 2 ... x 105mm Bolt 25mm Inner Cap M6 x 70mm Screw User's Manual Exercise Guide Greaes Packet Note: "#" indicates a non-illustrated part. Qty. 1 10 2 2 3 42 4 1 5 1 6 1 7 1 8 12 9 10 10 11 11 12 12 5 13 2 14 1 15 14 16 1 17 1 18 6 19 4 20 1 21 25 22 4 23 1 24 2 25 18 26 2 27 8 28 2 29 1 30 4 31 4 32...
PART LIST-Model No. Qty. 60 2 61 4 62 2 63 1 64 2 65 2 66 7 67 2 68 1 69 4 70 2 71 2 72 1 73 2 74 1 75 1 76 2 77 1 78 1 79 1 80 2 ... x 105mm Bolt 25mm Inner Cap M6 x 70mm Screw User's Manual Exercise Guide Greaes Packet Note: "#" indicates a non-illustrated part. Qty. 1 10 2 2 3 42 4 1 5 1 6 1 7 1 8 12 9 10 10 11 11 12 12 5 13 2 14 1 15 14 16 1 17 1 18 6 19 4 20 1 21 25 22 4 23 1 24 2 25 18 26 2 27 8 28 2 29 1 30 4 31 4 32...

English Manual
Page 33
The MODEL NUMBER of the product (CLUB WEIDER® 16.6ST weight system) 3. LIMITED WARRANTY ICON Health & Fitness, Inc. (ICON), warrants this product to be free from defects in workmanship and material, under this warranty is a registered trademark of ICON Health & Fitness, Inc. The KEY NUMBER and DESCRIPTION of the part(s) (see the front cover of...
The MODEL NUMBER of the product (CLUB WEIDER® 16.6ST weight system) 3. LIMITED WARRANTY ICON Health & Fitness, Inc. (ICON), warrants this product to be free from defects in workmanship and material, under this warranty is a registered trademark of ICON Health & Fitness, Inc. The KEY NUMBER and DESCRIPTION of the part(s) (see the front cover of...


