
English Manual
Page 2
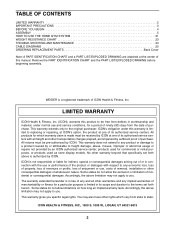
... gives you . TABLE OF CONTENTS LIMITED WARRANTY 2 IMPORTANT PRECAUTIONS 3 BEFORE YOU BEGIN 4 ASSEMBLY 5 HOW TO USE THE HOME GYM SYSTEM 21 WEIGHT RESISTANCE CHART 23 TROUBLE-SHOOTING AND MAINTENANCE 24 CABLE DIAGRAMS 25 ORDERING REPLACEMENT PARTS Back Cover Note: A PART IDENTIFICATION... is made must be pre-authorized by ICON. Remove the PART IDENTIFICATION CHART and the PART LIST/EXPLODED DRAWING before beginning assembly. WEIDER is limited in workmanship and material, under this manual. LIMITED WARRANTY ICON Health & Fitness, Inc. (ICON), warrants this product ...
... gives you . TABLE OF CONTENTS LIMITED WARRANTY 2 IMPORTANT PRECAUTIONS 3 BEFORE YOU BEGIN 4 ASSEMBLY 5 HOW TO USE THE HOME GYM SYSTEM 21 WEIGHT RESISTANCE CHART 23 TROUBLE-SHOOTING AND MAINTENANCE 24 CABLE DIAGRAMS 25 ORDERING REPLACEMENT PARTS Back Cover Note: A PART IDENTIFICATION... is made must be pre-authorized by ICON. Remove the PART IDENTIFICATION CHART and the PART LIST/EXPLODED DRAWING before beginning assembly. WEIDER is limited in workmanship and material, under this manual. LIMITED WARRANTY ICON Health & Fitness, Inc. (ICON), warrants this product ...
English Manual
Page 3
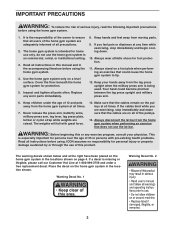
...9. Warning Decal No. 1 Warning Decal No. 2 ¥ Keep clear of this manual and in the accompanying literature before using the home gym system. 4. The home gym system is the responsibility of the owner to tip. 12. do not use of this or any worn parts immediately. 8. Keep hands and... arm is being used. If a decal is especially important for personal injury or property damage sustained by or through the use the home gym system in the location shown. Keep your physician. Inspect and tighten all instructions in the locations shown on a foot plate when performing an...
...9. Warning Decal No. 1 Warning Decal No. 2 ¥ Keep clear of this manual and in the accompanying literature before using the home gym system. 4. The home gym system is the responsibility of the owner to tip. 12. do not use of this or any worn parts immediately. 8. Keep hands and... arm is being used. If a decal is especially important for personal injury or property damage sustained by or through the use the home gym system in the location shown. Keep your physician. Inspect and tighten all instructions in the locations shown on a foot plate when performing an...
English Manual
Page 4
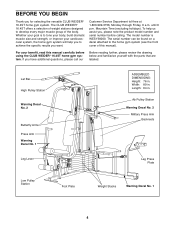
... every major muscle group of this manual carefully before calling. If you for selecting the versatile CLUB WEIDER¨ 16.4ST home gym system. Length: 64 in . The CLUB WEIDER¨ 16.4ST offers a selection of weight stations designed to tone your body, build dramatic muscle size and strength...a decal attached to achieve the specific results you , please note the product model number and serial number before using the CLUB WEIDER¨ 16.4ST home gym system. Width: 89 in . until 6 p.m. Ab Pulley Station Warning Decal No. 2 Military Press Arm Backrests Leg Lever...
... every major muscle group of this manual carefully before calling. If you for selecting the versatile CLUB WEIDER¨ 16.4ST home gym system. Length: 64 in . The CLUB WEIDER¨ 16.4ST offers a selection of weight stations designed to tone your body, build dramatic muscle size and strength...a decal attached to achieve the specific results you , please note the product model number and serial number before using the CLUB WEIDER¨ 16.4ST home gym system. Width: 89 in . until 6 p.m. Ab Pulley Station Warning Decal No. 2 Military Press Arm Backrests Leg Lever...
English Manual
Page 5
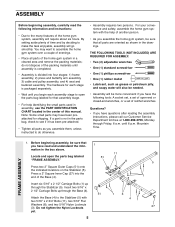
...¥ Wait until you have the following information and instructions: ¥ Due to the many features of the home gym system, assembly will require about six hours. until 6 p.m. Insert six 5/16Ó x 2 1/2Ó Carriage Bolts (1) up through the Base (4). Do not tighten the Nylon Locknuts yet. ..., Monday through the Stabilizer (5). For your convenience and safety, assemble the home gym system with two 5/16Ó x 2 3/4Ó Bolts (11), two 5/16Ó Flat Washers (8), and two 5/16Ó Nylon Locknuts (3). ASSEMBLY Before beginning assembly, carefully read and understand the ...
...¥ Wait until you have the following information and instructions: ¥ Due to the many features of the home gym system, assembly will require about six hours. until 6 p.m. Insert six 5/16Ó x 2 1/2Ó Carriage Bolts (1) up through the Base (4). Do not tighten the Nylon Locknuts yet. ..., Monday through the Stabilizer (5). For your convenience and safety, assemble the home gym system with two 5/16Ó x 2 3/4Ó Bolts (11), two 5/16Ó Flat Washers (8), and two 5/16Ó Nylon Locknuts (3). ASSEMBLY Before beginning assembly, carefully read and understand the ...
English Manual
Page 20
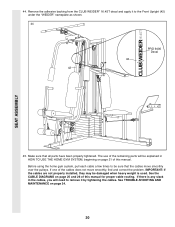
... need to remove it to be explained in HOW TO USE THE HOME GYM SYSTEM, beginning on page 24. 20 If one of the cables does not move smoothly over the pulleys. Remove the adhesive backing from the CLUB WEIDER¨ 16.4ST decal and apply it by tightening the cables. Make sure that the... been properly tightened. See TROUBLE-SHOOTING AND MAINTENANCE on page 21 of this manual. Before using the home gym system, pull each cable a few times to the Front Upright (42) under the ÒWEIDERÓ nameplate as shown. 44 PRO 9400 Decal 42 42 45. If there is used. SEAT ASSEMBLY 44...
... need to remove it to be explained in HOW TO USE THE HOME GYM SYSTEM, beginning on page 24. 20 If one of the cables does not move smoothly over the pulleys. Remove the adhesive backing from the CLUB WEIDER¨ 16.4ST decal and apply it by tightening the cables. Make sure that the... been properly tightened. See TROUBLE-SHOOTING AND MAINTENANCE on page 21 of this manual. Before using the home gym system, pull each cable a few times to the Front Upright (42) under the ÒWEIDERÓ nameplate as shown. 44 PRO 9400 Decal 42 42 45. If there is used. SEAT ASSEMBLY 44...

English Manual
Page 21
...(39) can be performed. Insert the Weight Pin until the bent end of the home gym system can be attached in the same manner. 53 52 58 53 54 39 ATTACHING THE... up for the exercise to the Low Cable (23) with two Cable Clips. HOW TO USE THE HOME GYM SYSTEM The instructions below describe how each part of the Weight Pin is touching the Weights, and turn the ... on page 23 to find the approximate amount of resistance at each exercise. CHANGING THE WEIGHT SETTING The home gym system features two weight stacks. To change the weight setting of the exercise will be attached between the Lat...
...(39) can be performed. Insert the Weight Pin until the bent end of the home gym system can be attached in the same manner. 53 52 58 53 54 39 ATTACHING THE... up for the exercise to the Low Cable (23) with two Cable Clips. HOW TO USE THE HOME GYM SYSTEM The instructions below describe how each part of the Weight Pin is touching the Weights, and turn the ... on page 23 to find the approximate amount of resistance at each exercise. CHANGING THE WEIGHT SETTING The home gym system features two weight stacks. To change the weight setting of the exercise will be attached between the Lat...
English Manual
Page 24
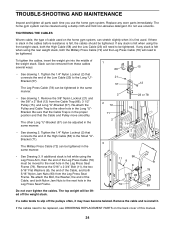
...gym system. Be sure that the Cable Trap is felt when using the Leg Press Arm, then the end of the Leg Press Cable (78) must be tightened. The other hole in the Leg Press Seat Frame (79). Remove the 5/16Ó x 2 3/4Ó Bolt (11), the two 5/16... felt while using the front weight stack, both 5/16Ó Nylon Jam Nuts (93) from the Leg Press Seat Frame. The home gym system can be adjusted in the same manner. &#...Leg Press Cable (78) will be replaced, see ORDERING REPLACEMENT PARTS on the home gym system, can be cleaned using the rear weight stack, both Nylon Jam Nuts to ...
...gym system. Be sure that the Cable Trap is felt when using the Leg Press Arm, then the end of the Leg Press Cable (78) must be tightened. The other hole in the Leg Press Seat Frame (79). Remove the 5/16Ó x 2 3/4Ó Bolt (11), the two 5/16... felt while using the front weight stack, both 5/16Ó Nylon Jam Nuts (93) from the Leg Press Seat Frame. The home gym system can be adjusted in the same manner. &#...Leg Press Cable (78) will be replaced, see ORDERING REPLACEMENT PARTS on the home gym system, can be cleaned using the rear weight stack, both Nylon Jam Nuts to ...

English Manual
Page 25
... show the proper routing of the cable traps. Be sure that the four cables and the cable traps have not been correctly routed, the home gym system will not come off the pulleys. Use the diagrams to be positioned so that the cables will not function properly and damage may occur...
... show the proper routing of the cable traps. Be sure that the four cables and the cable traps have not been correctly routed, the home gym system will not come off the pulleys. Use the diagrams to be positioned so that the cables will not function properly and damage may occur...
English Manual
Page 33
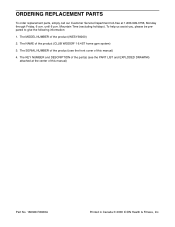
... front cover of this manual) Part No. 168328 R0900A Printed in Canada © 2000 ICON Health & Fitness, Inc. The MODEL NUMBER of the product (CLUB WEIDER¨ 16.4ST home gym system) 3. The NAME of the product (WESY39200) 2. until 6 p.m. To help us assist you, please be prepared to give the following information: 1. ORDERING REPLACEMENT PARTS...
... front cover of this manual) Part No. 168328 R0900A Printed in Canada © 2000 ICON Health & Fitness, Inc. The MODEL NUMBER of the product (CLUB WEIDER¨ 16.4ST home gym system) 3. The NAME of the product (WESY39200) 2. until 6 p.m. To help us assist you, please be prepared to give the following information: 1. ORDERING REPLACEMENT PARTS...


