
English Manual
Page 1
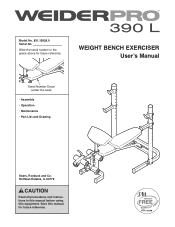
WEIGHT BENCH EXERCISER Userʼs Manual Serial Number Decal (under the seat) • Assembly • Operation • Maintenance • Part List and Drawing Sears, Roebuck and Co. Hoffman Estates, IL 60179 CAUTION Read all precautions and instructions in the space above for future reference. Save this equipment. Model No. 831.15928.0 Serial No. Write the serial number in this manual before using this manual for future reference.
WEIGHT BENCH EXERCISER Userʼs Manual Serial Number Decal (under the seat) • Assembly • Operation • Maintenance • Part List and Drawing Sears, Roebuck and Co. Hoffman Estates, IL 60179 CAUTION Read all precautions and instructions in the space above for future reference. Save this equipment. Model No. 831.15928.0 Serial No. Write the serial number in this manual before using this manual for future reference.
English Manual
Page 2
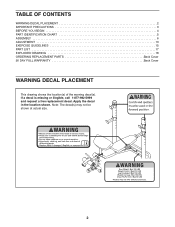
TABLE OF CONTENTS WARNING DECAL PLACEMENT 2 IMPORTANT PRECAUTIONS 3 BEFORE YOU BEGIN 4 PART IDENTIFICATION CHART 5 ASSEMBLY 6 ADJUSTMENT 13 EXERCISE GUIDELINES 15 PART LIST 17 EXPLODED DRAWING 18 ORDERING REPLACEMENT PARTS Back Cover 90 DAY FULL WARRANTY Back Cover WARNING DECAL PLACEMENT This drawing shows the location(s) of the warning decal(s). Apply the decal in the location shown. If a decal is missing or illegible, call 1-877-992-5999 and request a free replacement decal. Note: The decal(s) may not be shown at actual size. 2
TABLE OF CONTENTS WARNING DECAL PLACEMENT 2 IMPORTANT PRECAUTIONS 3 BEFORE YOU BEGIN 4 PART IDENTIFICATION CHART 5 ASSEMBLY 6 ADJUSTMENT 13 EXERCISE GUIDELINES 15 PART LIST 17 EXPLODED DRAWING 18 ORDERING REPLACEMENT PARTS Back Cover 90 DAY FULL WARRANTY Back Cover WARNING DECAL PLACEMENT This drawing shows the location(s) of the warning decal(s). Apply the decal in the location shown. If a decal is missing or illegible, call 1-877-992-5999 and request a free replacement decal. Note: The decal(s) may not be shown at actual size. 2
English Manual
Page 4
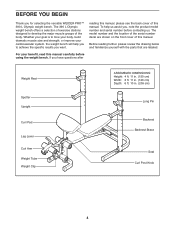
...number and serial number before using the weight bench. For your cardiovascular system, the weight bench will help us assist you for selecting the versatile WEIDER PRO™ 390 L Olympic weight bench. If you want. reading this manual. Whether your goal is to achieve the specific results you have... questions after Weight Rest Spotter Upright Curl Pad Leg Lever Curl Arm Weight Tube Weight Clip ASSEMBLED DIMENSIONS: Height: 4 ft. 11 in. (150 cm) Width: 3 ft. 11 in. (120 cm) Depth: 6 ft. 10 in. (209 cm) Long Pin Backrest ...
...number and serial number before using the weight bench. For your cardiovascular system, the weight bench will help us assist you for selecting the versatile WEIDER PRO™ 390 L Olympic weight bench. If you want. reading this manual. Whether your goal is to achieve the specific results you have... questions after Weight Rest Spotter Upright Curl Pad Leg Lever Curl Arm Weight Tube Weight Clip ASSEMBLED DIMENSIONS: Height: 4 ft. 11 in. (150 cm) Width: 3 ft. 11 in. (120 cm) Depth: 6 ft. 10 in. (209 cm) Long Pin Backrest ...
English Manual
Page 5
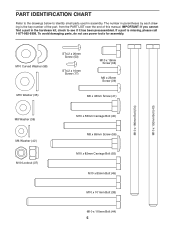
IMPORTANT: If you cannot find a part in assembly. PART IDENTIFICATION CHART Refer to the drawings below to identify small parts used in the hardware kit, check to see if it has been preassembled. ... (44) 5 The number in parentheses by each drawing is missing, please call 1-877-992-5999. To avoid damaging parts, do not use power tools for assembly. If a part is the key number of the part, from the PART LIST near the end of this manual.
IMPORTANT: If you cannot find a part in assembly. PART IDENTIFICATION CHART Refer to the drawings below to identify small parts used in the hardware kit, check to see if it has been preassembled. ... (44) 5 The number in parentheses by each drawing is missing, please call 1-877-992-5999. To avoid damaging parts, do not use power tools for assembly. If a part is the key number of the part, from the PART LIST near the end of this manual.

English Manual
Page 6
...and the Front Leg (4). 4 2 Square Holes 37 56 36 55 6 Attach the Front Leg (4) to walk around the weight bench as you assemble it will be used. To make assembly easier, read the tips at 1 the top of ratchet wrenches. 1. Then, tighten an M8 x 65mm Screw (56) with two M10 x 82mm...socket set, a set of open-end or closed-end wrenches, or a set of this page before your begin. ASSEMBLY • Assembly requires two persons. • Because of its size and weight, assemble the weight bench in a cleared area and remove the packing materials. Make sure that the square holes are facing ...
...and the Front Leg (4). 4 2 Square Holes 37 56 36 55 6 Attach the Front Leg (4) to walk around the weight bench as you assemble it will be used. To make assembly easier, read the tips at 1 the top of ratchet wrenches. 1. Then, tighten an M8 x 65mm Screw (56) with two M10 x 82mm...socket set, a set of open-end or closed-end wrenches, or a set of this page before your begin. ASSEMBLY • Assembly requires two persons. • Because of its size and weight, assemble the weight bench in a cleared area and remove the packing materials. Make sure that the square holes are facing ...


