
User Manual
Page 3
... fall with pre-existing health problems. Read all users of this manual and in use the VKR station when either weight stack is the responsibility of the owner to ensure that does not use of all times. 5. It is in the accompanying literature before using the ...home gym system. 2. This is being used. Never release the press arm, butterfly arms, squat arm, leg lever, lat bar or nylon strap while weights are exercising, stop immediately and begin cooling down. 13. Inspect and properly tighten all times. Keep small children and pets away from the home gym...
... fall with pre-existing health problems. Read all users of this manual and in use the VKR station when either weight stack is the responsibility of the owner to ensure that does not use of all times. 5. It is in the accompanying literature before using the ...home gym system. 2. This is being used. Never release the press arm, butterfly arms, squat arm, leg lever, lat bar or nylon strap while weights are exercising, stop immediately and begin cooling down. 13. Inspect and properly tighten all times. Keep small children and pets away from the home gym...
User Manual
Page 4
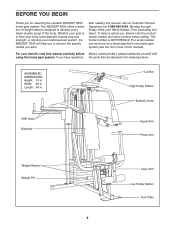
... system. If you want. Lat Bar High Pulley Station Butterfly Arms VKR Arms Backrest Squat Arm Press Arm Weight Stacks Weight Pin Leg Lever Low Pulley Station Foot Plate 4 The WEIDER® 8530 offers a selection of weight stations designed to tone your body, build dramatic muscle size and strength, or improve your benefit, read this...
... system. If you want. Lat Bar High Pulley Station Butterfly Arms VKR Arms Backrest Squat Arm Press Arm Weight Stacks Weight Pin Leg Lever Low Pulley Station Foot Plate 4 The WEIDER® 8530 offers a selection of weight stations designed to tone your body, build dramatic muscle size and strength, or improve your benefit, read this...
User Manual
Page 6
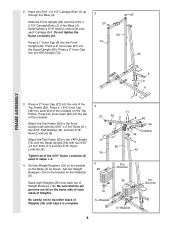
... 5/16" Nylon Locknuts (3) used in the Base (4). Be careful not to tip either stack of the crossbar on the same side of each end of Weights (25) until step 6 is complete. 3 27 11 74 1 11 55 3 8 96 44 Crossbar 44 3 56 42 4 Pin Grooves 25 19 5-Bracket 25 19 4-Bracket...VKR Upright (74) and the Squat Upright (56) with two 5/16" x 2 3/4" Bolts (11), two 5/16" Flat Washers (8), and two 5/16" Nylon Locknuts (3). Set two Weight Bumpers (19) on the bracket on the Base (4) as shown. Press a 1 3/4" Inner Cap (44) into the VKR Upright (74). 42 FRAME ASSEMBLY 6 3 4 3. Set two...
... 5/16" Nylon Locknuts (3) used in the Base (4). Be careful not to tip either stack of the crossbar on the same side of each end of Weights (25) until step 6 is complete. 3 27 11 74 1 11 55 3 8 96 44 Crossbar 44 3 56 42 4 Pin Grooves 25 19 5-Bracket 25 19 4-Bracket...VKR Upright (74) and the Squat Upright (56) with two 5/16" x 2 3/4" Bolts (11), two 5/16" Flat Washers (8), and two 5/16" Nylon Locknuts (3). Set two Weight Bumpers (19) on the bracket on the Base (4) as shown. Press a 1 3/4" Inner Cap (44) into the VKR Upright (74). 42 FRAME ASSEMBLY 6 3 4 3. Set two...
User Manual
Page 7
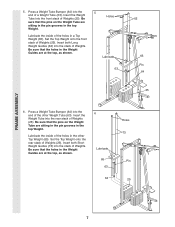
...Top Weight onto the front stack of Weights (25). Set the Top Weight onto the rear stack of Weights (25). Insert the Weight Tube into the end of the other Top Weight (65). Insert both Long Weight Guides (62) into the end of a Weight Tube (63). Be sure that the holes in the Weight Guides...pin grooves in the top Weight. Press a Weight Tube Bumper (64) into the stack of the holes in a Top Weight (65). Lubricate the inside of Weights. Insert both Short Weight Guides (73) into the front stack of Weights (25). Be sure that the pins on the Weight Tube are at the top...
...Top Weight onto the front stack of Weights (25). Set the Top Weight onto the rear stack of Weights (25). Insert the Weight Tube into the end of the other Top Weight (65). Insert both Long Weight Guides (62) into the end of a Weight Tube (63). Be sure that the holes in the Weight Guides...pin grooves in the top Weight. Press a Weight Tube Bumper (64) into the stack of the holes in a Top Weight (65). Lubricate the inside of Weights. Insert both Short Weight Guides (73) into the front stack of Weights (25). Be sure that the pins on the Weight Tube are at the top...
User Manual
Page 8
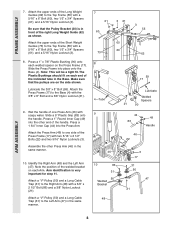
...Press Frame (17) with a 5/16" x 6" Bolt (60), two 1/2" x 3/4" Spacers (61), and a 5/16" Nylon Locknut (3). Wet the handle of one side of the Short Weight Guides (73) to the Top Frame (55) with soapy water. Press a 1" Round Inner Cap (49) into the other Press Arm (46) in the Base. Arm...to one Press Arm (46) with a 5/16" x 6" Bolt (60), two 1/2" x 3/4" Spacers (61), and a 5/16" Nylon Locknut (3). 8. Attach the upper ends of the right Long Weight Guide (62) as shown. The Plastic Bushings should fit on each welded spacer on the Press Frame (17). Attach the Press Arm (46) to the...
...Press Frame (17) with a 5/16" x 6" Bolt (60), two 1/2" x 3/4" Spacers (61), and a 5/16" Nylon Locknut (3). Wet the handle of one side of the Short Weight Guides (73) to the Top Frame (55) with soapy water. Press a 1" Round Inner Cap (49) into the other Press Arm (46) in the Base. Arm...to one Press Arm (46) with a 5/16" x 6" Bolt (60), two 1/2" x 3/4" Spacers (61), and a 5/16" Nylon Locknut (3). 8. Attach the upper ends of the right Long Weight Guide (62) as shown. The Plastic Bushings should fit on each welded spacer on the Press Frame (17). Attach the Press Arm (46) to the...
User Manual
Page 12
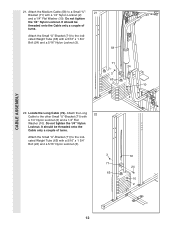
... be threaded onto the Cable only a couple of turns. Attach the Long 22 Cable to the indicated Weight Tube (63) with a 1/4" Nylon Locknut (2) and a 1/4" Flat Washer (10). Attach the Medium Cable (58) to the indicated Weight Tube (63) with a 1/4" Nylon Locknut (2) and a 1/4" Flat Washer (10). Do not tighten the 1/4" Nylon Locknut. Attach...
... be threaded onto the Cable only a couple of turns. Attach the Long 22 Cable to the indicated Weight Tube (63) with a 1/4" Nylon Locknut (2) and a 1/4" Flat Washer (10). Attach the Medium Cable (58) to the indicated Weight Tube (63) with a 1/4" Nylon Locknut (2) and a 1/4" Flat Washer (10). Do not tighten the 1/4" Nylon Locknut. Attach...
User Manual
Page 16
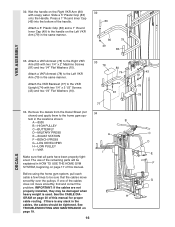
Attach a VKR Armrest (78) to be tightened. tem in the locations shown: B A -8530 B -HIGH PULLEY C -BUTTERFLY D-MILITARY PRESS A E -SQUAT STATION F -BENCH PRESS G-LEG DEVELOPER H-LOW PULLEY I -VKR I Make sure that the cables move smoothly, find and correct the ... 83 80 49 79 83 VKR ASSEMBLY 33. Press a 1" Round Inner Cap (49) into the bottom of the remaining parts will be damaged when heavy weight is any slack in HOW TO USE THE HOME GYM SYSTEM, beginning on the Left VKR Arm (79) in the same manner. If one of...
Attach a VKR Armrest (78) to be tightened. tem in the locations shown: B A -8530 B -HIGH PULLEY C -BUTTERFLY D-MILITARY PRESS A E -SQUAT STATION F -BENCH PRESS G-LEG DEVELOPER H-LOW PULLEY I -VKR I Make sure that the cables move smoothly, find and correct the ... 83 80 49 79 83 VKR ASSEMBLY 33. Press a 1" Round Inner Cap (49) into the bottom of the remaining parts will be damaged when heavy weight is any slack in HOW TO USE THE HOME GYM SYSTEM, beginning on the Left VKR Arm (79) in the same manner. If one of...
User Manual
Page 17
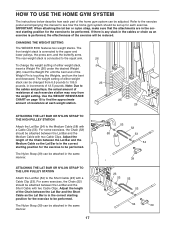
.... ATTACHING THE LAT BAR OR NYLON STRAP TO THE LOW PULLEY STATION Attach the Lat Bar (54) to be performed. CHANGING THE WEIGHT SETTING The WEIDER 8530 features two weight stacks. The Nylon Strap (39) can be reduced. IMPORTANT: When attaching the lat bar or nylon strap, make sure that the...For some exercises, the Chain (52) should be adjusted. Refer to the exercise poster accompanying this manual to be performed. The weight setting of the Weight Pin is in the correct starting position for the exercise to see how the home gym system should be attached between the Lat ...
.... ATTACHING THE LAT BAR OR NYLON STRAP TO THE LOW PULLEY STATION Attach the Lat Bar (54) to be performed. CHANGING THE WEIGHT SETTING The WEIDER 8530 features two weight stacks. The Nylon Strap (39) can be reduced. IMPORTANT: When attaching the lat bar or nylon strap, make sure that the...For some exercises, the Chain (52) should be adjusted. Refer to the exercise poster accompanying this manual to be performed. The weight setting of the Weight Pin is in the correct starting position for the exercise to see how the home gym system should be attached between the Lat ...
User Manual
Page 18
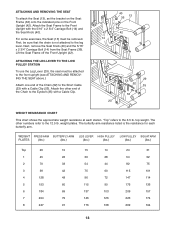
... (36). Lift the Seat Frame off the Front Upright (42). Attach the other numbers refer to the Short Cable (23) with a Cable Clip (53). top weight. WEIGHT PRESS ARM BUTTERFLY ARM LEG LEVER HIGH PULLEY LOW PULLEY SQUAT ARM PLATES (lbs.) (lbs.) (lbs.) (lbs.) (lbs.) (lbs.) Top 20 10 15 14 24... Seat (13) must be sure that the chain is the resistance for each station. The other end of the Chain (52) to the 12.5 lb. weight plates. First, be attached to the front upright (see ATTACHING AND REMOVING THE SEAT above.) Attach one end of the Chain to the leg lever...
... (36). Lift the Seat Frame off the Front Upright (42). Attach the other numbers refer to the Short Cable (23) with a Cable Clip (53). top weight. WEIGHT PRESS ARM BUTTERFLY ARM LEG LEVER HIGH PULLEY LOW PULLEY SQUAT ARM PLATES (lbs.) (lbs.) (lbs.) (lbs.) (lbs.) (lbs.) Top 20 10 15 14 24... Seat (13) must be sure that the chain is the resistance for each station. The other end of the Chain (52) to the 12.5 lb. weight plates. First, be attached to the front upright (see ATTACHING AND REMOVING THE SEAT above.) Attach one end of the Chain to the leg lever...
User Manual
Page 19
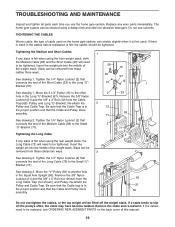
...Move the "V"-Pulley (50) to be tightened. Re-attach the Pulley and Cable Trap. If the cables need to slip off the weight stack. Insert the weight pin into the middle of the weight stack. Re-attach the 2 Pulley and Cable Trap. Tighten the 1/4" Nylon Locknut (2) that connects the end of the... is in 72 the proper position and that the Cable and Pulley move smoothly. 56 21 50 Do not overtighten the cables, or the top weight will need to another hole in the Long "U"-Bracket (57). Do not use the home gym system. See drawing 1. Remove the 3/8" Nylon Locknut (...
...Move the "V"-Pulley (50) to be tightened. Re-attach the Pulley and Cable Trap. If the cables need to slip off the weight stack. Insert the weight pin into the middle of the weight stack. Re-attach the 2 Pulley and Cable Trap. Tighten the 1/4" Nylon Locknut (2) that connects the end of the... is in 72 the proper position and that the Cable and Pulley move smoothly. 56 21 50 Do not overtighten the cables, or the top weight will need to another hole in the Long "U"-Bracket (57). Do not use the home gym system. See drawing 1. Remove the 3/8" Nylon Locknut (...
User Manual
Page 20
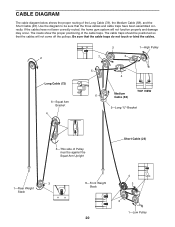
... (72), the Medium Cable (58), and the Short Cable (23). The cable traps should be against the Squat Arm Upright Short Cable (23) 3 1-Rear Weight Stack 4 8-Front Weight 3 Stack 2 1-Low Pulley 20 Use the diagram to be sure that the cable traps do not touch or bind the cables. 2 1-High Pulley 2 7 3 Long...
... (72), the Medium Cable (58), and the Short Cable (23). The cable traps should be against the Squat Arm Upright Short Cable (23) 3 1-Rear Weight Stack 4 8-Front Weight 3 Stack 2 1-Low Pulley 20 Use the diagram to be sure that the cable traps do not touch or bind the cables. 2 1-High Pulley 2 7 3 Long...
User Manual
Page 23
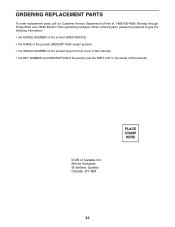
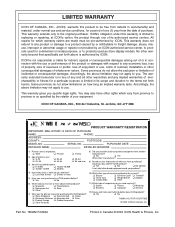
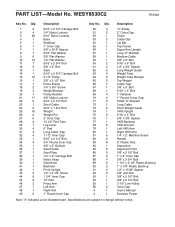
When ordering parts, please be prepared to give the following information: • the MODEL NUMBER of the product (WESY8530C2) • the NAME of the product (WEIDER® 8530 weight system) • the SERIAL NUMBER of the product (see the front cover of this manual) • the KEY NUMBER and DESCRIPTION of the part(s) (see...
When ordering parts, please be prepared to give the following information: • the MODEL NUMBER of the product (WESY8530C2) • the NAME of the product (WEIDER® 8530 weight system) • the SERIAL NUMBER of the product (see the front cover of this manual) • the KEY NUMBER and DESCRIPTION of the part(s) (see...
User Manual
Page 24
... other warranties and any implied warranties of purchase. J Less than 3 times J 3 times or more 5) Have you specific legal rights. J Bicycle J Exercise Cycle J Treadmill J Home Gym J Weight Bench J Stepper J Cardio Glide J Other 11) Which type of /du Canada Inc. Part No. 185282 R1202A Printed in workmanship and material, under this ICON product...
... other warranties and any implied warranties of purchase. J Less than 3 times J 3 times or more 5) Have you specific legal rights. J Bicycle J Exercise Cycle J Treadmill J Home Gym J Weight Bench J Stepper J Cardio Glide J Other 11) Which type of /du Canada Inc. Part No. 185282 R1202A Printed in workmanship and material, under this ICON product...
User Manual
Page 29
... 5/16" Flat Washer 3/8" Flat Washer 1/4" Flat Washer 5/16" x 2 3/4" Bolt 3/8" x 2" Bolt Seat 5/16" x 2 3/4" Carriage Bolt 3 1/2" Pulley 3/8" x 3 1/2" Bolt Press Frame 1/4" x 3/4" Screw Weight Bumper Pulley Bracket 3/8" Nylon Locknut 5/16" x 2 1/2" Bolt Short Cable 5/16" x 1 3/4" Bolt Weight Weight Pin 2" Inner Cap 13 1/2" Pad Tube Leg Lever 6" Pad Long Cable Trap 1 1/2" Inner Cap 5/16" x 2 1/4" Bolt 3/4" Round Inner Cap 3/8" x 2" Eyebolt...
... 5/16" Flat Washer 3/8" Flat Washer 1/4" Flat Washer 5/16" x 2 3/4" Bolt 3/8" x 2" Bolt Seat 5/16" x 2 3/4" Carriage Bolt 3 1/2" Pulley 3/8" x 3 1/2" Bolt Press Frame 1/4" x 3/4" Screw Weight Bumper Pulley Bracket 3/8" Nylon Locknut 5/16" x 2 1/2" Bolt Short Cable 5/16" x 1 3/4" Bolt Weight Weight Pin 2" Inner Cap 13 1/2" Pad Tube Leg Lever 6" Pad Long Cable Trap 1 1/2" Inner Cap 5/16" x 2 1/4" Bolt 3/4" Round Inner Cap 3/8" x 2" Eyebolt...


