

English Manual
Page 2
TABLE OF CONTENTS IMPORTANT PRECAUTIONS 3 BEFORE YOU BEGIN 4 ASSEMBLY 5 ADJUSTMENTS 19 TROUBLE-SHOOTING AND MAINTENANCE 21 WEIGHT RESISTANCE CHART 22 CABLE DIAGRAM 23 ORDERING REPLACEMENT PARTS Back Cover LIMITED WARRANTY Back Cover Note: An EXPLODED DRAWING/PART LIST and a PART IDENTIFICATION CHART are attached in the center of ICON Health & Fitness, Inc. 2 WEIDER is a registered trademark of this manual. Remove the EXPLODED DRAWING/PART LIST and the PART IDENTIFICATION CHART before beginning assembly.
TABLE OF CONTENTS IMPORTANT PRECAUTIONS 3 BEFORE YOU BEGIN 4 ASSEMBLY 5 ADJUSTMENTS 19 TROUBLE-SHOOTING AND MAINTENANCE 21 WEIGHT RESISTANCE CHART 22 CABLE DIAGRAM 23 ORDERING REPLACEMENT PARTS Back Cover LIMITED WARRANTY Back Cover Note: An EXPLODED DRAWING/PART LIST and a PART IDENTIFICATION CHART are attached in the center of ICON Health & Fitness, Inc. 2 WEIDER is a registered trademark of this manual. Remove the EXPLODED DRAWING/PART LIST and the PART IDENTIFICATION CHART before beginning assembly.
English Manual
Page 10
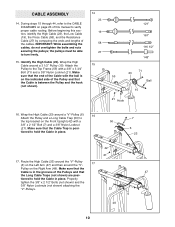
During steps 15 through 44, refer to the CABLE DIAGRAMS on the Front Upright (42) with a 50 3/8" x 2 1/2" Bolt (7) and a 3/8" Nylon Locknut (21). Before beginning this manual to hold the Cable in place. 7 6 23 42 21 17. Identify the High Cable (23). Attach the Pulley to turn freely. ...shown) and the 3/8" Nylon Locknuts (not shown) attaching the "V"-Pulleys. 23 6 48 10 tioned to verify proper cable routing. IMPORTANT: While assembling the cables, do not overtighten the bolts and nuts securing the pulleys; tioned to the top bracket on page 23 of this ...
During steps 15 through 44, refer to the CABLE DIAGRAMS on the Front Upright (42) with a 50 3/8" x 2 1/2" Bolt (7) and a 3/8" Nylon Locknut (21). Before beginning this manual to hold the Cable in place. 7 6 23 42 21 17. Identify the High Cable (23). Attach the Pulley to turn freely. ...shown) and the 3/8" Nylon Locknuts (not shown) attaching the "V"-Pulleys. 23 6 48 10 tioned to verify proper cable routing. IMPORTANT: While assembling the cables, do not overtighten the bolts and nuts securing the pulleys; tioned to the top bracket on page 23 of this ...

English Manual
Page 19
... and release the knob so that the attachments are not properly installed, they may be adjusted. Before using the weight system. See the CABLE DIAGRAMS on the knob is touching the Weights, and turn the bent end downward. CHANGING THE WEIGHT SETTING To change the resistance setting of the ... amount of resistance at each exercise station. 63 26 25 CHANGING THE RESISTANCE CYLINDER SETTING To change the weight setting of resistance at each cable a few times to insert the Weight Pin until the bent end of the remaining parts will vary from the weight setting. 49. IMPORTANT...
... and release the knob so that the attachments are not properly installed, they may be adjusted. Before using the weight system. See the CABLE DIAGRAMS on the knob is touching the Weights, and turn the bent end downward. CHANGING THE WEIGHT SETTING To change the resistance setting of the ... amount of resistance at each exercise station. 63 26 25 CHANGING THE RESISTANCE CYLINDER SETTING To change the weight setting of resistance at each cable a few times to insert the Weight Pin until the bent end of the remaining parts will vary from the weight setting. 49. IMPORTANT...

English Manual
Page 23
... been correctly routed, the weight system will not function properly and damage may occur. CABLE DIAGRAMS The cable diagrams below show the correct route for each cable are labeled. Use the diagram to make sure that the cable traps do not touch or bind the cables. 8 7 5 2 High Cable (23) 1-High Pulley 6 5-Rear Upright Bracket 3 4 9-Weight Stack 5 7 1-Weight Stack 4 2 Resistance...
... been correctly routed, the weight system will not function properly and damage may occur. CABLE DIAGRAMS The cable diagrams below show the correct route for each cable are labeled. Use the diagram to make sure that the cable traps do not touch or bind the cables. 8 7 5 2 High Cable (23) 1-High Pulley 6 5-Rear Upright Bracket 3 4 9-Weight Stack 5 7 1-Weight Stack 4 2 Resistance...


