

English Manual
Page 2
... allow children on the weight bench in the center of this product may result in the location shown. Apply the replacement decal in serious injury. • Read user's manual and follow all warnings and operating instructions prior to order a free replacement decal. WARNING • Misuse of this area. ! WEIDER is missing or illegible...
... allow children on the weight bench in the center of this product may result in the location shown. Apply the replacement decal in serious injury. • Read user's manual and follow all warnings and operating instructions prior to order a free replacement decal. WARNING • Misuse of this area. ! WEIDER is missing or illegible...
English Manual
Page 3
... time while exercising, stop immediately and begin cooling down. Make sure that is designed to ensure that all users of the weight bench are inserted completely and tightened into the uprights before performing leg curls with the leg lever. 17. Do not place more ... you are properly tightened each time you cannot complete a repetition. 14. When you are using the weight bench. 1. Note: The weight bench does not include a barbell or weights. 16. Use the weight bench only on both ends of all instructions in the adjustment brackets. 9. Do not place more than 110...
... time while exercising, stop immediately and begin cooling down. Make sure that is designed to ensure that all users of the weight bench are inserted completely and tightened into the uprights before performing leg curls with the leg lever. 17. Do not place more ... you are properly tightened each time you cannot complete a repetition. 14. When you are using the weight bench. 1. Note: The weight bench does not include a barbell or weights. 16. Use the weight bench only on both ends of all instructions in the adjustment brackets. 9. Do not place more than 110...
English Manual
Page 4
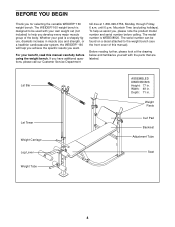
... manual carefully before calling. The serial number can be used with the parts that are labeled. The WEIDER® 160 weight bench is WEBE08920. Depth: 71 in muscle size and strength, or a healthier cardiovascular system, the WEIDER® 160 will help you achieve the specific results you , please note the product model number and serial number...
... manual carefully before calling. The serial number can be used with the parts that are labeled. The WEIDER® 160 weight bench is WEBE08920. Depth: 71 in muscle size and strength, or a healthier cardiovascular system, the WEIDER® 160 will help you achieve the specific results you , please note the product model number and serial number...
English Manual
Page 5
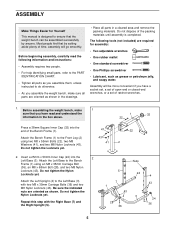
... of open-end or closed-end wrenches, or a set of the packing materials until assembly is designed to ensure that the weight bench can be more convenient if you assemble the weight bench, make 1 sure that by anyone. Do not tighten the Locknuts yet. 41 22 43 41 2 2. Attach the Left Base... to the Bench Frame (1) using two M8 x 55mm Bolts (22), two M8 Washers (41), and two M8 Nylon Locknuts (43). ASSEMBLY Make ...
... of open-end or closed-end wrenches, or a set of the packing materials until assembly is designed to ensure that the weight bench can be more convenient if you assemble the weight bench, make 1 sure that by anyone. Do not tighten the Locknuts yet. 41 22 43 41 2 2. Attach the Left Base... to the Bench Frame (1) using two M8 x 55mm Bolts (22), two M8 Washers (41), and two M8 Nylon Locknuts (43). ASSEMBLY Make ...
English Manual
Page 9
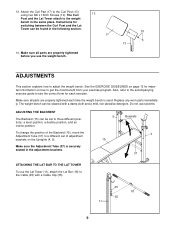
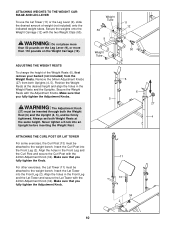
...Tube (37) is used. Make sure all parts are properly tightened each exercise. The weight bench can be found in the same place. To change the position of adjustment brackets on how to the weight bench in the following section. 10 17 13 14. Also, refer to the accompanying exercise ...guide to see the correct form for important information on the Uprights (4, 5). See the EXERCISE GUIDELINES on page 12 for each time the weight bench is securely seated in the adjustment brackets. 5 Brackets 4 15 37 ATTACHING THE LAT BAR TO THE LAT TOWER To use the Lat Tower ...
...Tube (37) is used. Make sure all parts are properly tightened each exercise. The weight bench can be found in the same place. To change the position of adjustment brackets on how to the weight bench in the following section. 10 17 13 14. Also, refer to the accompanying exercise ...guide to see the correct form for important information on the Uprights (4, 5). See the EXERCISE GUIDELINES on page 12 for each time the weight bench is securely seated in the adjustment brackets. 5 Brackets 4 15 37 ATTACHING THE LAT BAR TO THE LAT TOWER To use the Lat Tower ...
English Manual
Page 10
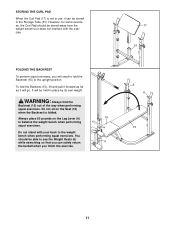
... The Adjustment Knob (27) must be inserted through both the Weight Rest (6) and the Upright (4, 5), and be attached to the weight bench. Remove the 54mm Adjustment Knobs (27) from the Weight Rests. Secure the Weight Rests with the two Weight Clips (50). Never tighten a Knob into an Upright before ...exercises, the Curl Post (13) must be attached to the weight bench. Make sure that you fully tighten the Adjustment Knob. 34 2 10 Insert the Lat Tower into the Front Leg (2). Secure the weights onto the Weight Carriage (12) with the Adjustment Knobs. Align the holes ...
... The Adjustment Knob (27) must be inserted through both the Weight Rest (6) and the Upright (4, 5), and be attached to the weight bench. Remove the 54mm Adjustment Knobs (27) from the Weight Rests. Secure the Weight Rests with the two Weight Clips (50). Never tighten a Knob into an Upright before ...exercises, the Curl Post (13) must be attached to the weight bench. Make sure that you fully tighten the Adjustment Knob. 34 2 10 Insert the Lat Tower into the Front Leg (2). Secure the weights onto the Weight Carriage (12) with the Adjustment Knobs. Align the holes ...
English Manual
Page 11
It will go. You should be stored away from the weight bench so it will be held in the Storage Tube (51). WARNING: Always fold the Backrest (15) out of the way when performing squat exercises. STORING ... barbell when you will need to fold the Backrest (15) to the weight bench when performing squat exercises. Do not sit on the Leg Lever (9) 16 to see the Weight Rests (6) while exercising so that you can be able to balance the weight bench when performing squat exercises. To fold the Backrest (15), lift and...
It will go. You should be stored away from the weight bench so it will be held in the Storage Tube (51). WARNING: Always fold the Backrest (15) out of the way when performing squat exercises. STORING ... barbell when you will need to fold the Backrest (15) to the weight bench when performing squat exercises. Do not sit on the Leg Lever (9) 16 to see the Weight Rests (6) while exercising so that you can be able to balance the weight bench when performing squat exercises. To fold the Backrest (15), lift and...
English Manual
Page 16
... , please be prepared to give the following information when calling: • The MODEL NUMBER of the product (WEBE08920) • The NAME of the product (WEIDER® 160 weight bench) • The SERIAL NUMBER of the product (see the front cover of this manual) • The KEY NUMBER and DESCRIPTION of the desired part(s) (see...
... , please be prepared to give the following information when calling: • The MODEL NUMBER of the product (WEBE08920) • The NAME of the product (WEIDER® 160 weight bench) • The SERIAL NUMBER of the product (see the front cover of this manual) • The KEY NUMBER and DESCRIPTION of the desired part(s) (see...
English Manual
Page 19
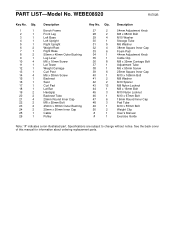
... M8 Washer M10 Spacer M8 Nylon Locknut M8 x 16mm Bolt M10 Nylon Locknut M10 x 67mm Bolt 19mm Round Inner Cap Pad Tube M10 x 55mm Bolt Weight Clip User's Manual Exercise Guide Note: "#" indicates a non-illustrated part. See the back cover of this manual for information about ordering replacement parts. Qty. 1 1 2 1 ... 21 4 22 2 23 2 24 2 25 1 26 1 Description Bench Frame Front Leg Left Base Left Upright Right Upright Weight Rest Right Base 50mm x 45mm Outer Bushing Leg Lever M6 x 16mm Screw Lat Tower Weight Carriage Curl Post M6 x 38mm Screw Backrest Seat Curl Pad Lat Bar ...
... M8 Washer M10 Spacer M8 Nylon Locknut M8 x 16mm Bolt M10 Nylon Locknut M10 x 67mm Bolt 19mm Round Inner Cap Pad Tube M10 x 55mm Bolt Weight Clip User's Manual Exercise Guide Note: "#" indicates a non-illustrated part. See the back cover of this manual for information about ordering replacement parts. Qty. 1 1 2 1 ... 21 4 22 2 23 2 24 2 25 1 26 1 Description Bench Frame Front Leg Left Base Left Upright Right Upright Weight Rest Right Base 50mm x 45mm Outer Bushing Leg Lever M6 x 16mm Screw Lat Tower Weight Carriage Curl Post M6 x 38mm Screw Backrest Seat Curl Pad Lat Bar ...


