

User Manual
Page 1
... HOT LINE. WEBE13870 Serial No. MST MAY 12 1997 CAUTION Read all precatitIons and Instruc- CUSTOMER HOT LINE: 1-800-999-3756 Mon.-Fri., 6 a.m.-6 p.m. As a manufacturer, we are missing or damaged parts, we will provide immediate assistance, free of charge to providing complete customer satisfaction. WEIDER (7/ Model No. Write the serial number in the space above for future reference:-'''' USER'S MANUAL
... HOT LINE. WEBE13870 Serial No. MST MAY 12 1997 CAUTION Read all precatitIons and Instruc- CUSTOMER HOT LINE: 1-800-999-3756 Mon.-Fri., 6 a.m.-6 p.m. As a manufacturer, we are missing or damaged parts, we will provide immediate assistance, free of charge to providing complete customer satisfaction. WEIDER (7/ Model No. Write the serial number in the space above for future reference:-'''' USER'S MANUAL

User Manual
Page 2
Accordingly, the above limitation may not apply to you specific legal rights. TABLE OF CONTENTS LIMITED WARRANTY IMPORTANT PRECAUTIONS BEFORE YOU BEGIN PART IDENTIFICATION CHART ASSEMBLY ADJUSTING THE WEIGHT BENCH EXERCISE GUIDELINES PART LIST EXPLODED DRAWING ORDERING REPLACEMENT PARTS 2 3 4 5 6 10 11 14 15 Back Cover WEIDER is limited in its scope and duration to the terms set forth above is limited to replacing or repairing, at ICON's option, the product at one of its...
Accordingly, the above limitation may not apply to you specific legal rights. TABLE OF CONTENTS LIMITED WARRANTY IMPORTANT PRECAUTIONS BEFORE YOU BEGIN PART IDENTIFICATION CHART ASSEMBLY ADJUSTING THE WEIGHT BENCH EXERCISE GUIDELINES PART LIST EXPLODED DRAWING ORDERING REPLACEMENT PARTS 2 3 4 5 6 10 11 14 15 Back Cover WEIDER is limited in its scope and duration to the terms set forth above is limited to replacing or repairing, at ICON's option, the product at one of its...

User Manual
Page 3
...; Read owner's manual and follow Instructions. Do not place more than 110 pounds, including a weight bar and weights, on the weight rests; Replace any , commercial, rental, or institutional setting. 5. When you are using the leg lever, place a barbell with pre-existing health problems. Read all precautions. ICON assumes no responsibility for protection. 5.' Use the weight bench only as described in this manual before using the weight bench. 2. Inspect and tighten all times...
...; Read owner's manual and follow Instructions. Do not place more than 110 pounds, including a weight bar and weights, on the weight rests; Replace any , commercial, rental, or institutional setting. 5. When you are using the leg lever, place a barbell with pre-existing health problems. Read all precautions. ICON assumes no responsibility for protection. 5.' Use the weight bench only as described in this manual before using the weight bench. 2. Inspect and tighten all times...

User Manual
Page 4
... want. Department toll-free at the drawing using the WEIDER® 138 Weight Bench. The model number is designed to be found on a decal attached to O Seat 4 until 6 p.m. The serial number can be used with the parts that are additional questions, please call our Customer Service labeled. If you have below and familiarize yourself with your own weight set (not included) to achieve the specific results you to...
... want. Department toll-free at the drawing using the WEIDER® 138 Weight Bench. The model number is designed to be found on a decal attached to O Seat 4 until 6 p.m. The serial number can be used with the parts that are additional questions, please call our Customer Service labeled. If you have below and familiarize yourself with your own weight set (not included) to achieve the specific results you to...

User Manual
Page 5
...)-1 / I I M10 x 19mm Bolt (31)-1 M8 Washer (16)-6 1 (2( ) M6 Washer (26)-8 M6 x 16mm Screw (29)-4 M6 x 38mm Screw (30)-4 M10 Washer (34)-1 5 The number in parenthesis below each part refers to the quantity needed for shipping purposes. If you identify the small parts used in assembly. PART IDENTIFICATION CHART This chart is provided to help you cannot find a part in the parts bags, check to...
...)-1 / I I M10 x 19mm Bolt (31)-1 M8 Washer (16)-6 1 (2( ) M6 Washer (26)-8 M6 x 16mm Screw (29)-4 M6 x 38mm Screw (30)-4 M10 Washer (34)-1 5 The number in parenthesis below each part refers to the quantity needed for shipping purposes. If you identify the small parts used in assembly. PART IDENTIFICATION CHART This chart is provided to help you cannot find a part in the parts bags, check to...

User Manual
Page 6
... assembly step before you have been pre-attached for shipping purposes. If a part is completed. • Read each Upright (1) with the M10 x 19mm Bolt (31). The decal must be facing up and the high side of the WEIDER® 138 in the drawings. High Side of ratchet wrenches. 1. ASSEMBLY Before beginning assembly, carefully read and understand the information in assembly, use the PART IDENTIFICATION CHART...
... assembly step before you have been pre-attached for shipping purposes. If a part is completed. • Read each Upright (1) with the M10 x 19mm Bolt (31). The decal must be facing up and the high side of the WEIDER® 138 in the drawings. High Side of ratchet wrenches. 1. ASSEMBLY Before beginning assembly, carefully read and understand the information in assembly, use the PART IDENTIFICATION CHART...
User Manual
Page 7
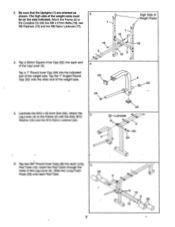
... Locknuts (17). 1 0 0 0 1 . 16\ _ 17 : High Side of the weight tube. Tap a 1" Round Inner Cap (24) into the indicated end of Weight Rests 18 2 18 16 . 4. Attach the Leg Lever (4) to the Crossbar (3) with the Bolt, M10 Washer (34) and the kii10 Nyion Locknut (33). 24 o v-.k. . 22 5 32-Lubricate 0 0 4 0. , 2 41-33 34 6. Tap a 30mm Square Inner Cap...
... Locknuts (17). 1 0 0 0 1 . 16\ _ 17 : High Side of the weight tube. Tap a 1" Round Inner Cap (24) into the indicated end of Weight Rests 18 2 18 16 . 4. Attach the Leg Lever (4) to the Crossbar (3) with the Bolt, M10 Washer (34) and the kii10 Nyion Locknut (33). 24 o v-.k. . 22 5 32-Lubricate 0 0 4 0. , 2 41-33 34 6. Tap a 30mm Square Inner Cap...
User Manual
Page 8
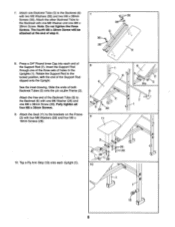
... Screws (29). 8 1 6 a 6 5 . ~Si 26 30 9 5 . , 0 0 o 2 Pin 5 2 • -I 7 1 9 11 / / I I_ 10. See the inset drawing. Fully tighten all four M6 x 38mm Screws. 9. Note: Do not tighten the three Screws. Press a 3/4" Round Inner Cap into each Upright (1). 2 . • 26 u--1 -29 26 29 10 1 15 8 Rotate the Support Rod to the Backrest (6) with two M6 Washers (26) and two M6 x 38mm Screws (30). Attach...
... Screws (29). 8 1 6 a 6 5 . ~Si 26 30 9 5 . , 0 0 o 2 Pin 5 2 • -I 7 1 9 11 / / I I_ 10. See the inset drawing. Fully tighten all four M6 x 38mm Screws. 9. Note: Do not tighten the three Screws. Press a 3/4" Round Inner Cap into each Upright (1). 2 . • 26 u--1 -29 26 29 10 1 15 8 Rotate the Support Rod to the Backrest (6) with two M6 Washers (26) and two M6 x 38mm Screws (30). Attach...

User Manual
Page 9
... each end of a Short Pad Tube (12). Press two Plastic Bushings (14) into the indicated Upright (1). Slide the Short Pad Tube 13 through the indicated Fly Arm (25) as shown. Slide a Weight Stop (28) onto the Weight Tube. Assemble the other Upright (not shown) in the same manner. 14 14...Fly Arm is on the outside of the Weight Tube. Push a 1" Round Inner 11 Cap (24) onto the end of the Fly Arm Stop (15). 0 0 13 Attach the other Fly Arm (not shown) to the Upright 12 using a M10 x 114 Bolt (19) and a Butterfly Knob (13). Attach a Fly Arm (25) to the other Fly Arm (...
... each end of a Short Pad Tube (12). Press two Plastic Bushings (14) into the indicated Upright (1). Slide the Short Pad Tube 13 through the indicated Fly Arm (25) as shown. Slide a Weight Stop (28) onto the Weight Tube. Assemble the other Upright (not shown) in the same manner. 14 14...Fly Arm is on the outside of the Weight Tube. Push a 1" Round Inner 11 Cap (24) onto the end of the Fly Arm Stop (15). 0 0 13 Attach the other Fly Arm (not shown) to the Upright 12 using a M10 x 114 Bolt (19) and a Butterfly Knob (13). Attach a Fly Arm (25) to the other Fly Arm (...
User Manual
Page 10
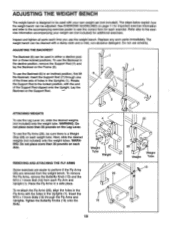
... the Leg Lever. Replace any worn parts immediately. Insert the Support Rod (7) through the Fly Arms and Uprights. Next, slide the desired weights (not included) onto the weight tubes. ADJUSTING THE WEIGHT BENCH The weight bench is a Weight Stop (28) on page 11 for important exercise information and refer to the accompanying exercise poster to see the correct form for additional exercises. The steps below explain how the weight bench can be used in...
... the Leg Lever. Replace any worn parts immediately. Insert the Support Rod (7) through the Fly Arms and Uprights. Next, slide the desired weights (not included) onto the weight tubes. ADJUSTING THE WEIGHT BENCH The weight bench is a Weight Stop (28) on page 11 for important exercise information and refer to the accompanying exercise poster to see the correct form for additional exercises. The steps below explain how the weight bench can be used in...

User Manual
Page 11
... your limits. A "set . Warming up to you plan weight training workouts. Each workout should be followed by using high amounts of repetitions in each exercise that you want to develop the most. Once you feeling exhausted. Exercise for 20,,to 30 minutes, resting for a maximum of 30 seconds between sets. • Cross Training In the pursuit of a complete and well-balanced fitness program, many sets of...
... your limits. A "set . Warming up to you plan weight training workouts. Each workout should be followed by using high amounts of repetitions in each exercise that you want to develop the most. Once you feeling exhausted. Exercise for 20,,to 30 minutes, resting for a maximum of 30 seconds between sets. • Cross Training In the pursuit of a complete and well-balanced fitness program, many sets of...

User Manual
Page 12
... you are doing a muscle building workout, 1 minute after each workout. Pectoralis Major (chest) A C. Biceps (front of each set if you are doing a weight loss workout. Move slowly as you can be photocopied and used to spend the first couple of weeks familiarizing yourself with 5 to make exercise a regular and enjoyable part of your weight and key body measurements at the end of each...
... you are doing a muscle building workout, 1 minute after each workout. Pectoralis Major (chest) A C. Biceps (front of each set if you are doing a weight loss workout. Move slowly as you can be photocopied and used to spend the first couple of weeks familiarizing yourself with 5 to make exercise a regular and enjoyable part of your weight and key body measurements at the end of each...

User Manual
Page 13
MONDAY Date: / / EXERCISE WEIGHT SETS REPS TUESDAY Date: / / AEROBIC EXERCISE WEDNESDAY EXERCISE Date: --.: / / WEIGHT SETS REPS - THURSDAY Date: / / AEROBIC EXERCISE FRIDAY Date: / / EXERCISE WEIGHT SETS REPS Make photocopies of this page for scheduling and recording your workouts. 13
MONDAY Date: / / EXERCISE WEIGHT SETS REPS TUESDAY Date: / / AEROBIC EXERCISE WEDNESDAY EXERCISE Date: --.: / / WEIGHT SETS REPS - THURSDAY Date: / / AEROBIC EXERCISE FRIDAY Date: / / EXERCISE WEIGHT SETS REPS Make photocopies of this page for scheduling and recording your workouts. 13

User Manual
Page 14
... Locknut M10 Washer User's Manual Exercise Poster "#" Indicates a non-illustrated part. Qty. 1 2 2 1 3 1 4 1 5 2 6 1 7 1 8 1 9 8 10 2 11 1 12 2 13 2 14 4 15 2 16 6 17 6 18 6 Description Upright Frame Crossbar Leg Lever Backrest Tube Backrest Support Rod Front Leg 3/4" Round Inner Cap Long Pad Tube Seat Short Pad Tube Butterfly Knob Plastic Bushing Fly Arm Stop M8 Washer M8 Nylon Locknut M8 x 57mm Bolt Key No. WEBE13870 Key No. PART LIST Model No.
... Locknut M10 Washer User's Manual Exercise Poster "#" Indicates a non-illustrated part. Qty. 1 2 2 1 3 1 4 1 5 2 6 1 7 1 8 1 9 8 10 2 11 1 12 2 13 2 14 4 15 2 16 6 17 6 18 6 Description Upright Frame Crossbar Leg Lever Backrest Tube Backrest Support Rod Front Leg 3/4" Round Inner Cap Long Pad Tube Seat Short Pad Tube Butterfly Knob Plastic Bushing Fly Arm Stop M8 Washer M8 Nylon Locknut M8 x 57mm Bolt Key No. WEBE13870 Key No. PART LIST Model No.

User Manual
Page 15
EXPLODED DRAWING Model No. B. 34 j,-33 22 ilk 9 23 20 22 0 9 7 9 24 22 10 9 9 23 0 15 WEBE13870 R0597A 6 26 0 26 0 5 30 27 11 30 12 22 9 18 16 25 28 24 19 22 16 18 2 0 14 13 r. 17 16 17 1 3 9 17 . 26 0 126 29 31 8 19 25 15 9 12 28 24 22 14 13 16 18 16 21 22 9S- 32 27 22 4 0.
EXPLODED DRAWING Model No. B. 34 j,-33 22 ilk 9 23 20 22 0 9 7 9 24 22 10 9 9 23 0 15 WEBE13870 R0597A 6 26 0 26 0 5 30 27 11 30 12 22 9 18 16 25 28 24 19 22 16 18 2 0 14 13 r. 17 16 17 1 3 9 17 . 26 0 126 29 31 8 19 25 15 9 12 28 24 22 14 13 16 18 16 21 22 9S- 32 27 22 4 0.

User Manual
Page 16
... the product (WEBE13870). 2. The KEY NUMBER and DESCRIPTION of the desired part(s) (see the front cover of this manual). 4. ORDERING REPLACEMENT PARTS To order replacement parts, simply call our Customer Service Department toll-free at 1-800-999-3756, Monday through Friday, 6 a.m. Part No. 138839 G01507-C R0597A Printed in China © 1997 ICON Health & Fitness, Inc. The MODEL NUMBER of the product (WEIDER° 138 Weight Bench). 3. The SERIAL NUMBER of the product (see...
... the product (WEBE13870). 2. The KEY NUMBER and DESCRIPTION of the desired part(s) (see the front cover of this manual). 4. ORDERING REPLACEMENT PARTS To order replacement parts, simply call our Customer Service Department toll-free at 1-800-999-3756, Monday through Friday, 6 a.m. Part No. 138839 G01507-C R0597A Printed in China © 1997 ICON Health & Fitness, Inc. The MODEL NUMBER of the product (WEIDER° 138 Weight Bench). 3. The SERIAL NUMBER of the product (see...


