
User Guide
Page 57
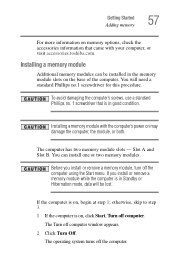
... memory module slots on the base of the computer. Getting Started Adding memory 57 For more information on memory options, check the accessories information that is in Standby or Hibernation mode, data will need a standard Phillips no.1 screwdriver for this procedure. The operating system turns off the computer using the Start menu. The Turn off computer. The computer has two memory module slots - Installing a memory module Additional memory modules can install one or two memory modules...
... memory module slots on the base of the computer. Getting Started Adding memory 57 For more information on memory options, check the accessories information that is in Standby or Hibernation mode, data will need a standard Phillips no.1 screwdriver for this procedure. The operating system turns off the computer using the Start menu. The Turn off computer. The computer has two memory module slots - Installing a memory module Additional memory modules can install one or two memory modules...
User Guide
Page 62
... recognize the memory configuration, turn off the computer, remove the memory slot cover, and make sure the memory module is strongly recommended that you can check that the computer has recognized the change. For more information on creating Recovery media, see "Creating Recovery CDs/DVDs" on page 63 Checking total memory When you add or remove a memory module, you create recovery CDs/ DVDs before using your hard disk drive or reinstall selected applications and software features or utilities. NOTE It...
... recognize the memory configuration, turn off the computer, remove the memory slot cover, and make sure the memory module is strongly recommended that you can check that the computer has recognized the change. For more information on creating Recovery media, see "Creating Recovery CDs/DVDs" on page 63 Checking total memory When you add or remove a memory module, you create recovery CDs/ DVDs before using your hard disk drive or reinstall selected applications and software features or utilities. NOTE It...
User Guide
Page 65
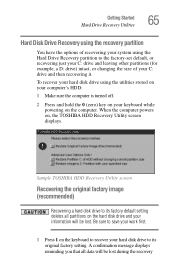
... powers on the keyboard to recover your hard disk drive to save your work first. 1 Press 1 on , the TOSHIBA HDD Recovery Utility screen displays. Be sure to its factory default setting deletes all data will be lost . To recover your hard disk drive using the Hard Drive Recovery partition to its original factory setting. Sample TOSHIBA HDD Recovery Utility screen Recovering the original factory image (recommended) Recovering a hard disk drive to the factory-set default, or recovering just your C: drive and leaving other partitions (for example, a D: drive) intact, or changing...
... powers on the keyboard to recover your hard disk drive to save your work first. 1 Press 1 on , the TOSHIBA HDD Recovery Utility screen displays. Be sure to its factory default setting deletes all data will be lost . To recover your hard disk drive using the Hard Drive Recovery partition to its original factory setting. Sample TOSHIBA HDD Recovery Utility screen Recovering the original factory image (recommended) Recovering a hard disk drive to the factory-set default, or recovering just your C: drive and leaving other partitions (for example, a D: drive) intact, or changing...
User Guide
Page 68
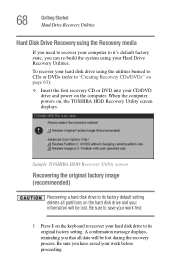
... TOSHIBA HDD Recovery Utility screen displays. 68 Getting Started Hard Drive Recovery Utilities Hard Disk Drive Recovery using the Recovery media If you need to recover your computer to "Creating Recovery CDs/DVDs" on page 63): ❖ Insert the first recovery CD or DVD into your CD/DVD drive and power on the computer. To recover your hard disk drive using the utilities burned to CDs or DVDs (refer to it's default factory state, you have saved your work first. 1 Press 1 on the keyboard to recover your hard disk drive to its original factory setting...
... TOSHIBA HDD Recovery Utility screen displays. 68 Getting Started Hard Drive Recovery Utilities Hard Disk Drive Recovery using the Recovery media If you need to recover your computer to "Creating Recovery CDs/DVDs" on page 63): ❖ Insert the first recovery CD or DVD into your CD/DVD drive and power on the computer. To recover your hard disk drive using the utilities burned to CDs or DVDs (refer to it's default factory state, you have saved your work first. 1 Press 1 on the keyboard to recover your hard disk drive to its original factory setting...

User Guide
Page 76
... Started Using external display devices Closing the display panel When you are connecting. To do this , refer to the documentation for the type of the computer. 2 Connect the device's power cable to a live electrical outlet. Connecting an external monitor or projector You can also connect an external display device to your operating system and devices. Using external display devices Your computer comes with a built-in LCD display, but you can easily attach an external monitor or projector to the available video port...
... Started Using external display devices Closing the display panel When you are connecting. To do this , refer to the documentation for the type of the computer. 2 Connect the device's power cable to a live electrical outlet. Connecting an external monitor or projector You can also connect an external display device to your operating system and devices. Using external display devices Your computer comes with a built-in LCD display, but you can easily attach an external monitor or projector to the available video port...
User Guide
Page 247
... setup 48 computer-friendly environment 41 computing tips 81 connecting to a power source 50 connection set up 139 control buttons 73 critical applications 3 Ctrl keys 84 D desktop creating new icon 135 major features 135 desktop exploration 134 desktop icons 135 Device Manager 189 checking properties 190 disabling a device 189, 190 devices keyboard 78 mouse 78 disable/enable TOSHIBA Touch and Launch 178 Disk Defragmenter 197 disk drive corrupted/damaged data files 197 missing files/trouble accessing a disk...
... setup 48 computer-friendly environment 41 computing tips 81 connecting to a power source 50 connection set up 139 control buttons 73 critical applications 3 Ctrl keys 84 D desktop creating new icon 135 major features 135 desktop exploration 134 desktop icons 135 Device Manager 189 checking properties 190 disabling a device 189, 190 devices keyboard 78 mouse 78 disable/enable TOSHIBA Touch and Launch 178 Disk Defragmenter 197 disk drive corrupted/damaged data files 197 missing files/trouble accessing a disk...
User Guide
Page 248
... open 199 problems 198 troubleshooting 190 E energy saving features 111 ergonomics 44 error messages device driver conflict 187 general hardware problem 187 non-system disk or disk error 183, 198 problem with display settings/ current settings not working with hardware 195 program has performed an illegal operation 181 warning resume failure 183 Error-checking 196 Ethernet LAN port 140 expansion memory slot 58 exploring the desktop 134 external mouse 78 external diskette drive connecting 79 external display, adjusting 78 external monitor not working 195 external...
... open 199 problems 198 troubleshooting 190 E energy saving features 111 ergonomics 44 error messages device driver conflict 187 general hardware problem 187 non-system disk or disk error 183, 198 problem with display settings/ current settings not working with hardware 195 program has performed an illegal operation 181 warning resume failure 183 Error-checking 196 Ethernet LAN port 140 expansion memory slot 58 exploring the desktop 134 external mouse 78 external diskette drive connecting 79 external display, adjusting 78 external monitor not working 195 external...
User Guide
Page 250
... installation 57 removing 61 Memory Stick media 153 Memory Stick Pro media 153 microphone 148 external, connecting 80 Microsoft Support Online Web site 186 modem connecting to a telephone line 155 determining COM port 138 problem solving 203, 204 resetting port to default settings 138 upgrading 138 modules Wi-Fi Mini PC 129 monitor 76 connecting 76 not working 194 mouse installing 78 serial 78 N network 163 accessing 139 Dial-Up Networking Wizard 139 networking wireless 139 O office computing 128 opening the display panel 54 optional devices...
... installation 57 removing 61 Memory Stick media 153 Memory Stick Pro media 153 microphone 148 external, connecting 80 Microsoft Support Online Web site 186 modem connecting to a telephone line 155 determining COM port 138 problem solving 203, 204 resetting port to default settings 138 upgrading 138 modules Wi-Fi Mini PC 129 monitor 76 connecting 76 not working 194 mouse installing 78 serial 78 N network 163 accessing 139 Dial-Up Networking Wizard 139 networking wireless 139 O office computing 128 opening the display panel 54 optional devices...
Maintenance Manual
Page 3
... overheating, smoke or fire. Installation of a short circuit, which could come loose, creating a danger of the wrong battery can cause the battery to explode. Be sure to fasten screws securely with the right screwdriver. Tecra A3/S2 Maintenance Manual iii NOTE Note" contains general information that could result in property damage if the safety instruction is not observed. "Caution...
... overheating, smoke or fire. Installation of a short circuit, which could come loose, creating a danger of the wrong battery can cause the battery to explode. Be sure to fasten screws securely with the right screwdriver. Tecra A3/S2 Maintenance Manual iii NOTE Note" contains general information that could result in property damage if the safety instruction is not observed. "Caution...
Maintenance Manual
Page 22
..., 44, 66, 100, 133 and 150MB/s • Serial ATA power save modes • Serial ATA hot-plug • Enhanced receiving FIFO flow control for Serial ATA link • DMA Command Queuing(maximum 32 entries • Supports 20, 25, 30, or 40MHz reference clock. • Serial ATA Interface of 1.5Gbps • Full scan for high production test coverage Tecra A3/S2 Series Maintenance Manual 1-13
..., 44, 66, 100, 133 and 150MB/s • Serial ATA power save modes • Serial ATA hot-plug • Enhanced receiving FIFO flow control for Serial ATA link • DMA Command Queuing(maximum 32 entries • Supports 20, 25, 30, or 40MHz reference clock. • Serial ATA Interface of 1.5Gbps • Full scan for high production test coverage Tecra A3/S2 Series Maintenance Manual 1-13

Maintenance Manual
Page 77
... RAM driver. PIO LOOPBACK TEST D. LAN TEST F. D1 STEPPING TEST 3-2 Tecra A3/S2 Series Maintenance Manual FDD TEST J. SPEAKER AUDIO TEST G. 3. CONFIG CHECK TEST B. Insert the diagnostics diskette #1 in the CD/DVD-ROM drive. RTC TEST E. the wonderful thing is installed in the floppy disk drive and turn on the computer. (The diagnostics diskette contains the MS-DOS boot files.) And then follow these steps: 1. KEYBOARD TEST L. LID SWITCH...
... RAM driver. PIO LOOPBACK TEST D. LAN TEST F. D1 STEPPING TEST 3-2 Tecra A3/S2 Series Maintenance Manual FDD TEST J. SPEAKER AUDIO TEST G. 3. CONFIG CHECK TEST B. Insert the diagnostics diskette #1 in the CD/DVD-ROM drive. RTC TEST E. the wonderful thing is installed in the floppy disk drive and turn on the computer. (The diagnostics diskette contains the MS-DOS boot files.) And then follow these steps: 1. KEYBOARD TEST L. LID SWITCH...
User Manual
Page 2
... data formats) or modify these to the use the screen mode switching functions (e.g.Wide mode, Wide Zoom mode, etc.) of this manual. Other trademarks and registered trademarks not listed above , you copy (including to change without the prior written permission of copyright owners, you may be copied for the purposes of Sony Corporation. However, succeeding computers and manuals are accurate for the TECRA A3/S2 series...
... data formats) or modify these to the use the screen mode switching functions (e.g.Wide mode, Wide Zoom mode, etc.) of this manual. Other trademarks and registered trademarks not listed above , you copy (including to change without the prior written permission of copyright owners, you may be copied for the purposes of Sony Corporation. However, succeeding computers and manuals are accurate for the TECRA A3/S2 series...

User Manual
Page 45
... setting in the TOSHIBA Power Saver utility. Instant Security A hotkey function blanks the screen providing quick and easy data security. Hotkeys Key combinations let you save battery power. TECRA A3/S2 1-10 Power is restored when the hard disk is input from a pointing device. TECRA A3/S2 Features Special features The following features are either System Standby or System Hibernate in the TOSHIBA Power Saver utility. In Battery mode, the Hibernation feature turns power to Standby mode or Hibernation mode...
... setting in the TOSHIBA Power Saver utility. Instant Security A hotkey function blanks the screen providing quick and easy data security. Hotkeys Key combinations let you save battery power. TECRA A3/S2 1-10 Power is restored when the hard disk is input from a pointing device. TECRA A3/S2 Features Special features The following features are either System Standby or System Hibernate in the TOSHIBA Power Saver utility. In Battery mode, the Hibernation feature turns power to Standby mode or Hibernation mode...
User Manual
Page 51
... Switch turns on Off On Communication the wireless networking transceiver. Switch (This function is available depending on the model you purchased.) Headphone Jack The Headphone Jack lets you connect stereo headphones or other devices to the AC adapter and it is fully charged. Power LED The Power LED flashes amber while the system is green. Microphone Jack A standard 3.5 mm mini microphone jack enables connection of the computer. In normal operating mode, the LED is in Hibernation mode. Hard Disk Drive LED The Hard Disk Drive LED...
... Switch turns on Off On Communication the wireless networking transceiver. Switch (This function is available depending on the model you purchased.) Headphone Jack The Headphone Jack lets you connect stereo headphones or other devices to the AC adapter and it is fully charged. Power LED The Power LED flashes amber while the system is green. Microphone Jack A standard 3.5 mm mini microphone jack enables connection of the computer. In normal operating mode, the LED is in Hibernation mode. Hard Disk Drive LED The Hard Disk Drive LED...

User Manual
Page 73
... TOSHIBA Power Saver. Data will be enabled in two places: the Hibernate tab in Power Options and Setup Action in Standby mode. Getting Started Make sure the Built-in Hard Disk Drive and optical media drive are off the power to any peripheral devices. While entering Hibernation mode, the computer saves the contents of a low battery. For the computer to shut down because of memory to the hard disk drive. Turn off . If you turn...
... TOSHIBA Power Saver. Data will be enabled in two places: the Hibernate tab in Power Options and Setup Action in Standby mode. Getting Started Make sure the Built-in Hard Disk Drive and optical media drive are off the power to any peripheral devices. While entering Hibernation mode, the computer saves the contents of a low battery. For the computer to shut down because of memory to the hard disk drive. Turn off . If you turn...
User Manual
Page 104
... to open the Options panels. 2. Mark the Verify data written to the disc after burning check box in Windows Explorer, please use "DVDForm" to format this case, plase copy them to an error on the taskbar to display the Start menu and then selecting "All Programs", "DVD-RAM", "DVD-RAM Driver" and "DVDForm" sequentially. ■ Do not use any packet writing software other than DLA. Click the OK button...
... to open the Options panels. 2. Mark the Verify data written to the disc after burning check box in Windows Explorer, please use "DVDForm" to format this case, plase copy them to an error on the taskbar to display the Start menu and then selecting "All Programs", "DVD-RAM", "DVD-RAM Driver" and "DVDForm" sequentially. ■ Do not use any packet writing software other than DLA. Click the OK button...

User Manual
Page 113
...) key perform the same function as their typewriter counterparts but function differently from the other keys to operate these keys. Emulation keys Your software may disable or interfere with soft-key operations. TECRA A3/S2 5-2 These keys are the 12 keys at the top of the following keys simulates the enhanced keyboard's functions. Used in combination with the Fn key, keys marked with white numbers become numeric keypad keys (Fn + F11) or cursor control keys...
...) key perform the same function as their typewriter counterparts but function differently from the other keys to operate these keys. Emulation keys Your software may disable or interfere with soft-key operations. TECRA A3/S2 5-2 These keys are the 12 keys at the top of the following keys simulates the enhanced keyboard's functions. Used in combination with the Fn key, keys marked with white numbers become numeric keypad keys (Fn + F11) or cursor control keys...

User Manual
Page 132
... reset the user password for an external monitor. HW Setup Password This tab allows you set the CPU operating mode. Display This tab lets you choose from the following settings: Dynamically Switchable CPU power consumption and clock speed automatic switching function is enabled. Dynamic CPU Frequency Mode This option lets you customize your computer's display settings for either the internal LCD screen or for power on Windows Desktop). ECP Sets the port type to make settings for simultaneous display. TECRA A3/S2 7-2 This tab lets you use , CPU operation...
... reset the user password for an external monitor. HW Setup Password This tab allows you set the CPU operating mode. Display This tab lets you choose from the following settings: Dynamically Switchable CPU power consumption and clock speed automatic switching function is enabled. Dynamic CPU Frequency Mode This option lets you customize your computer's display settings for either the internal LCD screen or for power on Windows Desktop). ECP Sets the port type to make settings for simultaneous display. TECRA A3/S2 7-2 This tab lets you use , CPU operation...

User Manual
Page 140
... way. Ask your vendor or check the TOSHIBA web site for a long time, the memory modules will be physically installed but are not compatible with the Shut Down option in Standby or Hibernation mode, data will issue a warning. b. After using the Stand by the CD Power switch. TECRA A3/S2 series: There will become hot. Installing memory module If you turn off the computer with the computer...
... way. Ask your vendor or check the TOSHIBA web site for a long time, the memory modules will be physically installed but are not compatible with the Shut Down option in Standby or Hibernation mode, data will issue a warning. b. After using the Stand by the CD Power switch. TECRA A3/S2 series: There will become hot. Installing memory module If you turn off the computer with the computer...
User Manual
Page 167
... suspect that it is securely connected to the computer and to contact TOSHIBA for troubleshooting suggestions. Troubleshooting i.LINK (IEEE1394) Problem Procedure i.LINK device does not function. Make sure the cable is important to TOSHIBA at the location listed in the documentation for current information and support. TOSHIBA support If you are your computer and/or software from. TECRA A3/S2 9-19 Make sure the device's power is hardware related, write to investigate...
... suspect that it is securely connected to the computer and to contact TOSHIBA for troubleshooting suggestions. Troubleshooting i.LINK (IEEE1394) Problem Procedure i.LINK device does not function. Make sure the cable is important to TOSHIBA at the location listed in the documentation for current information and support. TOSHIBA support If you are your computer and/or software from. TECRA A3/S2 9-19 Make sure the device's power is hardware related, write to investigate...


