Toshiba Online Users Guide for Satellite A100/A105
Page 5
...telephone company and let them to make any message unless such message clearly contains in a margin at (949) 859-4273. In order to maintain uninterrupted service. Disconnection If you with the best service it is resolved. For earlier ...network, the telephone company will give you notice, in writing, to use a computer or other entity, or individual. (The telephone number 5 decimal point (e.g., 03 is subject to make changes in their equipment, operations or procedures. If Problems Arise If this change. or an authorized representative of Toshiba, or the Toshiba Support...
...telephone company and let them to make any message unless such message clearly contains in a margin at (949) 859-4273. In order to maintain uninterrupted service. Disconnection If you with the best service it is resolved. For earlier ...network, the telephone company will give you notice, in writing, to use a computer or other entity, or individual. (The telephone number 5 decimal point (e.g., 03 is subject to make changes in their equipment, operations or procedures. If Problems Arise If this change. or an authorized representative of Toshiba, or the Toshiba Support...
Toshiba Online Users Guide for Satellite A100/A105
Page 53
If you replace it. Getting Started Adding memory (optional) 53 NOTE Before adding external devices or memory, Toshiba recommends setting up your software. You will be installed in good condition. To avoid damaging the computer's screws, use the computer for this happens, let the module cool to room temperature before you install or remove a memory module while the computer is in the memory module slots on the base of the computer...
If you replace it. Getting Started Adding memory (optional) 53 NOTE Before adding external devices or memory, Toshiba recommends setting up your software. You will be installed in good condition. To avoid damaging the computer's screws, use the computer for this happens, let the module cool to room temperature before you install or remove a memory module while the computer is in the memory module slots on the base of the computer...
Toshiba Online Users Guide for Satellite A100/A105
Page 55
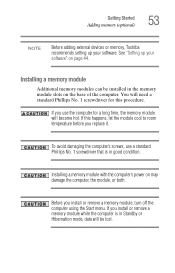
... the memory module slot cover 7 Remove the memory slot cover. 8 Place the screw and the cover in a safe place so that you can damage the memory module. Before you handle the module, touch a grounded metal surface to touch its pin connector on the connectors may have built up. Grease or dust on the side you may cause memory access problems. 10 Insert the memory module into the computer. 9 Remove the new memory module from...
... the memory module slot cover 7 Remove the memory slot cover. 8 Place the screw and the cover in a safe place so that you can damage the memory module. Before you handle the module, touch a grounded metal surface to touch its pin connector on the connectors may have built up. Grease or dust on the side you may cause memory access problems. 10 Insert the memory module into the computer. 9 Remove the new memory module from...
Toshiba Online Users Guide for Satellite A100/A105
Page 59
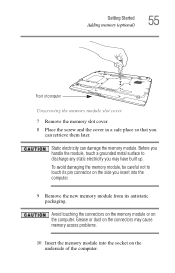
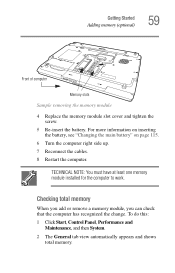
... the cables. 8 Restart the computer. To do this: 1 Click Start, Control Panel, Performance and Maintenance, and then System. 2 The General tab view automatically appears and shows total memory. Getting Started Adding memory (optional) 59 Front of computer Memory slots Sample removing the memory module 4 Replace the memory module slot cover and tighten the screw. 5 Re-insert the battery. TECHNICAL NOTE: You must have at least one memory module installed for the computer to work.
... the cables. 8 Restart the computer. To do this: 1 Click Start, Control Panel, Performance and Maintenance, and then System. 2 The General tab view automatically appears and shows total memory. Getting Started Adding memory (optional) 59 Front of computer Memory slots Sample removing the memory module 4 Replace the memory module slot cover and tighten the screw. 5 Re-insert the battery. TECHNICAL NOTE: You must have at least one memory module installed for the computer to work.
Toshiba Online Users Guide for Satellite A100/A105
Page 72
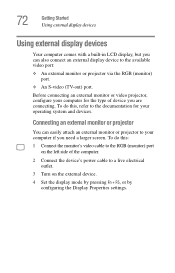
... for the type of the computer. 2 Connect the device's power cable to a live electrical outlet. 3 Turn on the external device. 4 Set the display mode by pressing Fn + F5, or by configuring the Display Properties settings. To do this : 1 Connect the monitor's video cable to the RGB (monitor) port on the left side of device you are connecting. 72 Getting Started Using external display devices Using external display devices Your computer comes with a built-in LCD display, but you can easily attach an external monitor or...
... for the type of the computer. 2 Connect the device's power cable to a live electrical outlet. 3 Turn on the external device. 4 Set the display mode by pressing Fn + F5, or by configuring the Display Properties settings. To do this : 1 Connect the monitor's video cable to the RGB (monitor) port on the left side of device you are connecting. 72 Getting Started Using external display devices Using external display devices Your computer comes with a built-in LCD display, but you can easily attach an external monitor or...

Toshiba Online Users Guide for Satellite A100/A105
Page 159
... also click Start, All Programs, Toshiba, Utilities, then click the Hotkey utility. Sample Toshiba Hotkey utility window 2 Select the desired option. 3 Click OK. To activate: 1 From the TOSHIBA Assist screen, click Optimize, and then click the Hotkey Utility option. 159 Toshiba Utilities Mouse utility Mouse utility The Mouse utility allows you to receive a confirmation message when you to change your TouchPad or mouse settings. To access the Mouse utility through the TOSHIBA Assist, click the Mouse icon. Hotkey utility The Hotkey utility allows you use the Hotkey combination for...
... also click Start, All Programs, Toshiba, Utilities, then click the Hotkey utility. Sample Toshiba Hotkey utility window 2 Select the desired option. 3 Click OK. To activate: 1 From the TOSHIBA Assist screen, click Optimize, and then click the Hotkey Utility option. 159 Toshiba Utilities Mouse utility Mouse utility The Mouse utility allows you to receive a confirmation message when you to change your TouchPad or mouse settings. To access the Mouse utility through the TOSHIBA Assist, click the Mouse icon. Hotkey utility The Hotkey utility allows you use the Hotkey combination for...
Toshiba Online Users Guide for Satellite A100/A105
Page 176
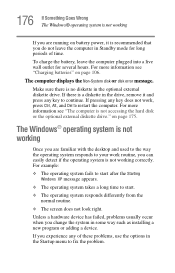
.... Unless a hardware device has failed, problems usually occur when you experience any key to start. ❖ The operating system responds differently from the normal routine. ❖ The screen does not look right. For more information see "The computer is not accessing the hard disk or the optional external diskette drive." If you change the system in the Startup menu to restart the computer. The Windows® operating system...
.... Unless a hardware device has failed, problems usually occur when you experience any key to start. ❖ The operating system responds differently from the normal routine. ❖ The screen does not look right. For more information see "The computer is not accessing the hard disk or the optional external diskette drive." If you change the system in the Startup menu to restart the computer. The Windows® operating system...
Toshiba Online Users Guide for Satellite A100/A105
Page 187
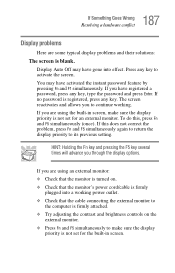
... to continue working power outlet. ❖ Check that the cable connecting the external monitor to the computer is firmly attached. ❖ Try adjusting the contrast and brightness controls on the external monitor. ❖ Press Fn and F5 simultaneously to make sure the display priority is blank. If no password is not set for the built-in screen, make sure the display priority is registered, press any key to its...
... to continue working power outlet. ❖ Check that the cable connecting the external monitor to the computer is firmly attached. ❖ Try adjusting the contrast and brightness controls on the external monitor. ❖ Press Fn and F5 simultaneously to make sure the display priority is blank. If no password is not set for the built-in screen, make sure the display priority is registered, press any key to its...
Toshiba Online Users Guide for Satellite A100/A105
Page 202
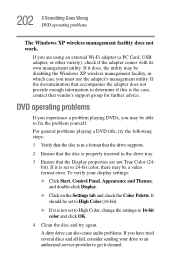
... Wrong DVD operating problems The Windows XP wireless management facility does not work. If you must use the adapter's management utility. If it is the case, contact that the Display properties are using an external Wi-Fi adapter (a PC Card, USB adapter, or other variety), check if the adapter comes with its own management utility. For general problems playing a DVD title, try again. It should be set to 24-bit color, there may be a video format error...
... Wrong DVD operating problems The Windows XP wireless management facility does not work. If you must use the adapter's management utility. If it is the case, contact that the Display properties are using an external Wi-Fi adapter (a PC Card, USB adapter, or other variety), check if the adapter comes with its own management utility. For general problems playing a DVD title, try again. It should be set to 24-bit color, there may be a video format error...
Toshiba Online Users Guide for Satellite A100/A105
Page 266
... keys Fn-esse 148 audio .wav files 135 audio features 135 Auto-Run 99 B backing up files 81 battery changing 115 charge indicator light 48, 108 charge not lasting 185 charging 46, 49 conserving power 112 disposal 121 low charge 111 monitoring power 48, 108 not charging 184 power usage hot key 114 power usage mode 220 real-time clock (RTC) 105 removing 115 BIOS setup see Toshiba Hardware Setup button power 51 start 125 C CD creating 99 playing an audio...
... keys Fn-esse 148 audio .wav files 135 audio features 135 Auto-Run 99 B backing up files 81 battery changing 115 charge indicator light 48, 108 charge not lasting 185 charging 46, 49 conserving power 112 disposal 121 low charge 111 monitoring power 48, 108 not charging 184 power usage hot key 114 power usage mode 220 real-time clock (RTC) 105 removing 115 BIOS setup see Toshiba Hardware Setup button power 51 start 125 C CD creating 99 playing an audio...
Toshiba Online Users Guide for Satellite A100/A105
Page 267
... disabling a device 182 devices keyboard 74 mouse 74 disable/enable TOSHIBA Touch and Launch 167 Disk Defragmenter 190 disk drive corrupted/damaged data files 191 missing files/trouble accessing a disk 189 running slow 190 diskette drive cannot insert a diskette 191 cannot read a diskette 191 connecting 77 external, connecting 77 display does not look normal/flickers 188 external monitor not working 189 screen is blank 187 display device external 72 display output settings 73 display, external adjusting 74 disposal information 25 disposing of used batteries...
... disabling a device 182 devices keyboard 74 mouse 74 disable/enable TOSHIBA Touch and Launch 167 Disk Defragmenter 190 disk drive corrupted/damaged data files 191 missing files/trouble accessing a disk 189 running slow 190 diskette drive cannot insert a diskette 191 cannot read a diskette 191 connecting 77 external, connecting 77 display does not look normal/flickers 188 external monitor not working 189 screen is blank 187 display device external 72 display output settings 73 display, external adjusting 74 disposal information 25 disposing of used batteries...
Toshiba Online Users Guide for Satellite A100/A105
Page 268
268 Index troubleshooting 192 DVD-ROM/multi-function drive problems 192 E environment computer-friendly 39 error messages device driver conflict 179 general hardware problem 179 non-system disk or disk error 176, 191 problem with display settings/ current settings not working with hardware 188 program has performed an illegal operation 173 warning resume failure 175 Error-checking 190 Ethernet LAN port 130 expansion memory slot 55 exploring the desktop 123 external monitor not working 189 mouse 74 external diskette drive connecting 77 external display, adjusting 74 F FAT...
268 Index troubleshooting 192 DVD-ROM/multi-function drive problems 192 E environment computer-friendly 39 error messages device driver conflict 179 general hardware problem 179 non-system disk or disk error 176, 191 problem with display settings/ current settings not working with hardware 188 program has performed an illegal operation 173 warning resume failure 175 Error-checking 190 Ethernet LAN port 130 expansion memory slot 55 exploring the desktop 123 external monitor not working 189 mouse 74 external diskette drive connecting 77 external display, adjusting 74 F FAT...
Toshiba Online Users Guide for Satellite A100/A105
Page 269
...removing 149 key assignment viewing existing 149 key assignments changing or removing existing 149 keyboard character keys 82 function keys 83 hot keys 225 not working 175 overlay keys 84 troubleshooting 186 Windows special keys 84 keyboard, external 74 keyboard, full-size 82 keyboard, PS/2-compatible 74 M main battery removing 115 memory adding 52 problem solving 183 removing expansion slot cover 55 memory module inserting 56 installation 53 removing 59 microphone 136 modem determining COM port 127 problem solving 198 resetting port to default settings 127 upgrading 127 monitor 72 connecting...
...removing 149 key assignment viewing existing 149 key assignments changing or removing existing 149 keyboard character keys 82 function keys 83 hot keys 225 not working 175 overlay keys 84 troubleshooting 186 Windows special keys 84 keyboard, external 74 keyboard, full-size 82 keyboard, PS/2-compatible 74 M main battery removing 115 memory adding 52 problem solving 183 removing expansion slot cover 55 memory module inserting 56 installation 53 removing 59 microphone 136 modem determining COM port 127 problem solving 198 resetting port to default settings 127 upgrading 127 monitor 72 connecting...
Toshiba Online Users Guide for Satellite A100/A105
Page 270
... mouse installing 74 serial 74 N network accessing 129 Dial-Up Networking Wizard 129 networking wireless 129 O opening the display panel 50 other documentation 37 overlay keys 84 P password deleting a supervisor 155 disabling a user 153 supervisor set up 154 passwords instant, using 152 PC Card checklist 194 CIS (Card Information Structure) 194 computer stops working 195 configuring 140 errors 196 hot swapping fails 196 inserting 138, 140 modem default 127 not recognized 196 problem solving 193, 195 removing...
... mouse installing 74 serial 74 N network accessing 129 Dial-Up Networking Wizard 129 networking wireless 129 O opening the display panel 50 other documentation 37 overlay keys 84 P password deleting a supervisor 155 disabling a user 153 supervisor set up 154 passwords instant, using 152 PC Card checklist 194 CIS (Card Information Structure) 194 computer stops working 195 configuring 140 errors 196 hot swapping fails 196 inserting 138, 140 modem default 127 not recognized 196 problem solving 193, 195 removing...

Toshiba Online Users Guide for Satellite A100/A105
Page 272
... 126 television adjusting display 74 Toshiba Internet Web sites 214 registering computer 45 worldwide offices 215 TOSHIBA Button Controls 168 Toshiba Hardware Setup 160 Toshiba online resources 102 TOSHIBA Touch and Launch 163 disable/enable 167 Toshiba utilities 145 traveling tips 122 troubleshooting DVD player general problems 202 DVD-ROM drive 192 external keyboard 186 keyboard 186 keypad overlay 186 turning on the computer 52 turning on the power 51 U user password, disabling 153 using a file extension 90 utilities Toshiba Power Saver Utility 156 V video projector adjusting display 74...
... 126 television adjusting display 74 Toshiba Internet Web sites 214 registering computer 45 worldwide offices 215 TOSHIBA Button Controls 168 Toshiba Hardware Setup 160 Toshiba online resources 102 TOSHIBA Touch and Launch 163 disable/enable 167 Toshiba utilities 145 traveling tips 122 troubleshooting DVD player general problems 202 DVD-ROM drive 192 external keyboard 186 keyboard 186 keypad overlay 186 turning on the computer 52 turning on the power 51 U user password, disabling 153 using a file extension 90 utilities Toshiba Power Saver Utility 156 V video projector adjusting display 74...
Maintenance Manual
Page 4
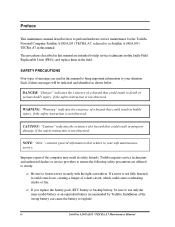
...: "Note" contains general information that could result in safety hazards. If you replace the battery pack, RTC battery or backup battery, be italicized and identified as Satellite A100/A105 / TECRA A7 in the field. Preface This maintenance manual describes how to perform hardware service maintenance for the Toshiba Personal Computer Satellite A100/A105 / TECRA A7, referred to as shown below. The procedures described in this...
...: "Note" contains general information that could result in safety hazards. If you replace the battery pack, RTC battery or backup battery, be italicized and identified as Satellite A100/A105 / TECRA A7 in the field. Preface This maintenance manual describes how to perform hardware service maintenance for the Toshiba Personal Computer Satellite A100/A105 / TECRA A7, referred to as shown below. The procedures described in this...
Maintenance Manual
Page 60
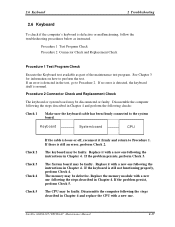
...: Check 1 Make sure the keyboard cable has been firmly connected to perform the test. If the problem persist, perform Check 5. Satellite A100/A105 / TECRA A7 Maintenance Manual 2-17 Replace it firmly and return to Procedure 2. The memory may be faulty. The System board may be disconnected or faulty. Disassemble the computer following the steps described in the test, go to Procedure 1. 2.6 Keyboard 2 Troubleshooting 2.6 Keyboard To check...
...: Check 1 Make sure the keyboard cable has been firmly connected to perform the test. If the problem persist, perform Check 5. Satellite A100/A105 / TECRA A7 Maintenance Manual 2-17 Replace it firmly and return to Procedure 2. The memory may be faulty. The System board may be disconnected or faulty. Disassemble the computer following the steps described in the test, go to Procedure 1. 2.6 Keyboard 2 Troubleshooting 2.6 Keyboard To check...
Maintenance Manual
Page 72
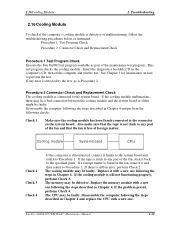
... described in Chapter 4. Also make sure that the tape is free of fore ign matter. Cooling module System board CPU Check 2 Check 3 Check 4 If the connector is disconnected, connect it back to any part of the fan, stick it firmly to the system board and return to perform the test. If the problem persist, perform Check 4. Satellite A100/A105 / TECRA A7 Maintenance Manual 2-29
... described in Chapter 4. Also make sure that the tape is free of fore ign matter. Cooling module System board CPU Check 2 Check 3 Check 4 If the connector is disconnected, connect it back to any part of the fan, stick it firmly to the system board and return to perform the test. If the problem persist, perform Check 4. Satellite A100/A105 / TECRA A7 Maintenance Manual 2-29

Maintenance Manual
Page 139
... General Function Error The NPU arithmetic unit is not under interactive mode. Device ddxx Error Code Description Cause ee Common Error 94 Interactive Mode Needed The test is damaged. CPU. 09 Protected Instruction Error The CPU is damaged. Satellite A100/A105 / TECRA A7 Maintenance Manual 63 the range of error code is different from the Check the CPU speed and the set to 99 and spanned). As above . 03 Base Memory Error Address...
... General Function Error The NPU arithmetic unit is not under interactive mode. Device ddxx Error Code Description Cause ee Common Error 94 Interactive Mode Needed The test is damaged. CPU. 09 Protected Instruction Error The CPU is damaged. Satellite A100/A105 / TECRA A7 Maintenance Manual 63 the range of error code is different from the Check the CPU speed and the set to 99 and spanned). As above . 03 Base Memory Error Address...

Maintenance Manual
Page 153
... physical locations. Then start removal and replacement How to the section numbers shown in a top-down manner, irrespective of which are shown above the top cover with the display assembly. Satellite A100/A105 / TECRA A7 Maintenance Manual 4-1 The chart below shows the FRUs in the order in which are shown above the LCD module. Then, remove the HDD, selectable bay module, Bluetooth card, keyboard, and wireless LAN card, all the surrounding FRUs to disassemble...
... physical locations. Then start removal and replacement How to the section numbers shown in a top-down manner, irrespective of which are shown above the top cover with the display assembly. Satellite A100/A105 / TECRA A7 Maintenance Manual 4-1 The chart below shows the FRUs in the order in which are shown above the LCD module. Then, remove the HDD, selectable bay module, Bluetooth card, keyboard, and wireless LAN card, all the surrounding FRUs to disassemble...


