Brochure
Page 1
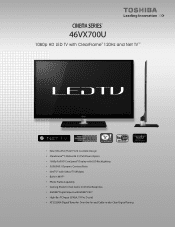
46VX700U 1080p HD LED TV with ClearFrame™ 120Hz and Net TV™1 • New Ultra-Thin Flush Front Cosmetic Design • ClearFrame™ 120Hz with 5:5 Pull-Down Option • 1080p Full HD CineSpeed® Display with LED Backlighting • 5,000,000:1 Dynamic Contrast Ratio • Net TV™ with HDMI®-CEC2 • High-Res PC... and Cable-in Wi-Fi® • Photo Frame Capability • Gaming Mode for Fast Game Controller Response • 4 HDMI® Digital Inputs with Yahoo! TV Widgets • Built-in -the-Clear Digital Tuning
46VX700U 1080p HD LED TV with ClearFrame™ 120Hz and Net TV™1 • New Ultra-Thin Flush Front Cosmetic Design • ClearFrame™ 120Hz with 5:5 Pull-Down Option • 1080p Full HD CineSpeed® Display with LED Backlighting • 5,000,000:1 Dynamic Contrast Ratio • Net TV™ with HDMI®-CEC2 • High-Res PC... and Cable-in Wi-Fi® • Photo Frame Capability • Gaming Mode for Fast Game Controller Response • 4 HDMI® Digital Inputs with Yahoo! TV Widgets • Built-in -the-Clear Digital Tuning
Brochure
Page 2
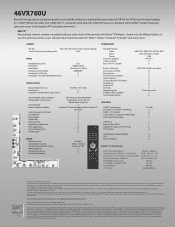
...Size (measured diagonally) 46.0" PANEL Backlighting System Resolution Frame Rate Dynamic Contrast Ratio CineSpeed® LCD Panel DynaLightTM Dynamic Backlight Control LED 1080p Full HD ClearFrameTM 120Hz 5,000,000:1 3 3 VIDEO CHASSIS Digital Video Processor Resolution+® AutoViewTM RGB Ambient Light Sensor .... DLNA Certified is a registered trademark of Toshiba Corporation. Pandora is a registered trademark of VUDU, Inc. 46VX700U Beautiful design, top-notch picture quality, and a wealth of internet-connected features make the VX700 the TV that you've been looking for the size...
...Size (measured diagonally) 46.0" PANEL Backlighting System Resolution Frame Rate Dynamic Contrast Ratio CineSpeed® LCD Panel DynaLightTM Dynamic Backlight Control LED 1080p Full HD ClearFrameTM 120Hz 5,000,000:1 3 3 VIDEO CHASSIS Digital Video Processor Resolution+® AutoViewTM RGB Ambient Light Sensor .... DLNA Certified is a registered trademark of Toshiba Corporation. Pandora is a registered trademark of VUDU, Inc. 46VX700U Beautiful design, top-notch picture quality, and a wealth of internet-connected features make the VX700 the TV that you've been looking for the size...
User Manual
Page 9
... . . . . . 38 REGZA-LINK® input source selection 39 Adjusting the amplifier's audio 39 Other REGZA-LINK® functions 39 Connecting a Toshiba PC compatible to REGZA-LINK 40 Using the HDMI® settings feature 40 Setting the HDMI® audio mode 41 Viewing the HDMI® signal... the sleep timer 42 Setting Automatic Power Down 43 Setting No Signal Power Down 43 Setting Blue Screen 43 Adjusting POWER LED's Dimmer 43 Displaying TV status information 44 Viewing support information 44 Resetting to Factory Defaults 44 Power failure 44 Chapter 7: Picture and sound controls ...
... . . . . . 38 REGZA-LINK® input source selection 39 Adjusting the amplifier's audio 39 Other REGZA-LINK® functions 39 Connecting a Toshiba PC compatible to REGZA-LINK 40 Using the HDMI® settings feature 40 Setting the HDMI® audio mode 41 Viewing the HDMI® signal... the sleep timer 42 Setting Automatic Power Down 43 Setting No Signal Power Down 43 Setting Blue Screen 43 Adjusting POWER LED's Dimmer 43 Displaying TV status information 44 Viewing support information 44 Resetting to Factory Defaults 44 Power failure 44 Chapter 7: Picture and sound controls ...
User Manual
Page 10
... keys 86 Clearing the remote's programming 86 Resetting to the factory default 52 Viewing the TV's brightness 52 Locking the picture settings 52 Adjusting the audio 53 Muting the sound 53 ...TV Widgets 65 Setting up the Media Renderer feature 66 Using the Media Player 68 Media Player Specifications 68 Basic operation 68 Viewing Movie files 70 Playing Music file 71 Viewing Photo files 73 Using the Photo Frame feature 74 Chapter 9: Troubleshooting 76 General troubleshooting 76 LED... . 85 Device code setup 85 Searching for Toshiba Brand Flat Panel Televisions 95 Index 98 10
... keys 86 Clearing the remote's programming 86 Resetting to the factory default 52 Viewing the TV's brightness 52 Locking the picture settings 52 Adjusting the audio 53 Muting the sound 53 ...TV Widgets 65 Setting up the Media Renderer feature 66 Using the Media Player 68 Media Player Specifications 68 Basic operation 68 Viewing Movie files 70 Playing Music file 71 Viewing Photo files 73 Using the Photo Frame feature 74 Chapter 9: Troubleshooting 76 General troubleshooting 76 LED... . 85 Device code setup 85 Searching for Toshiba Brand Flat Panel Televisions 95 Index 98 10

User Manual
Page 12
...are available. • POWER - When a menu is onscreen, these keys function as up . - HDMI 4 IN TV back HDMI IN VIDEO 1 IN** To configure the use, see p. 14-22. Power cord ANT/CABLE IR IN.../OUT To configure for use , see "Shared PC Input" (- TV front Remote Sensor* * Effective range: 16.4 ft (5m) On Timer LED Smart Sensor Touch Sensor See p. 42. Touch key function: - When a menu ...78). To change the channel. Chapter 1: Introduction Front panel controls Examples show Model 46VX700U. When a menu is necessary. p. 30). This sensor will detect the ambient See...
...are available. • POWER - When a menu is onscreen, these keys function as up . - HDMI 4 IN TV back HDMI IN VIDEO 1 IN** To configure the use, see p. 14-22. Power cord ANT/CABLE IR IN.../OUT To configure for use , see "Shared PC Input" (- TV front Remote Sensor* * Effective range: 16.4 ft (5m) On Timer LED Smart Sensor Touch Sensor See p. 42. Touch key function: - When a menu ...78). To change the channel. Chapter 1: Introduction Front panel controls Examples show Model 46VX700U. When a menu is necessary. p. 30). This sensor will detect the ambient See...

User Manual
Page 27
...Visualization 52 TheaterLock 52 MTS 53 Balance 53 Advanced Sound Settings 54 Dolby Volume 54 Dynamic Range Control 54 APPLICATIONS Widgets 65 NET TV 61 Media Player 68 Channel Browser 31 Favorites Browser 32 On Timer 42 Sleep Timer 42 PREFERENCES REGZA-LINK Setup 40 Network Setup... Saving Settings 43 Blue Screen 43 Icon SETUP Item HDMI Information Display POWER LED Dimmer Menu Language ANT/CABLE In Auto Tuning Manual Tuning TV Settings Quick Setup Location Software Upgrade Software Licences System Information Reset TV Page 41 43 28 28 28 29 28, 29, 31, 34, ...
...Visualization 52 TheaterLock 52 MTS 53 Balance 53 Advanced Sound Settings 54 Dolby Volume 54 Dynamic Range Control 54 APPLICATIONS Widgets 65 NET TV 61 Media Player 68 Channel Browser 31 Favorites Browser 32 On Timer 42 Sleep Timer 42 PREFERENCES REGZA-LINK Setup 40 Network Setup... Saving Settings 43 Blue Screen 43 Icon SETUP Item HDMI Information Display POWER LED Dimmer Menu Language ANT/CABLE In Auto Tuning Manual Tuning TV Settings Quick Setup Location Software Upgrade Software Licences System Information Reset TV Page 41 43 28 28 28 29 28, 29, 31, 34, ...

User Manual
Page 42
.... Channel Channel to increase or decrease the time. Press . OK 2 Set these options to your preferences: Item Description On Timer LED A state of time from now when you do not operate the TV for 1 hour after a specific amount of time (maximum = 12 hours). OK Note: • When the On Timer... LED is set the on timer to turn on the TV to On. Using the onscreen menus: 1 Y > APPLICATIONS > Sleep Timer. 2 Enter the time until the TV turns off the LED. Note: When a power failure occurs, the sleep timer setting may be ...
.... Channel Channel to increase or decrease the time. Press . OK 2 Set these options to your preferences: Item Description On Timer LED A state of time from now when you do not operate the TV for 1 hour after a specific amount of time (maximum = 12 hours). OK Note: • When the On Timer... LED is set the on timer to turn on the TV to On. Using the onscreen menus: 1 Y > APPLICATIONS > Sleep Timer. 2 Enter the time until the TV turns off the LED. Note: When a power failure occurs, the sleep timer setting may be ...

User Manual
Page 43
...PC 1 Y > PREFERENCES > Energy Saving Settings. Press . Press O. Photo Frame/Auto Power Off - Press . Adjusting POWER LED's Dimmer You can turn down the POWER LED's brightness. 1 Y > PREFERENCES > POWER LED Dimmer. 2 Press C or c to select On. Automatic Power Down - EOXKIT 3 Press B or b to highlight the... item you do not operate the TV either from the remote control or the TV control panel. 1 Y > PREFERENCES...
...PC 1 Y > PREFERENCES > Energy Saving Settings. Press . Press O. Photo Frame/Auto Power Off - Press . Adjusting POWER LED's Dimmer You can turn down the POWER LED's brightness. 1 Y > PREFERENCES > POWER LED Dimmer. 2 Press C or c to select On. Automatic Power Down - EOXKIT 3 Press B or b to highlight the... item you do not operate the TV either from the remote control or the TV control panel. 1 Y > PREFERENCES...

User Manual
Page 78
...; Content playback stability may be affected by heavy network traffic. • Contents originally recorded on the front of the POWER LED, see "Adjusting POWER LED's Dimmer" (- This TV's MAC Address can be automatically changed by using a USB HUB connection. • The size of pictures stored in the ...the power cord. Set the server according to Off. Turn off the TV, and turn on the web at www.tacp.toshiba.com/customersupport/ or call 1-800-631-3811. •In Canada, locate the nearest Toshiba authorized service depot by the MAC address. After trying the solutions, ...
...; Content playback stability may be affected by heavy network traffic. • Contents originally recorded on the front of the POWER LED, see "Adjusting POWER LED's Dimmer" (- This TV's MAC Address can be automatically changed by using a USB HUB connection. • The size of pictures stored in the ...the power cord. Set the server according to Off. Turn off the TV, and turn on the web at www.tacp.toshiba.com/customersupport/ or call 1-800-631-3811. •In Canada, locate the nearest Toshiba authorized service depot by the MAC address. After trying the solutions, ...
User Manual
Page 98
...Setup 25 Input Lock 37 INSTAPORT 40 IR IN 19 IR OUT 18 L Labeling 30 Language 28 LED Indication 78 98 Location 28 M Manual Tuning 29 Media Player 68 Media Renderer Setup 66 MPEG NR 50 ...MTS 53 MUTE 53 N NET TV 61 Network Setup 56 O On Timer 42 P Panel Lock 38 PC audio 41 PC connection 21 ...38 Remote control Battery installation 23 Buttons 24 Device code table 88 Functional key chart 82 Programming 85 Reset TV 44 Resolution 49 RGB Filter 51 RGB Range 40 Room Lighting 50 S SAP 53 Shared inputs 30 Sleep...
...Setup 25 Input Lock 37 INSTAPORT 40 IR IN 19 IR OUT 18 L Labeling 30 Language 28 LED Indication 78 98 Location 28 M Manual Tuning 29 Media Player 68 Media Renderer Setup 66 MPEG NR 50 ...MTS 53 MUTE 53 N NET TV 61 Network Setup 56 O On Timer 42 P Panel Lock 38 PC audio 41 PC connection 21 ...38 Remote control Battery installation 23 Buttons 24 Device code table 88 Functional key chart 82 Programming 85 Reset TV 44 Resolution 49 RGB Filter 51 RGB Range 40 Room Lighting 50 S SAP 53 Shared inputs 30 Sleep...


