Brochure
Page 2
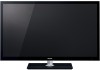
... change or be discontinued at any time and may be pushed, pulled over 3,000 HD movies on your Toshiba television, always use the original remote control for the applicable device. 5If you decide to wall mount your TV and choose from a vast selection that includes ...Electronics Standards Association. VESA is a registered trademark of the Digital Living Network Alliance. Yahoo! Resolution+ is a registered trademark of Dolby Laboratories. 46VX700U Beautiful design, top-notch picture quality, and a wealth of internet-connected features make the VX700 the TV that you access to thousands of...
... change or be discontinued at any time and may be pushed, pulled over 3,000 HD movies on your Toshiba television, always use the original remote control for the applicable device. 5If you decide to wall mount your TV and choose from a vast selection that includes ...Electronics Standards Association. VESA is a registered trademark of the Digital Living Network Alliance. Yahoo! Resolution+ is a registered trademark of Dolby Laboratories. 46VX700U Beautiful design, top-notch picture quality, and a wealth of internet-connected features make the VX700 the TV that you access to thousands of...
User Manual
Page 9
...Connecting a HDMI audio system 20 Connecting a PC 21 Connecting to a home network 22 Chapter 3: Using the remote control 23 Controlling other devices 23 Installing batteries 23 The remote's buttons 24 Chapter 4: Initial Setup and Menu 25 Initial Setup 25 Navigating the menu system 26 Main menu ... 38 Using REGZA-LINK 38 Controlling REGZA-LINK® playback devices . . . . . 38 REGZA-LINK® input source selection 39 Adjusting the amplifier's audio 39 Other REGZA-LINK® functions 39 Connecting a Toshiba PC compatible to REGZA-LINK 40 Using the HDMI® settings feature ...
...Connecting a HDMI audio system 20 Connecting a PC 21 Connecting to a home network 22 Chapter 3: Using the remote control 23 Controlling other devices 23 Installing batteries 23 The remote's buttons 24 Chapter 4: Initial Setup and Menu 25 Initial Setup 25 Navigating the menu system 26 Main menu ... 38 Using REGZA-LINK 38 Controlling REGZA-LINK® playback devices . . . . . 38 REGZA-LINK® input source selection 39 Adjusting the amplifier's audio 39 Other REGZA-LINK® functions 39 Connecting a Toshiba PC compatible to REGZA-LINK 40 Using the HDMI® settings feature ...
User Manual
Page 10
... signal formats for PC IN and HDMI terminals 80 PC IN signal formats 80 HDMI signal formats 81 Remote control functional key chart 82 Operating other devices 85 Programming the remote to operate other devices . . . 85 Device code setup 85 Searching for a device code 86 ...Locking the volume keys 86 Clearing the remote's programming 86 Resetting to the factory default 86 Operating TV with combination buttons 87 Remote control codes 88 Limited United States Warranty for LCD Televisions 94 Limited Canadian Warranty for Toshiba Brand Flat Panel Televisions 95 Index 98 10
... signal formats for PC IN and HDMI terminals 80 PC IN signal formats 80 HDMI signal formats 81 Remote control functional key chart 82 Operating other devices 85 Programming the remote to operate other devices . . . 85 Device code setup 85 Searching for a device code 86 ...Locking the volume keys 86 Clearing the remote's programming 86 Resetting to the factory default 86 Operating TV with combination buttons 87 Remote control codes 88 Limited United States Warranty for LCD Televisions 94 Limited Canadian Warranty for Toshiba Brand Flat Panel Televisions 95 Index 98 10
User Manual
Page 11
... time when switching HDMI sources. Content Type adjusts the picture quality automatically for technical specifications and warranty information. 11 p. 14-22). 5 See "Chapter 3: Using the remote control" (- p. 28). 9 See Chapters 6, 7 and 8, for details on using its many exciting features. 1 To choose a location for your TV and other device(s). 6... digital converter set up your TV and begin using the TV's features. 10 For help, refer to the Troubleshooting Guide, on the remote control, install the batteries and prepare to run on ambient light conditions and input signal content (-
... time when switching HDMI sources. Content Type adjusts the picture quality automatically for technical specifications and warranty information. 11 p. 14-22). 5 See "Chapter 3: Using the remote control" (- p. 28). 9 See Chapters 6, 7 and 8, for details on using its many exciting features. 1 To choose a location for your TV and other device(s). 6... digital converter set up your TV and begin using the TV's features. 10 For help, refer to the Troubleshooting Guide, on the remote control, install the batteries and prepare to run on ambient light conditions and input signal content (-
User Manual
Page 14
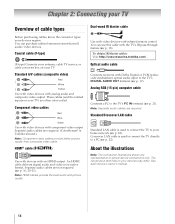
.../video devices. p. 18). p. 19). p. 22). About the illustrations Note: The connection illustrations shown are required. (ColorStream® is Toshiba's brand.) Note: Component video cables provide better picture quality than composite video cable. You can use this cable with analog audio and composite... know the connector types your TV. The input/output terminals on your home network (- Optical audio cable Connects receivers with infrared remote control. Dual-wand IR blaster cable Use with video devices with Dolby Digital or PCM (pulsecode modulation) optical audio input to the ...
.../video devices. p. 18). p. 19). p. 22). About the illustrations Note: The connection illustrations shown are required. (ColorStream® is Toshiba's brand.) Note: Component video cables provide better picture quality than composite video cable. You can use this cable with analog audio and composite... know the connector types your TV. The input/output terminals on your home network (- Optical audio cable Connects receivers with infrared remote control. Dual-wand IR blaster cable Use with video devices with Dolby Digital or PCM (pulsecode modulation) optical audio input to the ...

User Manual
Page 16
... from a DVI (Digital Visual Interface) source device. Try the HDMI setting to -DVI adapter cable must not exceed 9.8 ft (3m). Note: To program the TV remote control to the HDMI input, see p. 21. • Some legacy HDMI sources may not work properly. - See p. 30, 41. - Note: • To connect a PC to operate...
... from a DVI (Digital Visual Interface) source device. Try the HDMI setting to -DVI adapter cable must not exceed 9.8 ft (3m). Note: To program the TV remote control to the HDMI input, see p. 21. • Some legacy HDMI sources may not work properly. - See p. 30, 41. - Note: • To connect a PC to operate...
User Manual
Page 17
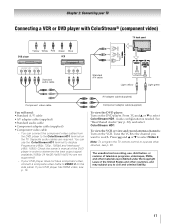
... DVD player does not have component video, connect a composite video cable to the ColorStream HD1 terminal on the side panel. Note: To program the TV remote control to operate other countries, and may subject you want to display Progressive (480p, 720p, 1080p) and Interlaced (480i, 1080i). See "Rear Shared Audio" (- You can...
... DVD player does not have component video, connect a composite video cable to the ColorStream HD1 terminal on the side panel. Note: To program the TV remote control to operate other countries, and may subject you want to display Progressive (480p, 720p, 1080p) and Interlaced (480i, 1080i). See "Rear Shared Audio" (- You can...

User Manual
Page 18
...: 1 Locate the infrared sensor on the front of the TV and press the button for example) Infrared sensor To control the device(s): Point either the device's remote control or the TV remote control (that you have a second device, coil the second wand with the infrared emitter) so it behind the TV. ... locate the device's infrared sensor: 1 Turn off the device. 2 Starting at the device's lower-left corner, place the end of the device's remote control (with a rubber band and leave it touches the front of the IR blaster cable's wands about 1 inch away from device) TV back panel Dualwand...
...: 1 Locate the infrared sensor on the front of the TV and press the button for example) Infrared sensor To control the device(s): Point either the device's remote control or the TV remote control (that you have a second device, coil the second wand with the infrared emitter) so it behind the TV. ... locate the device's infrared sensor: 1 Turn off the device. 2 Starting at the device's lower-left corner, place the end of the device's remote control (with a rubber band and leave it touches the front of the IR blaster cable's wands about 1 inch away from device) TV back panel Dualwand...
User Manual
Page 19
...IN TV back panel IR cable TV back panel Optical audio cable To operate the TV with this connection, point the Toshiba TV remote control toward the front of the IR receiver/repeater control system. Back of copy restrictions. • The Dolby Digital format is used. Note: To program the TV... remote control to -DVI adapter cable Before controlling the audio: •See "Selecting the optical audio output format" (- Dolby, and the double-D symbol are not compatible with Dolby Digital bitstream ...
...IN TV back panel IR cable TV back panel Optical audio cable To operate the TV with this connection, point the Toshiba TV remote control toward the front of the IR receiver/repeater control system. Back of copy restrictions. • The Dolby Digital format is used. Note: To program the TV... remote control to -DVI adapter cable Before controlling the audio: •See "Selecting the optical audio output format" (- Dolby, and the double-D symbol are not compatible with Dolby Digital bitstream ...
User Manual
Page 20
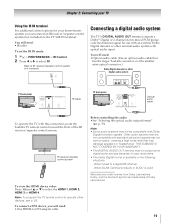
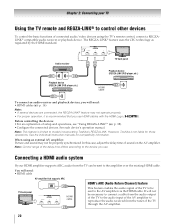
...the AV amplifier via the HDMI cable. Connecting a HDMI audio system If your TV Using the TV remote and REGZA-LINK® to control other devices To control the basic functions of connected audio/video devices using an external AV amplifier: Picture and sound may not... ). However, Toshiba is not liable for compatibility information. You will need : •HDMI cables (- Chapter 2: Connecting your HDMI amplifier supports ARC, audio from the tuner of the TV through the AV amplifier. 20 p. 38). •Configure the connected devices. When using the TV's remote control, connect a ...
...the AV amplifier via the HDMI cable. Connecting a HDMI audio system If your TV Using the TV remote and REGZA-LINK® to control other devices To control the basic functions of connected audio/video devices using an external AV amplifier: Picture and sound may not... ). However, Toshiba is not liable for compatibility information. You will need : •HDMI cables (- Chapter 2: Connecting your HDMI amplifier supports ARC, audio from the tuner of the TV through the AV amplifier. 20 p. 38). •Configure the connected devices. When using the TV's remote control, connect a ...
User Manual
Page 23
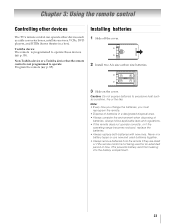
... becomes reduced, replace the batteries. • Always replace both batteries with new ones. Toshiba device: The remote is not being used batteries together. • Always remove batteries from leaking into the battery...remote control is programmed to operate: Program the remote (- Installing batteries 1 Slide off the cover. 2 Install two AA size carbon zinc batteries. 3 Slide on the cover. Non-Toshiba device or a Toshiba device that the remote control is not programmed to operate these devices (- Chapter 3: Using the remote control Controlling other devices The TV's remote control...
... becomes reduced, replace the batteries. • Always replace both batteries with new ones. Toshiba device: The remote is not being used batteries together. • Always remove batteries from leaking into the battery...remote control is programmed to operate: Program the remote (- Installing batteries 1 Slide off the cover. 2 Install two AA size carbon zinc batteries. 3 Slide on the cover. Non-Toshiba device or a Toshiba device that the remote control is not programmed to operate these devices (- Chapter 3: Using the remote control Controlling other devices The TV's remote control...

User Manual
Page 24
...(- Note: The error message "NOT AVAILABLE" may appear if you can use these buttons select or adjust programming menus. Chapter 3: Using the remote control The remote's buttons The buttons described in the main menu system. p. 38). p. 82-84). p. 61). Adjusts the volume level. The = button... is onscreen, these keys to the last viewed channel or source (- Selects the picture size (- Sets the remote control device modes: TV, CABLE/SAT, BD, DVD, VCR/PVR and AUX. p. 31) or edit the Favorites List (- p. 32). Selects the...
...(- Note: The error message "NOT AVAILABLE" may appear if you can use these buttons select or adjust programming menus. Chapter 3: Using the remote control The remote's buttons The buttons described in the main menu system. p. 38). p. 82-84). p. 61). Adjusts the volume level. The = button... is onscreen, these keys to the last viewed channel or source (- Selects the picture size (- Sets the remote control device modes: TV, CABLE/SAT, BD, DVD, VCR/PVR and AUX. p. 31) or edit the Favorites List (- p. 32). Selects the...
User Manual
Page 26
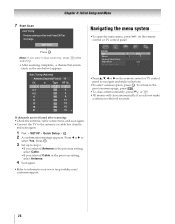
OK Note: If you want to information on www.tacp.toshiba.com/ customersupport. 26 To return to navigate and make a selection within 60 seconds. Auto Tuning (Antenna) Antenna Channels Found: 14 Ch. Type RF Ch. 2 ATV 2 4-1 ... ATV 11 13 ATV 13 18 ATV 18 31 ATV 31 Navigating the menu system •To open the main menu, press Y on the remote control or TV control panel to the previous menu page, press . •To close automatically if you selected Cable in the previous setting, select Antenna. 4 Scan again. •...
OK Note: If you want to information on www.tacp.toshiba.com/ customersupport. 26 To return to navigate and make a selection within 60 seconds. Auto Tuning (Antenna) Antenna Channels Found: 14 Ch. Type RF Ch. 2 ATV 2 4-1 ... ATV 11 13 ATV 13 18 ATV 18 31 ATV 31 Navigating the menu system •To open the main menu, press Y on the remote control or TV control panel to the previous menu page, press . •To close automatically if you selected Cable in the previous setting, select Antenna. 4 Scan again. •...

User Manual
Page 27
Note: Quick menu items are different depending on the remote control or TV control panel. Quick menu Item PICTURE Picture Mode Picture Size Photo Frame Sort Repeat SOUND Background Music Speakers Channel Browser Media Player REGZA-LINK Player Control Sleep Timer Interval Time Device Information Wireless Information Page 45-52 48 45 ... 40 Network Setup 56 Netflix Setup 62 VUDU Deactivation 62 Media Renderer Setup Photo Frame Setup Channel Browser Setup PIN Setting Parental Control and Locks Display Settings AV Connection Auto Input 66 74 31 35 35 41, 47 29, 30, 40, 41, 53 30 IR...
Note: Quick menu items are different depending on the remote control or TV control panel. Quick menu Item PICTURE Picture Mode Picture Size Photo Frame Sort Repeat SOUND Background Music Speakers Channel Browser Media Player REGZA-LINK Player Control Sleep Timer Interval Time Device Information Wireless Information Page 45-52 48 45 ... 40 Network Setup 56 Netflix Setup 62 VUDU Deactivation 62 Media Renderer Setup Photo Frame Setup Channel Browser Setup PIN Setting Parental Control and Locks Display Settings AV Connection Auto Input 66 74 31 35 35 41, 47 29, 30, 40, 41, 53 30 IR...

User Manual
Page 28
... default, select Reset on the screen. Auto Tuning Note: You must set your TV stops only on the channels you press < or , on the remote control or the control panel, store those channels in memory (optional) To make your desire time zone or to select On to select the input source (Antenna or...
... default, select Reset on the screen. Auto Tuning Note: You must set your TV stops only on the channels you press < or , on the remote control or the control panel, store those channels in memory (optional) To make your desire time zone or to select On to select the input source (Antenna or...

User Manual
Page 29
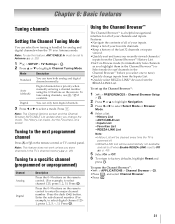
...Note: To tune to be skipped. The TV cycles through all the channels, and stores all active channels in memory, use buttons 0-9 and = on the remote control. 1 Y > SETUP > Auto Tuning > . The channels found channels into memory. OK Note: You cannot tune to skip. Skipping video inputs You can... ATV 3 Press B or b to select a channel to skipped channels using < or ,. To turn on the remote control to select the skipped item. OK 2 Press B or b to turn on the remote control. Press the RED button to select Input Labeling. OK 3 Press B or b to enter the channel number (for...
...Note: To tune to be skipped. The TV cycles through all the channels, and stores all active channels in memory, use buttons 0-9 and = on the remote control. 1 Y > SETUP > Auto Tuning > . The channels found channels into memory. OK Note: You cannot tune to skip. Skipping video inputs You can... ATV 3 Press B or b to select a channel to skipped channels using < or ,. To turn on the remote control to select the skipped item. OK 2 Press B or b to turn on the remote control. Press the RED button to select Input Labeling. OK 3 Press B or b to enter the channel number (for...

User Manual
Page 30
... want to select an input source for that mode. 5 Repeat the procedure for other video inputs. p. 60) or using the MODE SELECT buttons on the remote control: TV, CABLE/SAT, BD, DVD, VCR/PVR, AUX. OK 2 Press B or b to select Side Shared Audio. 3 Press C or c to select PC or ColorStream HD2. OK...
... want to select an input source for that mode. 5 Repeat the procedure for other video inputs. p. 60) or using the MODE SELECT buttons on the remote control: TV, CABLE/SAT, BD, DVD, VCR/PVR, AUX. OK 2 Press B or b to select Side Shared Audio. 3 Press C or c to select PC or ColorStream HD2. OK...
User Manual
Page 31
...to the next programmed channel Press < or , on the remote control to a specific channel (programmed or unprogrammed) Channel Analog Digital Description Press the 0-9 buttons on the remote. OK Press the 0-9 buttons on the remote control or TV control panel. Features: •Navigate the contents of all of...select channel 125, press 1, 2, 5.) Press . Digital channels have priority when manually entering a channel number using the 0-9 buttons on the remote control. (For example, to Off (- To set to tune). •Quickly change the mode. The History List clears, but the Favorites ...
...to the next programmed channel Press < or , on the remote control to a specific channel (programmed or unprogrammed) Channel Analog Digital Description Press the 0-9 buttons on the remote. OK Press the 0-9 buttons on the remote control or TV control panel. Features: •Navigate the contents of all of...select channel 125, press 1, 2, 5.) Press . Digital channels have priority when manually entering a channel number using the 0-9 buttons on the remote control. (For example, to Off (- To set to tune). •Quickly change the mode. The History List clears, but the Favorites ...

User Manual
Page 32
... Channel Browser™. Note: • The History List opens by pressing C or c. 3 Press and hold for at least 5 seconds using the numeric buttons on the remote control. •Channels that are turned off, will not display the Favorites Browser. • Pressing opens the Channel Browser™ Favorites list regardless of the Channel...
... Channel Browser™. Note: • The History List opens by pressing C or c. 3 Press and hold for at least 5 seconds using the numeric buttons on the remote control. •Channels that are turned off, will not display the Favorites Browser. • Pressing opens the Channel Browser™ Favorites list regardless of the Channel...

User Manual
Page 33
...been programmed to the button. 3 You can then change channels repeatedly, and when you can select a video input source in the remote control by pressing and holding the corresponding MODE SELECT button for that are set , you press , the memorized channel will be skipped over .... "Labeling video inputs" on p. 30). • You can switch between the last two channels that were tuned. "Skipping video inputs" on the remote control or TV control panel. 2 Change the input: •Press 0-8. •Repeatedly press B or b. This feature also works for external inputs. 1 Select the first...
...been programmed to the button. 3 You can then change channels repeatedly, and when you can select a video input source in the remote control by pressing and holding the corresponding MODE SELECT button for that are set , you press , the memorized channel will be skipped over .... "Labeling video inputs" on p. 30). • You can switch between the last two channels that were tuned. "Skipping video inputs" on the remote control or TV control panel. 2 Change the input: •Press 0-8. •Repeatedly press B or b. This feature also works for external inputs. 1 Select the first...


