User Manual
Page 2
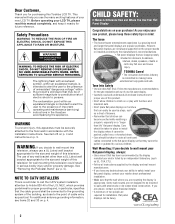
..., always: • Use a mount that has been recommended by the display manufacturer and/or listed by an independent laboratory (such as practical. TOSHIBA Cares! • The consumer electronics industry is committed to the presence of cable entry as UL, CSA, ETL). • Follow all . ... mounting the display is appropriate. The use a UL Listed wall bracket appropriate for installation. If you use of your purchase! This manual will help you are required for the size and weight of electric shock to the manufacturer's recommendations. • Flat panel displays that...
..., always: • Use a mount that has been recommended by the display manufacturer and/or listed by an independent laboratory (such as practical. TOSHIBA Cares! • The consumer electronics industry is committed to the presence of cable entry as UL, CSA, ETL). • Follow all . ... mounting the display is appropriate. The use a UL Listed wall bracket appropriate for installation. If you use of your purchase! This manual will help you are required for the size and weight of electric shock to the manufacturer's recommendations. • Flat panel displays that...

User Manual
Page 5
...carefully lay the front of the unit face down on p. 4. Never use these sounds become frequent or continuous, unplug the power cord and contact a Toshiba Authorized Service Center. 42) WARNING: RISK OF SERIOUS PERSONAL INJURY OR EQUIPMENT DAMAGE! Remove the four screws. (Do not use the screws attached to...) TV back panel Removing the Pedestal Stand 1) Carefully lay the front of the LCD Panel face down on the back of this manual to a Toshiba Authorized Service Center. 45) If you have the TV serviced: • Ask the service technician to service the TV yourself.
...carefully lay the front of the unit face down on p. 4. Never use these sounds become frequent or continuous, unplug the power cord and contact a Toshiba Authorized Service Center. 42) WARNING: RISK OF SERIOUS PERSONAL INJURY OR EQUIPMENT DAMAGE! Remove the four screws. (Do not use the screws attached to...) TV back panel Removing the Pedestal Stand 1) Carefully lay the front of the LCD Panel face down on the back of this manual to a Toshiba Authorized Service Center. 45) If you have the TV serviced: • Ask the service technician to service the TV yourself.
User Manual
Page 9
...Local Time Setting 28 Location 28 Smart Sound Equalizer 28 ANT/CABLE IN 28 Storing channels in memory (optional 28 Auto Tuning 28 Manual Tuning 29 Skipping channels 29 Skipping video inputs 29 Labeling video inputs 30 Configuring shared inputs 30 Setting the Auto Input feature 30 ... devices . . . . . 38 REGZA-LINK® input source selection 39 Adjusting the amplifier's audio 39 Other REGZA-LINK® functions 39 Connecting a Toshiba PC compatible to REGZA-LINK 40 Using the HDMI® settings feature 40 Setting the HDMI® audio mode 41 Viewing the HDMI® signal...
...Local Time Setting 28 Location 28 Smart Sound Equalizer 28 ANT/CABLE IN 28 Storing channels in memory (optional 28 Auto Tuning 28 Manual Tuning 29 Skipping channels 29 Skipping video inputs 29 Labeling video inputs 30 Configuring shared inputs 30 Setting the Auto Input feature 30 ... devices . . . . . 38 REGZA-LINK® input source selection 39 Adjusting the amplifier's audio 39 Other REGZA-LINK® functions 39 Connecting a Toshiba PC compatible to REGZA-LINK 40 Using the HDMI® settings feature 40 Setting the HDMI® audio mode 41 Viewing the HDMI® signal...
User Manual
Page 14
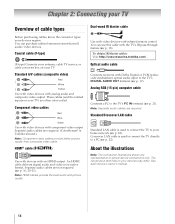
...Use with devices with Dolby Digital or PCM (pulsecode modulation) optical audio input to a PC (- To obtain IR blaster cables: Visit http://ceaccessories.toshiba.com/ . Optical audio cable Connects receivers with an HDMI output. Coaxial cable (F-type) (F-type) Connects your antenna, cable TV service, or cable... cables are not required (- You can use this cable with analog audio and composite video output. p. 21). See each device's owner's manual. 14 Note: HDMI cables provide the best audio and picture quality. p. 19). VIDEO PR PB Y Component video cables Red Blue Green ...
...Use with devices with Dolby Digital or PCM (pulsecode modulation) optical audio input to a PC (- To obtain IR blaster cables: Visit http://ceaccessories.toshiba.com/ . Optical audio cable Connects receivers with an HDMI output. Coaxial cable (F-type) (F-type) Connects your antenna, cable TV service, or cable... cables are not required (- You can use this cable with analog audio and composite video output. p. 21). See each device's owner's manual. 14 Note: HDMI cables provide the best audio and picture quality. p. 19). VIDEO PR PB Y Component video cables Red Blue Green ...
User Manual
Page 17
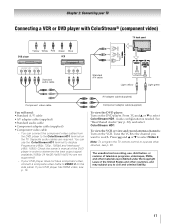
... other countries, and may subject you want to display Progressive (480p, 720p, 1080p) and Interlaced (480i, 1080i). p. 30), and select ColorStream HD1. Check the owner's manual of television programs, videotapes, DVDs, and other materials is needed. Chapter 2: Connecting your DVD player has HDMI video, see p. 85.
... other countries, and may subject you want to display Progressive (480p, 720p, 1080p) and Interlaced (480i, 1080i). p. 30), and select ColorStream HD1. Check the owner's manual of television programs, videotapes, DVDs, and other materials is needed. Chapter 2: Connecting your DVD player has HDMI video, see p. 85.
User Manual
Page 20
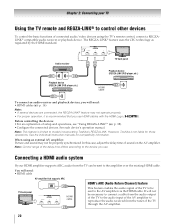
...HDMI cable AV amplifier that you use . p. 38). •Configure the connected devices. See the individual instruction manuals for those operations. See each device's operation manual. Note: This feature is not liable for compatibility information. Audio receiver HDMI IN HDMI OUT Playback device (REGZA-...REGZA-LINK® to control other devices To control the basic functions of sound on the AV amplifier. However, Toshiba is limited to models incorporating Toshiba's REGZA-LINK. Chapter 2: Connecting your HDMI amplifier supports ARC, audio from the tuner of the AV amplifier ...
...HDMI cable AV amplifier that you use . p. 38). •Configure the connected devices. See the individual instruction manuals for those operations. See each device's operation manual. Note: This feature is not liable for compatibility information. Audio receiver HDMI IN HDMI OUT Playback device (REGZA-...REGZA-LINK® to control other devices To control the basic functions of sound on the AV amplifier. However, Toshiba is limited to models incorporating Toshiba's REGZA-LINK. Chapter 2: Connecting your HDMI amplifier supports ARC, audio from the tuner of the AV amplifier ...

User Manual
Page 27
... Control 18 Energy Saving Settings 43 Blue Screen 43 Icon SETUP Item HDMI Information Display POWER LED Dimmer Menu Language ANT/CABLE In Auto Tuning Manual Tuning TV Settings Quick Setup Location Software Upgrade Software Licences System Information Reset TV Page 41 43 28 28 28 29 28, 29, 31, 34...
... Control 18 Energy Saving Settings 43 Blue Screen 43 Icon SETUP Item HDMI Information Display POWER LED Dimmer Menu Language ANT/CABLE In Auto Tuning Manual Tuning TV Settings Quick Setup Location Software Upgrade Software Licences System Information Reset TV Page 41 43 28 28 28 29 28, 29, 31, 34...

User Manual
Page 28
... the correct time zone for the ANT/CABLE input. Chapter 5: Setting up the antenna/cable input source first. From individual setting: Menu language You can manually store or skip individual channels from three different languages (English, Français and Español) for the TV location. Press . Press C or c to...
... the correct time zone for the ANT/CABLE input. Chapter 5: Setting up the antenna/cable input source first. From individual setting: Menu language You can manually store or skip individual channels from three different languages (English, Français and Español) for the TV location. Press . Press C or c to...

User Manual
Page 29
...Skipping channels". The TV cycles through all the channels, and stores all active channels in memory, you can manually enter channels if the physical channel is selected. Manual Tuning After storing channels in memory. Digital channel Skipping channels To prevent a channel from being viewed, you ... > AV Connection > . OK 2 Press B or b to select Input Labeling. OK The list of the screen. OK The box is known. 1 Y > SETUP > Manual Tuning > . To turn on the remote control to enter the channel number (for example, 56) and press . Chapter 5: Setting up your cable TV service's lineup...
...Skipping channels". The TV cycles through all the channels, and stores all active channels in memory, you can manually enter channels if the physical channel is selected. Manual Tuning After storing channels in memory. Digital channel Skipping channels To prevent a channel from being viewed, you ... > AV Connection > . OK 2 Press B or b to select Input Labeling. OK The list of the screen. OK The box is known. 1 Y > SETUP > Manual Tuning > . To turn on the remote control to enter the channel number (for example, 56) and press . Chapter 5: Setting up your cable TV service's lineup...
User Manual
Page 31
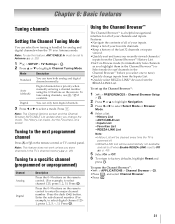
... channel Press < or , on the remote control. (For example, to select channel 125, press 1, 2, 5.) Press . Note: To use < / , if available. Digital channels have priority when manually entering a channel number using the 0-9 buttons on the remote control to enter the major channel number. Note: The Channel Options screen and the Channel Browser...
... channel Press < or , on the remote control. (For example, to select channel 125, press 1, 2, 5.) Press . Note: To use < / , if available. Digital channels have priority when manually entering a channel number using the 0-9 buttons on the remote control to enter the major channel number. Note: The Channel Options screen and the Channel Browser...
User Manual
Page 56
...desired AP. Press . p. 58). Press . Press C or c to select the desired AP. Enter the PIN displayed on the label or in Manual Setup (- A message will appear. Press . OK Note: If Network Name is not guaranteed. Wireless Setup Note: • Continued connection to execute ...64 Hex characters -WEP: 5 or 13 ASCII or 10 or 26 Hex characters 7 Press B or b to select Assisted Setup. in the manual of security easily. If you select Wired, see "Advanced Network Setup" (- Press . WPS will automatically configure all settings) Easy Setup using the...
...desired AP. Press . p. 58). Press . Press C or c to select the desired AP. Enter the PIN displayed on the label or in Manual Setup (- A message will appear. Press . OK Note: If Network Name is not guaranteed. Wireless Setup Note: • Continued connection to execute ...64 Hex characters -WEP: 5 or 13 ASCII or 10 or 26 Hex characters 7 Press B or b to select Assisted Setup. in the manual of security easily. If you select Wired, see "Advanced Network Setup" (- Press . WPS will automatically configure all settings) Easy Setup using the...

User Manual
Page 57
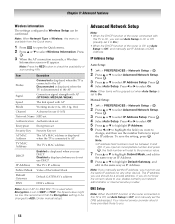
... Press . OK 3 Press B or b to select 1, 2, 3 or 4. To save your setting, press the BLUE button. Press C or c to select Manual Setup. Note: • Certain encryption types are only compatible with specific authentication types. -When Authentication is Open System, only WEP or None are compatible. -When... is resolved. 8 Press B or b to select Wireless Setup. OK 4 Press B or b to select Network Name. Chapter 8: Advanced features Manual Setup 1 Y > PREFERENCES > Network Setup > . The Software Keyboard window appears. 9 Input the Security Key by using the Software Keyboard (-
... Press . OK 3 Press B or b to select 1, 2, 3 or 4. To save your setting, press the BLUE button. Press C or c to select Manual Setup. Note: • Certain encryption types are only compatible with specific authentication types. -When Authentication is Open System, only WEP or None are compatible. -When... is resolved. 8 Press B or b to select Wireless Setup. OK 4 Press B or b to select Network Name. Chapter 8: Advanced features Manual Setup 1 Y > PREFERENCES > Network Setup > . The Software Keyboard window appears. 9 Input the Security Key by using the Software Keyboard (-
User Manual
Page 58
... with AP Mode Working mode (11a, 11b, 11g, 11n) Channel A channel in use DHCP. OK 2 Press B or b to Off, and manually set IP Address or DNS Address. Press . OK 3 Press B or b to use, please contact your network administrator or internet service provider. If... TV is set the DNS address(es). Disabled is connected to you must be a private address. Your internet service provider should be between 0 and 255. Manual Setup: 1 Y > PREFERENCES > Network Setup > . OK 4 Select Auto Setup. OK Note: • IP address field numbers must not use DHCP. IP ...
... with AP Mode Working mode (11a, 11b, 11g, 11n) Channel A channel in use DHCP. OK 2 Press B or b to Off, and manually set IP Address or DNS Address. Press . OK 3 Press B or b to use, please contact your network administrator or internet service provider. If... TV is set the DNS address(es). Disabled is connected to you must be a private address. Your internet service provider should be between 0 and 255. Manual Setup: 1 Y > PREFERENCES > Network Setup > . OK 4 Select Auto Setup. OK Note: • IP address field numbers must not use DHCP. IP ...

User Manual
Page 59
... 2 Press B or b to select On. To cancel the Network Connection Test: Press O while searching for the TV, if one is set to select DNS Setup. Manual setup: 1 Y > PREFERENCES > Network Setup > . Press . Press . OK 4 Select Auto Setup. Press . Press . OK 4 Select Auto Setup. Chapter 8: Advanced features Auto setup: 1 Y > PREFERENCES > Network Setup > . OK...
... 2 Press B or b to select On. To cancel the Network Connection Test: Press O while searching for the TV, if one is set to select DNS Setup. Manual setup: 1 Y > PREFERENCES > Network Setup > . Press . Press . OK 4 Select Auto Setup. Press . Press . OK 4 Select Auto Setup. Chapter 8: Advanced features Auto setup: 1 Y > PREFERENCES > Network Setup > . OK...
User Manual
Page 67
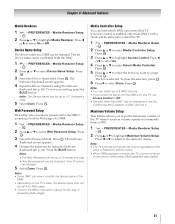
... Off. • Devices other than DMC may not be allowed to set it receives volume operation commands from Web page. • Confirm the DMCs instruction manual for the way of the DMR. • Depending on the TV's state, the device name may be changed . OK 2 Press B or b to highlight Maximum Volume...
... Off. • Devices other than DMC may not be allowed to set it receives volume operation commands from Web page. • Confirm the DMCs instruction manual for the way of the DMR. • Depending on the TV's state, the device name may be changed . OK 2 Press B or b to highlight Maximum Volume...
User Manual
Page 68
... a device which has a server function to 2GB SD High Capacity Memory Card (SDHC): 4 - 32GB Note: Use only the specified SD memory cards. Toshiba cannot and does not grant such permission. To close the Media Player: Press O. The TV will be asked if you will return to display contents.... DMC is not guaranteed for example) Supported file system FAT12, FAT16 and FAT32 You must manually start the Media Player from copyright owners to On (- Basic operation Using Media Player with a USB HUB connection. If Auto Start is ...
... a device which has a server function to 2GB SD High Capacity Memory Card (SDHC): 4 - 32GB Note: Use only the specified SD memory cards. Toshiba cannot and does not grant such permission. To close the Media Player: Press O. The TV will be asked if you will return to display contents.... DMC is not guaranteed for example) Supported file system FAT12, FAT16 and FAT32 You must manually start the Media Player from copyright owners to On (- Basic operation Using Media Player with a USB HUB connection. If Auto Start is ...
User Manual
Page 76
... procedure (- p. 48). Sound problems • Check the antenna/cable connections (- Try another device, use the remote control that particular input source. Refer to the owner's manual for 5 or more seconds to an A/V receiver that contain a digital display, this may be on. p. 88-93). • If the TV still does not act...
... procedure (- p. 48). Sound problems • Check the antenna/cable connections (- Try another device, use the remote control that particular input source. Refer to the owner's manual for 5 or more seconds to an A/V receiver that contain a digital display, this may be on. p. 88-93). • If the TV still does not act...
User Manual
Page 77
...or no captions appear. • If text is not available, a black rectangle may not operate properly. • Read the instruction manual furnished with Subnet mask 255.255.255.0; or c) the signal reception is available for the U.S. LINK compatible devices. • Ensure ... Internet • Check the modem and its incoming cable/telephone connections (- See Section (- p. 28). b) the signal reception is available for Toshiba REGZA- p. 40). both the DMS and TV are using a wireless home-network connection: - Repeat the wireless network setup procedure and check...
...or no captions appear. • If text is not available, a black rectangle may not operate properly. • Read the instruction manual furnished with Subnet mask 255.255.255.0; or c) the signal reception is available for the U.S. LINK compatible devices. • Ensure ... Internet • Check the modem and its incoming cable/telephone connections (- See Section (- p. 28). b) the signal reception is available for Toshiba REGZA- p. 40). both the DMS and TV are using a wireless home-network connection: - Repeat the wireless network setup procedure and check...

User Manual
Page 78
...Plug the power cord in the DMS may not play correctly. • Set the media sharing of the DMS correctly, according to the DMS instruction manual. • Confirm that supports two or more formats the display may select one format automatically. • Copyright protected contents stored in the DMS may... be limited by the DMS and improperly displayed. On Timer LED • Green is ON (solid) On Timer is set Media Renderer to www.toshiba.ca; click "Home Entertainment," and then click "Support." 78 Set the server according to discuss any content issues. TV front Touch Sensor On Timer...
...Plug the power cord in the DMS may not play correctly. • Set the media sharing of the DMS correctly, according to the DMS instruction manual. • Confirm that supports two or more formats the display may select one format automatically. • Copyright protected contents stored in the DMS may... be limited by the DMS and improperly displayed. On Timer LED • Green is ON (solid) On Timer is set Media Renderer to www.toshiba.ca; click "Home Entertainment," and then click "Support." 78 Set the server according to discuss any content issues. TV front Touch Sensor On Timer...
User Manual
Page 79
... band (J through W) Hyper band (AA through ZZ, AAA, BBB) Ultra band (65 through 94, 100 through 135) Power Source 120 V AC, 60 Hz Power Consumption 46VX700U: 1.4 A (rms) (maximum current) 0.12 W in standby mode 55VX700U: 1.6 A (rms) (maximum current) 0.10 W in the future. AUDIO: 200 mV(rms) (-20dBFS)... table on p. 5. • Cleaning cloth (to clean the cabinet and control panel) • Tool set up guide • Cleaning cloth's manual • Remote control with features and/ or specifications that may be compatible with two size "AA" carbon zinc batteries • Securement Clip Use ...
... band (J through W) Hyper band (AA through ZZ, AAA, BBB) Ultra band (65 through 94, 100 through 135) Power Source 120 V AC, 60 Hz Power Consumption 46VX700U: 1.4 A (rms) (maximum current) 0.12 W in standby mode 55VX700U: 1.6 A (rms) (maximum current) 0.10 W in the future. AUDIO: 200 mV(rms) (-20dBFS)... table on p. 5. • Cleaning cloth (to clean the cabinet and control panel) • Tool set up guide • Cleaning cloth's manual • Remote control with features and/ or specifications that may be compatible with two size "AA" carbon zinc batteries • Securement Clip Use ...


